


2011 Bluetec Air/Fuel Filter Change DIY. Large picture warning

Thread Starter
Super Member


Joined: Apr 2011
Posts: 541
Likes: 231
2021 GLS580 | 2011 ML350 BlueTec | 2009 Pontiac G8 GXP
2011 Bluetec Air/Fuel Filter Change DIY. Large picture warning
Since I wasn't able to find a good reference on changing the air and fuel filters on a 2011 bluetec ML350, I thought I'd post one. Click for very large pictures.
Standard disclaimers apply, I'm not responsible for anything that might go pear shaped while you're using my writeup. You assume all responsibility for your vehicle.
Tools needed:
CLIC Clamp pliars (I made my own out of a $3 nipper)
Flat Screwdriver
7/32" Hex wrench
E10 Star Socket
10MM Socket and or 10mm box end. A wratcheting box end will make things easier
Short and Medium extensions also a bonus
Jewler's screwdriver set
I made the CLIC clamp tool by starting with a $3 nipper from harbor freight. ~10 minutes with a dremmel and I was ready. I started by making the thin side and smoothing the bottom of both sides so that it was nearly flat. I then made the notch in the thicker side to make it fit around the bump on the clamps. The end result worked very well and didn't take much pressure to get the clamps to release or close.


Parts needed:
Cabin Air filters
Engine Air filters
Fuel Filter: A 642 090 53 52 05
The air filters can be found at most parts stores. The fuel filter for my engine was not available at anyone but an MB dealership. All the normal parts stores have the wrong filter listed. Mine has a five wire fixed sensor in it. I believe the others have a removable sensor with three wires. The fixed sensor makes install a bit easier as you don't have to swap anything, but of course this makes for a more expensive part. The MB part number is A 642 090 53 52 05 and it should be around $108 wholesale. It is a Mann filter WK820 something. I forgot to write it down before the install. According to MB, the filter is a mixed install item. Their own parts computers says to compare the old part to the new one so be sure to compare before you begin the install.
Start by removing the rear hood seal, it simply pulls off

Next remove the cabin air filter box. If the cabin air filters are all you want to do, you don't even need to remove the hood seal.


You will have to so some coercing (smashing) to remove and install the filters. I managed to pull the drivers side filter out first, then slid the passenger side to the middle to remove it. I did the install in reverse, put in one filter, slide it to the passenger side, then as gently as possible, smash in the driver's side. While it will take some smashing, you also don't want to completely mangle the filter while reinstalling so be patient.

Next you want to remove the two access panels for the engine airboxes. I started with the passenger side. Remove the two 10mm bolts, then lift the passenger side corner and slide it out toward the cabin air filter void.


On the driver side, you need only loosen the rearmost 10mm bolt and then remove the front and top bolt. This panel simply slides down and forward.


To remove the driver airbox, begin by disconnecting the sensor on the airbox. You will need a jeweler's screwdriver or equivalent small flat tool to release the grey tab. One you get grey tab to move out, squeeze it and pull to disconnect. There was very little slack on my car so be careful when disconnecting.

Next, disconnect the ducting and remove the intermediate duct. I tried simply disconnecting the intermediate duct from the box but ran into problems getting the box reinstalled until I removed the intermediate duct.


To remove the box, loosen the hose clamp going to the turbo ductwork, remove the E10 star bolt in front, and simply unscrew the E10 bolt in the rear. The rear E10 bolt stays captured in the airbox unless you really want it to come loose. To remove, work the box free from the turbo ductwork, pull up and then work the box out.

For the passenger side, start by simply disconnecting the intermediate duct from the box. There is more space on the passenger side so I didn't need to remove it completely.
Removal of the passenger side box is similar to the driver side, but there is no sensor to worry about. Remove the front E10 bolt and unscrew the rear. Loosen and disconnect the turbo duct ,pull up and wiggle the box free.

If your only goal is to change the air filters, you can stop here. If you are also changing the fuel filter, continue.
Start by disconnecting the two sensors connected to the ductwork and the one beside the turbo. Squeeze the sides of the two front sensors to release them. For the rear one, pull the gray tab up and then squeeze it to release.


Loosen the clamp going to the turbo, then wiggle the ductwork free. I didn't completely remove it, simply rotated it clockwise and let it rest on the passenger side of the engine. There will likely be a bit of oil in the back of duct and front of the turbo, some say this is normal, others not. I simply wiped it clean.

Apologies for not having pictures with the ductwork removed, I took the pictures after I put everything back together. Disconnect the circled connector by pulling the grey tab out and squeezing it. Then loosen the E10 bolt that holds the sensor in place. That should give enough play to work the fuel filter past it.

Next you'll want to disconnect the sensor on the fuel filter. It has a tab on top that must be depressed and then it can be disconnected. Loosen the fuel filter collar with the 7/32 hex key.

Release the CLIC clamps and slide them off the hose up onto the filter. I recommend breaking the hoses lose by twisting them both before removing either. When your ready to remove them, it is handy to have a second set of hands and rags to keep fuel from spilling everywhere. Have the second person hold the hoses up out of the way while you work the filter free. I rotated it clockwise to clear the connector bracket that you disconnected earlier. Once you're clear of that connector, simply pull the filter up and out. To install the new filter, just move the CLIC clamps to the new filter before dropping it back in and reconnecting the hoses and reverse these instructions.


Standard disclaimers apply, I'm not responsible for anything that might go pear shaped while you're using my writeup. You assume all responsibility for your vehicle.
Tools needed:
CLIC Clamp pliars (I made my own out of a $3 nipper)
Flat Screwdriver
7/32" Hex wrench
E10 Star Socket
10MM Socket and or 10mm box end. A wratcheting box end will make things easier
Short and Medium extensions also a bonus
Jewler's screwdriver set
I made the CLIC clamp tool by starting with a $3 nipper from harbor freight. ~10 minutes with a dremmel and I was ready. I started by making the thin side and smoothing the bottom of both sides so that it was nearly flat. I then made the notch in the thicker side to make it fit around the bump on the clamps. The end result worked very well and didn't take much pressure to get the clamps to release or close.


Parts needed:
Cabin Air filters
Engine Air filters
Fuel Filter: A 642 090 53 52 05
The air filters can be found at most parts stores. The fuel filter for my engine was not available at anyone but an MB dealership. All the normal parts stores have the wrong filter listed. Mine has a five wire fixed sensor in it. I believe the others have a removable sensor with three wires. The fixed sensor makes install a bit easier as you don't have to swap anything, but of course this makes for a more expensive part. The MB part number is A 642 090 53 52 05 and it should be around $108 wholesale. It is a Mann filter WK820 something. I forgot to write it down before the install. According to MB, the filter is a mixed install item. Their own parts computers says to compare the old part to the new one so be sure to compare before you begin the install.
Start by removing the rear hood seal, it simply pulls off

Next remove the cabin air filter box. If the cabin air filters are all you want to do, you don't even need to remove the hood seal.


You will have to so some coercing (smashing) to remove and install the filters. I managed to pull the drivers side filter out first, then slid the passenger side to the middle to remove it. I did the install in reverse, put in one filter, slide it to the passenger side, then as gently as possible, smash in the driver's side. While it will take some smashing, you also don't want to completely mangle the filter while reinstalling so be patient.

Next you want to remove the two access panels for the engine airboxes. I started with the passenger side. Remove the two 10mm bolts, then lift the passenger side corner and slide it out toward the cabin air filter void.


On the driver side, you need only loosen the rearmost 10mm bolt and then remove the front and top bolt. This panel simply slides down and forward.


To remove the driver airbox, begin by disconnecting the sensor on the airbox. You will need a jeweler's screwdriver or equivalent small flat tool to release the grey tab. One you get grey tab to move out, squeeze it and pull to disconnect. There was very little slack on my car so be careful when disconnecting.

Next, disconnect the ducting and remove the intermediate duct. I tried simply disconnecting the intermediate duct from the box but ran into problems getting the box reinstalled until I removed the intermediate duct.


To remove the box, loosen the hose clamp going to the turbo ductwork, remove the E10 star bolt in front, and simply unscrew the E10 bolt in the rear. The rear E10 bolt stays captured in the airbox unless you really want it to come loose. To remove, work the box free from the turbo ductwork, pull up and then work the box out.

For the passenger side, start by simply disconnecting the intermediate duct from the box. There is more space on the passenger side so I didn't need to remove it completely.

Removal of the passenger side box is similar to the driver side, but there is no sensor to worry about. Remove the front E10 bolt and unscrew the rear. Loosen and disconnect the turbo duct ,pull up and wiggle the box free.

If your only goal is to change the air filters, you can stop here. If you are also changing the fuel filter, continue.
Start by disconnecting the two sensors connected to the ductwork and the one beside the turbo. Squeeze the sides of the two front sensors to release them. For the rear one, pull the gray tab up and then squeeze it to release.


Loosen the clamp going to the turbo, then wiggle the ductwork free. I didn't completely remove it, simply rotated it clockwise and let it rest on the passenger side of the engine. There will likely be a bit of oil in the back of duct and front of the turbo, some say this is normal, others not. I simply wiped it clean.

Apologies for not having pictures with the ductwork removed, I took the pictures after I put everything back together. Disconnect the circled connector by pulling the grey tab out and squeezing it. Then loosen the E10 bolt that holds the sensor in place. That should give enough play to work the fuel filter past it.

Next you'll want to disconnect the sensor on the fuel filter. It has a tab on top that must be depressed and then it can be disconnected. Loosen the fuel filter collar with the 7/32 hex key.

Release the CLIC clamps and slide them off the hose up onto the filter. I recommend breaking the hoses lose by twisting them both before removing either. When your ready to remove them, it is handy to have a second set of hands and rags to keep fuel from spilling everywhere. Have the second person hold the hoses up out of the way while you work the filter free. I rotated it clockwise to clear the connector bracket that you disconnected earlier. Once you're clear of that connector, simply pull the filter up and out. To install the new filter, just move the CLIC clamps to the new filter before dropping it back in and reconnecting the hoses and reverse these instructions.


Member
Joined: Apr 2011
Posts: 83
Likes: 0
2011 M Class 300CDI
All i can say is a BIG MASSIVE THANK YOU!!
There was no where to go on how to change the air filters on the diesel models.
I have read that a light comes on when you take out the air filters. Was this the case with you??? Or was it fine??
There was no where to go on how to change the air filters on the diesel models.
I have read that a light comes on when you take out the air filters. Was this the case with you??? Or was it fine??
Thread Starter
Super Member
Joined: Apr 2011
Posts: 541
Likes: 231
2021 GLS580 | 2011 ML350 BlueTec | 2009 Pontiac G8 GXP
No lights/resets or anything else for replacing the air filters. They're just air filters after all. While the engine computer might have to make some adjustments from what it has learned over time, it will happily adjust to the clean filters with little trouble. What's the point of a computer of a human always has to baby sit for it?

Starting after the fuel filter change was a non-issue as well. After the change I simply left the key on until I heard the fuel pump shut off, then key off for a minute and then it started right up. Not even a stumble.
Thread Starter
Super Member
Joined: Apr 2011
Posts: 541
Likes: 231
2021 GLS580 | 2011 ML350 BlueTec | 2009 Pontiac G8 GXP
I'm not sure exactly which screws you're asking about. I think you're asking about the screws on the engine air boxes that come out so you can access the engine air filters. Once you have the boxes removed from the engine bay, I believe you need a torx T15 or T20. Can't remember 100%.

Junior Member
Joined: Feb 2011
Posts: 23
Likes: 0
From: Texas
2008 ml320 CDi
Thanks for this right up. I replaced my fuel filter and air filters today took me about 1.5 hours. I did not need to make the tool described, I used the larger version tool then the one from Harbor Freight without any mods.
Not too complex a task.
Cheers.
Not too complex a task.
Cheers.
Trending Topics

Newbie
Joined: Jan 2008
Posts: 11
Likes: 0
From: Northern Calif
2003 SLK230 and 2011 ML350 Bluetec (Diesel)
Thank you!
First and foremost, thanks for taking the time create this masterpiece! I never would have tackled this job by myself without your post. I would have never known to remove part of the firewall to get at these air filters. I can't imagine why MB makeing this service so darn difficult other than to make money.
QUESTION: How do you reset the computer? Do I just select complete service or do I go to additional work and select service 3, 4, 5, etc or Items under service menu. I just completed the 20K mile service (Fuel Filter, Air Filter, Cabin Filter, Oil/Filter change).
Also, I was talking with MB about the cabin filter change because the manufacturer twisted the seal on the cabin filter box upon initial installation. MB dealer informed me that the cabin filters are not changed from the installation according to their work instructions. The filters are accessed through the cabin (passengers side), but it takes much longer to do it this way. This is why we have to mash them up installing it the way you indicated in your write up.
I was pretty wore out by the time I finished this job! Thanks again for all your help with this awesome write up!
Last edited by millerm77; Jun 11, 2012 at 01:03 PM. Reason: Initially wrote it on my iphone. Needed a keyboard for proper message.
MB World Stories
The Best of Mercedes & AMG

Manual Mercedes? 6 Times Sindelfingen Let Drivers Have All The Fun
Verdad Gallardo
Mercedes SLR McLaren 722 S Is Extremely Rare Example Modified by McLaren
Verdad Gallardo
8 Classic Boxy Mercedes Designs That Have Aged Like Fine Wine
Verdad Gallardo
Flawlessly Restored Mercedes 190E Evo II Heads to Auction
Verdad Gallardo
Electric Mercedes C-Class Unveiled: 11 Things You Need to Know
Verdad Gallardo
Mercedes EQS Gets A Major Update: Everything You Need to Know
Verdad Gallardo
5 Underrated Mercedes-Benz Models That Don't Get the Love They Deserve
Verdad Gallardo
Mercedes 300D Has Pushed Well Past 1 Million Miles and It Ain't Stopping
Verdad Gallardo
10 Most Reliable Mercedes-Benz Models You Can Buy Used
Verdad Gallardo
Thread Starter
Super Member
Joined: Apr 2011
Posts: 541
Likes: 231
2021 GLS580 | 2011 ML350 BlueTec | 2009 Pontiac G8 GXP
First and foremost, thanks for taking the time create this masterpiece! I never would have tackled this job by myself without your post. I would have never known to remove part of the firewall to get at these air filters. I can't imagine why MB makeing this service so darn difficult other than to make money.
QUESTION: How do you reset the computer? Do I just select complete service or do I go to additional work and select service 3, 4, 5, etc or Items under service menu. I just completed the 20K mile service (Fuel Filter, Air Filter, Cabin Filter, Oil/Filter change).
QUESTION: How do you reset the computer? Do I just select complete service or do I go to additional work and select service 3, 4, 5, etc or Items under service menu. I just completed the 20K mile service (Fuel Filter, Air Filter, Cabin Filter, Oil/Filter change).
Also, I was talking with MB about the cabin filter change because the manufacturer twisted the seal on the cabin filter box upon initial installation. MB dealer informed me that the cabin filters are not changed from the installation according to their work instructions. The filters are accessed through the cabin (passengers side), but it takes much longer to do it this way. This is why we have to mash them up installing it the way you indicated in your write up.
I was pretty wore out by the time I finished this job! Thanks again for all your help with this awesome write up!
I was pretty wore out by the time I finished this job! Thanks again for all your help with this awesome write up!

Senior Member
Joined: Feb 2011
Posts: 350
Likes: 106
From: Palo Alto, CA
2011 GL 350, P1 Package, HID headlamps, Blind spot assist, Parktronic, Wood steering wheel
On the diesel fuel filter, there is a nipple coming out the left side of the wiring harness connector. On my original filter, it had a relatively elaborate black plastic cap held in place by a cotter pin. There were green and yellow paint dots on both the filter and the new cap. On the new filter, the nipple is longer and there is a very simple and thin rubber cap over the nipple - turns out this is just a dust protector. I was confused because the old heavy black plastic cover was too short to fit on the new filter, and there is nothing in the instructions I have from Mercedes about transferring the cap from the old filter to the new one.
I went back to the parts department at the dealer and we figured out together that there is a new heavy plastic cover for the new filter - the new cap is greenish white in color, longer than the original one and comes with an integral cotter pin. It looks a little bit like a tire valve stem cover.
Moral of the story - if you are replacing your Diesel fuel filter you may need not just the filter and two new click clamps like the directions say - you may also need a new cap for the nipple that comes out of the wiring harness connector built into the top of the filter.
Last edited by ddruker; Jul 19, 2012 at 05:02 PM.

Senior Member
Joined: Feb 2011
Posts: 350
Likes: 106
From: Palo Alto, CA
2011 GL 350, P1 Package, HID headlamps, Blind spot assist, Parktronic, Wood steering wheel
About two years after my post above, I just completed the 40,000 mile service - all but transmission, which I will have the dealer do.
Things I noted that were different than the writeup above.
I definitely had challenges replacing the drivers side air box. I finally found a small hand mirror which helped me to correctly seat the post at the rear of the box. It was just very hard to get this to line up correctly and there is direct no way to see whether the post is in the right place when re-installing.
The latest and greatest OEM diesel fuel filter from the dealer parts department now costs - gasp - $153.00 before tax. It included the bleeder cap and cotter pin - which the filter I installed two years ago did not have.
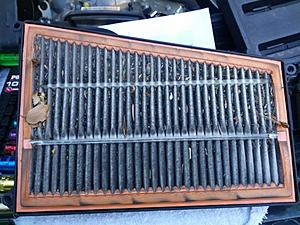
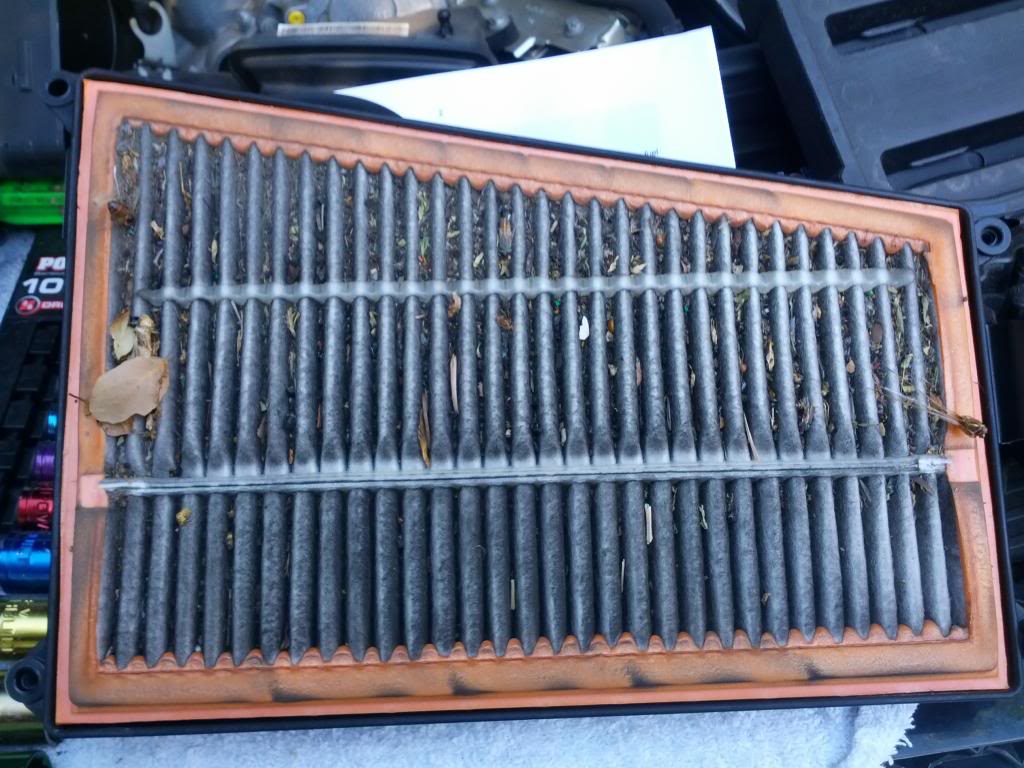
I definitely needed new air filters after 39,000 miles - mine were quite clogged with dead bees, butterflies, grasshoppers, etc - plus lots of dirt. A picture of the passenger side is below - the drivers side was worse.
Took about 2.5 hours start to finish, not counting the time to drive to the parts department and back to pickup the correct new fuel filter.
Things I noted that were different than the writeup above.
I definitely had challenges replacing the drivers side air box. I finally found a small hand mirror which helped me to correctly seat the post at the rear of the box. It was just very hard to get this to line up correctly and there is direct no way to see whether the post is in the right place when re-installing.
The latest and greatest OEM diesel fuel filter from the dealer parts department now costs - gasp - $153.00 before tax. It included the bleeder cap and cotter pin - which the filter I installed two years ago did not have.
I definitely needed new air filters after 39,000 miles - mine were quite clogged with dead bees, butterflies, grasshoppers, etc - plus lots of dirt. A picture of the passenger side is below - the drivers side was worse.
Took about 2.5 hours start to finish, not counting the time to drive to the parts department and back to pickup the correct new fuel filter.

Senior Member

Joined: Jan 2013
Posts: 421
Likes: 57
2021 V167
Fuel filter tip
I have a gl350 and a sprinter van which have the same basic engine. I have found that many maintenance parts on my sprinter are the same as the GL. For instance I get the same fuel filter for 109.00 for the 2012 sprinter as the dealer wants 160 bucks for the 2011 GL.
Fluids are way cheaper as well. Same mb spec as well.
Fluids are way cheaper as well. Same mb spec as well.
Member
Joined: Oct 2012
Posts: 140
Likes: 4
From: California
2010 GL350, 2005 BMW X5 4.8is, 2015 BMW 328d
About two years after my post above, I just completed the 40,000 mile service - all but transmission, which I will have the dealer do.
The latest and greatest OEM diesel fuel filter from the dealer parts department now costs - gasp - $153.00 before tax. It included the bleeder cap and cotter pin - which the filter I installed two years ago did not have.
The latest and greatest OEM diesel fuel filter from the dealer parts department now costs - gasp - $153.00 before tax. It included the bleeder cap and cotter pin - which the filter I installed two years ago did not have.
My 2010 GL 350 Bluetec uses OEM Mahle KL490 but went with the Mahle KL490-1D $26.95 from FCP Euro. Same filter but 1 cm taller. It holds more water and contaminates before I have to change it out. My fuel filter change interval went from 20K to 30K without worry. I'd recommend to anyone, changing the air filters according to your driving conditions as clean air intake volume is crucial, more so than gasoline engines. Diesel engines compress air not an air/fuel mixture, so unrestricted air filters are extremely important. Don't know about oiled cotton vs dry paper filters, but I suppose an oil bath air cleaner would have the least restriction and the best filtering capacity.
Last edited by drgeeforce; May 27, 2014 at 02:22 PM.

Member
Joined: Mar 2013
Posts: 162
Likes: 0
From: Madison, AL
2009 ML320 Bluetec
Oiled cotton gauze filters generally flow more air in the same sized package vs paper, but also flows more dirt. The oiled gauze has less surface area but more hole area. More hole area is how they get more flow. A paper filter will have about 10x more surface area, just count the pleats.
If your goal is to be first to the finish line at any cost then an oiled gauze filter is a good choice.
If your goal is to be last to the salvage yard then a disposable paper filter is your best choice.
If your goal is to be first to the finish line at any cost then an oiled gauze filter is a good choice.
If your goal is to be last to the salvage yard then a disposable paper filter is your best choice.

Newbie
Joined: Mar 2010
Posts: 8
Likes: 0
2012 GL350
Fuel Filter from Diesel-Filters.com
I have been reading through the forums on the diesel fuel filters. I had a 2009 ML BTC that I put 50K on. During that time, I think I had every common problem, turbo oil leak, oil cooler major leak, fuel filter leak, check engine lights from the DEF tank sensors, at least my dealer always fix it under warranty and gave me a loaner. Even when I had the oil cooler leak they fixed it when the car was technically 2 months out of warranty by time and not millage.
I decided to roll the dice and traded it in for a 2012 GL350. I was rather shocked when I looked under the hood an saw a totally different fuel filter and then saw how much they were compared to the older version. (More so, because I have a replacement still left from my 2009 that I guess I will not get the chance to use)
I found this website that has the new version with the 5 wire connection for ~55 bucks (61 w/ shipping)
http://www.diesel-filters.com/products/wk-820-7-mann-inline-fuel-filter-642-090-53-52.html
I have yet to order anything from this site. Would appreciate any feedback if anyone has ordered from them.
Thanks
Member
Joined: Mar 2013
Posts: 162
Likes: 0
From: Madison, AL
2009 ML320 Bluetec
Its my understanding the new filters have a built-in water sensor (adding to the cost) while the old filters had a detachable reusable water sensor. I don't understand why M-B wants the sensor replaced with the filter.
I have ordered Ford Powerstroke stuff from http://www.dieselfiltersonline.com but not http://www.diesel-filters.com/
I have ordered Ford Powerstroke stuff from http://www.dieselfiltersonline.com but not http://www.diesel-filters.com/

Junior Member
Joined: Apr 2014
Posts: 44
Likes: 0
E350 Bluetec
Better Price on 5-pin Bluetec Fuel Filters
So, after buying 2 wrong fuel filters, I stumbled over to the Sprinter Van sites. Here is what looks to be a good source for the 5-pin late 2012 (and on) Bluetec fuel filters. $70.00 a pop. Guys reporting the product is genuine and shipping is reasonably fast. THe other site above .looks to be a slightly better price. You can skip Amazon and Partstrain (Ask me how I know). ; )
http://idparts.com/catalog/product_i...oducts_id=4140
http://idparts.com/catalog/product_i...oducts_id=4140
Last edited by carsandcapp; Nov 24, 2014 at 05:30 PM.
Member
Joined: Mar 2013
Posts: 162
Likes: 0
From: Madison, AL
2009 ML320 Bluetec
So, after buying 2 wrong fuel filters, I stumbled over to the Sprinter Van sites. Here is what looks to be a good source for the 5-pin late 2012 (and on) Bluetec fuel filters. $70.00 a pop. Guys reporting the product is genuine and shipping is reasonably fast. THe other site above .looks to be a slightly better price. You can skip Amazon and Partstrain (Ask me how I know). ; )
http://idparts.com/catalog/product_i...oducts_id=4140
http://idparts.com/catalog/product_i...oducts_id=4140
Member
Joined: Mar 2013
Posts: 162
Likes: 0
From: Madison, AL
2009 ML320 Bluetec
Junior Member
Joined: Apr 2014
Posts: 44
Likes: 0
E350 Bluetec
true, true...air filters are definitely different, but the fuel is the same. Do you know...Is the ML motor more akin to a Sprinter configuration?

Newbie
Joined: Apr 2015
Posts: 2
Likes: 0
2012 C250 and 2010 GL350
GREAT DYI INSTRUCTIONS
I am planning on performing this maintenence this weekend. The only question from just eyeballing the job that I have is whether or not the engine upper strut brace needs to be removed. I am assuming it does.
Any comments?
Any comments?

Junior Member
Joined: Apr 2014
Posts: 45
Likes: 0
Ml350 bluetech
Oil/filter change
Since I wasn't able to find a good reference on changing the air and fuel filters on a 2011 bluetec ML350, I thought I'd post one. Click for very large pictures.
Standard disclaimers apply, I'm not responsible for anything that might go pear shaped while you're using my writeup. You assume all responsibility for your vehicle.
Tools needed:
CLIC Clamp pliars (I made my own out of a $3 nipper)
Flat Screwdriver
7/32" Hex wrench
E10 Star Socket
10MM Socket and or 10mm box end. A wratcheting box end will make things easier
Short and Medium extensions also a bonus
Jewler's screwdriver set
I made the CLIC clamp tool by starting with a $3 nipper from harbor freight. ~10 minutes with a dremmel and I was ready. I started by making the thin side and smoothing the bottom of both sides so that it was nearly flat. I then made the notch in the thicker side to make it fit around the bump on the clamps. The end result worked very well and didn't take much pressure to get the clamps to release or close.
Parts needed:
Cabin Air filters
Engine Air filters
Fuel Filter: A 642 090 53 52 05
The air filters can be found at most parts stores. The fuel filter for my engine was not available at anyone but an MB dealership. All the normal parts stores have the wrong filter listed. Mine has a five wire fixed sensor in it. I believe the others have a removable sensor with three wires. The fixed sensor makes install a bit easier as you don't have to swap anything, but of course this makes for a more expensive part. The MB part number is A 642 090 53 52 05 and it should be around $108 wholesale. It is a Mann filter WK820 something. I forgot to write it down before the install. According to MB, the filter is a mixed install item. Their own parts computers says to compare the old part to the new one so be sure to compare before you begin the install.
Start by removing the rear hood seal, it simply pulls off
Next remove the cabin air filter box. If the cabin air filters are all you want to do, you don't even need to remove the hood seal.
You will have to so some coercing (smashing) to remove and install the filters. I managed to pull the drivers side filter out first, then slid the passenger side to the middle to remove it. I did the install in reverse, put in one filter, slide it to the passenger side, then as gently as possible, smash in the driver's side. While it will take some smashing, you also don't want to completely mangle the filter while reinstalling so be patient.
Next you want to remove the two access panels for the engine airboxes. I started with the passenger side. Remove the two 10mm bolts, then lift the passenger side corner and slide it out toward the cabin air filter void.
On the driver side, you need only loosen the rearmost 10mm bolt and then remove the front and top bolt. This panel simply slides down and forward.
To remove the driver airbox, begin by disconnecting the sensor on the airbox. You will need a jeweler's screwdriver or equivalent small flat tool to release the grey tab. One you get grey tab to move out, squeeze it and pull to disconnect. There was very little slack on my car so be careful when disconnecting.
Next, disconnect the ducting and remove the intermediate duct. I tried simply disconnecting the intermediate duct from the box but ran into problems getting the box reinstalled until I removed the intermediate duct.
To remove the box, loosen the hose clamp going to the turbo ductwork, remove the E10 star bolt in front, and simply unscrew the E10 bolt in the rear. The rear E10 bolt stays captured in the airbox unless you really want it to come loose. To remove, work the box free from the turbo ductwork, pull up and then work the box out.
For the passenger side, start by simply disconnecting the intermediate duct from the box. There is more space on the passenger side so I didn't need to remove it completely.
Removal of the passenger side box is similar to the driver side, but there is no sensor to worry about. Remove the front E10 bolt and unscrew the rear. Loosen and disconnect the turbo duct ,pull up and wiggle the box free.
If your only goal is to change the air filters, you can stop here. If you are also changing the fuel filter, continue.
Start by disconnecting the two sensors connected to the ductwork and the one beside the turbo. Squeeze the sides of the two front sensors to release them. For the rear one, pull the gray tab up and then squeeze it to release.
Loosen the clamp going to the turbo, then wiggle the ductwork free. I didn't completely remove it, simply rotated it clockwise and let it rest on the passenger side of the engine. There will likely be a bit of oil in the back of duct and front of the turbo, some say this is normal, others not. I simply wiped it clean.
Apologies for not having pictures with the ductwork removed, I took the pictures after I put everything back together. Disconnect the circled connector by pulling the grey tab out and squeezing it. Then loosen the E10 bolt that holds the sensor in place. That should give enough play to work the fuel filter past it.
Next you'll want to disconnect the sensor on the fuel filter. It has a tab on top that must be depressed and then it can be disconnected. Loosen the fuel filter collar with the 7/32 hex key.
Release the CLIC clamps and slide them off the hose up onto the filter. I recommend breaking the hoses lose by twisting them both before removing either. When your ready to remove them, it is handy to have a second set of hands and rags to keep fuel from spilling everywhere. Have the second person hold the hoses up out of the way while you work the filter free. I rotated it clockwise to clear the connector bracket that you disconnected earlier. Once you're clear of that connector, simply pull the filter up and out. To install the new filter, just move the CLIC clamps to the new filter before dropping it back in and reconnecting the hoses and reverse these instructions.
Ty


