

BAD IC pump? check my test please
 02-13-2016 | 02:03 PM
#26

Super Member
Joined: May 2015
Posts: 554
Likes: 36
2004 S600
The factory heat shields are metal. Just not very substantial. Metal shields block radiant heat and are typically used with an air gap to basically reflect heat away from the protected area.
02-13-2016 | 06:34 PM
#27

MBWorld Fanatic!
Joined: Nov 2010
Posts: 2,605
Likes: 329
From: Welwyn, Herts, UK
2006 S600
Exactly. The stock shields conform to the sides of the coil pack - they're actually screwed down onto it. Mine have a stand off, so there's an air gap. That's the only way for a heat shield to be effective.
02-14-2016 | 01:36 AM
#28
Senior Member
Joined: Apr 2014
Posts: 290
Likes: 2
SL65
I dont agree, from what I recall these coils sit directly into the motor (where the highest temps are) what other part of the motor are they attempting to block heat from? isn't it the engine that is making all that heat ? which means that the coils sit right into them I dont see how they would block any heat ,or do you mean they dissipate the heat of the coil packs ? if the latter it still doesn't make sense as there is only one bolt that is conducting the heat shields to the coils. But you were saying they are shielding , from what exactly is very unclear, its the motor that creates all the heat, the coils are directly attatched, they will absorb so much heat I cant see a thin piece of sheet actually reducing temps that great. Also how did you do the temp test , this ought to be interesting.
Last edited by SL65MONSTA; 02-14-2016 at 01:42 AM.
02-14-2016 | 04:41 AM
#29
MBWorld Fanatic!
Joined: Nov 2010
Posts: 2,605
Likes: 329
From: Welwyn, Herts, UK
2006 S600
I measured the peak operating temperature of the coil packs with temperature sensitive tape.
The whole of the engine compartment basically runs at coolant temperature, except those parts exposed to radiant heat from the exhaust, turbos and cats. Those hot parts are entirely enclosed by metal shields, except for a small aperture above the turbo centre housing to run the oil inlet and coolant outlet pipes.
Therefore there's a line of sight from the turbo to the coil pack, that has to be blocked to stop the latter from being grilled. Mercedes fit a small metal heat shield, but its pressed against the plastic cover. Metal heat shields are very effective if they have a good air gap ON BOTH SIDES, but that's not the case here, so I upgraded it to a larger shield with a proper air gap.
I measured the improvement it made, and the coil pack now largely runs at the ambient temp of the engine compartment. That might not have saved my coil packs, but it can only help.
What's probably most important is to run the right spark plugs at the right gap. The voltage needed to generate a spark increases roughly in proportion with the pressure. Therefore the voltage is higher with a high load than it is for a low load. Furthermore, if you increase the boost pressure, you will also increase the voltage, which puts more electrical load on the coil.
Of course it could be that all these coil packs are failing after a tune because the owners / drivers are suddenly going out there and driving at full throttle much more than they were before, revelling in their new-found power.
Nick
02-14-2016 | 09:28 AM
#30

MBWorld Fanatic!
Joined: Oct 2009
Posts: 1,924
Likes: 38
cl600
They are quite robust, really...I deal with a variety of makes and models of cars on a day to day basis and it's highly unusual for a car with to go 100k without at least one coil failure. In my opinion these cars don't have an unusually high failure rate on those parts...on my coil assembly that finally failed, I ohmed them out and had 3 bad individual coils out of 12 after 96k miles. I checked the other bank as well and they are all good. so 12.5% total failure rate after 100k and mine had definitely been directly wet numerous times.
Furthermore,I think heat is a MUCH more likely culprit of coil destruction than a wee bit of moisture...they're sealed pretty darn well against that (if you've ever tried to get one of the covers off you know that) and live in a hot enviroment anyway that would tend to keep them dry. Moisture in the plug well might cause the spark to break down/arc to another place as opposed to across the spark plug gap but that's actually easier on the coils because that event is happening due to lower resistance/voltage requirements across the path the spark does take vs the plug gap...it does not stress them, what really stresses them is an open-circuit condition in which the spark has nowhere within the voltage range the coil is producing to jump to and breaks down internally in the coil windings. However, that's very unlikely to happen with these as the entire coil tube is grounded and provides a convenient, nearby place for the spark to arc to in the event of a plug failure/too large of a gap/whatever the cause of the high firing voltage requirement.
Zeph, i very interested in how you tested your coils. me, being a novice would really appreciate if you could explain the procedure and if the coil packs have to be disassembled to do this.
thanks
02-14-2016 | 12:54 PM
#31
Super Member
Joined: May 2015
Posts: 554
Likes: 36
2004 S600
I will play around with my spare coil and see if I can map the terminals.

 02-14-2016 | 04:58 PM
#33
Super Member
Joined: May 2015
Posts: 554
Likes: 36
2004 S600
Well yeah, you would use your voltmeter set on ohms and touch the leads to the primary terminals coming out of the top of each coil. I will try and take pics of the procedure later if I get a chance...also, I will try and figure out if it can be done without disassembling the coil.
02-15-2016 | 12:12 AM
#37
Senior Member
Joined: Apr 2014
Posts: 290
Likes: 2
SL65
Honestly, I haven't gone as far as figuring out if/which pins in the connector go to which coil so as far as I'm concerned the black plastic cover has to be removed from the coil assembly to measure resistances and such. This is very difficult to do without breaking it and takes a LONG time with progressively larger flathead screwdrivers. Then you just measure the primary and secondary resistance on the coils. Primary should be like 2-3 ohms, and secondary should be in the 35k ohm range or so. I'm no electronics engineer so I don't necessarily know what to look for in-depth, but essentially I also went through and compared resistances on all the other components cylinder to cylinder as well to verify that they were all more or less the same. My bad coils on the first bank measured out very low secondary resistance, like 2k ohms or something. Which I believe would cause the spark to break down internally in the coil as opposed to jumping the gap if the firing voltage requirement was very high at all.
As far as spraying the intercooler, I think you misunderstood what I meant. I mean spraying the front mounted heat exchanger, not the intercooler directly. I can see why you would be concerned about that getting moisture into bad places. In an air/water setup the spray will have a much slower, more cumulative effect than in a direct air/air cooling setup like most turbo cars have. I already have a water/methanol injection system on the car and am in the process of improving it so while I am at it, I will probably be adding a separate loop (either separated via solenoid, or a completely separate pump) for misting the intercoolers. These nozzles will be a LOT smaller than your typical water/alcohol injection nozzles, and produce a much finer low-volume spray. But I'm going to use a ton of them, lol. Essentially it will be these nozzles:
https://youtu.be/bpSMRVngiQI
However, mine will be operated at much higher pressures than just hooking up a garden hose, which will make even finer spray. I believe my injection pump is at 250psi right now so it should make an extremely fine fog and prevent any moisture accumulation. When the droplet size is below a certain threshold, the surface tension of the water droplets is so high that they bounce off of things instead of wetting surfaces, in addition to having a much larger surface area for heat transfer with the air making them much more easily vaporized for cooling. It's essentially dry fog. I will also be using nozzles threaded/brazed directly into rigid aluminum or stainless tubing, not plastic tubing with adapters like they are typically used.
As far as how it will be activated, I will most likely have a switch somewhere that I will have activate a number of things together to put the car into "chill" mode. As you may know, I will be playing around with refrigerated intercooling and that's my primary purpose for attempting to increase system efficiency with the misting, so I will need to activate the A/C system control solenoids I will be installing, the misting pump, the cooling fan, and a circulation pump on that intercooler loop. I don't want a ton of switches, so they will probably all be on one switch or controller with diodes to prevent issues when the car triggers those systems itself.
On the coils how do you differentiate the "primary and secondary coils?"
02-15-2016 | 02:56 AM
#38
Super Member
Joined: May 2015
Posts: 554
Likes: 36
2004 S600
I didn't get a chance to work on it tonight. When I do have time to dig into the coil situation more in-depth, I will start a new thread for it to help out future searches...an intercooler pump thread is probably not the best place to stick coil diagnostics. I doubt I will get to it before Wednesday, that's my next day off.
02-15-2016 | 03:00 AM
#39
Super Member
Joined: May 2015
Posts: 554
Likes: 36
2004 S600
it will give you a lot better idea of what I am talking about, although at this point to access the coils directly like that, you would have to remove the cover. Like I said, I'll do some probing and see if they can be tested without disassembly, but I'm not sure that they can. Would be super easy to tell if I could actually find a pinout for the coil assembly, or a more thorough description of how the system works.
Last edited by ZephTheChef; 02-15-2016 at 03:00 AM. Reason: add link
02-15-2016 | 01:25 PM
#41
Super Member
Joined: May 2015
Posts: 554
Likes: 36
2004 S600
That's what I'm saying...you most likely have to take the plastic cover off to get at the terminals directly. And I'm wanting to probe around to see if anything can be done externally, but I'm kind of under the impression they are triggered from within the assembly so it may not be possible.
02-15-2016 | 02:27 PM
#42
MBWorld Fanatic!
Joined: Nov 2010
Posts: 2,605
Likes: 329
From: Welwyn, Herts, UK
2006 S600

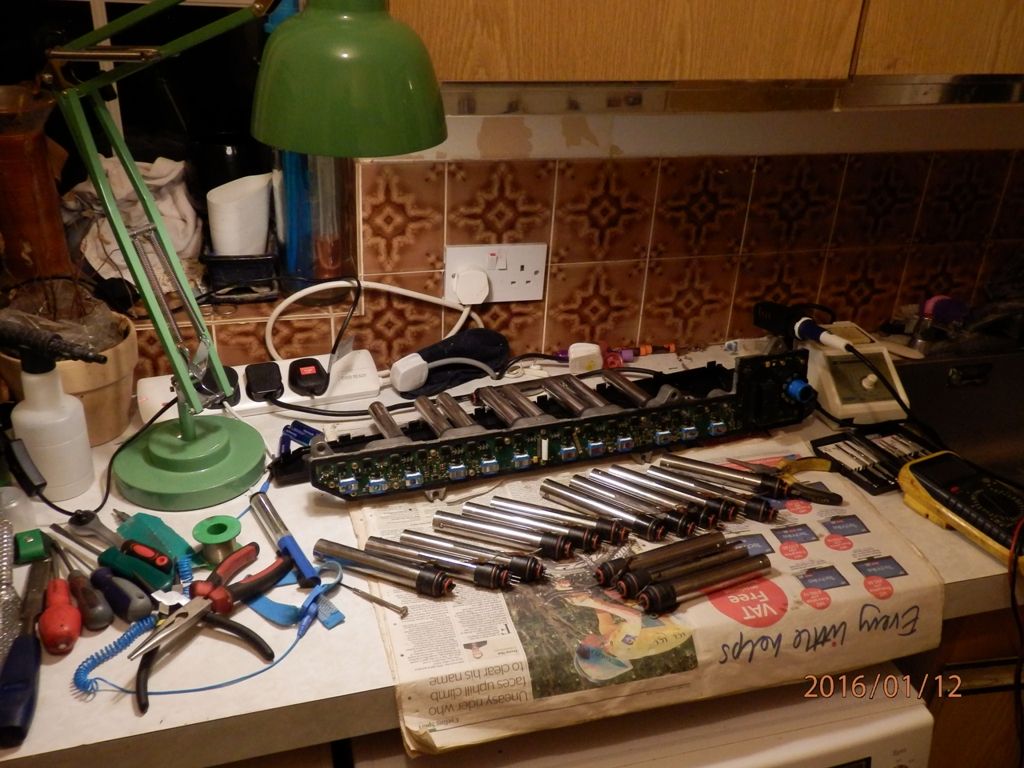
I stripped and rebuilt two coil packs last month. I measured everything I could, with the coils both connected and removed.
There were NO measurements I could take that showed a good coil from a faulty one, but good luck to anyone who can.
Only difference I could see was whether the metal cylinders' weld lines were split.
Nick
02-15-2016 | 02:33 PM
#43
Super Member
Joined: May 2015
Posts: 554
Likes: 36
2004 S600
I stripped and rebuilt two coil packs last month. I measured everything I could, with the coils both connected and removed.
There were NO measurements I could take that showed a good coil from a faulty one, but good luck to anyone who can.
Only difference I could see was whether the metal cylinders' weld lines were split.
Nick
02-16-2016 | 12:03 PM
#46
Super Member
Joined: May 2015
Posts: 554
Likes: 36
2004 S600
The ignition module/coil, or the boost converter for the coils? Interested in more information in general. Post up a link!
02-16-2016 | 03:04 PM
#47
Senior Member
Joined: Apr 2014
Posts: 290
Likes: 2
SL65
IGN module , it sits smack bang in the middle on top of the motor, looks like a ECU here is a link:
https://mbworld.org/forums/m275-v12-...ansformer.html
https://mbworld.org/forums/m275-v12-...ansformer.html
02-20-2016 | 10:17 AM
#48
MBWorld Fanatic!
Joined: Oct 2009
Posts: 1,924
Likes: 38
cl600
hi, as you know i have been following this thread and purchased a used coil pack to experiment on. supposedly it was throwing a code on 2 cylinders. i removed the cover using a heat gun as you suggested. all coils look good with no discoloration, or splitting. i then removed all screws to the circuit board and tried prying out the circuit board to see if there was a disconnected lead to a coil. i was only able to pry the board about 1/4". i am assuming that i can't pry it any further because the board is attached to the coils. i am stuck and don't know where to go from here. can you give me any advice? if needed i can take pictures of the coil pack and send it to you. i checked continuity and have it on all three lead going to the coils from the circuit board on all cylinders. it would be a great accomplishment if i could fix this coil pack with your help. is it possible the coil pack might be good? the member i purchased it from diagnosed two cylinders misfiring on the drivers side pack. he believes it was 7 and 10. when he replaced this coil pack the misfires went away.
thanks you all for all your help in the past and hope someone can give me advice on this problem as well.
thanks you all for all your help in the past and hope someone can give me advice on this problem as well.
02-20-2016 | 10:20 AM
#49
Super Member
Joined: May 2015
Posts: 554
Likes: 36
2004 S600
You shouldn't need to unscrew the circuit board, everything can be accessed from the top. I was up all night doing exhaust on my car, but I will try and get you some pics and information later about exactly what measurements I took on my dead coil to pinpoint the bad cylinders.


