When you click on links to various merchants on this site and make a purchase, this can result in this site earning a commission. Affiliate programs and affiliations include, but are not limited to, the eBay Partner Network.
I have a Quickjack so when I work on my S550 I raise all 4 wheels off the ground at the same time. I can tell you that I raise the suspension, drive over the Quickjacks, drag them out to the frame rails and raise the car. I don't perform any other rituals and I have never had an issue. Same goes for my E55. I don't have a Star/Xentry setup so I've never tried to depressurize or disable anything. I've even removed the front struts on my E55 (to replace upper control arms) and all I did was crack the upper lines to let the air out. When dealing with a replaced/deflated air bag, I would take some care to not drop the car to the ground with no pressure in the bags. Other than that, I have zero concerns. But I welcome other opinions.
Think about the car going up on a lift at a dealer. Think about all of the Airmatic cars that come into the shop. Do you think they hook a computer up and depressurize (or disable) as the car is being lifted? I don't. If it was that big of a concern Mercedes would have included a switch or mode to disable the system but it appears they designed it correctly so as not to need that.
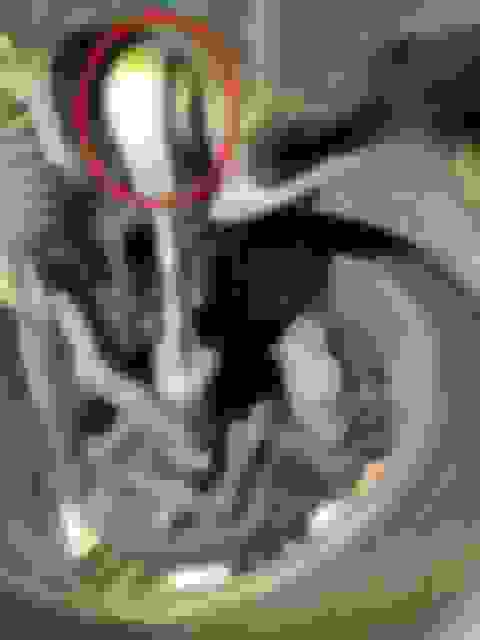
There seems to be some special requirements according to some on here about the bolt that connects this end circled in red. I wasn't fully understanding it so I've not did the job yet. Also, I'm not fully confident of letting the air out manually at top of strut since I don't use STAR software.
When you let the air out of yours, and then aired it back up, did the car have the correct ride height?
So on my 4Matic car I assessed that I would be able to remove the bolt with no interference. I can't speak for a RWD car.
I have not aired down my S550 yet. I have done so on my E55 (front struts) by simply slowly removing the air fittings once the car was lifted. Upon reassembly I don't recall the exact order but I believe I set the car at approx ride height, started it and let the air system do what it wanted, and then slowly dropped it making sure it wasn't going to bottom out. It will put itself back to the correct height (there are height sensors, plus it knows the pressure in each air bag). You just don't want weight on a depressurized bag. Having the system pressurized at full droop is not an issue.
you have the perfect picture here - top of the picture - go look which side the nut sits - the bolt needs to come out exactly into the gaitor / steering arm of the rack - thus you can't just simply swap the arm
Originally Posted by s550hollywood
Have you ever replaced this lower control arm on your S550?
I've seen all manor of things. Sometimes the factory instructions are right on. Sometimes they way over-complicate the repair. There's really no telling until you look at it up close and make a judgement and/or try something. I HAVE been a victim of spending an hour or more trying to work around something when I could have just taken the 10 minutes and removed the thing in the way. Been there, done that...
On a previous car (2005 Cadillac STS) I did the front lower control arms (one piece lowers). On one side I was able to disconnect the tie rod and flop it out of the way and slide the bolt out. On the other side I tried the same thing but it was still too tight to slide the bolt out. So I was forced to loosen the rack mounting bolts and push the rack up 0.5-1" and that was enough room to remove the bolt. That is way less work than removing the rack from the car.
Well, I will get under it again and look at it more when my jack stands get here, but it's sounding like maybe its worth the dealer doing for $1000. I see they charged me $500 for the part when replacing the other side last year yet they sell it on their order parts section of their site for around half that and the labor was $500. They also did a 4 wheel alignment check for $250. So I was $1250 out the door on the other side. It pisses me off when I can't fix it myself because all of my tools were paid for by money I would have otherwise given to the dealership for repairs on all my cars over the years. I wish I could watch the mercedes tech do the repairs because I enjoy learning to fix it myself. It's therapeutic for me as well as satisfying to care for such a wonderful car myself. I feel stupid when I can't do it myself.
The video I posted at the top of this post makes it look pretty easy but he did say its on an S350, so I'm not sure if thats any different than my S550 but it looked the same. He also discusses a torque sequence which I wasn't really understanding, its hard to get what he's saying due to his accent.
Bushings must be torqued at ride height. Mark it somehow, or use your phone level to replicate that angle before torqueing. Otherwise I'm not sure of what a sequence would be.
Your issue is you won't know if you need to remove the rack until you are in there. Popping the tie rod out and manipulating it (after steering to I think left lock) could work, or it could not. Not sure why they didn't put the bolt in the other way.
Here's what I did when I did this job a couple of weeks ago on my 4Matic,
After jacking up the car, pulling the wheels and putting it on jack stands and deflating the shock, remove 3 nuts and separate two joints.
Nut to the knuckle is removed and ball joint separated from knuckle.
Nut to the shock removed and separated from the arm.
Nut to the bolt connecting bushing to the body.
That's all that's needed to remove the arm.
To reassemble attach ball joint to knuckle, attach bushing to body and finger tighten the nut, attach shock to arm.
Tighten and torque nut holding control arm to knuckle.
Tighten and torque nut holding shock to control arm.
Replace the wheels with jack stands still on and raise car enough to put ramps under the wheels.
Turn the car on so that the shock reinflates.
Remove jack stands and lower car onto ramps, you are now at drive height with the weight of the car on the wheels.
Tighten and torque the nut connecting the arm to the body.
Back car off of ramps or jack up again to remove ramps and enjoy fruits of your labor with dollars saved.
I thought I had the video I found of this job but just noticed I didn't put it on this post, rather I put it on my BenzWorld post. Here it is being done on an S350, looks pretty simple.
This guy said he didn't take the air out of the shock at all, but instead used his jack to take the pressure of the air shock off the large bushing, then used the jack to put the bushing back in place with the air still in shock. He also said he did not do an alignment after he was done. The dealer did an alignment on mine last year after replacing the other side and charged $250 for it. Everything this guy does in video cost me $1000 at the dealer for my other side. Dealer sells this arm for $235 on their parts order page but charged me $500 for it last year when they did it.
This guy said he didn't take the air out of the shock at all, but instead used his jack to take the pressure of the air shock off the large bushing, then used the jack to put the bushing back in place with the air still in shock. He also said he did not do an alignment after he was done. The dealer did an alignment on mine last year after replacing the other side and charged $250 for it. Everything this guy does in video cost me $1000 at the dealer for my other side. Dealer sells this arm for $235 on their parts order page but charged me $500 for it last year when they did it.
I bought original Mercedes control arms, left and right for less than $500. My thrust arm bushings were shot, see prior photo of one, but the ball joint was still good so I replaced the bushings instead for $30 each.
ABC ones can be had for almost free as u can get lemforder ones everywhere - but on air tragic they deliberately don't do OEM ones outside main dealer and they are costly
$100 for a black (steel?) Mevotech on Rockauto (4Matic, Airmatic). Lifetime warranty. Previous experience with this brand is that quality is reasonable.
Local dealer online price is $186 for left and $230 for right but I guess they are reman.
FCP Euro $233 for Mercedes left, lifetime. Doesn't show Mercedes for right but has a Vaico for $113 on clearance.
I'm never sure about part numbers because of the Airmatic vs ABC, RWD vs 4Matic and steel vs aluminum. There was another thread where it was a big process to figure out the correct spring arms...
Overview of replacing the front lower control arm on 2013 Mercedes S550 W221 because of a cracked rubber which houses the ball joint.
Note: I did not need to let the air out of the airmatic shock as when the control arm was unbolted I had a bottle jack beneath the bushing end where its attached to the frame. I pulled the bolt out and the control arm was resting on top of the bottle jack and the shock did not push downward at all.
Note: Be sure to see my updated comments in the videos description on YouTube before doing this job
I show you how to replace your front lower control arm on a 2013 Mercedes S550. This control arm connects a ball joint on one end behind the front wheel and the other end connects a bushing to the cars frame. The center of this control arm holds the bottom of the airmatic shock. You do not have to let the air out of the airmatic shock as it will not extend any further down when you take off the control arm.
One thing I forgot to mention in the video is when you’re ready to remove the bolt from the frame end of the control arm be sure to start the car and very quickly straighten your steering to take pressure off the bushing the bolt goes through at the frame. Also you’ll need to play with a bottle jack going up and down slowly to take pressure off the bolt that’s holding the arm to the frame to get it out of the bushing. When you find the sweet spot, you can turn the bolt almost all the way out but you won't get it out all the way by turning it. A pry bar will help to get the bolt the rest of the way out. The ball joint end will more than likely will require a ball joint separator.
Torque:
The nut that holds the arm to the wheel is 50nM + 60 Degree further turn.
The nut that holds the other end to the frame is 80nM + 120 Degree further turn.
Last edited by s550hollywood; 08-09-2023 at 02:34 PM.
Reason: add pictures
Took her out for a DRINK afterwards and she was PURRING like a Champ. She loves the High Octane Stuff, thinking of taking her to an AA Meeting, its getting to be an expensive habit.
Took her out for a DRINK afterwards and she was PURRING like a Champ. She loves the High Octane Stuff, thinking of taking her to an AA Meeting, its getting to be an expensive habit.
She looks great! Just took mine to get ceramic coated
Last edited by COUPCONNOISSEUR; 12-15-2023 at 01:12 PM.

 07-07-2022 | 09:48 AM