When you click on links to various merchants on this site and make a purchase, this can result in this site earning a commission. Affiliate programs and affiliations include, but are not limited to, the eBay Partner Network.
I think I finally feel confident to replace the front lower control arm with ball joint on my 2013 Mercedes S550 but I cannot find any info on how to deflate the air strut. Has anyone ever done this before?
I don't have the fancy software and laptop so is there another way to get the air out of it.
I think I finally feel confident to replace the front lower control arm with ball joint on my 2013 Mercedes S550 but I cannot find any info on how to deflate the air strut. Has anyone ever done this before?
I don't have the fancy software and laptop so is there another way to get the air out of it.
you�re not really supposed to deflate them without star but I�ve done it this way several times and never had a problem.
After you have the car jacked up and not running, SLOWLY loosen the fitting at the top of the strut until you hear air escaping, when it stops hissing you can fully disconnect the line and have a deflated air strut. Also, before deflating take a measurement of current ride height(distance from the center of the wheel hub to the edge of the wheel well, usually around 15-16�) it is at that distance the vehicle needs to be lowered to before inflating them again.
Last edited by COUPCONNOISSEUR; Jul 25, 2022 at 10:17 PM.
you don't do anything with the air strut (obviously get the weight off that corner first)
you'll have far more fun getting the inner bolt out as the rack is in the way - and first stop is to check if the geometry is outside spec - and use the adjustment bolts to get you the choice to set it in spec when u add the new arms
don't change the bolt - utter waste of time just buy 2 washers available separately and remove the offending bit on the subframe that shouldn't be be there - when building a car with accurate geometry (2 washers per side - but only one side is built wrong)
WOW I have no idea what you're talking about and it sounds complex. Maybe dealership is the best solution for replacing this. The dealership replaced the other side last year for $500 labor and $500 parts for $1000 total. I did notice they sell the part on their website for $264 so I guess they double the price on parts when you take it in.
Not sure what the rack is you refer to, I was under it looking to see if I can do this and the only thing I saw in the way is the plastic road shield as its blocking the bolt where the arm connects to body.
If you can offer a more clear understanding of what your diagram refers to I'd like to do this job myself but I'm not understanding what you're saying here.
Nothing fancy about this job other than the bolt under the car is very tight and obviously also needs to be tightened very tight. I changed the load bearing control arms on both sides and the only obstacle was the plastic shield under the engine. I did not bother getting under the car, so I ended up breaking a small part of the plastic shield where the bolt needs to come out/go in. Big deal...
A thing to know is to measure the center of the hub distance to the fender edge when car is sitting at it's normal height. Then before tightening the bolt under the car set this hub height first. This way the rubber in the end of the arm does not get twisted too much that can cayuse it to break actually.
Remove the plastic shields, it makes the job easier.
You need jack stands and ramps for this job. Jack stands for the initial removing of the control arm and ramps so that the wheels are bearing the weight of the vehicle before tightening the control arm to the body of the vehicle.
WOW I have no idea what you're talking about and it sounds complex. Maybe dealership is the best solution for replacing this. The dealership replaced the other side last year for $500 labor and $500 parts for $1000 total. I did notice they sell the part on their website for $264 so I guess they double the price on parts when you take it in.
If you have a 4matic ignore what BOTUS posted, you have a regular washer.
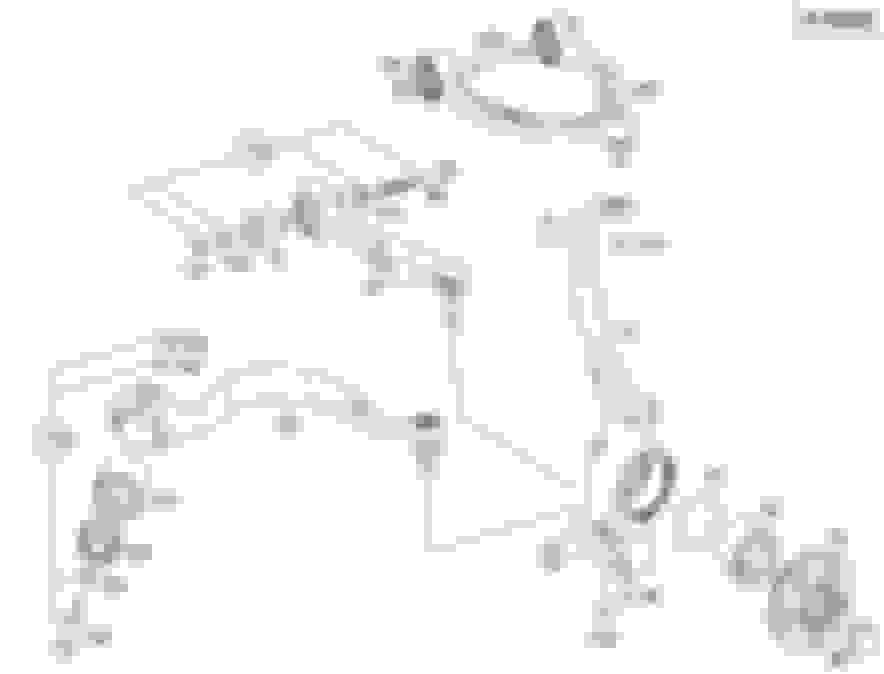
aluminium ones part 120 and the front bush falls to bits (you can buy part 125 but pressing them in is a nightmare and you need to pop the ball joint without screwing the boot)
and a track control arms made of steel - the inner bolt part 90 for the steel arm part 70 won't come out as the steering rack is in the way - you can with a special tool remove the arm from the rack and leave the rake in place .
part 100 can be replaced for the adjustment washers - available separately A 20 233 303 76 - $1.31 https://nemigaparts.com/cat_spares/e...71/63w/33/030/
No, the bushing doesn't have the internals like other models. Meaning the hole in the bushing doesn't accommodate different orientations. I recently replaced bushings in the Thrust Arm, they have a hole like this: O Not like this: (__).
aluminium ones part 120 and the front bush falls to bits (you can buy part 125 but pressing them in is a nightmare and you need to pop the ball joint without screwing the boot)
and a track control arms made of steel - the inner bolt part 90 for the steel arm part 70 won't come out as the steering rack is in the way - you can with a special tool remove the arm from the rack and leave the rake in place .
part 100 can be replaced for the adjustment washers - available separately A 20 233 303 76 - $1.31 https://nemigaparts.com/cat_spares/e...71/63w/33/030/
Replacing the bushings is fairly easy if you have the right tool, takes about 15 minutes if that. Part 70, the lower control arm, can be removed easily, you just need a ball joint separator kit to take of the ball joint and to push the shock ball joint out of the arm. I did this about a month ago.
EasyPhil the bush is just a bush - you get the adjustment by just doing the bolt up in a different part of the subframe
the white bit is air and the black is the subframe ....
The drivers side needs adjusting on all right hand drive cars - forget which way - so you land on manu spec as you try to get the car so it drives in a straight line -
IF you know the arm needs to be effectively longer, you grind the triangle out on the outer side, letting the real bolt sit further out towards the road wheel and fill the gap behind with the special washers and retain the better stronger bolt (that's how the good dealers do it) - its a one off correction - not a wandering entity through the cars life - the other idea of the dodgy weak bolt is to allow the tyre fitters to know you have adjustment - BUT its game over when they attack it with an air gun and the bolt tears the triangle off the subframe anyway
The bushing for the control arm or thrust arm for my 4matic doesn't have that spacing, it's a round hole not an elongated ellipse like hole that you are showing.
the guy originally was asking about track control arms (and that's the adjustment I'm talking about) - they sell bolts to fiddle the castor control arms but its recco'd not to touch as likely will screw all the rest up
naming in motoring is generally rubbish
lower control arm in what direction ?
track control = width
castor control = nasty McPherson strut inferior suspension control under heavy braking
anti-roll bar = what it does (not what girls evening dresses do)
Sounds like the dealer will get my business for this replacement when it starts to give me trouble. Right now just the rubber above where I'm pointing my finger in the pic is cracked but the car still drives just fine. Upon looking underneath the car last week, it appeared like a simple "unbolt it" and "replace it" type job but I guess looks are deceiving as you guys make it sound pretty technical which will earn the dealer some business. This car is apparently nothing like the deuce and half's and hummers and tanks I worked on in the army. I have some Jackpoint Jack Stands on the way and will have to decide whether I want to attempt this job or not myself. It looked to me like it was just two bolts and the pressure of the air shock I was dealing with which is why I always ask on these forums. Its always that small part I may not know that can cause problems ultimately requiring a tow truck taking my mistakes to the dealer to solve after all.
Due to having to tighten the inner bolt while the suspension is loaded, after I am done changing the control arm, I will place jack stands under both front knuckles and lower the car on to them. I will not drop it all the way at the beginning just enough that the weight is on the jack stand, then I will reattach the air line, start the car and allow pressure to rebuild in the strut. As it is pressurizing, I will slowly lower the rest of the way until the struts are fully inflated and the entire weight is upon the jack stands. At that point I have tons of room to properly torque the inner bolt. Then jack the car up, remove the jack stands and put the wheels back on.
Due to having to tighten the inner bolt while the suspension is loaded, after I am done changing the control arm, I will place jack stands under both front knuckles and lower the car on to them. I will not drop it all the way at the beginning just enough that the weight is on the jack stand, then I will reattach the air line, start the car and allow pressure to rebuild in the strut. As it is pressurizing, I will slowly lower the rest of the way until the struts are fully inflated and the entire weight is upon the jack stands. At that point I have tons of room to properly torque the inner bolt. Then jack the car up, remove the jack stands and put the wheels back on.
I've never done anything superstitious with the air suspension on either car. I hear crazy stories about air bags blowing out. People say stuff like "don't open the door with the car in the air" and stuff and that always seemed ridiculous to me. I've had these cars running in the air as you have to do sometimes and nothing blows out....
I know some Range Rovers and stuff have a special jack mode to disable the system but these cars don't have those modes and as far as I can tell, don't need them. It may have to do with the extended suspension travel in truck applications vs car.
I used to have a 2007 Lincoln Town Car that had a switch in the trunk you had to turn off before lifting the wheels off the ground. It was said to me if you didn't turn that switch off that the air bag suspension in the rear would blow up and pop. I've always wondered about that with my 2013 S550. I have not lifted the wheels off the ground with this car yet but have not heard of any switch to turn off either. There doesn't seem to be any kind of switch in the trunk. Its reasons like that I typically take this car to the dealership because in this case, its what you don't know that can hurt you financially if you screw something up.
Can anyone confirm that there is no harm in raising the wheels of the 2013 S550 off the ground without disengaging the air shocks?
Mercedes SLR McLaren 722 S Is Extremely Rare Example Modified by McLaren
Slideshow: A one-of-one U.S.-spec Mercedes-Benz SLR McLaren Roadster became even rarer after a factory-backed transformation at McLaren's headquarters.