
SL/R230: LOWERING LINKS ?


 05-13-2009, 07:26 PM
#227
Super Member
Join Date: May 2009
Location: In a VAN down by the river
Posts: 644
Likes: 0
Received 0 Likes
on
0 Posts
His wifes head hard into the headboard nightly!!
05-13-2009, 10:15 PM
#228
Senior Member

Join Date: Jan 2009
Location: Montrose, CA
Posts: 337
Likes: 0
Received 0 Likes
on
0 Posts
2007 SL550
 05-13-2009, 10:23 PM
#229
Super Member
Join Date: May 2009
Location: In a VAN down by the river
Posts: 644
Likes: 0
Received 0 Likes
on
0 Posts
His wifes head hard into the headboard nightly!!
05-13-2009, 10:44 PM
#230
MBWorld Fanatic!
Thread Starter
hold up !! that photo is your wife ? the actual wife  you were mombuling on your last post lol
you were mombuling on your last post lol
Last edited by m4xm1l10n; 05-14-2009 at 08:41 AM.
05-13-2009, 11:08 PM
#231
Super Member
Join Date: May 2009
Location: In a VAN down by the river
Posts: 644
Likes: 0
Received 0 Likes
on
0 Posts
His wifes head hard into the headboard nightly!!
05-14-2009, 12:45 AM
#232
Senior Member
Join Date: Jan 2009
Location: Montrose, CA
Posts: 337
Likes: 0
Received 0 Likes
on
0 Posts
2007 SL550
05-14-2009, 08:43 AM
#233
MBWorld Fanatic!
Thread Starter
. Man i could never thought the guy would actually post his old lady pics with a drop like that lol HHAHAHA !!!! Well since you at it where is the rest of the pictures ?
Last edited by m4xm1l10n; 05-14-2009 at 08:46 AM.
05-14-2009, 01:55 PM
#234
Super Member
Join Date: May 2009
Location: In a VAN down by the river
Posts: 644
Likes: 0
Received 0 Likes
on
0 Posts
His wifes head hard into the headboard nightly!!
05-24-2009, 05:08 AM
#235
Junior Member

Join Date: Mar 2009
Posts: 24
Likes: 0
Received 0 Likes
on
0 Posts
SL500
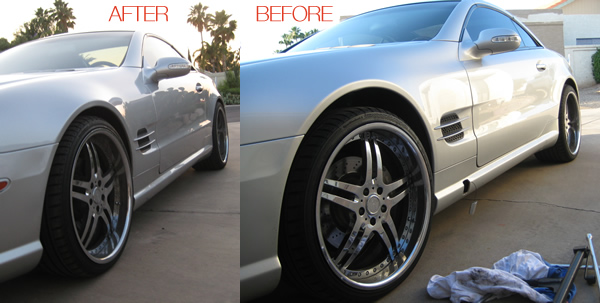
Back to the scheduled program... I received my lowering links today and was able to install them in about 1 hour.
I didn't have to remove my tires, just jacked up one wheel, popped out the stock link, popped in the new one. Took a few tries to get the height correct. Dropped it 1" in the front and 3/4" in the back. Thinking about dropping it another .25" in the front.


I didn't have to remove my tires, just jacked up one wheel, popped out the stock link, popped in the new one. Took a few tries to get the height correct. Dropped it 1" in the front and 3/4" in the back. Thinking about dropping it another .25" in the front.
Last edited by neomonkey; 05-24-2009 at 05:15 AM.

 05-24-2009, 01:56 PM
#237
Junior Member
Neomonkey, I have links on order that should arrive this coming week. May I ask how much longer at front and shorter at rear you went with the new links to produce the drops you quoted and show in the photos?
05-24-2009, 02:37 PM
#238
Junior Member
Join Date: Mar 2009
Posts: 24
Likes: 0
Received 0 Likes
on
0 Posts
SL500
You should do it on a totally level surface. The easiest way to do this is to measure the height of your wheel well on all 4 surfaces. Mine were 71cm high. Then install the links and measure them again. Mine ended up around 69cm, but it changed a few mm depending on how I parked on my driveway since it was sloped slightly.
05-24-2009, 02:58 PM
#239
Junior Member
Join Date: Mar 2009
Posts: 24
Likes: 0
Received 0 Likes
on
0 Posts
SL500
 05-24-2009, 03:02 PM
#240
Junior Member
Neomonkey, thanks for the info. Previously I had taken the measurements you suggest. Converted to metric, the wheelwell height is 68.9cm front and 69.5cm rear. The car is an 09 SL550. I would like to reach 67.3 both front and rear. That would mean a reduction of 16mm front and 22mm rear. If I use your experience as a benchmark, lengthening the front link by 4mm and shortening the rear link 5mm should get me there. Do you agree with this calculation?
I will do it in my garage which has a very slight slope of approximately 1" over 24' front to rear. Thanks again.
I will do it in my garage which has a very slight slope of approximately 1" over 24' front to rear. Thanks again.
05-24-2009, 03:08 PM
#241
Junior Member
I haven't received my links yet but as for placing the long part of the link at the top, the only reason I can think of is to make it easier to adjust, especially in the rear, as the jam nut would be more accessible. There shouldn't be a clearance issue and I believe the inserts at either end are the same as well.
05-24-2009, 03:42 PM
#242
Member
But time to time I get this ABC warning message on my board computer, just don't know why... Not in red, yellow color, just in ordinary blue/white color as manually it is. Anyone knows what it could be? It says to check vehicle...

 05-25-2009, 04:02 AM
#245
Junior Member

Join Date: Feb 2009
Posts: 69
Likes: 0
Received 0 Likes
on
0 Posts
03 SL500
Neomonkey, thanks for the info. Previously I had taken the measurements you suggest. Converted to metric, the wheelwell height is 68.9cm front and 69.5cm rear. The car is an 09 SL550. I would like to reach 67.3 both front and rear. That would mean a reduction of 16mm front and 22mm rear. If I use your experience as a benchmark, lengthening the front link by 4mm and shortening the rear link 5mm should get me there. Do you agree with this calculation?
I will do it in my garage which has a very slight slope of approximately 1" over 24' front to rear. Thanks again.
I will do it in my garage which has a very slight slope of approximately 1" over 24' front to rear. Thanks again.
If you already know where the links are, you'll see that adjusting it is very easy. I made both of mine about 10 mm longer. I installed them and it was too low. So then and took them out and counted the number of turns. Installed again, then uninstalled and adjusted a few turns.
Once you do this, you'll get a feel as to what one turn will do to your ride height.
I used the Mercedes jack and I would be able to jack up a side, pop out the link, adjust it and reinstall the link in about 1 minute.
05-25-2009, 04:13 AM
#246
Member
Maybe an issue is ABC fault because of it's long use term, already...? But anyways, as I take my car back to the highest position, stay for 15sec and get to normal it works fine.
Once I came back to my car and one side of it was a little bit higher, so I made the same process with height and it came back to normal again...
Don't know, I'm a little bit confused about this ABC, because as I read lots of threads here it is an expensive s*it.. And I have got no warranty..
 05-25-2009, 12:14 PM
#247
Junior Member
That sounds good, measuring mm in pretty tough. You are limited to the threading, so its a matter of starting at what you think is correct and then going by number of turns after that.
If you already know where the links are, you'll see that adjusting it is very easy. I made both of mine about 10 mm longer. I installed them and it was too low. So then and took them out and counted the number of turns. Installed again, then uninstalled and adjusted a few turns.
Once you do this, you'll get a feel as to what one turn will do to your ride height.
I used the Mercedes jack and I would be able to jack up a side, pop out the link, adjust it and reinstall the link in about 1 minute.
I'm using a floor jack and will be able to do the same.
From what I can tell, the pitch of the screw is 1mm so each full turn will change the overall length by 1mm. From postings and from speaking to John at Adjustable Air Ride, a 1mm length change of the link will cause a 1/8" change in ride height. This is useful info for somebody like me who hasn't done this before.
I have a minor concern about the plastic sensor arm and whether it can be broken if the link is hard to disconnect. Maybe it should be supported with pliers when doing this?
05-25-2009, 02:14 PM
#248
Junior Member
Join Date: Feb 2009
Posts: 69
Likes: 0
Received 0 Likes
on
0 Posts
03 SL500
I did it the same the instructions said, I put an adjustable wrench on the link, you are using the wrench like pliers. Then twisted the part off at the top joint first by turning the link. I did not pull the link off the ball, rather torqued it off.
05-25-2009, 03:12 PM
#249
Junior Member
I'm sure you're right. I'll twist it off like everyone else did without a problem. Btw, you're car looks real good.
Did you bother to remove any of your wheels for the instrallation or adjustments?
Did you bother to remove any of your wheels for the instrallation or adjustments?
05-26-2009, 03:37 AM
#250
Junior Member
Join Date: Mar 2009
Posts: 24
Likes: 0
Received 0 Likes
on
0 Posts
SL500
Anyway, to answer your question I did not have to remove any tires at all.
Just jack up the fronts enough until you can clearly see the link.
On the backs I jacked it up about 7". Lay down, slightly under the car and then reach behind the tire to get to the link. (Make sure you put something else to hold up the car, don't just rely on the jack) You can only see about half of the link. You can't see the lower ball, but you can get to the top one and twist off. It's a little tight doing the back, I had to use a pair of pliers to twist it off.


