


SL/R230: DIY to remove and install ABC pump

Thread Starter
Junior Member


Joined: Feb 2013
Posts: 74
Likes: 19
From: San Francisco
2006 SL55 AMG, 2012 Land Rover LR4, 2009 C63 AMG
DIY to remove and install ABC pump
I am writing this DIY as I don’t find the instructions in WIS to be very informative. It describes how I replaced my own ABC pump after my local dealer wanted to charge over $8k for the job, due to an occasional red ABC Drive Carefully warning on my dashboard, and me needing to re-prime my pump every few hundred miles. I am happy to modify this DIY with feedback or other advice. This work is done at your own risk, I take no responsibility for you skinning your knuckles, damaging your car or anything else by using these instructions!
Total time taken to remove and reinstall the pump was about 5 hours and 2 beers, including taking pics and notes. I spent another hour or so filling and bleeding the ABC and power steering. The pump was a remanufactured unit I bought off ebay for $400. Banjo O-rings were replaced with new ones.
Tools needed
Sockets
8mm (for undertrays)
10mm deep socket
17mm (and long breaker bar for belt tensioner)
19mm
E10 torx
E12 torx
Short and long handled ratchets
Torque wrench
Wrenches
17mm flare wrench
19mm flare wrench
19mm box wrench / ring spanner
Other tools
Hose clamp pliers
Hose crimping clamps to reduce fluid leakage
Flat head screwdriver
Jack stands
Jack
Lots of shop towel / rags to clean up spillages
Drain buckets
Some way to apply a little air pressure to the reservoir after reassembly to prime the tandem pump (I use an air compressor with a rubber bung with a hole through the center)
Consumables and parts
ABC Tandem pump, part number 0034662701 or 0034665001
4x banjo hose o-rings, part # 0289976548 or 028-997-65-48
10 litres of Pentosin CHF11S for ABC system (bought from Amazon)
ABC reservoir filter 0031846101 (bought from Amazon)
Plastic hose seals or caps, or kitchen wrap and rubber bands to temporarily seal off hoses etc to prevent contaminating the system with dirt.
Step 1
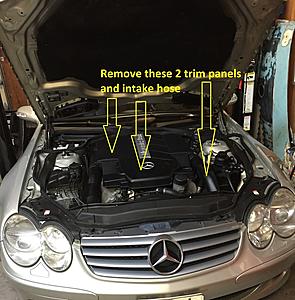
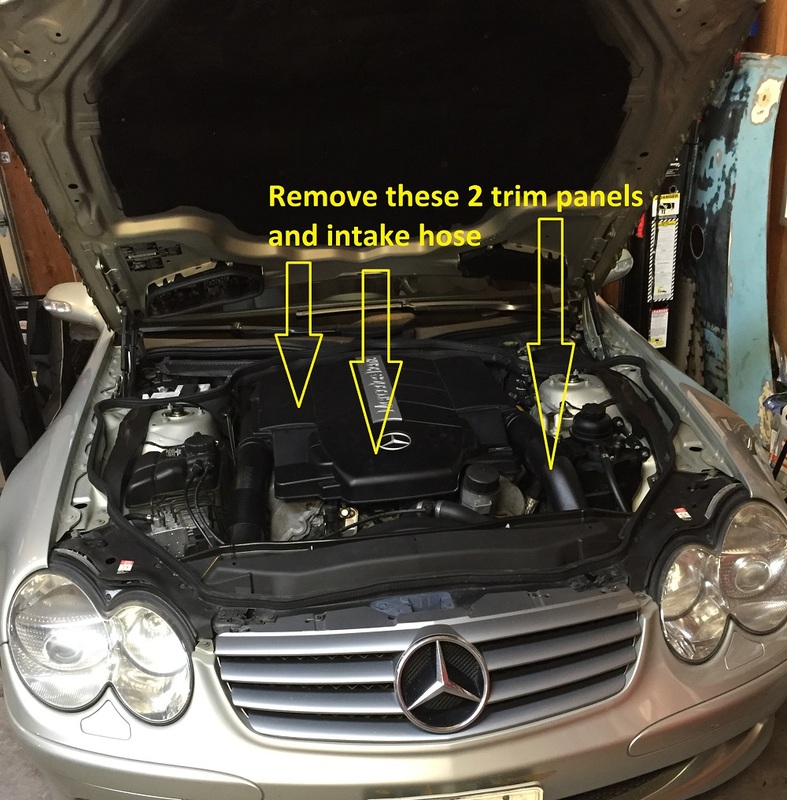
Remove the engine trim plastics and filter intake hoses. WIS says to remove the fan shroud but this is not necessary. (I was unable to get mine out through the gap without removing coolant hoses, and discovered it didn’t need to be removed anyway.)
Remove the front center 2 undertrays from beneath the engine at this time, using an 8mm socket. Try to clean all the areas thoroughly with degreaser where you are working to reduce the risk of getting contaminants into the ABC or power steering system.
Step 2
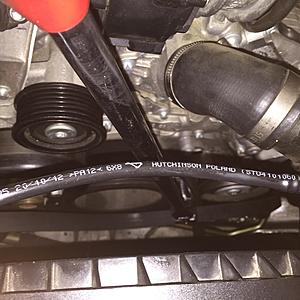
Loosen (do not remove yet) the 3 e-torx bolts holding the pulley to the ABC pump, then remove the serpentine belt. To remove the belt, put a 17mm socket on the belt tensioner, release the tension by turning the bolt to the left and slide the belt off the pulleys. Make sure you review the diagram (see lower down the page) of the belt routing before you do this so you are clear how it goes back on. Leave the breaker bar on the tensioner, as you need to move the tensioner pulley aside again to remove one of the ABC pump etorx bolts. Inspect the belt for cracks or wear and replace if necessary.
Now remove the 3 ABC pulley etorx bolts and remove the pulley from the ABC pump.
Step 3
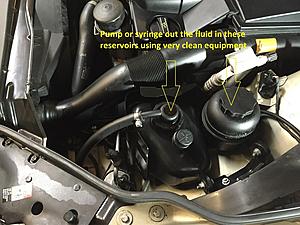
Siphon, pump or syringe out the fluid from the ABC and power steering reservoirs using very clean equipment. Do not let any contaminants get into either tank.
Step 4
Put drip trays under the car to catch dripping hydraulic fluid.
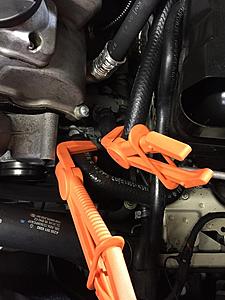
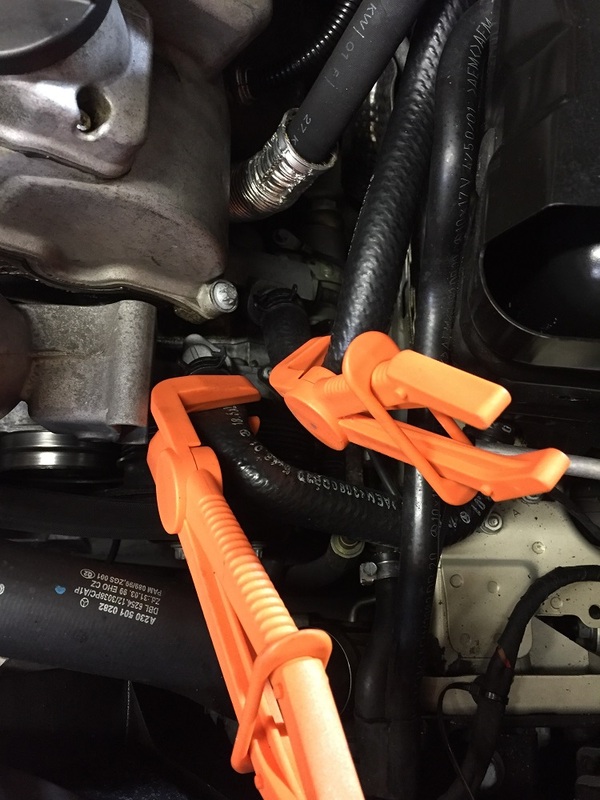
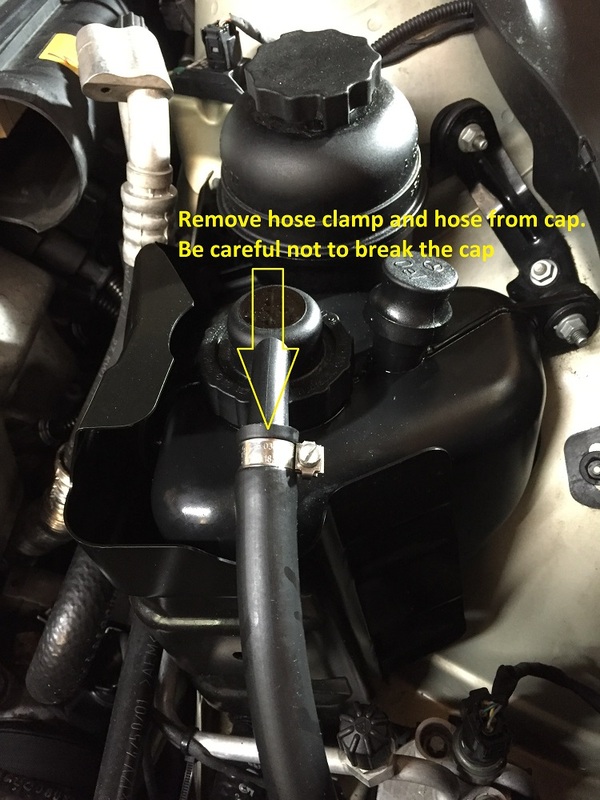
Remove the hose clamps from both of the hoses on the ABC pump, then remove the hoses. I used crimping tools to try and reduce the fluid spilling in the engine bay, but I still lost a fair amount. Cap and seal all hoses as you remove them, I used kitchen wrap and some plastic caps I had in my workshop.
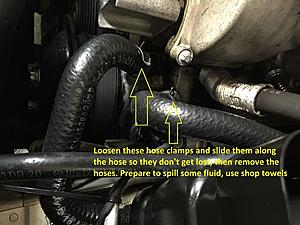
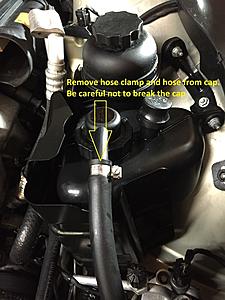
Loosen the hose clamps from the 2 hoses where they go to the power steering reservoir and ABC reservoir, then pull the hoses from them.
Step 5
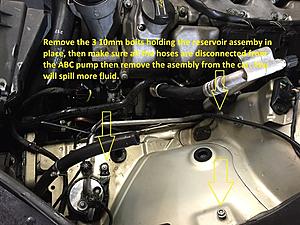
Remove the front 2 of the three 10mm bolts holding the reservoir assembly in the car, then loosen the 3rd nut that attaches the bracket to the strut tower. This nut doesn't need to be removed entirely. Then remove the assembly and place in a drip tray. You will probably have some spillage here. Try to cap off the hoses and clean the units.

(Pic shows bolt locations with the assembly already removed from car)
Step 6
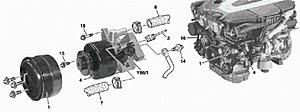
Remove the two 19mm banjo bolts on the ABC pump to release the hoses. The rear hose has a bracket that is held in place by one of the AC compressor bolts. Remove that one from beneath the car. You may also find it easier to remove the rear banjo from below, but wear eye protection as it will leak when you undo the bolt.
Remove the earth strap etorx bolt
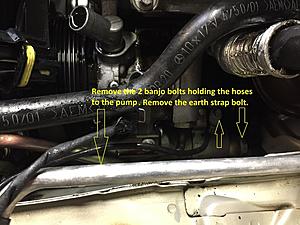
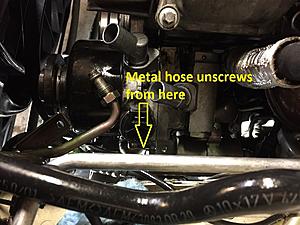
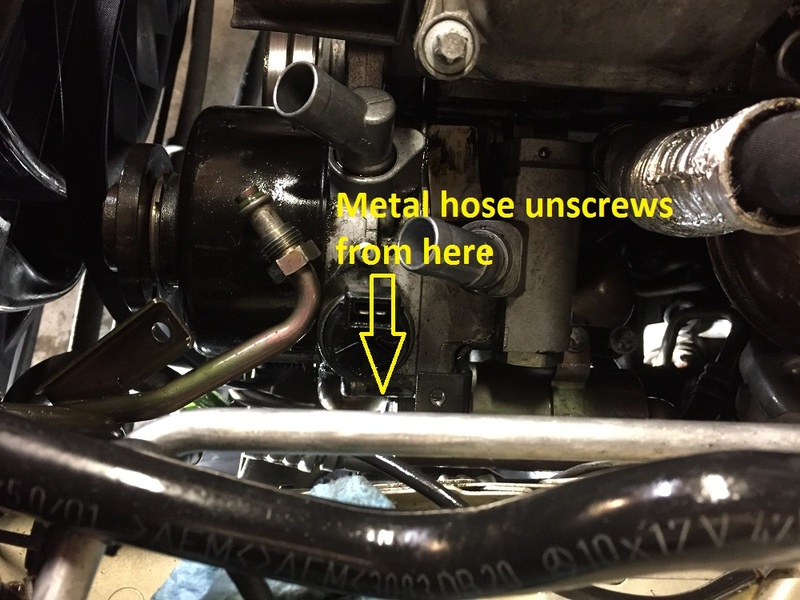
There is another metal hose that needs to be undone from the side using a 17mm flare wrench. Undo the etorx bolt that holds the metal hose bracket to the ABC pump then move this hose out of the way.
Disconnect the electrical connector from the ABC pump.
Step 7
Remove the 2 etorx bolts on the front of the ABC pump. You will need to move the belt tensioner using the breaker bar to access one of the bolts.
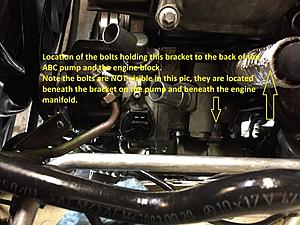
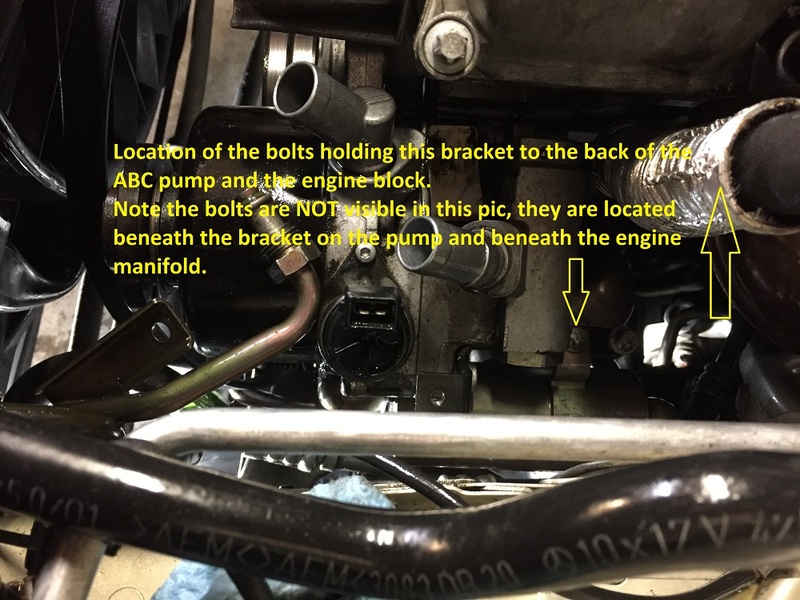
The rear of the pump is held in place with a nut through an engine bracket onto a captive stud in the pump. In order to access this nut, you need to remove the cylinder that the banjo bolts go into from the ABC pump. It is held in place by 2 etorx bolts which are not so easy to access. One is under the bracket shown in the pic, the other is at the other end of the bar and bolts into the engine block by the exhaust manifold.
To access the ABC pump bolt, use a short extension beneath the bracket pointing towards the front of the car.
To access the engine block bolt, best access is from beneath, between the AC unit and the engine. You can get an arm up there and see the bolt.
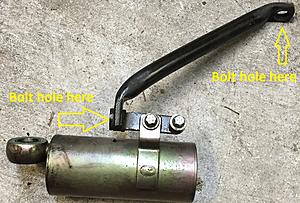
This is the banjo unit removed from the pump so you can see the bolt hole locations more clearly.
Step 8
Slide the cylinder and bracket aside so you can access the last nut that holds the pump in place. Remove the bolt, then the ABC pump can be removed from the car. You will likely spill more fluid as you maneuver it out of the car. Clean up all the spillages and degrease the work area.
Step 9
Have a beer, cup of coffee or whatever floats your boat.
Wash your hands or replace your gloves before reassembly, in order to reduce risk of contaminants getting into the ABC system during assembly.
Reinstall the new pump in the reverse order of the steps above.
I used Loctite and 25nm as the torque setting for all the etorx as I replaced them.
Replace all 4 banjo o-rings by removing the old ones with a small pick. The o-rings may be difficult to pick out of the hose face, make sure you don't scratch or damage the hose face or you could get leaks. The banjos need to be carefully done up so as not to cross thread them. (You may need to replace both the pump and the hose if you cross thread!) I tightened these as much as I could using a long 19mm box wrench. I found the rear banjo to be awkward to engage the bolt onto the thread, due to the tension in the metal hose.
Refill the reservoirs and check for leaks.
Prime the ABC pump by rotating the pulley to pump fluid through the pump. (I couldn't detect much change in the fluid levels when I did this.)
Top up the ABC reservoir again.
Put the serpentine belt back on as per the diagram below.
Prepare your air pressurizing kit to prime the ABC pump again.
Start the car with a helper while you check for leaks. Put a few bar of air pressure into the ABC tank to prime the pump for 15 seconds or so. Keep an eye on the fluid level and top up as required to maintain the levels. Get the helper to cycle the ride height switch to make sure the car rises and lowers OK. This means the pump has successfully primed itself. Rising and lowering the car will bleed the system, as will just driving it around.
Get the helper to turn the steering fully left and fully right until bubbles stop coming into the power steering reservoir. Top up as necessary. Mine was OK after about 10 turns lock to lock.
You may need to get any old ABC error codes cleared from your car using a code scanner or DAS system. I have a Chinese DAS laptop, so I can clear my own codes.
Go and buy a holiday or a weeks supply of beer with the $7k you just saved for one day’s work…
Total time taken to remove and reinstall the pump was about 5 hours and 2 beers, including taking pics and notes. I spent another hour or so filling and bleeding the ABC and power steering. The pump was a remanufactured unit I bought off ebay for $400. Banjo O-rings were replaced with new ones.

Tools needed
Sockets
8mm (for undertrays)
10mm deep socket
17mm (and long breaker bar for belt tensioner)
19mm
E10 torx
E12 torx
Short and long handled ratchets
Torque wrench
Wrenches
17mm flare wrench
19mm flare wrench
19mm box wrench / ring spanner
Other tools
Hose clamp pliers
Hose crimping clamps to reduce fluid leakage
Flat head screwdriver
Jack stands
Jack
Lots of shop towel / rags to clean up spillages
Drain buckets
Some way to apply a little air pressure to the reservoir after reassembly to prime the tandem pump (I use an air compressor with a rubber bung with a hole through the center)
Consumables and parts
ABC Tandem pump, part number 0034662701 or 0034665001
4x banjo hose o-rings, part # 0289976548 or 028-997-65-48
10 litres of Pentosin CHF11S for ABC system (bought from Amazon)
ABC reservoir filter 0031846101 (bought from Amazon)
Plastic hose seals or caps, or kitchen wrap and rubber bands to temporarily seal off hoses etc to prevent contaminating the system with dirt.
Step 1
Remove the engine trim plastics and filter intake hoses. WIS says to remove the fan shroud but this is not necessary. (I was unable to get mine out through the gap without removing coolant hoses, and discovered it didn’t need to be removed anyway.)
Remove the front center 2 undertrays from beneath the engine at this time, using an 8mm socket. Try to clean all the areas thoroughly with degreaser where you are working to reduce the risk of getting contaminants into the ABC or power steering system.
Step 2
Loosen (do not remove yet) the 3 e-torx bolts holding the pulley to the ABC pump, then remove the serpentine belt. To remove the belt, put a 17mm socket on the belt tensioner, release the tension by turning the bolt to the left and slide the belt off the pulleys. Make sure you review the diagram (see lower down the page) of the belt routing before you do this so you are clear how it goes back on. Leave the breaker bar on the tensioner, as you need to move the tensioner pulley aside again to remove one of the ABC pump etorx bolts. Inspect the belt for cracks or wear and replace if necessary.
Now remove the 3 ABC pulley etorx bolts and remove the pulley from the ABC pump.

Step 3
Siphon, pump or syringe out the fluid from the ABC and power steering reservoirs using very clean equipment. Do not let any contaminants get into either tank.

Step 4
Put drip trays under the car to catch dripping hydraulic fluid.
Remove the hose clamps from both of the hoses on the ABC pump, then remove the hoses. I used crimping tools to try and reduce the fluid spilling in the engine bay, but I still lost a fair amount. Cap and seal all hoses as you remove them, I used kitchen wrap and some plastic caps I had in my workshop.
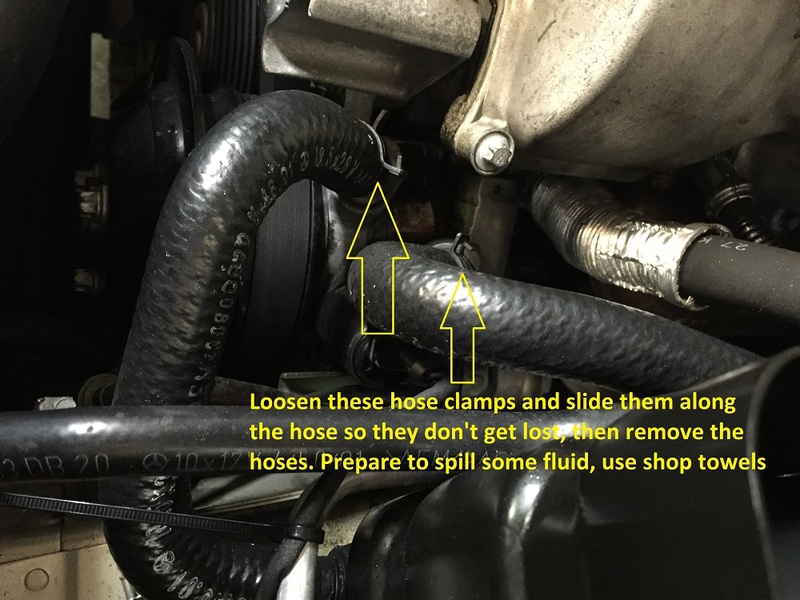
Loosen the hose clamps from the 2 hoses where they go to the power steering reservoir and ABC reservoir, then pull the hoses from them.
Step 5
Remove the front 2 of the three 10mm bolts holding the reservoir assembly in the car, then loosen the 3rd nut that attaches the bracket to the strut tower. This nut doesn't need to be removed entirely. Then remove the assembly and place in a drip tray. You will probably have some spillage here. Try to cap off the hoses and clean the units.
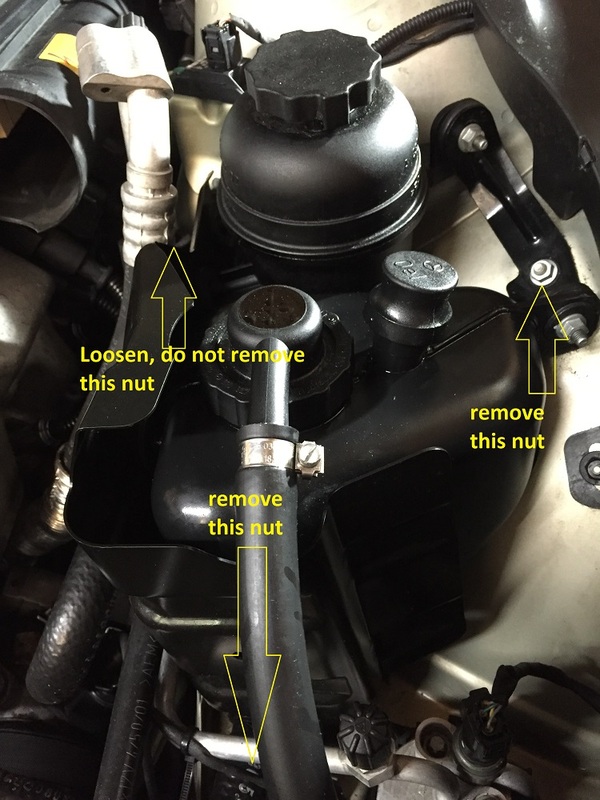
(Pic shows bolt locations with the assembly already removed from car)

Step 6
Remove the two 19mm banjo bolts on the ABC pump to release the hoses. The rear hose has a bracket that is held in place by one of the AC compressor bolts. Remove that one from beneath the car. You may also find it easier to remove the rear banjo from below, but wear eye protection as it will leak when you undo the bolt.
Remove the earth strap etorx bolt

There is another metal hose that needs to be undone from the side using a 17mm flare wrench. Undo the etorx bolt that holds the metal hose bracket to the ABC pump then move this hose out of the way.
Disconnect the electrical connector from the ABC pump.
Step 7
Remove the 2 etorx bolts on the front of the ABC pump. You will need to move the belt tensioner using the breaker bar to access one of the bolts.
The rear of the pump is held in place with a nut through an engine bracket onto a captive stud in the pump. In order to access this nut, you need to remove the cylinder that the banjo bolts go into from the ABC pump. It is held in place by 2 etorx bolts which are not so easy to access. One is under the bracket shown in the pic, the other is at the other end of the bar and bolts into the engine block by the exhaust manifold.
To access the ABC pump bolt, use a short extension beneath the bracket pointing towards the front of the car.
To access the engine block bolt, best access is from beneath, between the AC unit and the engine. You can get an arm up there and see the bolt.
This is the banjo unit removed from the pump so you can see the bolt hole locations more clearly.

Step 8
Slide the cylinder and bracket aside so you can access the last nut that holds the pump in place. Remove the bolt, then the ABC pump can be removed from the car. You will likely spill more fluid as you maneuver it out of the car. Clean up all the spillages and degrease the work area.
Step 9
Have a beer, cup of coffee or whatever floats your boat.
Wash your hands or replace your gloves before reassembly, in order to reduce risk of contaminants getting into the ABC system during assembly.
Reinstall the new pump in the reverse order of the steps above.
I used Loctite and 25nm as the torque setting for all the etorx as I replaced them.
Replace all 4 banjo o-rings by removing the old ones with a small pick. The o-rings may be difficult to pick out of the hose face, make sure you don't scratch or damage the hose face or you could get leaks. The banjos need to be carefully done up so as not to cross thread them. (You may need to replace both the pump and the hose if you cross thread!) I tightened these as much as I could using a long 19mm box wrench. I found the rear banjo to be awkward to engage the bolt onto the thread, due to the tension in the metal hose.
Refill the reservoirs and check for leaks.
Prime the ABC pump by rotating the pulley to pump fluid through the pump. (I couldn't detect much change in the fluid levels when I did this.)
Top up the ABC reservoir again.
Put the serpentine belt back on as per the diagram below.

Prepare your air pressurizing kit to prime the ABC pump again.
Start the car with a helper while you check for leaks. Put a few bar of air pressure into the ABC tank to prime the pump for 15 seconds or so. Keep an eye on the fluid level and top up as required to maintain the levels. Get the helper to cycle the ride height switch to make sure the car rises and lowers OK. This means the pump has successfully primed itself. Rising and lowering the car will bleed the system, as will just driving it around.
Get the helper to turn the steering fully left and fully right until bubbles stop coming into the power steering reservoir. Top up as necessary. Mine was OK after about 10 turns lock to lock.
You may need to get any old ABC error codes cleared from your car using a code scanner or DAS system. I have a Chinese DAS laptop, so I can clear my own codes.
Go and buy a holiday or a weeks supply of beer with the $7k you just saved for one day’s work…
Last edited by spawnywhippet; Feb 5, 2016 at 06:17 PM.
Thread Starter
Junior Member
Joined: Feb 2013
Posts: 74
Likes: 19
From: San Francisco
2006 SL55 AMG, 2012 Land Rover LR4, 2009 C63 AMG
That's nothing, they also quoted $2k to change the rubber flex disks ($200 of parts and 15 mins time for me to do), $900 to flush the ABC fluid, $2200 to change the engine mounts and $3.5k to change the pressure accumulators. I think the service advisor was trying to retire off this one quote alone.
Trending Topics

MBWorld Fanatic!


Joined: Nov 2010
Posts: 2,605
Likes: 343
From: Welwyn, Herts, UK
2006 S600
That's a marvellous illustrated write-up, and just the encouragement people need to tackle ABC jobs themselves.
Would you mind if I copied it to my ABC Suspension Thread, below?
Thanks,
Would you mind if I copied it to my ABC Suspension Thread, below?
Thanks,
MB World Stories
The Best of Mercedes & AMG

Manual Mercedes? 6 Times Sindelfingen Let Drivers Have All The Fun
Verdad Gallardo
Mercedes SLR McLaren 722 S Is Extremely Rare Example Modified by McLaren
Verdad Gallardo
8 Classic Boxy Mercedes Designs That Have Aged Like Fine Wine
Verdad Gallardo
Flawlessly Restored Mercedes 190E Evo II Heads to Auction
Verdad Gallardo
Electric Mercedes C-Class Unveiled: 11 Things You Need to Know
Verdad Gallardo
Mercedes EQS Gets A Major Update: Everything You Need to Know
Verdad Gallardo
5 Underrated Mercedes-Benz Models That Don't Get the Love They Deserve
Verdad Gallardo
Mercedes 300D Has Pushed Well Past 1 Million Miles and It Ain't Stopping
Verdad Gallardo
10 Most Reliable Mercedes-Benz Models You Can Buy Used
Verdad Gallardo
Thread Starter
Junior Member
Joined: Feb 2013
Posts: 74
Likes: 19
From: San Francisco
2006 SL55 AMG, 2012 Land Rover LR4, 2009 C63 AMG

Member
Joined: Jan 2003
Posts: 238
Likes: 10
Noob here with the ABC system.
I was wondering how would you know if this pump needs to be changed? Is it the super low vehicle people experience or error messages you get on the dash? And if so, is this different from the hydralic leaks that people experience or is this the same repair method?
If someone can explain when and how this repair is needed and for, that would be awesome.
Thanks,
J
Thread Starter
Junior Member
Joined: Feb 2013
Posts: 74
Likes: 19
From: San Francisco
2006 SL55 AMG, 2012 Land Rover LR4, 2009 C63 AMG
The first thing you should do is read and understand this "Mercedes Benz ABC System Troubleshooting Guide" blog, which is excellent:
http://mercedes-abc-drive-carefully.blogspot.com/
Several things you can check, depending on whether you have access to DAS scanner or not.
If you do, check the pressure in the pump. Should be around 200 bar if healthy. If 0 bar and you have sufficient fluid in the system, try to re-prime the pump with a little air pressure.
If you don't have a DAS:
Check if the ride height switch operates correctly and swiftly.
Visually inspect for leaks all round the ABC system
Look and listen for unusual movement or noise from the pump
You will get Red 'Drive Carefully, Visit Workshop' messages.
You may also get 'Vehicle too low' messages.
Newbie
Joined: Dec 2011
Posts: 8
Likes: 1
From: Shrewsbury, UK.
CLK500 (Gone) SL500 (R230)
Just had to do this task.
Many thanks to Spawnywhippet for the info in this thread, it made the whole job much easier.
I did the swap for a replacement pump in my garage with everyday tools, the only thing I bought was a 19mm swivel head crow foot socket.
I'm not sure if I caught the problem in time I got both of the red 'Drive Carefully, Visit Workshop' messages but neither remained after the new pump was installed.
The ABC took approx 8 ride height cycles to sort, & the same for the PAS.
The car now feels superb, I think it was actually on its way out since I bought it 3yrs ago as its always felt a bit 'squidgy' & the pump was quite noisey, eventually the front seal went, when the pump was opened it was very obvisouly dead so went for a service exchange item & new filter & 'O'rings.
Cheers.
Phil

Junior Member
Joined: Sep 2014
Posts: 25
Likes: 3
From: Central California
300E, CL500, ML350
I need to remove the banjo cylinder. If I siphon the fluid out from the reservoir then disconnect the banjo connectors will there be a lot of fluid coming out? After putting back the cylinder and connectors to their original state and refilling the reservoir, do I need to prime the system? Thanks!

Newbie
Joined: Dec 2017
Posts: 2
Likes: 1
From: Albertville, Al
2001CLK320,2004 SL500
ABC System change out 2004 SL500
I replaced my ABC system with a StrutMaster coilover kit& replaced power steering pump with a 2001 SL500 pump, With this site and U Tube diy videos. Complete job took couple weeks since I�m 68 years old.
used same fluid going back for power steering.
Around $2000. Total cost comes with module to by pass abc warning.
used same fluid going back for power steering.
Around $2000. Total cost comes with module to by pass abc warning.

Newbie
Joined: May 2019
Posts: 12
Likes: 1
Cl500
Great Post, thanks. I will be changing mine next weekend as its leaking big time from the front of the pump.
Do you know the torque specs for the banjo bolts please?
I assume there's only 4 o rings 2 for each banjo? When I look on https://mercedes.7zap.com/en/eu/fg/c...0/290/0/0/#160
There seems to be 2 part numbers, one for sealing ring and one for o ring, what's the sealing ring!? Also there's part no 160 and 170 on that diagram, are the banjos the same size?
Finally, did you have to remove any coolant hoses to get the pump out?
Thanks, sorry for all the questions!

Newbie
Joined: Oct 2014
Posts: 2
Likes: 1
From: Houston, TX
2005 SL500
Make sure to check with Mercedes before working on the ABC system. I received a recall notice from Mercendes a few months back. They actually extended the factory warranty on the ABC system to 25 years. And, the letter mentions that if anyone had their system fixed by an authorized MB center, they may get their money refunded. No joke.
Member
Joined: Jan 2018
Posts: 152
Likes: 36
From: Nashville Tn
2011 mercedes sl550, 1995 corvette
Extended warranty??
The 25 year extended warranty was NOT on the ABC system, but I�m sure all r230�s would prefer it was. The extended warranty was on the SBC SYSTEM, braking system.


Newbie
Joined: Jul 2019
Posts: 1
Likes: 0
SL500 2008
Can this guide be used on a 2008 SL500?
Just registered and new to this site. I have been told my my MB dealer I need to change the ABC Pump on my SL500, having same warnings coming up and they say it�s leaking. So just wanted to know if this DIY Guide applies the my late 2008 SL500 (new shape in 2008)?
thanks
thanks
Thread Starter
Junior Member
Joined: Feb 2013
Posts: 74
Likes: 19
From: San Francisco
2006 SL55 AMG, 2012 Land Rover LR4, 2009 C63 AMG
"Do you know the torque specs for the banjo bolts please?" - No, sorry, I just tightened them to 'pretty tight' spec.
"I assume there's only 4 o rings 2 for each banjo? When I look on https://mercedes.7zap.com/en/eu/fg/c...0/290/0/0/#160
There seems to be 2 part numbers, one for sealing ring and one for o ring, what's the sealing ring!? Also there's part no 160 and 170 on that diagram, are the banjos the same size?" - I didn't buy any parts not listed in the first post. The sealing ring is a copper crush washer.
"Finally, did you have to remove any coolant hoses to get the pump out?" - No
"Did you use any special tools to remove the pulley of the pump?" - No
"So just wanted to know if this DIY Guide applies the my late 2008 SL500 (new shape in 2008)?" - I believe it is if not identical, then substantially similar.
Member
Joined: Sep 2013
Posts: 157
Likes: 33
From: Walpole, MA USA
2004 SL500


