


DIY Brakes Job
Thread Starter
MBWorld Fanatic!
Joined: Mar 2005
Posts: 1,164
Likes: 0
From: sac, calif.
'06 slk55
DIY Brakes Job
First, let me say that this is more of a thread about how I changed my brakes and less about how YOU should/could/can do it. I say that because I realize that brakes are the most important part of your car... clearly the most important in terms of safety. I highly recommend not doing it yourself unless you feel absolutely comfortable with the process. Afterall, you could put yourself and your loved ones at risk!
Okay, so on with the show. Oh, and I'm sorry I didn't take more pics. My focus was more on doing it right then documenting the process.
Items/Tools required:
-Gloves
-Floor jack
-Wheel chocks
-Torque wrench with 17mm socket
-Rachet with 13mm socket
-Channel locks or pliers
-Flathead Screwdriver
-Hammer
-Nail punch
-Towel
-Brake Cleaner
-Brake Pads http://www.irotors.com/storefrontpro...=0&i=232958930
-New Brake sensor
Pic 1)
New brake pads. Ceramic Posi-Quiet from I Rotors. $177 'Scortched' meaning there is no typical 80-0 hard stop bed in process. It is recommended to brake easy for the first 200 miles.

Pic 2)
Pop the hood and remove the brake reservoir cap. Place a towel around it just in case it overflows as you later depress the brake pistons.

Pic 3)
After applying the wheel chocks and jacking up the rear of the car, it is time to clean the brakes and remove the old brake pads. I started working before I remembered to take a before picture. Sorry. In comes the brake cleaner. Most of them simply state to spray everywhere except on rubber. I did it while the old pads were in. The only exposed rubber I could see was the brake line. Stay away from that. Just read the instructions on the can and you should be fine. Oh, and put something underneath the rotors as it'll get dirty. Now onto the pads. You fist want to use your hammer and punch to remove the two pins that hold the pads in place. Carefully punch the pin at its pointy end facing you. Strike each pin so that it merely recesses beyond the face of the caliper. Now, use your channel locks to pull out the pins. Please note, you must hold in the center spring (copper in color below) while removing the first pin. If you do not, it will pop out. Whoops. Once the first pin is removed, the spring can simply be tilted up and away. Now remove the next pin. Here it is all removed. Make sure you clean them again with the brake cleaner.

Pic 4 & 5)
Now use your channel locks or pliers to remove the old brake pads. Again, I forgot to take a pic! They may be wedged in there so be prepared to use a little muscle. I found myself slowing working the pad out first pulling on the top, then bottom, etc. Pics below show the rear Brembo brakes with no pad. Awww, look at those dirty little pistons - 4 in all. Now, here is the fun part. You need to depress those pistons all the way back so that you can fit the new pads. I used a flat head screwdriver and wrapped a towel around it so I could slowly depress the pistons. As you push one in, the other will want to push back out. That means you will have to get creative and keep one in while pushing in the other. Please be careful. You do not want to damage the rubber surround. You also do not want to push the pistons too far back. Just push it far enough to get the new pad in... although that may mean nearly all the way.


Pic 6)
New rear pads vs old pads.

Pic 7)
Easy. Slide in the new pads. These OE Brembo pads did not use shims. So, it is really simple. Just slide the new ones in. I did consider using some brake anti-squeal compound. However, that can get messy so I decided against it. Besides, these pads are meant to be quiet so I didn't see the need.

Pic 8)
Finally a before pic of the front left caliper. Basically it is just like the rears. Except now you have 6 pistons so that means a little more work. Also you have an additional center bolt securing the pad. This is where the 13mm socket comes into play. Just remove the pins like before. Then remove that bolt. Easy.

Pic 9)
Front left caliper with pads removed.

Pic 10)
New front pad vs old pad.

Pic 11)
Front pads, bolt, spring clip and one pin installed.

Pic 12)
Front right caliper. There's the brake sensor. Replacement sensors can be purchased for around $16.

Pic 13)
Pull the brake sensor from the caliper. I used my channel locks again.

Pic 14)
Here it is removed. I never got a chance to buy another sensor. So, I pulled it off the old pad and taped it up. It will still work as it only needs to be connected to not cause an error light. I'm comfortable with this as it is very easy to see if your pads need to be changed. However, installing a new sensor is very simple.

Pic 15)
Okay, sensor taped out of the way. Pads are in.

Final steps:
Mount last tire. Double check torque on all lug bolts (80ft/lbs). Place cap back on brake reservoir. Remove towel and close the hood. Clean up your mess. Jump in the car and start it up. Depress the brake pedal repeatedly until it feels normal. Take a slow drive around the block. Take it easy just in case. That's it. Congrats! You're done!
You may wish to:
-measure your brake rotors to see if they are still to spec. I do not know the acceptable thickness. Still waiting on that.
-have your rotors resurfaced.
-bleed your brakes. I plan to do this later. I think I'll get some SS lines first.
Okay, so on with the show. Oh, and I'm sorry I didn't take more pics. My focus was more on doing it right then documenting the process.
Items/Tools required:
-Gloves
-Floor jack
-Wheel chocks
-Torque wrench with 17mm socket
-Rachet with 13mm socket
-Channel locks or pliers
-Flathead Screwdriver
-Hammer
-Nail punch
-Towel
-Brake Cleaner
-Brake Pads http://www.irotors.com/storefrontpro...=0&i=232958930
-New Brake sensor
Pic 1)
New brake pads. Ceramic Posi-Quiet from I Rotors. $177 'Scortched' meaning there is no typical 80-0 hard stop bed in process. It is recommended to brake easy for the first 200 miles.
Pic 2)
Pop the hood and remove the brake reservoir cap. Place a towel around it just in case it overflows as you later depress the brake pistons.
Pic 3)
After applying the wheel chocks and jacking up the rear of the car, it is time to clean the brakes and remove the old brake pads. I started working before I remembered to take a before picture. Sorry. In comes the brake cleaner. Most of them simply state to spray everywhere except on rubber. I did it while the old pads were in. The only exposed rubber I could see was the brake line. Stay away from that. Just read the instructions on the can and you should be fine. Oh, and put something underneath the rotors as it'll get dirty. Now onto the pads. You fist want to use your hammer and punch to remove the two pins that hold the pads in place. Carefully punch the pin at its pointy end facing you. Strike each pin so that it merely recesses beyond the face of the caliper. Now, use your channel locks to pull out the pins. Please note, you must hold in the center spring (copper in color below) while removing the first pin. If you do not, it will pop out. Whoops. Once the first pin is removed, the spring can simply be tilted up and away. Now remove the next pin. Here it is all removed. Make sure you clean them again with the brake cleaner.
Pic 4 & 5)
Now use your channel locks or pliers to remove the old brake pads. Again, I forgot to take a pic! They may be wedged in there so be prepared to use a little muscle. I found myself slowing working the pad out first pulling on the top, then bottom, etc. Pics below show the rear Brembo brakes with no pad. Awww, look at those dirty little pistons - 4 in all. Now, here is the fun part. You need to depress those pistons all the way back so that you can fit the new pads. I used a flat head screwdriver and wrapped a towel around it so I could slowly depress the pistons. As you push one in, the other will want to push back out. That means you will have to get creative and keep one in while pushing in the other. Please be careful. You do not want to damage the rubber surround. You also do not want to push the pistons too far back. Just push it far enough to get the new pad in... although that may mean nearly all the way.
Pic 6)
New rear pads vs old pads.
Pic 7)
Easy. Slide in the new pads. These OE Brembo pads did not use shims. So, it is really simple. Just slide the new ones in. I did consider using some brake anti-squeal compound. However, that can get messy so I decided against it. Besides, these pads are meant to be quiet so I didn't see the need.
Pic 8)
Finally a before pic of the front left caliper. Basically it is just like the rears. Except now you have 6 pistons so that means a little more work. Also you have an additional center bolt securing the pad. This is where the 13mm socket comes into play. Just remove the pins like before. Then remove that bolt. Easy.
Pic 9)
Front left caliper with pads removed.
Pic 10)
New front pad vs old pad.
Pic 11)
Front pads, bolt, spring clip and one pin installed.
Pic 12)
Front right caliper. There's the brake sensor. Replacement sensors can be purchased for around $16.
Pic 13)
Pull the brake sensor from the caliper. I used my channel locks again.
Pic 14)
Here it is removed. I never got a chance to buy another sensor. So, I pulled it off the old pad and taped it up. It will still work as it only needs to be connected to not cause an error light. I'm comfortable with this as it is very easy to see if your pads need to be changed. However, installing a new sensor is very simple.
Pic 15)
Okay, sensor taped out of the way. Pads are in.
Final steps:
Mount last tire. Double check torque on all lug bolts (80ft/lbs). Place cap back on brake reservoir. Remove towel and close the hood. Clean up your mess. Jump in the car and start it up. Depress the brake pedal repeatedly until it feels normal. Take a slow drive around the block. Take it easy just in case. That's it. Congrats! You're done!
You may wish to:
-measure your brake rotors to see if they are still to spec. I do not know the acceptable thickness. Still waiting on that.
-have your rotors resurfaced.
-bleed your brakes. I plan to do this later. I think I'll get some SS lines first.
Last edited by dsb; Jul 25, 2008 at 10:48 AM.

Member
Joined: Mar 2007
Posts: 194
Likes: 2
From: Redondo Beach, CA
2006 SLK 55 amg, 2002 CLK 430 Cab (hers), 1989 944 Turbo (sold), CLK 500 (sold), 125cc shifter kart
Great new thread. Great pics and info. Did you chose not to resurface the rotors? Can our rotors be resurfaced given the drilling and gas slotting?
Thread Starter
MBWorld Fanatic!
Joined: Mar 2005
Posts: 1,164
Likes: 0
From: sac, calif.
'06 slk55
Thanks for the compliments!
Yeah, these Brembos are awesome! Extremely easy to work with.
Answers:
-On my car, I only had 1 sensor on the front right caliper.
-I'm not sure if you can resurface slotted/drilled rotors. However, I didn't see the need. If I feel anything transfer to the steering wheel, then I'll definitely get it done. That or new rotors I guess. However, so far everything feels good... plus no squeal. Now, we'll see if I get the same performance.

Member
Joined: Jun 2008
Posts: 126
Likes: 0
2006 SLK55
Unfortunately, a lot of manufacturers will have throw away rotors these days. I think it helps keep the techs employed. Don't know the tolerances on the SLK, however. Until the last few years, I never had to replace the rotors, only resurface, if that. Did you mic/gauge the thickness of the rotors? How many miles did you get on your pads?
Trending Topics
Thread Starter
MBWorld Fanatic!
Joined: Mar 2005
Posts: 1,164
Likes: 0
From: sac, calif.
'06 slk55
30K on original pads. Still had a little life in fronts and lots left on the rears. I just decided to change them all out. I do have a gauge but didn't bother to measure as I'm still awaiting to hear the minimum thickness from another member. Once I do, I'll check them to see where I'm at.
MB World Stories
The Best of Mercedes & AMG

Manual Mercedes? 6 Times Sindelfingen Let Drivers Have All The Fun
Verdad Gallardo
Mercedes SLR McLaren 722 S Is Extremely Rare Example Modified by McLaren
Verdad Gallardo
8 Classic Boxy Mercedes Designs That Have Aged Like Fine Wine
Verdad Gallardo
Flawlessly Restored Mercedes 190E Evo II Heads to Auction
Verdad Gallardo
Electric Mercedes C-Class Unveiled: 11 Things You Need to Know
Verdad Gallardo
Mercedes EQS Gets A Major Update: Everything You Need to Know
Verdad Gallardo
5 Underrated Mercedes-Benz Models That Don't Get the Love They Deserve
Verdad Gallardo
Mercedes 300D Has Pushed Well Past 1 Million Miles and It Ain't Stopping
Verdad Gallardo
10 Most Reliable Mercedes-Benz Models You Can Buy Used
Verdad Gallardo
Member
Joined: Oct 2004
Posts: 165
Likes: 9
'05 SLK55, Obsidian, black/red, light and premium pkg., COMAND with nav, airscarf, Sirius
Dan, great write up! Thanks for taking the time to help the rest of us. Several questions...is the purpose of the brake sensor to let the driver know when new pads are needed? Does that cause a warning light? Did your car also have a sensor on the rear axle, or just the one on the right front as you stated? Did the pads you installed completely eliminate the brake squeal that most of us experience with the OEM pads? And do the pads you installed cause less brake dust, or is it about the same? Thanks!
Last edited by Shark; Aug 12, 2008 at 05:57 AM.
Thread Starter
MBWorld Fanatic!
Joined: Mar 2005
Posts: 1,164
Likes: 0
From: sac, calif.
'06 slk55
Dan, great write up! Thanks for taking the time to help the rest of us. Several questions...is the purpose of the brake sensor to let the driver know when new pads are needed? Does that cause a warning light? Did your car also have a sensor on the rear axle, or just the one on the right front as you stated? Did the pads you installed completely eliminate the brake squeal that most of us experience with the OEM pads? And do the pads you installed cause less brake dust, or is it about the same? Thanks!
Last edited by dsb; Aug 13, 2008 at 11:25 PM.
Thread Starter
MBWorld Fanatic!
Joined: Mar 2005
Posts: 1,164
Likes: 0
From: sac, calif.
'06 slk55
Update!
Brake Pad review.
Well, I've had nearly 1 month to evaluate these new pads. Within that time, I've driven about 350 miles. I have to say, I'm impressed. These pads have been absolutely quiet. Never a squeak, squeal, chirp, etc. I no longer have to think, "Am I braking too hard or light to cause that horrible noise?"
Not only do I not have to worry about the noise, I don't have to worry about car washes... well not as often. With the original pads, I would experience so much dust that I would go as far as to use Manual mode just to minimize brake usage. Brake dust on the front wheels was like flys to sh*t. You just couldn't stop it. Now, you can hardly tell the car has been driven. Take a look at the pics below. They were taken after 2 weeks and 250 miles. The wheels hardly look dirty. Before, the wheels would dictate how often I needed to wash the car. Now, it will be the entire car.
Lastly, I should mention performance. Street performance will fill just like before. There was not a noticeable difference between the original and Posi-Quiet pads. Today, I decided to put them to the test. I conducted (8) 60-5mph hard stops. I engaged the brakes just shy of ABS kicking in. I did not feel any brake fade until the 7-8 stop. Even at that time, the pedal only traveled .5-1" inches more. With the original pads, I never experienced any fade... at least nothing I remember.
Overall thoughts:
I'm happy I made the switch. Do they perform better than the originals? Performance wise, No. Dust, Absolutely. Squeal, You bet! So, 2 out of 3 is good enough for me and that's why I recommend them. Oh, and in terms of performance, I hope to put them to the test eventually at a road course. As for the street, they are more than adequate.
Enjoy the pics!
After 2 weeks and 250 miles:

Dirty front wheel close up

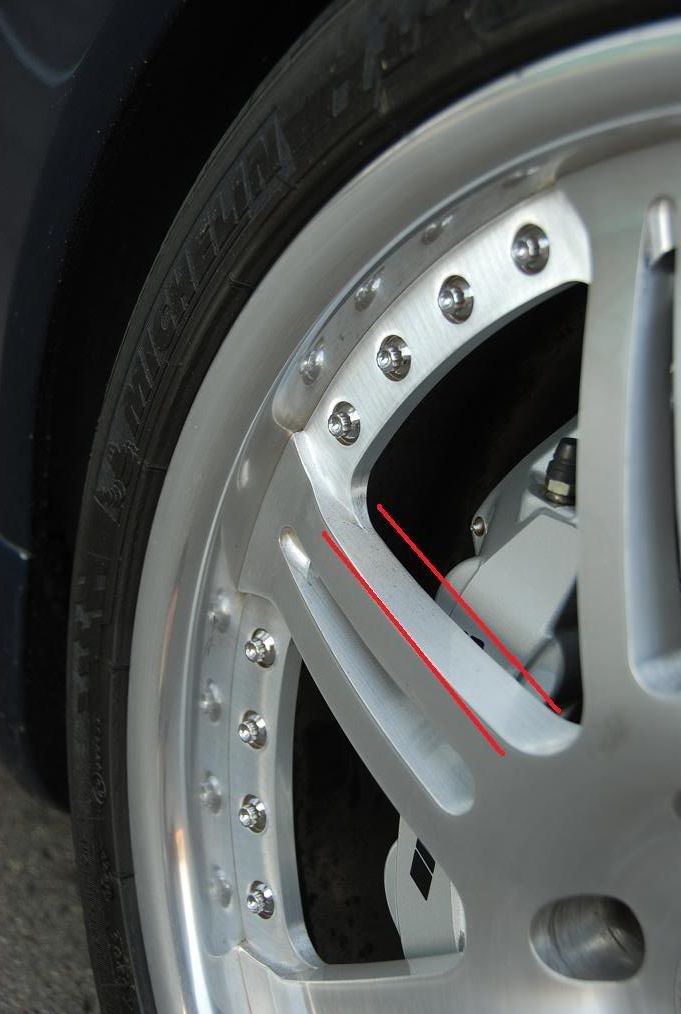
Dirty rear wheel close up

Can you see the difference? In the next two pics, you will see a dirty spoke (in RED) and then the same spoke wiped clean (in BLUE). Not much of a difference especially after 250 miles!

Brake Pad review.
Well, I've had nearly 1 month to evaluate these new pads. Within that time, I've driven about 350 miles. I have to say, I'm impressed. These pads have been absolutely quiet. Never a squeak, squeal, chirp, etc. I no longer have to think, "Am I braking too hard or light to cause that horrible noise?"
Not only do I not have to worry about the noise, I don't have to worry about car washes... well not as often. With the original pads, I would experience so much dust that I would go as far as to use Manual mode just to minimize brake usage. Brake dust on the front wheels was like flys to sh*t. You just couldn't stop it. Now, you can hardly tell the car has been driven. Take a look at the pics below. They were taken after 2 weeks and 250 miles. The wheels hardly look dirty. Before, the wheels would dictate how often I needed to wash the car. Now, it will be the entire car.
Lastly, I should mention performance. Street performance will fill just like before. There was not a noticeable difference between the original and Posi-Quiet pads. Today, I decided to put them to the test. I conducted (8) 60-5mph hard stops. I engaged the brakes just shy of ABS kicking in. I did not feel any brake fade until the 7-8 stop. Even at that time, the pedal only traveled .5-1" inches more. With the original pads, I never experienced any fade... at least nothing I remember.
Overall thoughts:
I'm happy I made the switch. Do they perform better than the originals? Performance wise, No. Dust, Absolutely. Squeal, You bet! So, 2 out of 3 is good enough for me and that's why I recommend them. Oh, and in terms of performance, I hope to put them to the test eventually at a road course. As for the street, they are more than adequate.
Enjoy the pics!
After 2 weeks and 250 miles:
Dirty front wheel close up
Dirty rear wheel close up
Can you see the difference? In the next two pics, you will see a dirty spoke (in RED) and then the same spoke wiped clean (in BLUE). Not much of a difference especially after 250 miles!
Last edited by dsb; Aug 13, 2008 at 11:31 PM.

Member
Joined: Jan 2005
Posts: 154
Likes: 0
SLK55, Mustang 480hp, CBR600rr
Nice write up DSB!
I would agree too with the performance aspect of the new ceramic pads vs. old Brembo dust generators. If, you want max performance and don't mind cleaning your rims 24/7 I would stay with the stock Brembo pads.
Pp
I would agree too with the performance aspect of the new ceramic pads vs. old Brembo dust generators. If, you want max performance and don't mind cleaning your rims 24/7 I would stay with the stock Brembo pads.
Pp
Thread Starter
MBWorld Fanatic!
Joined: Mar 2005
Posts: 1,164
Likes: 0
From: sac, calif.
'06 slk55
Thanks Pp.
I say get the best of both worlds. I think I'll buy another set of Brembo front pads. If I take it to the track, I'll spend the hour swapping them back and forth. These Brembo calipers are easy to work with so it shouldn't be a problem.
I say get the best of both worlds. I think I'll buy another set of Brembo front pads. If I take it to the track, I'll spend the hour swapping them back and forth. These Brembo calipers are easy to work with so it shouldn't be a problem.
Thread Starter
MBWorld Fanatic!
Joined: Mar 2005
Posts: 1,164
Likes: 0
From: sac, calif.
'06 slk55
Something worth noting.
I just washed the car. Wow. What a difference. There was hardly any dirt that came off wheels and rotors. Before, I would have a large deposit of black soot all over the driveway. It nearly required rinsing down the driveway just to get rid of it all. Now, nearly nothing. Great improvement indeed.
I just washed the car. Wow. What a difference. There was hardly any dirt that came off wheels and rotors. Before, I would have a large deposit of black soot all over the driveway. It nearly required rinsing down the driveway just to get rid of it all. Now, nearly nothing. Great improvement indeed.
Member
Joined: Mar 2007
Posts: 194
Likes: 2
From: Redondo Beach, CA
2006 SLK 55 amg, 2002 CLK 430 Cab (hers), 1989 944 Turbo (sold), CLK 500 (sold), 125cc shifter kart
Notice any abnormal scoring on those hugely expensive rotors? I appreciate you posting this very informative thread. Also love the close up on the wheels, can really see the quality build...
Thread Starter
MBWorld Fanatic!
Joined: Mar 2005
Posts: 1,164
Likes: 0
From: sac, calif.
'06 slk55
I haven't noticed anything abnormal. The rotors did look a little colorized after the initial installation, like a very slight tint. It's all gone now. So far, I have only positive comments about these pads.
BTW, today I went on a spirited EuroSunday drive (eurosunday.net) and even through the mountain twisties- no problems with the brakes. Very pleased.
BTW, today I went on a spirited EuroSunday drive (eurosunday.net) and even through the mountain twisties- no problems with the brakes. Very pleased.
Member
Joined: Mar 2007
Posts: 194
Likes: 2
From: Redondo Beach, CA
2006 SLK 55 amg, 2002 CLK 430 Cab (hers), 1989 944 Turbo (sold), CLK 500 (sold), 125cc shifter kart
Thanks again. I just ordered a set for my CLK (the low pad warning just went off this morning...). Probably follow up with a set for the SLK. Brembo pads work great, but the dusting is intolerable. I typically wipe off the wheels daily (yes, I'm that ****....).
Thread Starter
MBWorld Fanatic!
Joined: Mar 2005
Posts: 1,164
Likes: 0
From: sac, calif.
'06 slk55
From what I understand, the CLK and SLK share the rear calipers IIRC. Don't quote me on that though. But, I'll tell ya, these pads make life with an AMG much more pleasant. Now my car gets dirty before the wheels!

MBWorld Fanatic!


Joined: Oct 2004
Posts: 4,152
Likes: 60
From: NJ, NYC
Something Slow
Front!

Rear!

Thread Starter
MBWorld Fanatic!
Joined: Mar 2005
Posts: 1,164
Likes: 0
From: sac, calif.
'06 slk55
Nice looking rotors! They look pretty.
They might be the same. I would suggest taking a picture of the brake pads themselves. Also, measure them. I have my old pads still and I can see if they're identical. Note, the Posi-quiet replacements were identical in size to OEM pads.
They might be the same. I would suggest taking a picture of the brake pads themselves. Also, measure them. I have my old pads still and I can see if they're identical. Note, the Posi-quiet replacements were identical in size to OEM pads.
Super Member
Joined: Nov 2007
Posts: 529
Likes: 0
From: London, GB
RHD C200 Sport Coupe, RHD SLK-55, LHD SLK-350
Hey Wavey - A1715400617 is the front sensor A2115401717 is the rear sensor - and yeah, that's the right part number for the rear.
Oh, and these are for the SLK55, so not sure on your CLK - if the pads were the same, I'd think you are safe on the sensors as well.
Oh, and these are for the SLK55, so not sure on your CLK - if the pads were the same, I'd think you are safe on the sensors as well.


