


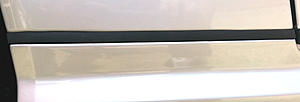
Black Trim Piece Between The Fender & Rocker Skirt
Thread Starter
Senior Member
Joined: Apr 2013
Posts: 323
Likes: 17
2002 E55
Black Trim Piece Between The Fender & Rocker Skirt
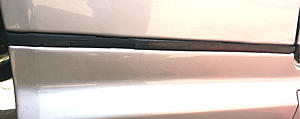
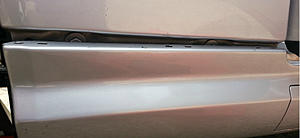
When I purchased my 2002 E55 16 months ago the trim pieces that sit between the bottom of the fenders and the top of the rocker skirts weren't in the best of shape, but they were intact. During the last few weeks the one on the left side split and started falling apart. The right one was in better shape, but still not great, so I ordered a replacement set.
The part numbers are: 210 698 72 30 for the left trim piece and 210 698 71 30 for the right side. They are about $15 each from most online stores. My guess is these part numbers are good for all of the facelift cars, but makes sure before ordering.
Installing them was easy. I jacked up the car from the front center and placed a set of jack stands underneath.
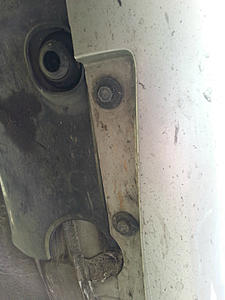
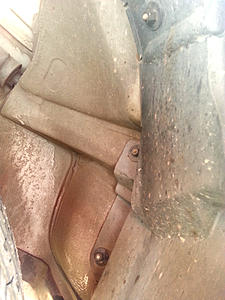
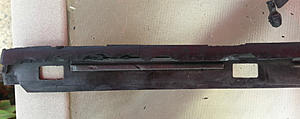
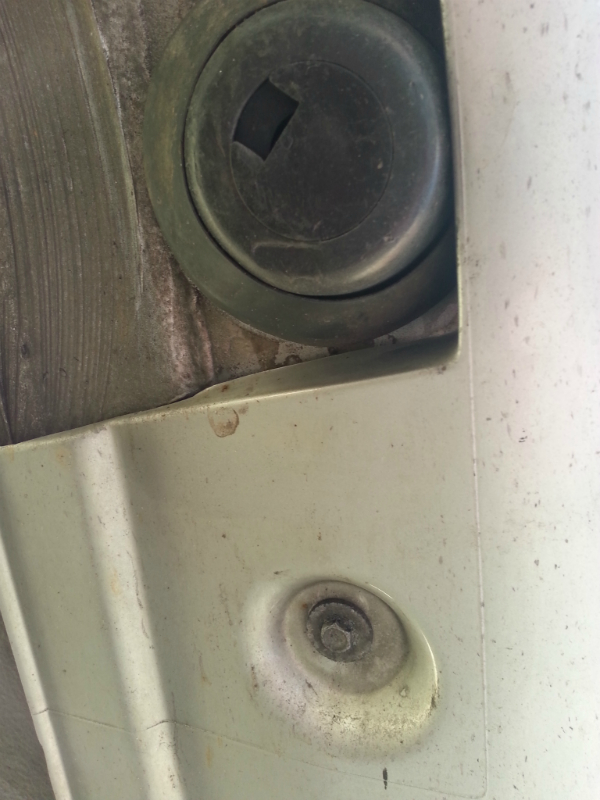
There are 3 small bolts on the bottom of the skirt just behind the front wheels. The first 2 are 10mm. The third is 8mm and just behind the side jacking point. Remove the 3 bolts and the skirt will be free enough to move once you completely open the front door.
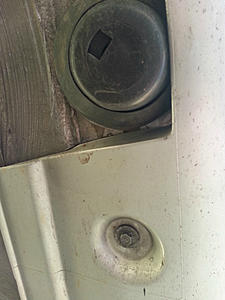
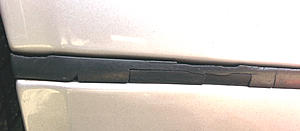
Gently pull the skirt towards you (away from the car) and three clips that attach to both the skirt and the bottom of the fender will separate allowing you to remove the old trim piece. On both sides, both front clips broke when I separated the skirts from the fenders.
To facilitate removing the broken clips, I removed three, 10mm, plastic nuts that secure the plastic fender well liner in place so I could grab the back half of the broken clips.
I didn't have replacement clips so I temporarily installed the new trim pieces utilizing the 2 good remaining clips on each side. I will pick up some new clips and install them the next time I jack up the front of the car. I would recommend ordering a few replacements when you order the trim pieces just in a case you need them.
The old trim pieces were very brittle and fell apart during the removal process.
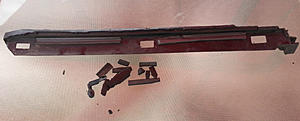
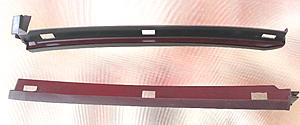
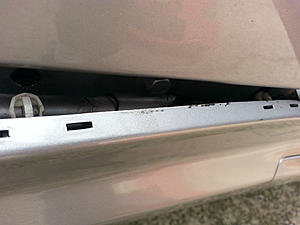
The trim pieces are shaped sort of like the letter L. The long part of the L is the visible part outside of the car. The short part of the L sits inside of the corner of the door jam. The trick to installing the new pieces is to hold the part in a vertical position and thread the short part of the L inside the door jam. There is a groove in the short part of the L that slides onto the skirt in the corner of the jam. Once you get this short L section in place, you can rotate the long section to a horizontal position and align the holes in the trim piece with the clips that are part of the skirt. Once they are aligned you can press the clips into the bottom of the fender and replace the fasteners. It will make sense once you start working on it. Takes about 5 minutes per side once you know what you are doing.
ddb


The part numbers are: 210 698 72 30 for the left trim piece and 210 698 71 30 for the right side. They are about $15 each from most online stores. My guess is these part numbers are good for all of the facelift cars, but makes sure before ordering.

Installing them was easy. I jacked up the car from the front center and placed a set of jack stands underneath.
There are 3 small bolts on the bottom of the skirt just behind the front wheels. The first 2 are 10mm. The third is 8mm and just behind the side jacking point. Remove the 3 bolts and the skirt will be free enough to move once you completely open the front door.

Gently pull the skirt towards you (away from the car) and three clips that attach to both the skirt and the bottom of the fender will separate allowing you to remove the old trim piece. On both sides, both front clips broke when I separated the skirts from the fenders.


To facilitate removing the broken clips, I removed three, 10mm, plastic nuts that secure the plastic fender well liner in place so I could grab the back half of the broken clips.

I didn't have replacement clips so I temporarily installed the new trim pieces utilizing the 2 good remaining clips on each side. I will pick up some new clips and install them the next time I jack up the front of the car. I would recommend ordering a few replacements when you order the trim pieces just in a case you need them.
The old trim pieces were very brittle and fell apart during the removal process.


The trim pieces are shaped sort of like the letter L. The long part of the L is the visible part outside of the car. The short part of the L sits inside of the corner of the door jam. The trick to installing the new pieces is to hold the part in a vertical position and thread the short part of the L inside the door jam. There is a groove in the short part of the L that slides onto the skirt in the corner of the jam. Once you get this short L section in place, you can rotate the long section to a horizontal position and align the holes in the trim piece with the clips that are part of the skirt. Once they are aligned you can press the clips into the bottom of the fender and replace the fasteners. It will make sense once you start working on it. Takes about 5 minutes per side once you know what you are doing.
ddb

Last edited by ddb; Aug 31, 2014 at 08:47 PM.
Senior Member
Joined: Feb 2011
Posts: 312
Likes: 8
From: South, FL
2002 E55 AMG Obsidian Black with Charcoal
Looks great.
I did mine about 6 months ago. I decided to do both front and rear. 4 pieces.
When doing the rear ones, I had to purchase two new clips as the originals broke during disassembly.
Doing this DIY really made my car look better. (Probably because I seemed to alwys look at the cracked rubber.)
Thanks for posting.
Thread Starter
Senior Member
Joined: Apr 2013
Posts: 323
Likes: 17
2002 E55
In my mind, everyone that would see my car would immediately focus on that trim piece, and other defects. Now onto something else........

Junior Member
Joined: Feb 2016
Posts: 27
Likes: 1
2002 E430 4MATIC
it's 2021 and this post is helping Lol, i need the front ones but i also need both the small rear ones next to quarters, if anyone knows those part numbers please let me know (i'm not googling anymore for now lol)

Newbie
Joined: Sep 2021
Posts: 4
Likes: 2
From: Charlotte, NC
2000 E55
The rear strips:
210-698-73-30
210-698-74-30
Pelican parts has them.
I found they are definitely more challenging than the front, but i also could not figure out how the trim clip worked and broke it. Currently trying to source clips for both the front and rear.
210-698-73-30
210-698-74-30
Pelican parts has them.
I found they are definitely more challenging than the front, but i also could not figure out how the trim clip worked and broke it. Currently trying to source clips for both the front and rear.
Trending Topics
MB World Stories
The Best of Mercedes & AMG

Manual Mercedes? 6 Times Sindelfingen Let Drivers Have All The Fun
Verdad Gallardo
Mercedes SLR McLaren 722 S Is Extremely Rare Example Modified by McLaren
Verdad Gallardo
8 Classic Boxy Mercedes Designs That Have Aged Like Fine Wine
Verdad Gallardo
Flawlessly Restored Mercedes 190E Evo II Heads to Auction
Verdad Gallardo
Electric Mercedes C-Class Unveiled: 11 Things You Need to Know
Verdad Gallardo
Mercedes EQS Gets A Major Update: Everything You Need to Know
Verdad Gallardo
5 Underrated Mercedes-Benz Models That Don't Get the Love They Deserve
Verdad Gallardo
Mercedes 300D Has Pushed Well Past 1 Million Miles and It Ain't Stopping
Verdad Gallardo
10 Most Reliable Mercedes-Benz Models You Can Buy Used
Verdad Gallardo
MBWorld Fanatic!


Joined: Jan 2014
Posts: 3,966
Likes: 1,315
From: Republic of Texas
'99 and '05 E55 AMG


