

DIY Quaife Install
 01-09-2008, 08:42 PM
#1
Senior Member
Thread Starter
DIY Quaife Install
Here's what I've got so far. I'm still waiting on the Silkolene gear lube arrive, and when it does I'll soak the diff and gears then put it all back together. I won't go into excrutiating detail because if you undertake this project you should already have the appropriate tools, WIS, and good mechanical intuition.
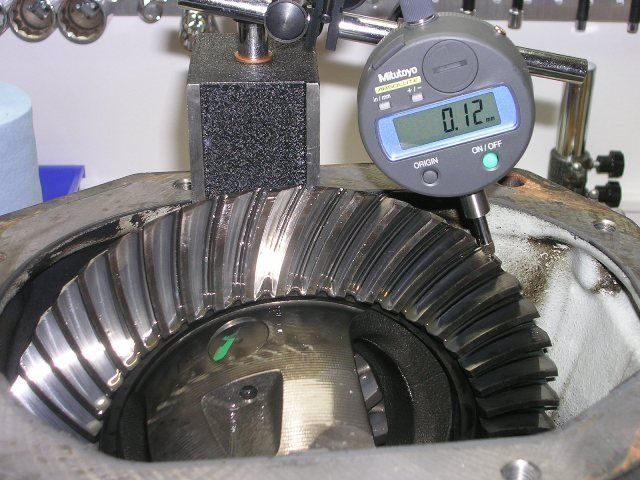
According to WIS, the factory backlash spec is .10-.16mm. The stock diff measured .12mm backlash and I was at .13mm with the Quaife....no shims needed. I used gear marking compound to check the wear pattern as well. All is good.
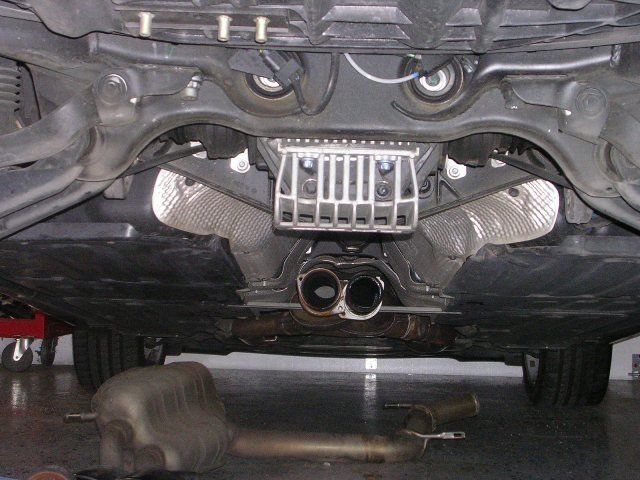
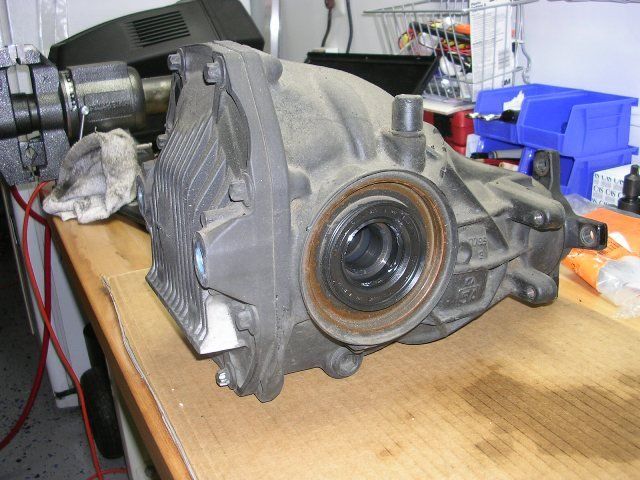
Jack up car, remove wheel, remove center cap, mount wheel back, lower, loosen axle nut (32mm socket), raise car back up, and remove back half of the exhaust. At some point disconnect the SBC harness under the hood.
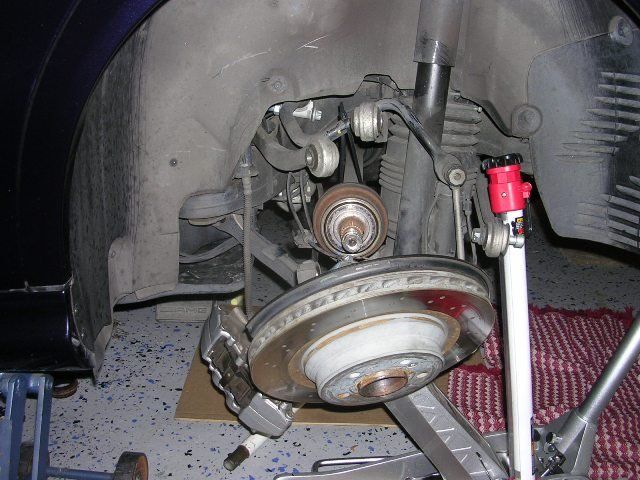
Disassemble one side of the suspension. I chose left because it was closed to my workbench but either side is fine. Slide axle out of wheel carrier.
Pry axle out of differential housing.
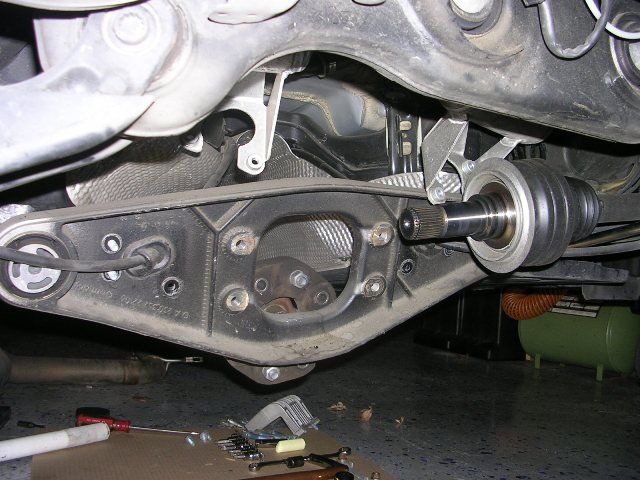
Disconnect drive shaft, unbolt differential support housing, lower diff some and pry out the other axle.
Now the patient is ready for surgery...
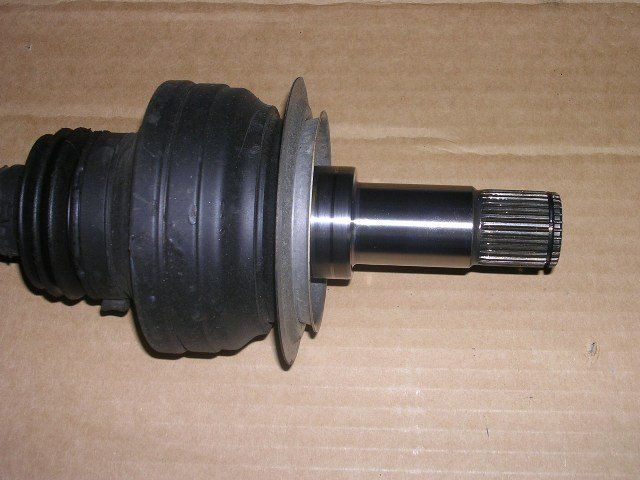
Remove both axle seals.
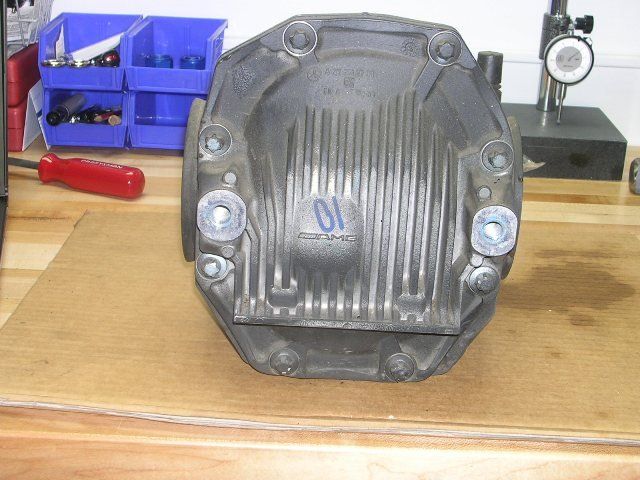
Remove cover and drain remaining fluid.
Backlash measured on stock differential. (I did this just to make sure)
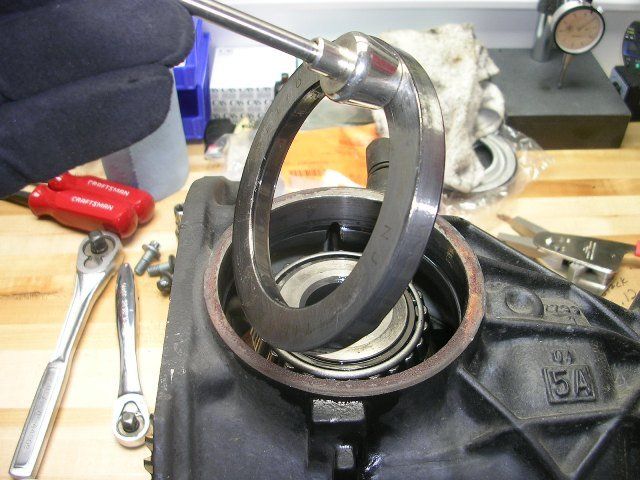
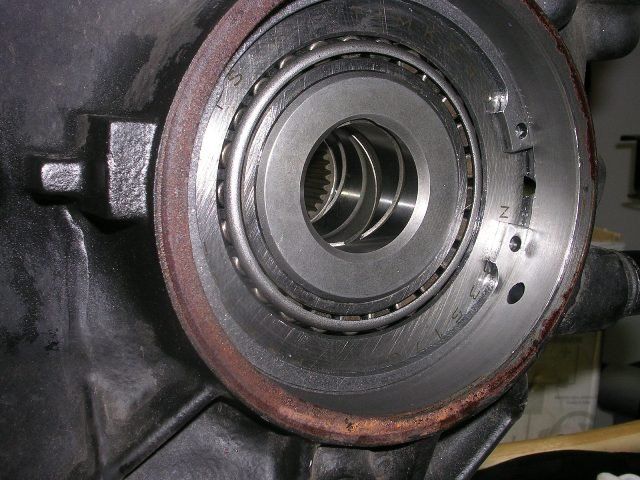
Once the seals are removed you'll see the bearing races held in with big *** circlips. Remove them.
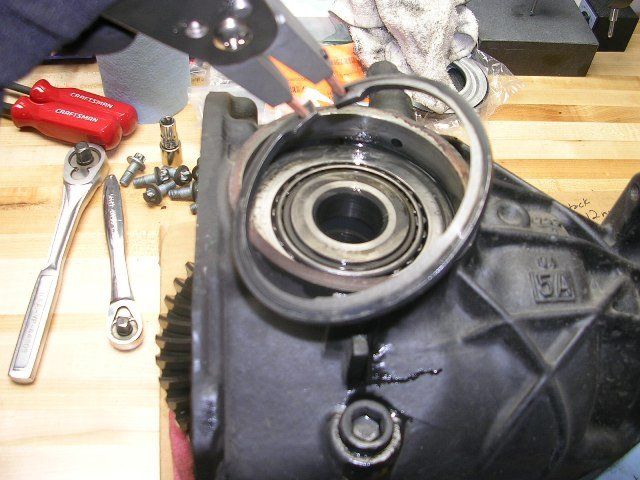
Next remove the bearing races. I used a strong magnet for this.
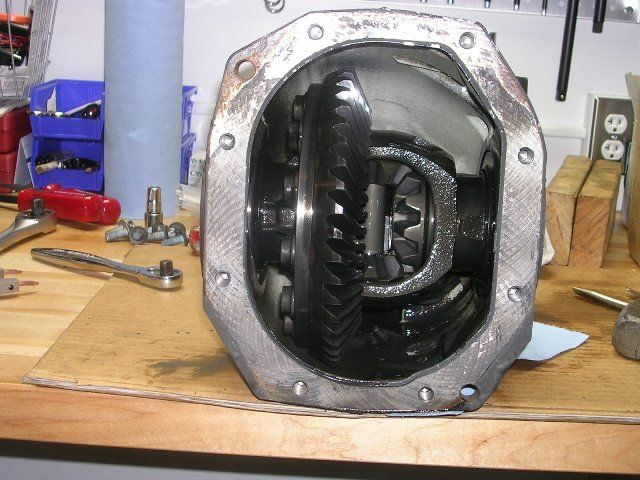
Do this on the other side as well and turn out the stock diff.
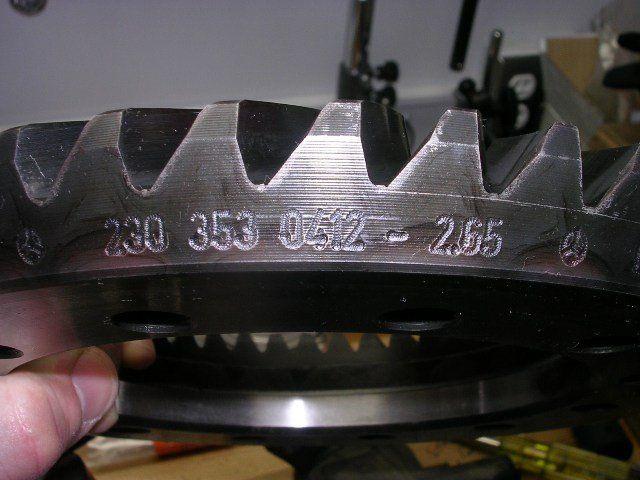
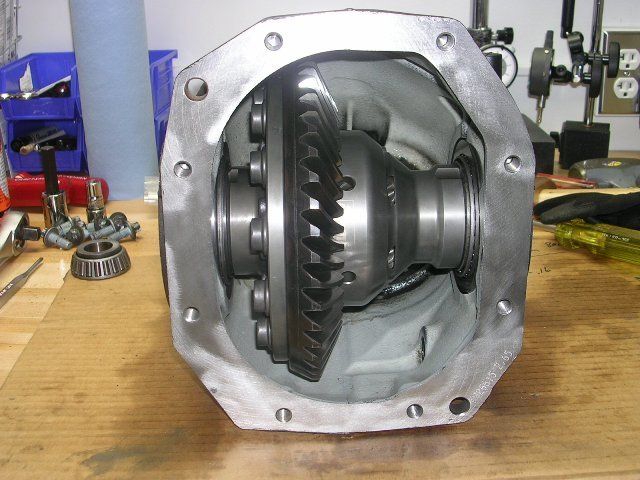
Mount stock diff in bench vise and remove ring gear.
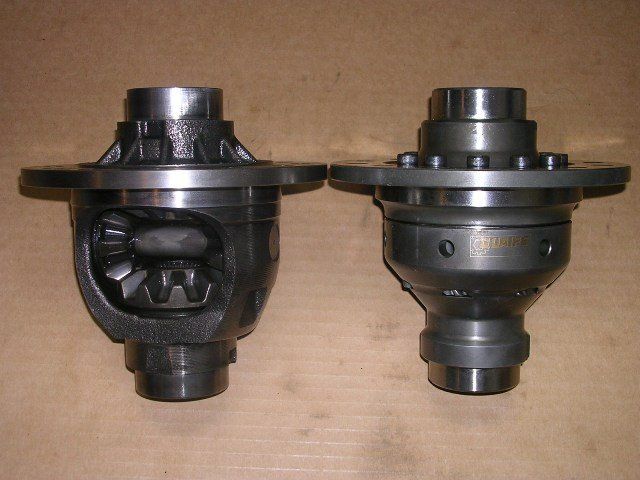
Here's the stock compared to the Quaife.
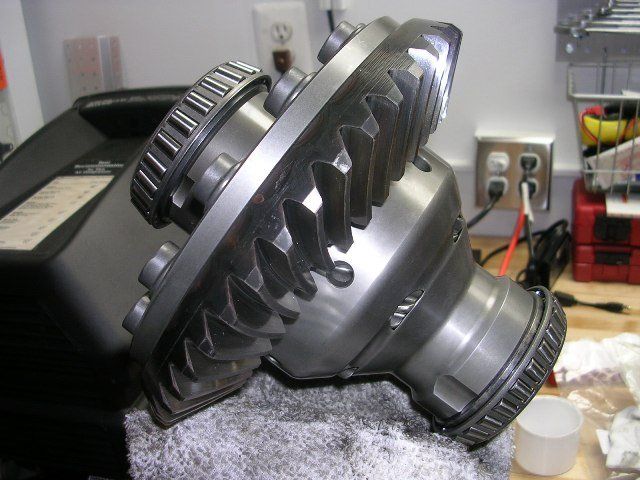
Transfer the ring gear and install new bearings.
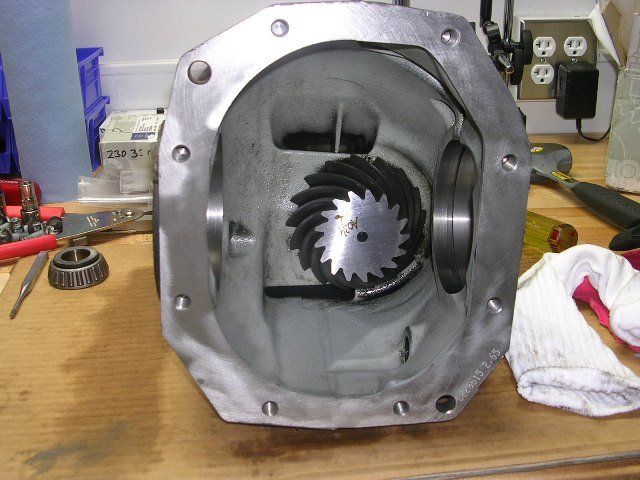
Clean the case and prep for the new unit.
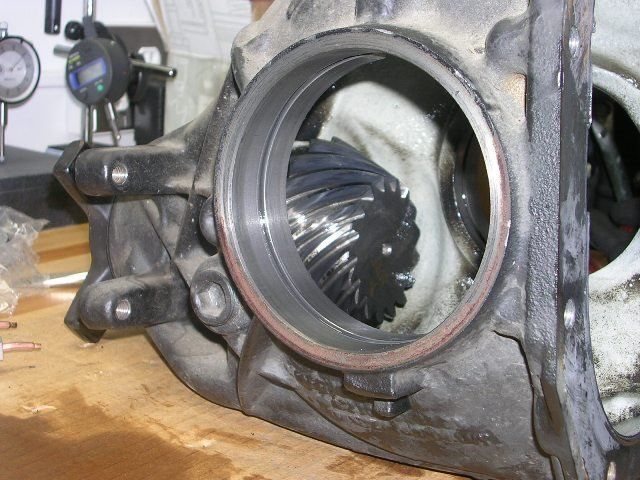
Install Quaife, new bearing races, and circlips. Make sure you don't block the lube hole in the circlip groove.
Quaife installed. Check backlash. Mine was within spec. No shims required.
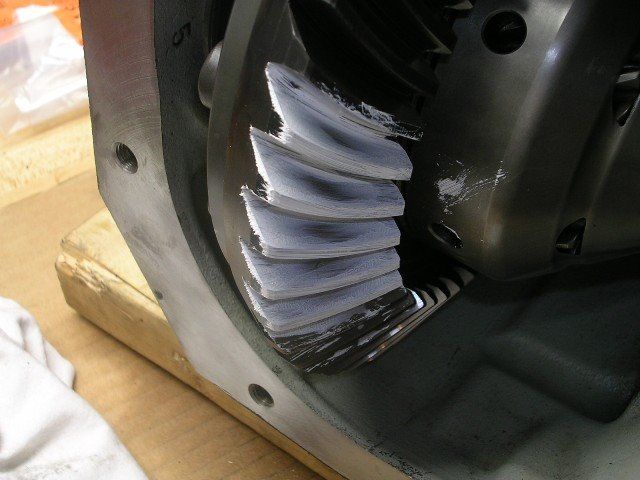
As additional check I applied gear marking compound on several areas so I could read the contact patch. Looks perfect to me.
Once my gear lube arrives I'll prelube all the moving parts, install new axle seals, and button it all up. Then it's just reversing the removal order of all the suspension parts and test drive.
According to WIS, the factory backlash spec is .10-.16mm. The stock diff measured .12mm backlash and I was at .13mm with the Quaife....no shims needed. I used gear marking compound to check the wear pattern as well. All is good.
Jack up car, remove wheel, remove center cap, mount wheel back, lower, loosen axle nut (32mm socket), raise car back up, and remove back half of the exhaust. At some point disconnect the SBC harness under the hood.
Disassemble one side of the suspension. I chose left because it was closed to my workbench but either side is fine. Slide axle out of wheel carrier.
Pry axle out of differential housing.
Disconnect drive shaft, unbolt differential support housing, lower diff some and pry out the other axle.
Now the patient is ready for surgery...
Remove both axle seals.
Remove cover and drain remaining fluid.
Backlash measured on stock differential. (I did this just to make sure)
Once the seals are removed you'll see the bearing races held in with big *** circlips. Remove them.
Next remove the bearing races. I used a strong magnet for this.
Do this on the other side as well and turn out the stock diff.
Mount stock diff in bench vise and remove ring gear.
Here's the stock compared to the Quaife.
Transfer the ring gear and install new bearings.
Clean the case and prep for the new unit.
Install Quaife, new bearing races, and circlips. Make sure you don't block the lube hole in the circlip groove.
Quaife installed. Check backlash. Mine was within spec. No shims required.
As additional check I applied gear marking compound on several areas so I could read the contact patch. Looks perfect to me.
Once my gear lube arrives I'll prelube all the moving parts, install new axle seals, and button it all up. Then it's just reversing the removal order of all the suspension parts and test drive.
Last edited by MJ50; 04-04-2015 at 05:21 PM. Reason: Additional pics and instructions.

The following 4 users liked this post by BrianS:
 01-10-2008, 07:05 AM
#6
MBWorld Fanatic!

Join Date: Jan 2002
Location: Carefree az usa
Posts: 1,098
Likes: 0
Received 23 Likes
on
19 Posts
2020 S560,14 ml350, 03 sl55, silver, pano, slr cams, evo headers, lsd, 2019 s63 cab.
brian- did you use a 10 bolt or 12 bolt lsd in you car? i am still waiting for the 12 bolt from james art creative.
Trending Topics
01-10-2008, 09:16 AM
#8
Super Member
Join Date: Jul 2007
Posts: 566
Likes: 0
Received 0 Likes
on
0 Posts
2004 E55 AMG and 2003 C320 4Matic Miss my 993 Turbo above!!
The Ultimate Do It Your Self'r. Brian looks great.....
How about I just send my car to you and you can take care of my upgrades for me (Pully, IC, Q LSD, Cams...). It would be a lot cheaper than sending it out to Vadim or Adam.....
When you going to the track with all of those new mods. Your car has got to be an 11.2 to 11.4 car now with everything in it and the right tires.......
01-10-2008, 09:43 AM
#9
Member
Join Date: Aug 2007
Location: philadelphia
Posts: 126
Likes: 0
Received 0 Likes
on
0 Posts
2005 E55 drowned/ 2011 CTS-v coupe gone/ 2012 E63 PP,LSD finally here
I knew you would end up doing it yourself, this is probably the route I'm going to take, I remember from the other thread you were checking out some shop that was gonna do your install and you must not have been impressed, anyway great job and PLEASE post all pics and some step by step instructions, you are the man and your DIY threads have helped me many times 
01-10-2008, 09:46 AM
#10
Senior Member
Thread Starter
 01-10-2008, 09:53 AM
#11
Senior Member
Thread Starter
I knew you would end up doing it yourself, this is probably the route I'm going to take, I remember from the other thread you were checking out some shop that was gonna do your install and you must not have been impressed, anyway great job and PLEASE post all pics and some step by step instructions, you are the man and your DIY threads have helped me many times
 01-10-2008, 10:01 AM
#12
Member
Join Date: Aug 2007
Location: philadelphia
Posts: 126
Likes: 0
Received 0 Likes
on
0 Posts
2005 E55 drowned/ 2011 CTS-v coupe gone/ 2012 E63 PP,LSD finally here
Actually, the other shop I'm sure had the ability to do it but they only had one guy to do the actual work. They had the STAR tool so I would go there for anything requiring that level of diagnosis. After reading WIS and staring at the diff and suspension for a little while, I figured, oh hell, I'll just do it myself. Much better quality control anyway.
on regular rears the carrier comes out after you take out c-clips, slide out axles, and then take off the main caps that hold the carrier in, I see you installed new carrier bearings, how are they held in the housing, do they slide into the housing one at a time, this is my biggest dilema, the rear not having main caps that hold the carrier assembly in the housing, please explain how the carrier comes out/in
 01-10-2008, 11:32 AM
#13
Senior Member
Thread Starter
Brian
on regular rears the carrier comes out after you take out c-clips, slide out axles, and then take off the main caps that hold the carrier in, I see you installed new carrier bearings, how are they held in the housing, do they slide into the housing one at a time, this is my biggest dilema, the rear not having main caps that hold the carrier assembly in the housing, please explain how the carrier comes out/in
on regular rears the carrier comes out after you take out c-clips, slide out axles, and then take off the main caps that hold the carrier in, I see you installed new carrier bearings, how are they held in the housing, do they slide into the housing one at a time, this is my biggest dilema, the rear not having main caps that hold the carrier assembly in the housing, please explain how the carrier comes out/in
01-10-2008, 12:02 PM
#14
Member
Join Date: Aug 2007
Location: philadelphia
Posts: 126
Likes: 0
Received 0 Likes
on
0 Posts
2005 E55 drowned/ 2011 CTS-v coupe gone/ 2012 E63 PP,LSD finally here
 01-10-2008, 12:07 PM
#15
MBWorld Fanatic!

Join Date: Jan 2004
Location: Salt Lake City (but not Morm)
Posts: 7,092
Likes: 0
Received 12 Likes
on
10 Posts
2003 E55 & 2014 GL550
10 bolt, 12 bolt.....HEH, it's Chevy all over again!!! (70's Chevy's used 10bolt and 12 bolt rears, but it was the diff cover)
01-10-2008, 12:10 PM
#16
Senior Member
Thread Starter
Thanks. More than happy to share my experieces. Besides, in some twisted way I feel like I'm sticking it to the dealers every time I open this thing up.
01-10-2008, 12:51 PM
#18
Senior Member
Thread Starter
The Ultimate Do It Your Self'r. Brian looks great.....
How about I just send my car to you and you can take care of my upgrades for me (Pully, IC, Q LSD, Cams...). It would be a lot cheaper than sending it out to Vadim or Adam.....
When you going to the track with all of those new mods. Your car has got to be an 11.2 to 11.4 car now with everything in it and the right tires.......
How about I just send my car to you and you can take care of my upgrades for me (Pully, IC, Q LSD, Cams...). It would be a lot cheaper than sending it out to Vadim or Adam.....
When you going to the track with all of those new mods. Your car has got to be an 11.2 to 11.4 car now with everything in it and the right tires.......
01-10-2008, 01:06 PM
#19
Member
Join Date: Aug 2007
Location: philadelphia
Posts: 126
Likes: 0
Received 0 Likes
on
0 Posts
2005 E55 drowned/ 2011 CTS-v coupe gone/ 2012 E63 PP,LSD finally here
 PLEASE
 they told me they don't open them up they replace the whole unit, they were clueless on swapping out carriers told me they prefer not to, after seeing these pics the install is very straight forward and honestly very basic, I have set-up rears before and my only hangup was how the carrier was held into the rear, I knew it wasn't a c-clip but I never saw how it was held in without main caps, Brian had the nads to rip his out and show us all, no need for speciality tool to spread case, just a good dial indicator to check the backlash, once the races are removed it will just turn out of the housing, installation of Quaifes' has been a concern on this forum, I believe it to be pretty basic thanks to the info and pics provided on this thread, once again Brian I personally thank you as I needed to see these pics
01-10-2008, 06:50 PM
#20
MBWorld Fanatic!
Brian
on regular rears the carrier comes out after you take out c-clips, slide out axles, and then take off the main caps that hold the carrier in, I see you installed new carrier bearings, how are they held in the housing, do they slide into the housing one at a time, this is my biggest dilema, the rear not having main caps that hold the carrier assembly in the housing, please explain how the carrier comes out/in
on regular rears the carrier comes out after you take out c-clips, slide out axles, and then take off the main caps that hold the carrier in, I see you installed new carrier bearings, how are they held in the housing, do they slide into the housing one at a time, this is my biggest dilema, the rear not having main caps that hold the carrier assembly in the housing, please explain how the carrier comes out/in
I have the pdf for the wis removal if you need it.
01-10-2008, 07:16 PM
#21
MBWorld Fanatic!
Join Date: Oct 2006
Location: Caribbean/Florida/Colorado
Posts: 3,642
Likes: 0
Received 11 Likes
on
11 Posts
E-ZGO 53hp., 1999 E 430 sport, 2004 E 55, 2008 Tahoe LTZ on 24"s
Brian,
Thanks so much, for taking your time and effort to produce a great DIY!
It is members like you that elevate the quality of MBWorld forms.
Fantastic pics.
Thanks so much, for taking your time and effort to produce a great DIY!
It is members like you that elevate the quality of MBWorld forms.
Fantastic pics.
01-10-2008, 09:05 PM
#22
Senior Member
Thread Starter
On mine I just removed one side of the suspension not both like the wis calls for, then used the Star-diagnostic to deflate the airbag. I could not figure out a way of doing it with-out the star-diag, the bag is under pressure so the minute that it's unbolted from the lower control arm it extends. It would be good to know if BrianS did it another way.
I have the pdf for the wis removal if you need it.
I have the pdf for the wis removal if you need it.
01-11-2008, 08:59 AM
#23
Member
Join Date: Aug 2007
Location: philadelphia
Posts: 126
Likes: 0
Received 0 Likes
on
0 Posts
2005 E55 drowned/ 2011 CTS-v coupe gone/ 2012 E63 PP,LSD finally here
I have the pdf for the wis removal if you need it.[/QUOTE]
could you PM it to me or maybe hot link it on this thread, should be a good read
could you PM it to me or maybe hot link it on this thread, should be a good read
01-11-2008, 09:16 AM
#24
MBWorld Fanatic!
The WIS is essential for this definitely. Not sure why it said to remove both sides because it's not necessary at all, but it will drive service hours if that's how it's billed. The WIS usually shows many more steps than necessary to do a job. I put jack stands under the wheel carriers and it rested on those no problem. Airbags expanded and compressed as I jacked and lowered the car. I also unplugged the SBC wiring harness but I'm not sure if there's any correlation between the two.
Again good work !.


