


Black Emblems DIY!!
Thread Starter
MBWorld Fanatic!


Joined: Sep 2009
Posts: 2,614
Likes: 117
From: LA
W213 E63
Black Emblems DIY!!
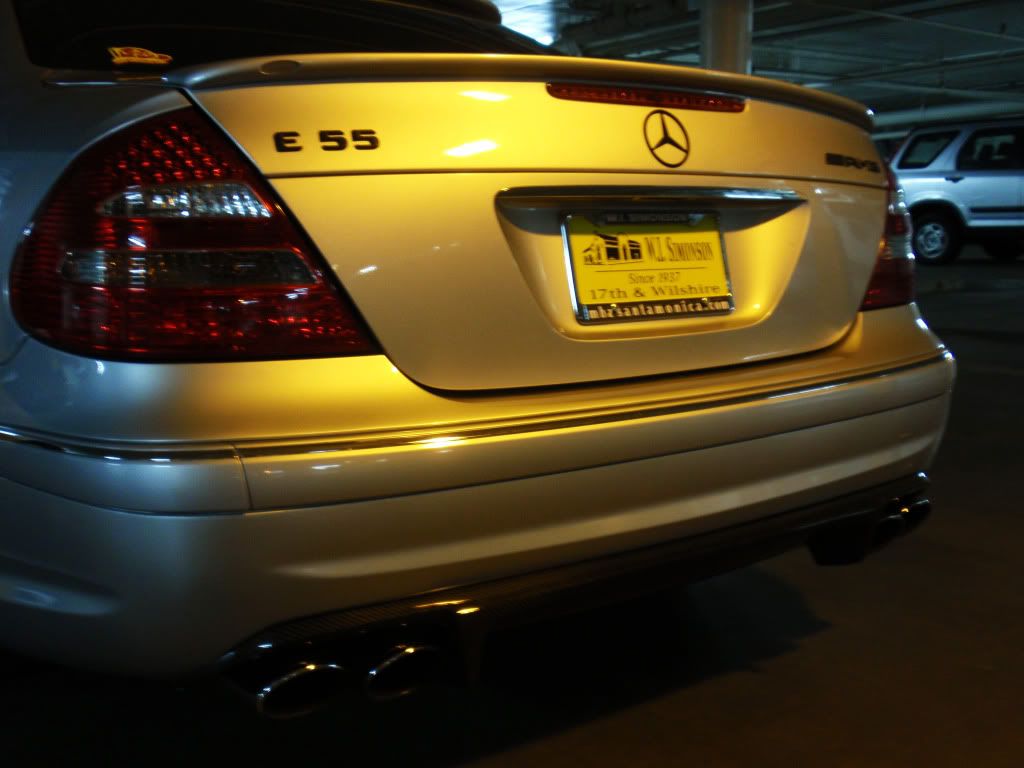
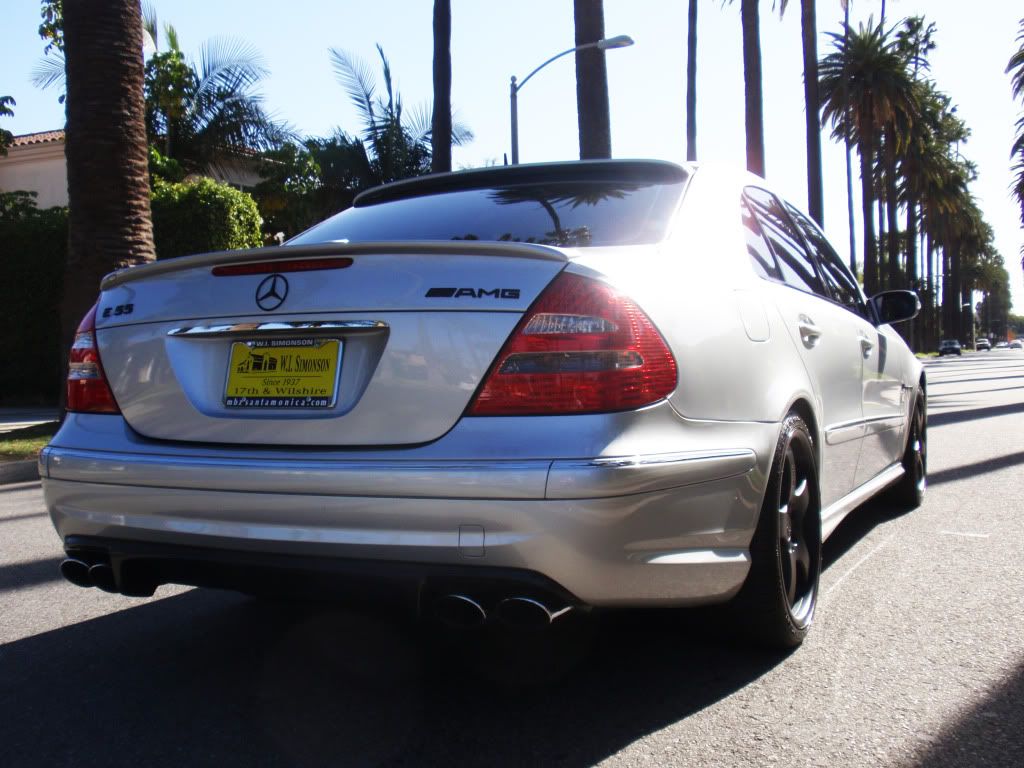
I thought I'd share with you how I did my 05 E55 emblems flat black. My car is silver and I decided to do my emblems flat black. IMO, the black emblems, flat or gloss, look even better on a black car. But, I got the silver and it looks A+.
This is what I did and they came out clean. I realize there are plenty of ways to do it but this is how I got down and I loved every minute of it! Oh yeah, I didn't buy new emblems, I de-badged mine and painted them.
1. DE-BADGING THE CAR
Before you do anything, take blue painters tape and outline the OEM emblems. This way, when you take them off for painting, you'll know exactly where to return the painted emblems.
Get some dental floss and a blow dryer. Heavier/thicker dental floss works best. Fishing wire is too fragile. Blow dryer, any will do. I used a $25 dryer from Wallgreens.
The trunk emblems are the trickiest because that's where most of the factory 3M tape is. The older it is, the harder it is to remove. All you have to do is heat the emblems with the blow dryer enough to soften the 3M tape. 30 seconds on low heat per letter will do. Take the dental floss and "floss" the letter right off. On the letters it should just fly like knife through butter. The AMG logo is a pain but still managable. Be VERY careful with the star logo on the trunk. It is VERY fragile. Three plastic "prongs" in the middle of the star can be handled with a spatula. Very careful not to scratch the paint.
The logos in the front I just heated up by driving the **** out of my car for 5 minutes. It was fun and it got the job done better then any hair dryer would.
Now that you have the emblems removed from the car you have to get all the old 3M tape removed. I soaked the letteris in a cup filled with regular 99c nail polish remover. I let them sit for about an hour and then used a razor blade to scrape the 3M off each individual letter. It came right off. In the hour that the emblems were soaking in the nail polish remover, I scrubbed the remainder off the car. Same thing, nail polish remover and a towel get that done.
2. PAINTING THE EMBLEMS
There are many paints, I chose to go with spray plastic model paint. I used to build all kinds of crazy plastic models when I was little and I was down to use the paint. So what? You need to sand the emblems. Get two "grits" of sandpaper. One has to be rough and one super fine. Some people use three or four, I dont have the patience for that ****. Sand down the logos with both grit, once over well should be plenty. First the rougher and then finer. CLEAN the emblems once they have been sanded. Lay the emblems out on old newspaper to be painted. Or new newspaper, makes no difference.
PRIMER the emblems. Some people dont like to primer. Some people say that if you sand the emblems you dont need to primer. I say do what makes you feel good. I like to sand AND primer. Gray primer works best, no discussion neccessary. I do two coats of primer with 5-6 hours in between coats. No need to cake it on there, just a nice even cover will do.
Once the primer has COMPLETELY dried you are ready to paint. I like to give the emblems a move at this point, just be sure they're not stuck to the newspaper. Spray the emblems three times over with paint. As always, allow dry time in between coats.
Last is the clear coat. I did my emblems flat black so I did a flat clear. If your emblems were gloss, you would use gloss coat. Two coats is plenty.
3. ATTACHING EMBLEMS TO CAR
Once the last clear coat has dried you can start applying 3M double sided tape to the emblems. Any auto store double sided tape will do, body shops use 3M and so do I. You have to cut the tape with the razor for each letter. Tiny peices of tape also work, that stuff turns to goop anyways. Just make sure to put enough on each letter so that they stick permanantly but not too much so you can see it behind the letter. Attaching to the car is easy. You already know exactly where they go because you've been driving around with blue tape on your car marking the locations of the OEM palcement. Make sure not to mispell Kompressor, and you drive an E55 AMG not a A-5M 5GE. Give the letters a push for about 20 seconds each to make sure that 3M gets to work.
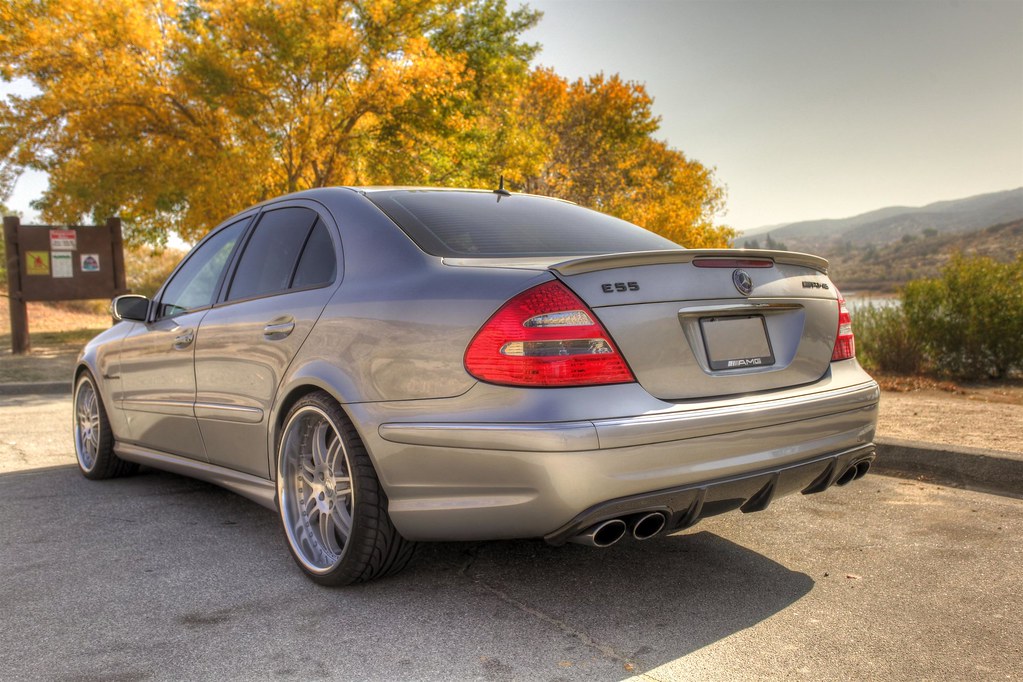
Wait about 24 hours before you go to the car wash. Once you do go and that car comes out all nice and clean with the black emblems you will pat your self on the back. Its worth every grueling minute!!
-razor blade
-hair dryer
-dental floss
-nail polish remover
-sandpaper
-primer
-paint
-clear coat
-3M painters tape
-3M double sided molding tape

This is what I did and they came out clean. I realize there are plenty of ways to do it but this is how I got down and I loved every minute of it! Oh yeah, I didn't buy new emblems, I de-badged mine and painted them.
1. DE-BADGING THE CAR
Before you do anything, take blue painters tape and outline the OEM emblems. This way, when you take them off for painting, you'll know exactly where to return the painted emblems.
Get some dental floss and a blow dryer. Heavier/thicker dental floss works best. Fishing wire is too fragile. Blow dryer, any will do. I used a $25 dryer from Wallgreens.
The trunk emblems are the trickiest because that's where most of the factory 3M tape is. The older it is, the harder it is to remove. All you have to do is heat the emblems with the blow dryer enough to soften the 3M tape. 30 seconds on low heat per letter will do. Take the dental floss and "floss" the letter right off. On the letters it should just fly like knife through butter. The AMG logo is a pain but still managable. Be VERY careful with the star logo on the trunk. It is VERY fragile. Three plastic "prongs" in the middle of the star can be handled with a spatula. Very careful not to scratch the paint.
The logos in the front I just heated up by driving the **** out of my car for 5 minutes. It was fun and it got the job done better then any hair dryer would.
Now that you have the emblems removed from the car you have to get all the old 3M tape removed. I soaked the letteris in a cup filled with regular 99c nail polish remover. I let them sit for about an hour and then used a razor blade to scrape the 3M off each individual letter. It came right off. In the hour that the emblems were soaking in the nail polish remover, I scrubbed the remainder off the car. Same thing, nail polish remover and a towel get that done.
2. PAINTING THE EMBLEMS
There are many paints, I chose to go with spray plastic model paint. I used to build all kinds of crazy plastic models when I was little and I was down to use the paint. So what?
You need to sand the emblems. Get two "grits" of sandpaper. One has to be rough and one super fine. Some people use three or four, I dont have the patience for that ****. Sand down the logos with both grit, once over well should be plenty. First the rougher and then finer. CLEAN the emblems once they have been sanded. Lay the emblems out on old newspaper to be painted. Or new newspaper, makes no difference. PRIMER the emblems. Some people dont like to primer. Some people say that if you sand the emblems you dont need to primer. I say do what makes you feel good. I like to sand AND primer. Gray primer works best, no discussion neccessary. I do two coats of primer with 5-6 hours in between coats. No need to cake it on there, just a nice even cover will do.
Once the primer has COMPLETELY dried you are ready to paint. I like to give the emblems a move at this point, just be sure they're not stuck to the newspaper. Spray the emblems three times over with paint. As always, allow dry time in between coats.
Last is the clear coat. I did my emblems flat black so I did a flat clear. If your emblems were gloss, you would use gloss coat. Two coats is plenty.
3. ATTACHING EMBLEMS TO CAR
Once the last clear coat has dried you can start applying 3M double sided tape to the emblems. Any auto store double sided tape will do, body shops use 3M and so do I. You have to cut the tape with the razor for each letter. Tiny peices of tape also work, that stuff turns to goop anyways. Just make sure to put enough on each letter so that they stick permanantly but not too much so you can see it behind the letter. Attaching to the car is easy. You already know exactly where they go because you've been driving around with blue tape on your car marking the locations of the OEM palcement. Make sure not to mispell Kompressor, and you drive an E55 AMG not a A-5M 5GE. Give the letters a push for about 20 seconds each to make sure that 3M gets to work.
Wait about 24 hours before you go to the car wash. Once you do go and that car comes out all nice and clean with the black emblems you will pat your self on the back. Its worth every grueling minute!!
-razor blade
-hair dryer
-dental floss
-nail polish remover
-sandpaper
-primer
-paint
-clear coat
-3M painters tape
-3M double sided molding tape
MBWorld Fanatic!
Joined: Oct 2009
Posts: 2,825
Likes: 17
From: Southern California
E55 w/ goods, Z32 Project underway
I actually went with pearl black with clear on my emblems. A PITA for the sides but well worth it to get rid of the chrome. I also purchased new emblems so that I did not have to screw around with removing the old tape, cutting new tape, and applying it on the back of the old units. Saved me a ton of time.

Former Vendor of MBWorld
Joined: Nov 2009
Posts: 466
Likes: 1
From: California
E55 AMG
lol man, I cut hella corners with mine. I got new emblems, used a rustoleum glossy paint for plastic (the can has a picture of a plastic lawn/outdoor chair on it), I just clean with alcohol I think, IF at all, sprayed a few coats, and done. No sanding or nothing. It's been over a year, and no chipping or nada  Cheap and easy mod!
Cheap and easy mod!
Trending Topics
MB World Stories
The Best of Mercedes & AMG

8 Oddball Mercedes Ideas That Actually Made it to Production
Verdad Gallardo
Dubai Tuner Gives the Mercedes G-Class An Entirely New Look
Verdad Gallardo
Six Gift Ideas Your AMG Loving Dad or Grad Will Cherish

7 Craziest Things AMG Gas Ever Built
Verdad Gallardo
New Electric Mercedes-AMG GT 4-Door Coupe Unveiled: 10 Things You Need to Know
Verdad Gallardo
6 Mercedes Models That Did NOT Age Well (But Are Somehow Still Cool)
Verdad Gallardo
Manual Mercedes? 6 Times Sindelfingen Let Drivers Have All The Fun
Verdad Gallardo
Mercedes SLR McLaren 722 S Is Extremely Rare Example Modified by McLaren
Verdad Gallardo
8 Classic Boxy Mercedes Designs That Have Aged Like Fine Wine
Verdad GallardoMBWorld Fanatic!
Joined: Dec 2008
Posts: 7,217
Likes: 6
3-five-five/ TUNDRA/ 07 997 cab


MBWorld Fanatic!
Joined: Dec 2008
Posts: 4,411
Likes: 69
From: Socal, Chino
E55 2006 / CLS55 / S450 / Jag XKR2011

Thread Starter
MBWorld Fanatic!
Joined: Sep 2009
Posts: 2,614
Likes: 117
From: LA
W213 E63
You know I considered it. It looks real nice on some cars but for me I always liked the way the stock red shines. I've always wanted a fun toy and the stock red lights remind me of that I guess...
MBWorld Fanatic!
Joined: Dec 2008
Posts: 4,411
Likes: 69
From: Socal, Chino
E55 2006 / CLS55 / S450 / Jag XKR2011
Oh cool, I was planning to buy the DTM Euro Smoke tail light... just wonder if anybody tried that before. I hate to go to a shop and wait for whole day just to do the tail light tinting so got to DIY. Very nicely done to your car !

Super Member
Joined: Aug 2009
Posts: 697
Likes: 1
From: Tar Heel State
His wife crazy
Dammit, wish I had read this before ordering the Hong Kong specials. Oh well, I'll see what they look like when they get here.


