
Severe parasitic draw, where to look?
 01-26-2013 | 12:32 AM
#1
Thread Starter
MBWorld Fanatic!
Joined: Jan 2011
Posts: 2,127
Likes: 4
From: Chicagoland
AMG
Severe parasitic draw, where to look? **SOLVED**
Over the past few days, something has REALLY been drawing off my main battery. I thought I had a bad battery so I replaced it, but it went from 12.7 volts on a BRAND NEW 30 MINUTE OLD battery down to 0.4 volts in less than 12 hours.. What could be drawing this much?
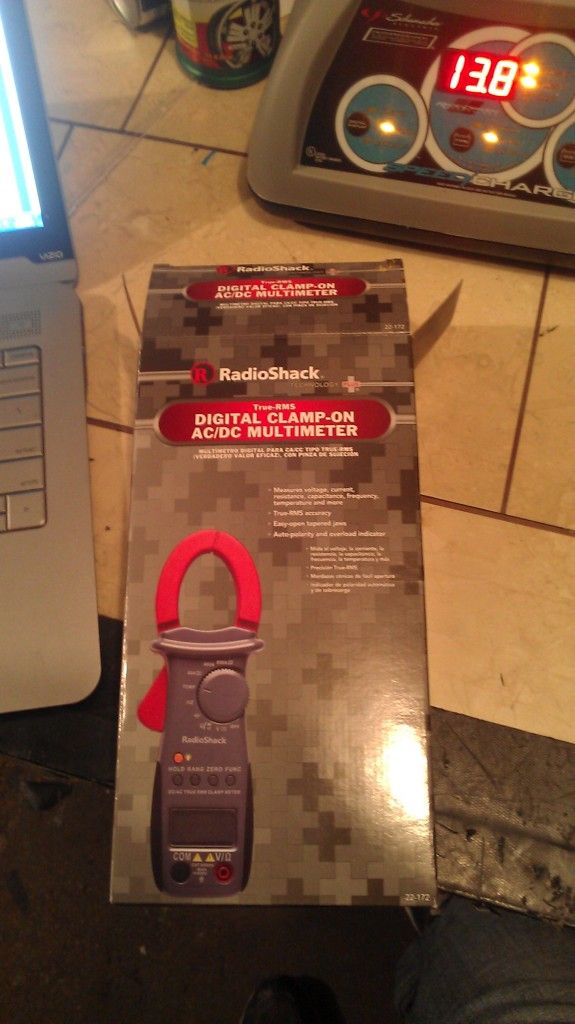
I am buying another current clamp for my multimeter tomorrow, as mine ceases to function. In the mean time I bought a Schumacher SC7500A charger maintainer and jumper in one and a Schumacher XP2260 portable jumper, air compressor, and a bunch of other stuff to keep in the truck in case it dies away from home.
Any ideas on where to check in the meantime? Nothing is being left on in the car, nothings running (sbc pump, compressor, "rest" feature), but its still drawing from somewhere..
Last edited by 03'55AMG; 01-27-2013 at 02:29 AM.

 01-26-2013 | 01:35 PM
#6

MBWorld Fanatic!
Joined: Dec 2006
Posts: 4,949
Likes: 38
From: Clifton, NJ
96 and 08 911 turbos
01-26-2013 | 04:58 PM
#7
Thread Starter
MBWorld Fanatic!
Joined: Jan 2011
Posts: 2,127
Likes: 4
From: Chicagoland
AMG
Yea, my space heater takes less that that. Got the current clamp, going to test it out later tonight. Start in the truck and work my way forward. I am really interested to see whats causing this.
Trending Topics
01-26-2013 | 05:35 PM
#8
Senior Member
Joined: Apr 2010
Posts: 368
Likes: 0
From: Anaheim, CA
'04 E55 AMG
Here is what you do. Get a test light and stick it between the positive battery post and cable but do it without breaking the connection between the two. You will notice the test light will be lit meaning there is a draw.
What you do now is remove a fuse one by one but replace it if the light doesn't go away. When you do find the right component causing the current draw the light on the test light will go away. (Ex. When you remove the fuse for the 12v cig lighter the light on the test light goes away meaning the cig lighter is causing the draw)
What you do now is remove a fuse one by one but replace it if the light doesn't go away. When you do find the right component causing the current draw the light on the test light will go away. (Ex. When you remove the fuse for the 12v cig lighter the light on the test light goes away meaning the cig lighter is causing the draw)
01-26-2013 | 06:32 PM
#10
Thread Starter
MBWorld Fanatic!
Joined: Jan 2011
Posts: 2,127
Likes: 4
From: Chicagoland
AMG
I bought a current meter so I will just use that, Already started too, at idle, with EVERYTHING off an untouched for 10 minutes, its drawing 1.7 amps. I will update in a bit
01-26-2013 | 06:48 PM
#11
Thread Starter
MBWorld Fanatic!
Joined: Jan 2011
Posts: 2,127
Likes: 4
From: Chicagoland
AMG
This is after opening the trunk:

This is after 5 minute wait, the drivers door open:
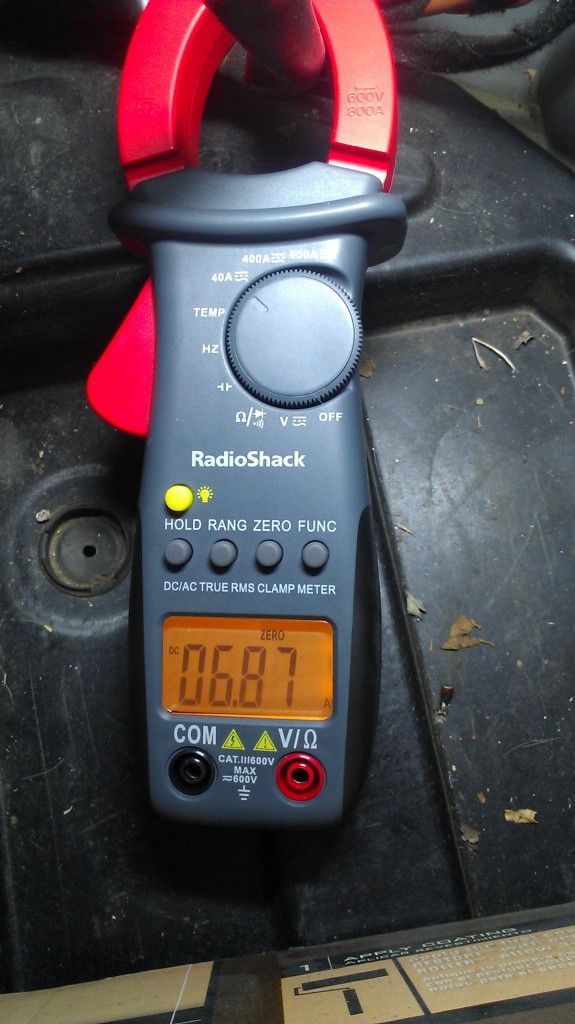
This is a weird one, this was during the 5 minute wait, first pic is with everything off, all idle after about 3 minutes, then it jumped significantly to the second pic, and lasted for about 10 seconds. Nothing turned on, nothing changed.
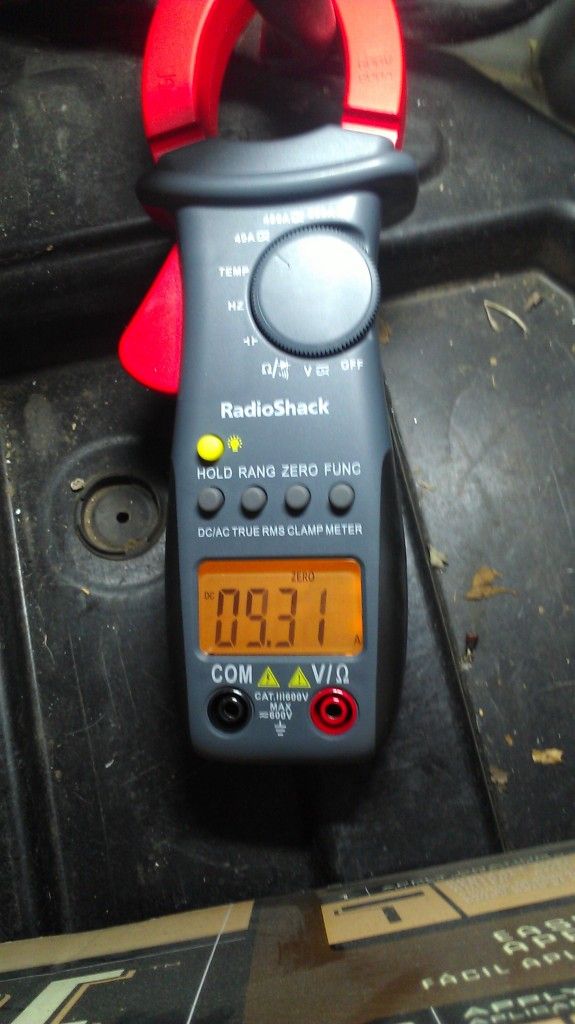
So the draw when car is sleeping at night is around 1.5 amps. Time to start pulling fuses!
EDIT: This is the tester I am using. Accuracy is +/_ 8 on the last digit.
This is after 5 minute wait, the drivers door open:
This is a weird one, this was during the 5 minute wait, first pic is with everything off, all idle after about 3 minutes, then it jumped significantly to the second pic, and lasted for about 10 seconds. Nothing turned on, nothing changed.
So the draw when car is sleeping at night is around 1.5 amps. Time to start pulling fuses!
EDIT: This is the tester I am using. Accuracy is +/_ 8 on the last digit.
Last edited by 03'55AMG; 01-26-2013 at 06:52 PM.
01-26-2013 | 07:50 PM
#12

MBWorld Fanatic!
Joined: Feb 2010
Posts: 1,477
Likes: 5
From: Los Angeles
04 CL55 (sold), 2012 CLS550 (sold), 2014 S550 (sold), 2015 ES300H (DAILY)

 01-26-2013 | 10:44 PM
#17
Thread Starter
MBWorld Fanatic!
Joined: Jan 2011
Posts: 2,127
Likes: 4
From: Chicagoland
AMG
I went ahead and tested all the fuses again to be sure, and the locking gas cap was taking current too, even though the fuse IS good, it doesn't work.. Gas cap never locks. So there's obviously something wrong there. Now it sits right around 220 milliamps. Would it be easier just to ditch the audio gateway and go with pioneers radio for the E55 and use an aftermarket amp? I want to retain stock look inside the car. Now I guess I will charge up the battery and see how things go overnight!
EDIT: Not pioneer, I meant dynavin. It has a built in amplifier so would this plug and play w/o the audio gateway installed?
http://www.dynavin.com/products/product_dnv_mbe.php
EDIT: Not pioneer, I meant dynavin. It has a built in amplifier so would this plug and play w/o the audio gateway installed?
http://www.dynavin.com/products/product_dnv_mbe.php
Last edited by 03'55AMG; 01-26-2013 at 11:14 PM.
01-27-2013 | 12:26 AM
#18

MBWorld Fanatic!
Joined: Oct 2012
Posts: 1,242
Likes: 7
From: Canada
2004 E55 AMG
I went ahead and tested all the fuses again to be sure, and the locking gas cap was taking current too, even though the fuse IS good, it doesn't work.. Gas cap never locks. So there's obviously something wrong there. Now it sits right around 220 milliamps. Would it be easier just to ditch the audio gateway and go with pioneers radio for the E55 and use an aftermarket amp? I want to retain stock look inside the car. Now I guess I will charge up the battery and see how things go overnight!
EDIT: Not pioneer, I meant dynavin. It has a built in amplifier so would this plug and play w/o the audio gateway installed?
http://www.dynavin.com/products/product_dnv_mbe.php
EDIT: Not pioneer, I meant dynavin. It has a built in amplifier so would this plug and play w/o the audio gateway installed?
http://www.dynavin.com/products/product_dnv_mbe.php
 01-27-2013 | 09:02 AM
#20
Thread Starter
MBWorld Fanatic!
Joined: Jan 2011
Posts: 2,127
Likes: 4
From: Chicagoland
AMG
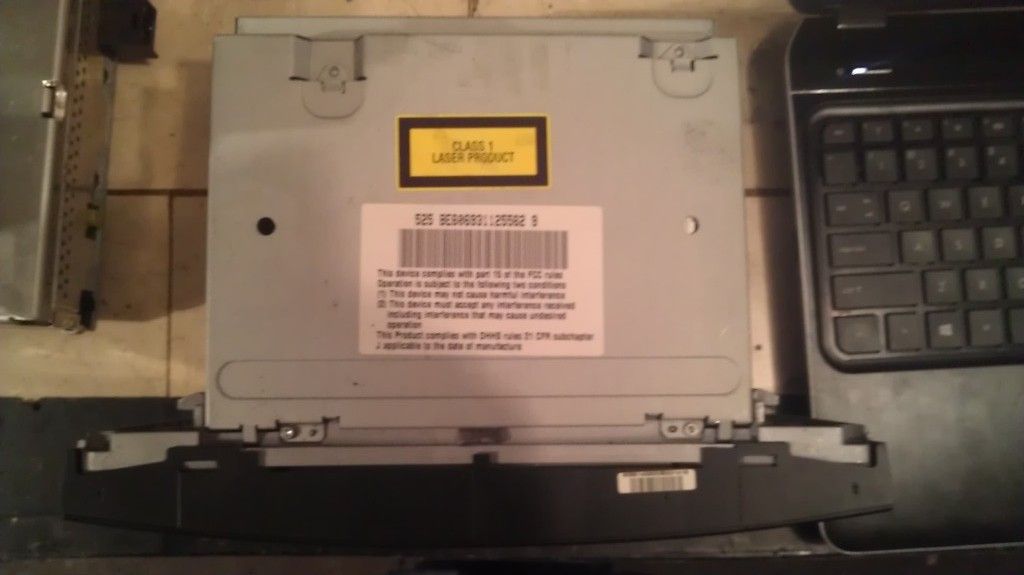
I figured I would go ahead and remove the audio gateway and radio to try and get these replaced here pretty soon, so I figured I would post some more pictures so people will know how to remove the audio gateway.
To start you will need to remove the left side trunk cover, info on how to do this should be available already. If not, its pretty simple as is, just remove the fasteners and two torx screws on the cargo tie down points and remove the panel. Then you will see the spot where all the fuses go into, and a LOT of wires coming to/from it. TERRIBLE PICTURES, but I hope you can make them out.
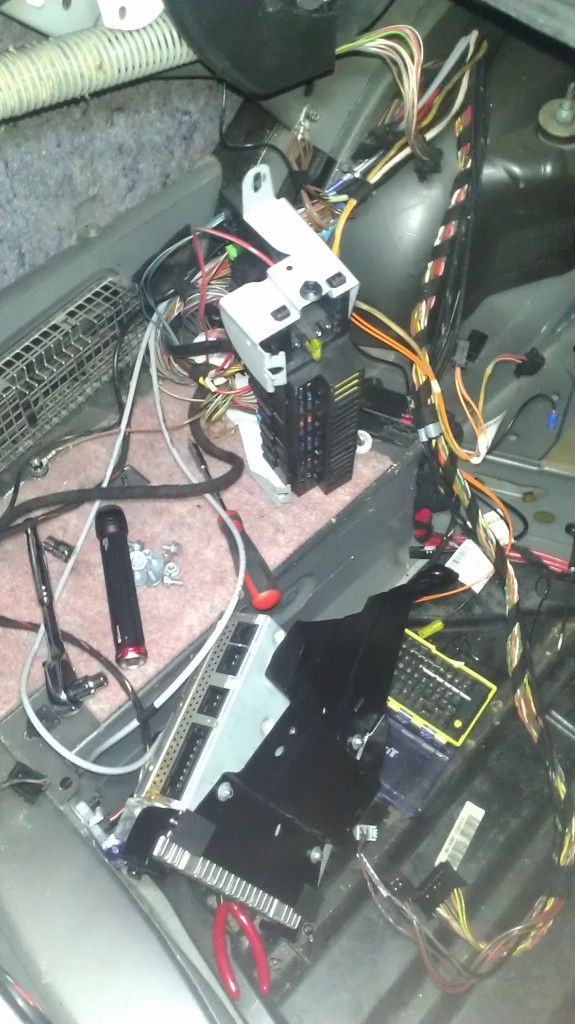
There is a 10mm bolt at the top that you have to remove, and two 10mm nuts that have to be removed as well, then it slides out enough to get to the audio gateway. It is tucked up and behind the metal plate, in between the quarter panel and the trunk.
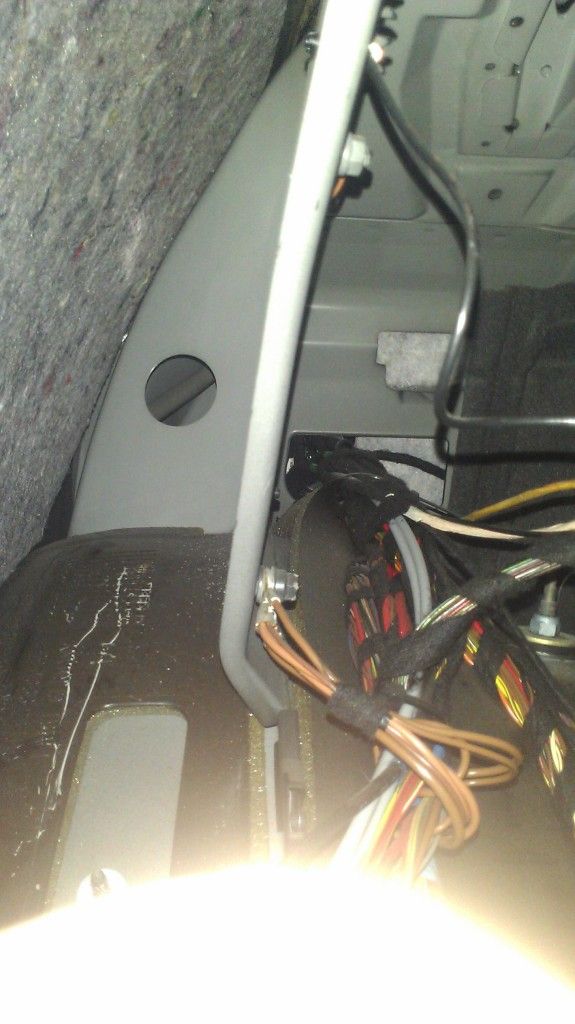
I found it easier to also remove the black metal "rail" that the little pump for seats rests on off, too. To do this just remove the 4 10mm bolts that fasten it, two at the bottom and two up top.
Now you have to remove another 10mm nut and two more 10mm bolts that hold in the audio gateway, and it will come out. The nut is directly behind the wires on the fuse holder. It is on the curve of the wheel well.
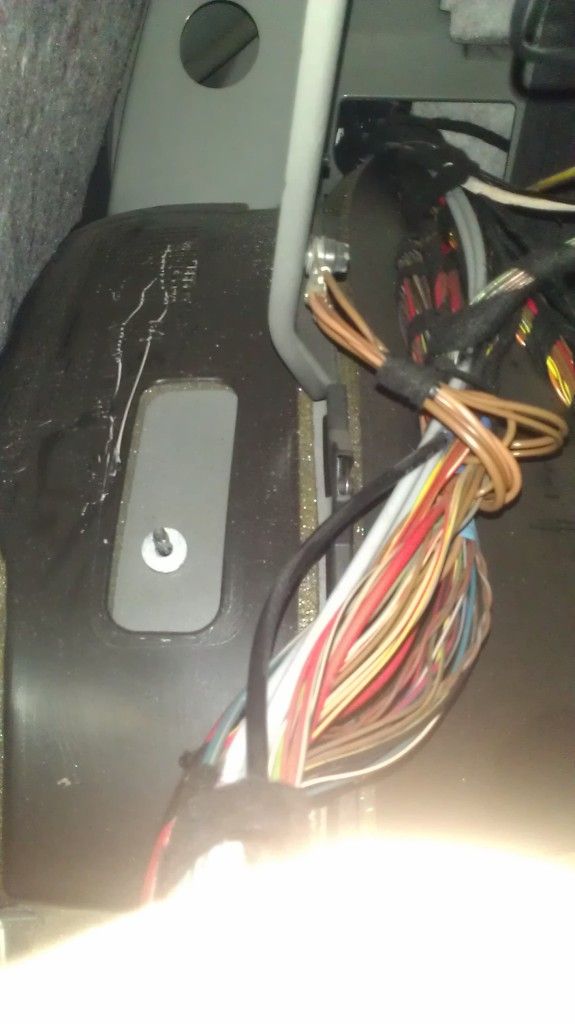
The two bolts are near the bolt that held the fuse block in place, and then you can remove it enough to unhook the connectors. There are 2 antenna wires, and a black connector that looks exactly like the one on the back of the radio.
then 4 more connectors on the other side, then it is free to come out.
Then there a 4 more smaller nuts to remove it from the bracket.
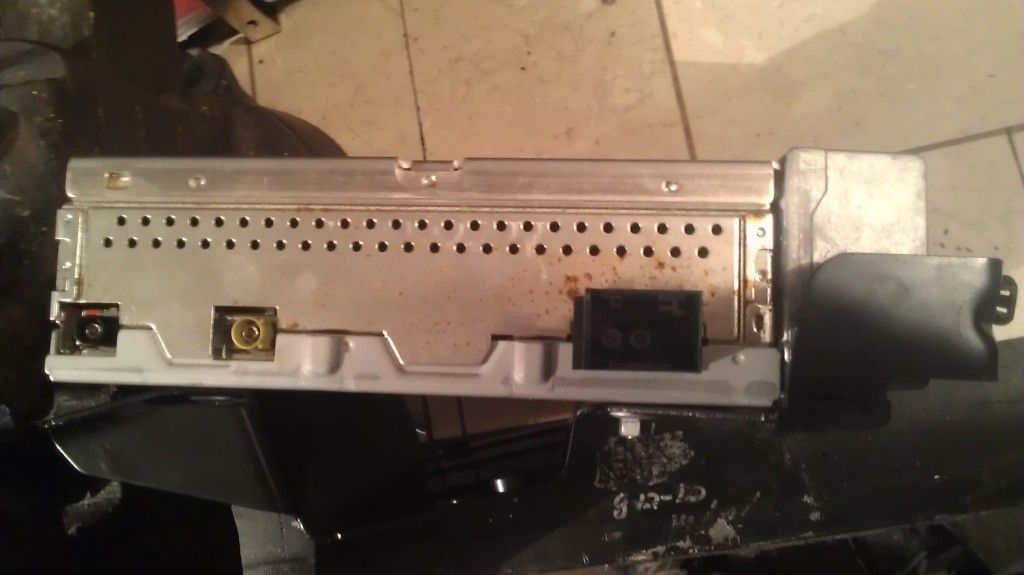
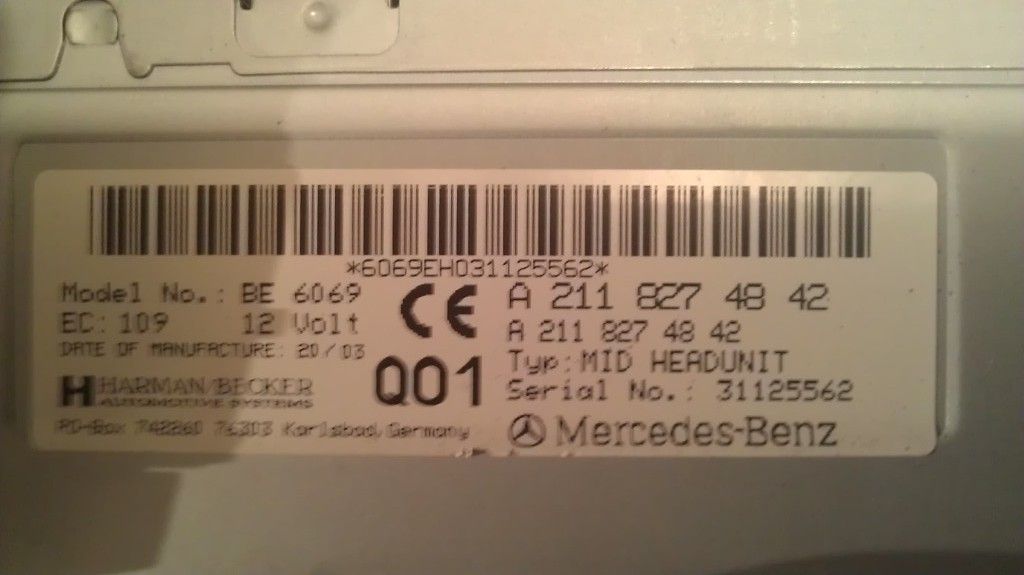
Here the part # for the audio gateway
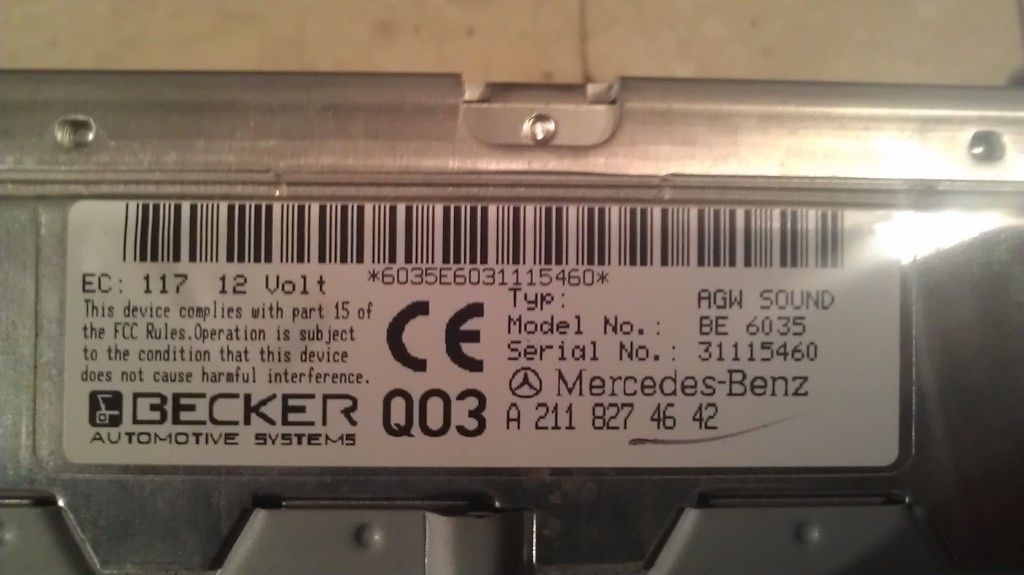
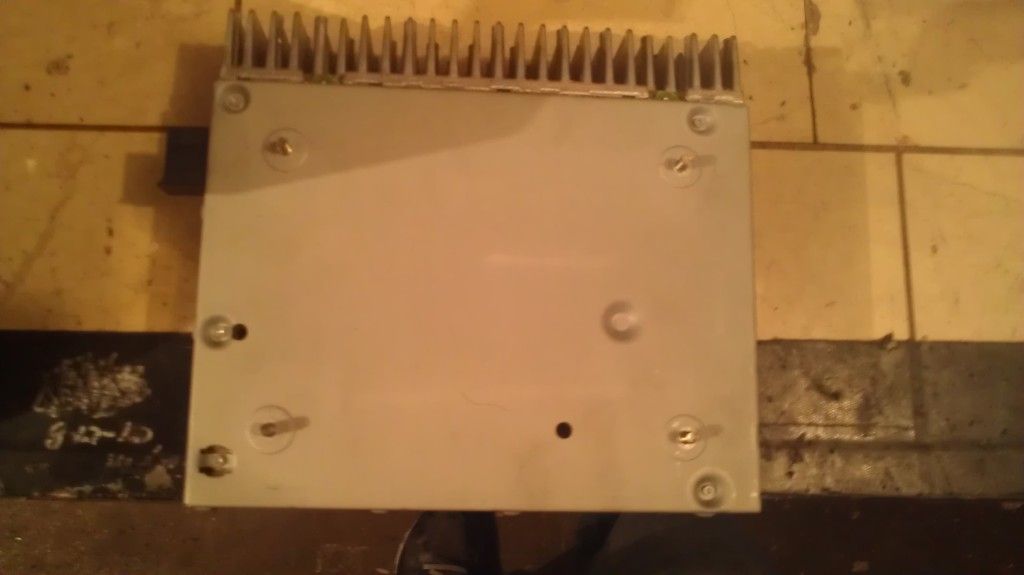
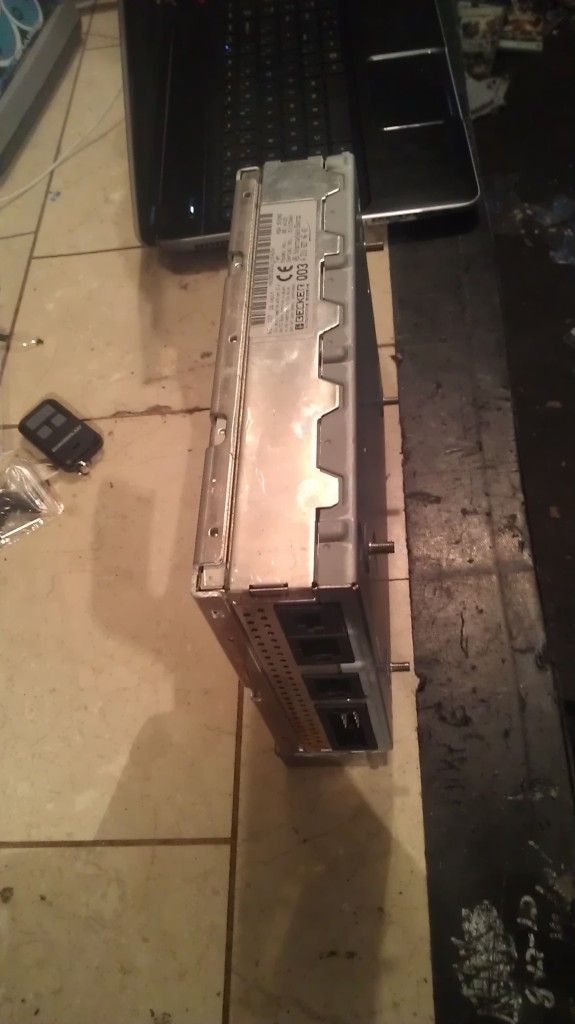
More pictures of the gateway
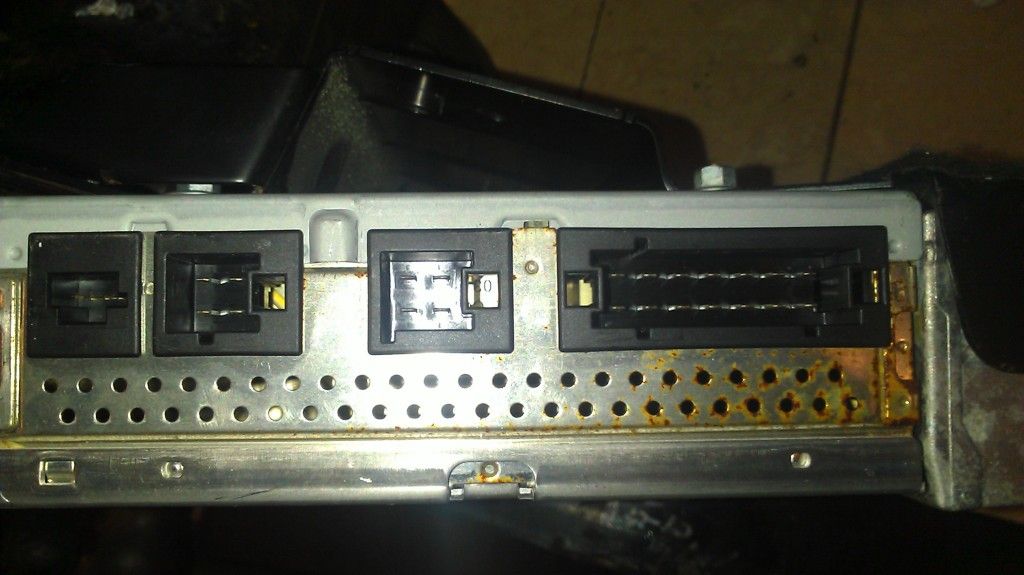
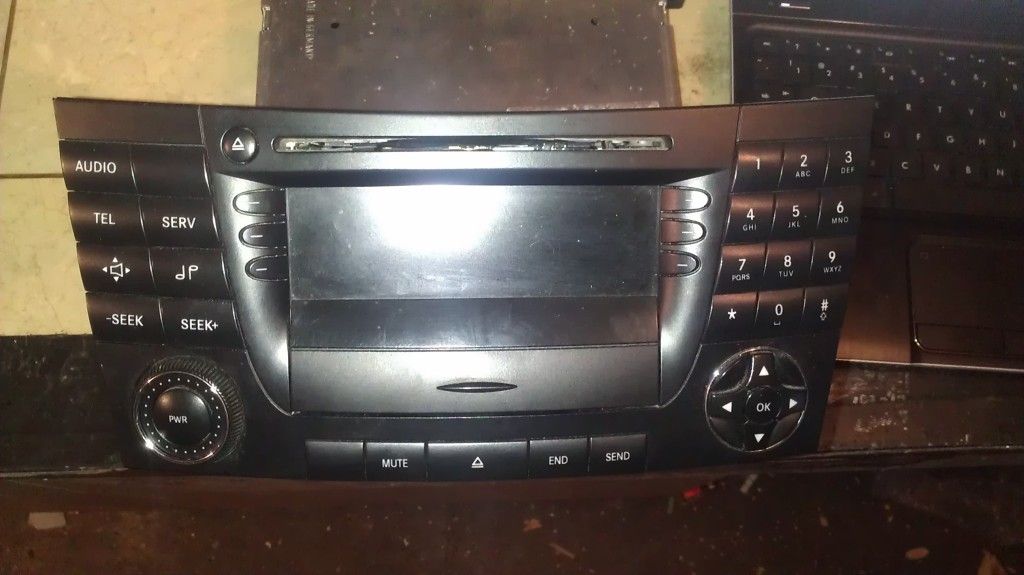
Here is the stock audio 50 radio, and accompanying part #s.
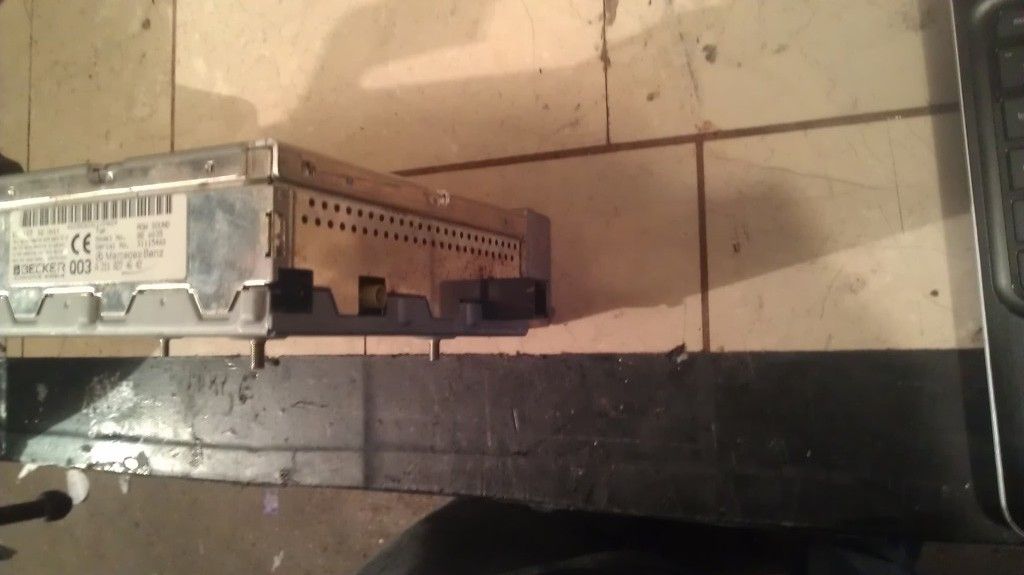
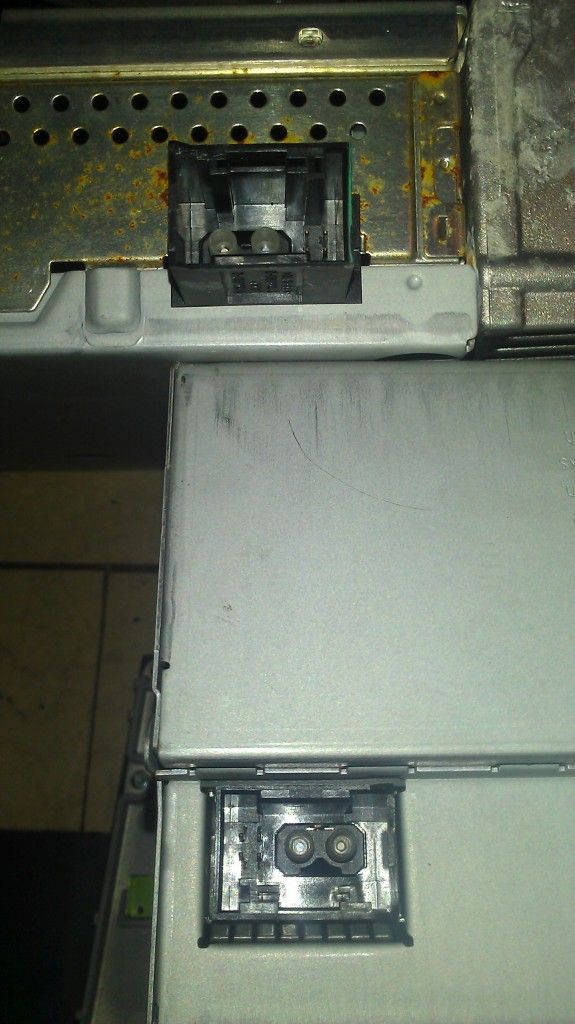
This is once comparing the connectors to the radio (bottom) to the audio gateway (top).
To start you will need to remove the left side trunk cover, info on how to do this should be available already. If not, its pretty simple as is, just remove the fasteners and two torx screws on the cargo tie down points and remove the panel. Then you will see the spot where all the fuses go into, and a LOT of wires coming to/from it. TERRIBLE PICTURES, but I hope you can make them out.
There is a 10mm bolt at the top that you have to remove, and two 10mm nuts that have to be removed as well, then it slides out enough to get to the audio gateway. It is tucked up and behind the metal plate, in between the quarter panel and the trunk.
I found it easier to also remove the black metal "rail" that the little pump for seats rests on off, too. To do this just remove the 4 10mm bolts that fasten it, two at the bottom and two up top.
Now you have to remove another 10mm nut and two more 10mm bolts that hold in the audio gateway, and it will come out. The nut is directly behind the wires on the fuse holder. It is on the curve of the wheel well.
The two bolts are near the bolt that held the fuse block in place, and then you can remove it enough to unhook the connectors. There are 2 antenna wires, and a black connector that looks exactly like the one on the back of the radio.
then 4 more connectors on the other side, then it is free to come out.
Then there a 4 more smaller nuts to remove it from the bracket.
Here the part # for the audio gateway
More pictures of the gateway
Here is the stock audio 50 radio, and accompanying part #s.
This is once comparing the connectors to the radio (bottom) to the audio gateway (top).
Last edited by 03'55AMG; 01-27-2013 at 09:05 AM.
01-27-2013 | 10:22 AM
#21
MBWorld Fanatic!
Joined: Oct 2012
Posts: 1,242
Likes: 7
From: Canada
2004 E55 AMG
01-27-2013 | 06:48 PM
#23
MBWorld Fanatic!
Joined: Oct 2012
Posts: 1,242
Likes: 7
From: Canada
2004 E55 AMG
that part alone is 500-550. I just got one off the forum member. If you don't want to do get that part, you'd have to replace all the speakers, wiring, and amp or convert it to NTG 2.5 system which I don't have much knowledge about.
Here this would help
https://mbworld.org/forums/w211-amg/...tallation.html
01-27-2013 | 08:53 PM
#24
Thread Starter
MBWorld Fanatic!
Joined: Jan 2011
Posts: 2,127
Likes: 4
From: Chicagoland
AMG
That is a lot for a connector for the MOST features.. I think I may have to do the dynavin, to keep costs down and make it simple. I REALLY dont want a dash kit, and I don't have what it takes right now to make a custom one. Hopefully I can find some more info on it.
01-27-2013 | 10:30 PM
#25
MBWorld Fanatic!
Joined: Oct 2012
Posts: 1,242
Likes: 7
From: Canada
2004 E55 AMG
I agree with you but I had no other option, lol it was either spending money on this or spending even more in replacing everything. I just don't wanted dynavin cuz of the no name brand and lacking features compared to AVIC.


