


M113k head gasket/long block rebuild

Thread Starter
Super Member
Joined: Feb 2013
Posts: 659
Likes: 25
From: SE MI
2005 Mercedes E55 AMG

It has held up well on the Cobra, just need to give it very ample cure time. I was a bit rushed on the E55 so it likely didn't set like I wanted it to. The way I disconnected the plastic cage, however, the pumps still retain their position in the basket so I'm not worried about it for now. I'll have to look into that Yamabond, always willing to jump ship for something better
MBWorld Fanatic!

Joined: Dec 2006
Posts: 1,124
Likes: 32
From: Florida-Germany-New York
2004 E55,1969 300SEL6.3,2011 ML350 BlueTec Diesel,2005 ML400 CDI
I will be replacing my pump/filter assemblies next year simply as a preventative maintenance item. Now, as I have posted before, I do not use any ethanol laced gasoline. To date the pumps show no indication of excessive current draw. To my point of view, the current pump/filter assemblies will provide more than enough capacity and are designed for non-return systems. Looking at supply fuel line sizes, I believe they need to be increased for BHP exceeding 700. I suspect some 113K's are on the very edge of capacity based on the existing line size.
Any thoughts on this?
Any thoughts on this?
Thread Starter
Super Member
Joined: Feb 2013
Posts: 659
Likes: 25
From: SE MI
2005 Mercedes E55 AMG
I will be replacing my pump/filter assemblies next year simply as a preventative maintenance item. Now, as I have posted before, I do not use any ethanol laced gasoline. To date the pumps show no indication of excessive current draw. To my point of view, the current pump/filter assemblies will provide more than enough capacity and are designed for non-return systems. Looking at supply fuel line sizes, I believe they need to be increased for BHP exceeding 700. I suspect some 113K's are on the very edge of capacity based on the existing line size.
Any thoughts on this?
Any thoughts on this?
Regarding line size, I have not bothered to look into them. My pumps and injectors should be good for at least 900 bhp on corn so if I turn up the power and experience a pressure drop, I'll know I'm at the limit of the line. Through my research thus far, I haven't seen anyone hit the limit of our stock line size on 93 octane.
MBWorld Fanatic!
Joined: Mar 2011
Posts: 1,835
Likes: 12
From: The Granite State
.
This might be unrelated,, but a recent issue of HOTROD had a pretty thorough article on counterfeit parts...... Aeromotive was one of the companies that struggles to prevent counterfeiting of their products, so it's possible that some of the complaints about "bad batches" of pumps might actually just be people who unintentionally bought fakes....
Comp cams, Autometer and MSD were also listed in the article as companies who are routinely targeted by counterfeiters.
-G
Comp cams, Autometer and MSD were also listed in the article as companies who are routinely targeted by counterfeiters.
-G
Thread Starter
Super Member
Joined: Feb 2013
Posts: 659
Likes: 25
From: SE MI
2005 Mercedes E55 AMG
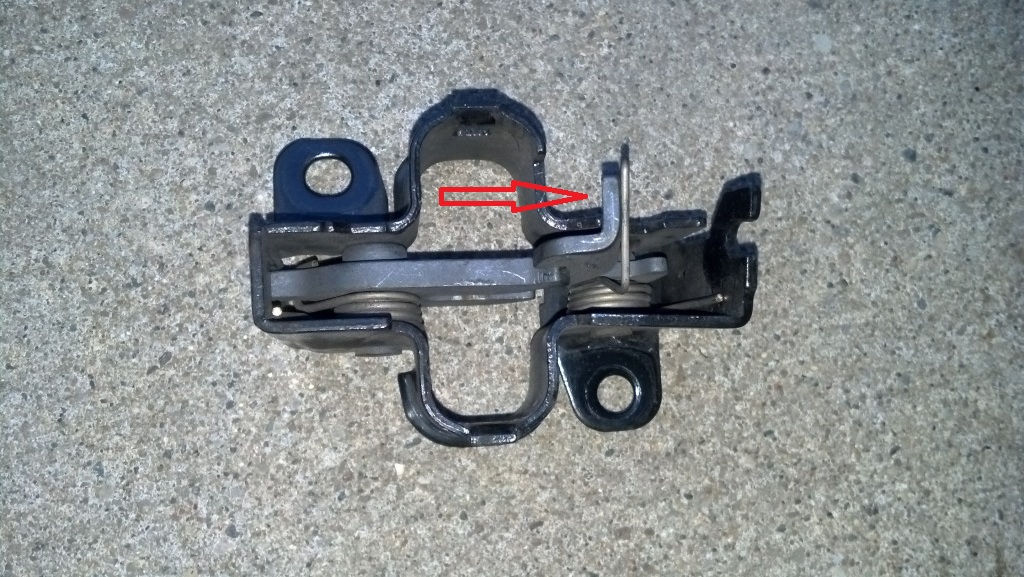
So when I had everything apart, the only item in front of the engine really was the hood release cable because I had everything else removed. At some point I either stretched or damaged the cable because when I put everything back together and closed the hood, my passenger hood latch refused to open. I was stumped for awhile and everything I read stated people just took the car to the dealer and paid 350-400 between parts and labor to get the hood open and have the cable replaced. Obviously, I don't do dealerships. In 2010, a member on here (reitmeid) posted a quick instruction on how to access the latch from underneath. Big shout out to him, I would have probably gone a different route and possibly damaged something.
This is how to get the hood open if your passenger side latch stops working:
- Remove the passenger front wheel
- Remove the front portion of the wheel well
- Remove the under tray that mounts to the front bumper
- Unbolt the oil cooler assembly and push it to the side
- Looking straight up outboard of the framerail near the back of the headlight housings, theres a kidney shaped plastic cover, this houses the bottom of the latch. Obviously since it's up near the hood it's pretty far away so you'll have to use some long needle nose pliers or a similar tool to remove this
(I can't find a picture of the part online so I'll take one later and update this)
- Now you can see the bottom of the latch. Use the needle nose pliers or a long flathead screwdriver and push the latch toward the center of the car. This should trip the latch and allow you to open the hood
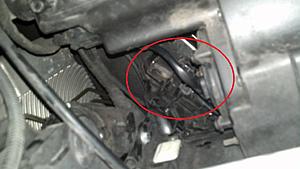
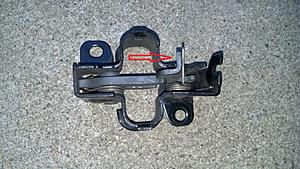
Voila.
This is how to get the hood open if your passenger side latch stops working:
- Remove the passenger front wheel
- Remove the front portion of the wheel well
- Remove the under tray that mounts to the front bumper
- Unbolt the oil cooler assembly and push it to the side
- Looking straight up outboard of the framerail near the back of the headlight housings, theres a kidney shaped plastic cover, this houses the bottom of the latch. Obviously since it's up near the hood it's pretty far away so you'll have to use some long needle nose pliers or a similar tool to remove this
(I can't find a picture of the part online so I'll take one later and update this)
- Now you can see the bottom of the latch. Use the needle nose pliers or a long flathead screwdriver and push the latch toward the center of the car. This should trip the latch and allow you to open the hood

Voila.
MB World Stories
The Best of Mercedes & AMG

Manual Mercedes? 6 Times Sindelfingen Let Drivers Have All The Fun
Verdad Gallardo
Mercedes SLR McLaren 722 S Is Extremely Rare Example Modified by McLaren
Verdad Gallardo
8 Classic Boxy Mercedes Designs That Have Aged Like Fine Wine
Verdad Gallardo
Flawlessly Restored Mercedes 190E Evo II Heads to Auction
Verdad Gallardo
Electric Mercedes C-Class Unveiled: 11 Things You Need to Know
Verdad Gallardo
Mercedes EQS Gets A Major Update: Everything You Need to Know
Verdad Gallardo
5 Underrated Mercedes-Benz Models That Don't Get the Love They Deserve
Verdad Gallardo
Mercedes 300D Has Pushed Well Past 1 Million Miles and It Ain't Stopping
Verdad Gallardo
10 Most Reliable Mercedes-Benz Models You Can Buy Used
Verdad Gallardo
Thread Starter
Super Member
Joined: Feb 2013
Posts: 659
Likes: 25
From: SE MI
2005 Mercedes E55 AMG
Haven't updated in awhile...
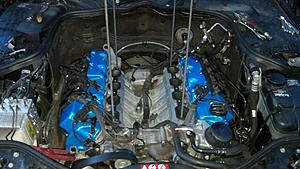
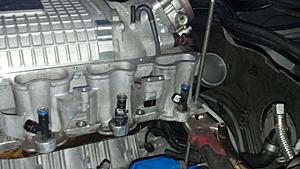
I've got the blower off right now, in the process of relocating my water injection nozzle and outfitting sensors for the Zeitronix ZT-2 datalogging system. Previously, I had the nozzle coming in from the driver side but since I'm relocating my stock IAT sensor to the passenger surge tank, I wanted to make sure the spray was more uniform between the two banks. I'd really like to replace the straight quick release adapter with a 90 for a little more clearance to the engine valley, but as it stands this should still fit (barely). I'll also be wrapping the nylon line and fitting in a spark plug boot sleeve to protect it from heat.
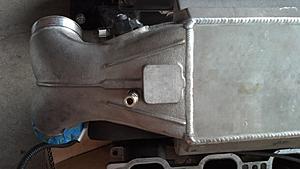
Stock IAT sensor has been relocated to the passenger side surge, along with the aftermarket MAP sensor for the Zeitronix. The nipple is for vacuum reference going to the water injection in the trunk. The aftermarket IAT sensor for the Zeitronix is in the driver side surge so I can compare the two. The aftermarket IAT has FAR better resolution and the Zeitronix has a much higher refresh rate so I'll be monitoring that sensor more closely. I moved the nozzle further upstream and the stock IAT for downstream to try and ensure and even water distribution before the air hits the IAT.. but we'll see how that goes.
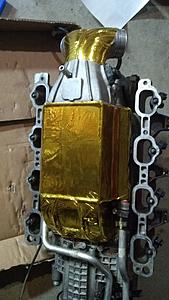
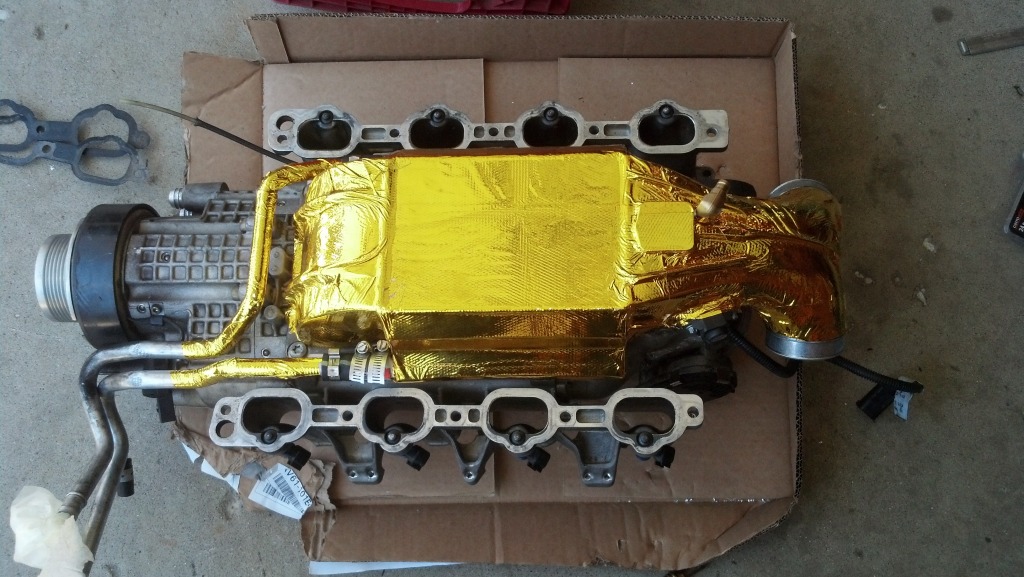
I can't find a lot of data on the effectiveness of thermal barriers within the engine valley, but for $50 I figured I would give it a shot. I'll finish wrapping the intercooler, and likely wrap the coolant lines forward to a certain extent.
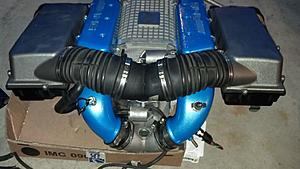
Also threw this puppy on during the winter. The revised tune is pretty far off, which is what drove the purchase of the Zeitronix datalogging equipment.. need to get this thing back to tip top shape.
Current sight at the house
I've got the blower off right now, in the process of relocating my water injection nozzle and outfitting sensors for the Zeitronix ZT-2 datalogging system. Previously, I had the nozzle coming in from the driver side but since I'm relocating my stock IAT sensor to the passenger surge tank, I wanted to make sure the spray was more uniform between the two banks. I'd really like to replace the straight quick release adapter with a 90 for a little more clearance to the engine valley, but as it stands this should still fit (barely). I'll also be wrapping the nylon line and fitting in a spark plug boot sleeve to protect it from heat.

Stock IAT sensor has been relocated to the passenger side surge, along with the aftermarket MAP sensor for the Zeitronix. The nipple is for vacuum reference going to the water injection in the trunk. The aftermarket IAT sensor for the Zeitronix is in the driver side surge so I can compare the two. The aftermarket IAT has FAR better resolution and the Zeitronix has a much higher refresh rate so I'll be monitoring that sensor more closely. I moved the nozzle further upstream and the stock IAT for downstream to try and ensure and even water distribution before the air hits the IAT.. but we'll see how that goes.

I can't find a lot of data on the effectiveness of thermal barriers within the engine valley, but for $50 I figured I would give it a shot. I'll finish wrapping the intercooler, and likely wrap the coolant lines forward to a certain extent.

Also threw this puppy on during the winter. The revised tune is pretty far off, which is what drove the purchase of the Zeitronix datalogging equipment.. need to get this thing back to tip top shape.
Current sight at the house

Last edited by rockthemullet; Jun 20, 2014 at 08:47 AM.


Thread Starter
Super Member
Joined: Feb 2013
Posts: 659
Likes: 25
From: SE MI
2005 Mercedes E55 AMG
99 Cobra (black), forged 4.6/built auto/built IRS/Borg Warner turbo/serious chassis mods
03 Mach1 (blue), procharger/5spd
69 MB 280S, 302/C4 swap/original paint
05 E55, obviously
07 TBSS, nearly stock daily
Everything has a v8, haha
Last edited by rockthemullet; Jun 20, 2014 at 02:19 PM.
Thread Starter
Super Member
Joined: Feb 2013
Posts: 659
Likes: 25
From: SE MI
2005 Mercedes E55 AMG
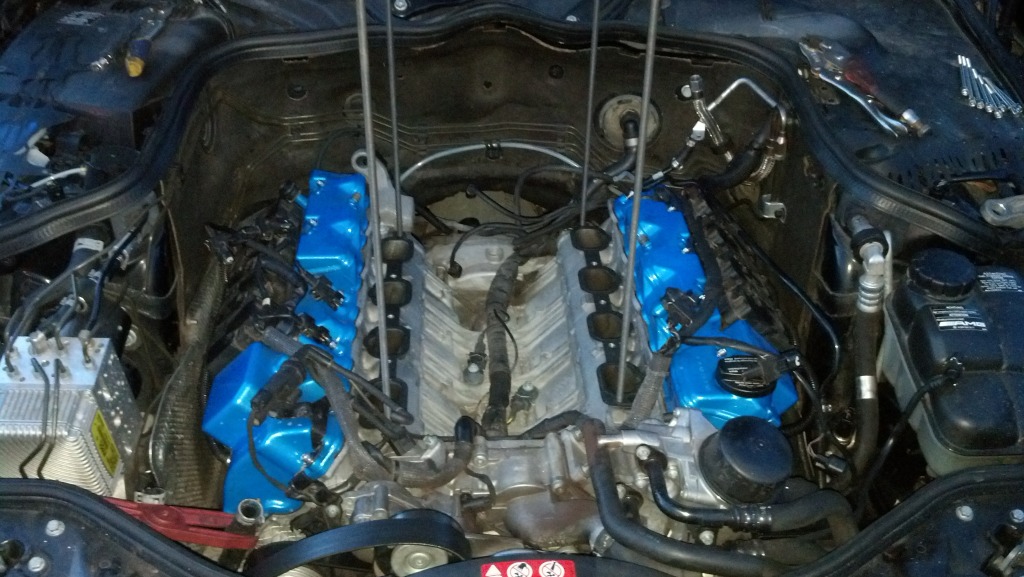
Finished the gold wrap and swapped out the straight nozzle adapter for a 90� one

Here's a little trick you guys may or may not want to use. Since our blowers are so damn heavy and I find myself taking it on and off quite often, I bought some threaded rod to better control the assembly when putting it back in place. This helps to keep from damaging the intake gaskets and allows me to hover the blower with vise grips when I'm trying to hook up the injection nozzle or ensure everything is out of the way.
Cost: $21
Here's a little trick you guys may or may not want to use. Since our blowers are so damn heavy and I find myself taking it on and off quite often, I bought some threaded rod to better control the assembly when putting it back in place. This helps to keep from damaging the intake gaskets and allows me to hover the blower with vise grips when I'm trying to hook up the injection nozzle or ensure everything is out of the way.

Cost: $21
MBWorld Fanatic!


Joined: Aug 2012
Posts: 1,790
Likes: 109
From: DownEast Maine
CLS 55 AMG E500 ML320
Looks good man! There is stuff called fiberfrax developed by NASA, ceramic fiber insulation. It comes in blankets, paper etc. Wrap 3mm around your finger and put a blow torch to it, you'll be impressed. Google it. Might be what your looking for.
Thread Starter
Super Member
Joined: Feb 2013
Posts: 659
Likes: 25
From: SE MI
2005 Mercedes E55 AMG
1969 280s (W108)
Super Member
Joined: Nov 2012
Posts: 698
Likes: 16
From: Germany
C215 CL55 AMG, W124 500E, W210 E430, W124 300E
I would be very interested in whats the best heat insulation for our medium-temps inside engine bays.
A ceramic coated thing sheet of aluminium might work good as well. There are very good products by for instance "Techline coatings".
There are so many products on the market that are made to insulate ovens from inside and stuff, but i dont really believe they are suitable for cars engines.
Member
Joined: Sep 2014
Posts: 190
Likes: 4
Subies
So how is the car doing? Have you dyno'd it lately? I'm curious about the pressure limits of this stock supercharger. Any idea what the intake temps are?
I apologize. I'm a fabricator and have been working on cars for quite a while. My interests have recently turned to this vehicle.
I apologize. I'm a fabricator and have been working on cars for quite a while. My interests have recently turned to this vehicle.
Thread Starter
Super Member
Joined: Feb 2013
Posts: 659
Likes: 25
From: SE MI
2005 Mercedes E55 AMG
So how is the car doing? Have you dyno'd it lately? I'm curious about the pressure limits of this stock supercharger. Any idea what the intake temps are?
I apologize. I'm a fabricator and have been working on cars for quite a while. My interests have recently turned to this vehicle.
I apologize. I'm a fabricator and have been working on cars for quite a while. My interests have recently turned to this vehicle.
https://mbworld.org/forums/w211-amg/...tor-build.html
I could update that one, but the car is back up and running strong
Member
Joined: Sep 2014
Posts: 190
Likes: 4
Subies
This thread evolved into the thread below
https://mbworld.org/forums/w211-amg/...tor-build.html
I could update that one, but the car is back up and running strong
https://mbworld.org/forums/w211-amg/...tor-build.html
I could update that one, but the car is back up and running strong
Thank you. GOing there now.
MBWorld Fanatic!
Joined: Oct 2011
Posts: 2,279
Likes: 27
From: A to the Z (the state)
'06 E55
Member
Joined: Sep 2014
Posts: 190
Likes: 4
Subies
It seems there isn't much to do here. The motor is apparently built well enough to handle the limits of the stock supercharger. Simply limited by the supercharger.
Honestly, It looks like 550 whp on cooled off intake runs via E-85 is about the max this thing can go. Over boost it and you're just heating things up for less power. I'm just starting the research, and I may still be wrong, but this is what I am finding. I haven't found out the typical Boost level that would be at though.
The larger Supercharger option is Close to $10K. (Weistec?) I see diminishing returns in that prospect unless you are very very hard core. And I personally feel 500-550 whp is not bad at all for this car. Comfortable, classy and Faster than 95(?) Percent of the cars out there? Sounds like a perfect family car for me.. I already have a race car.. - In my Avatar.
I'm just here to figure out my best bang for the buck. I'm also trying to figure out the things to look for when I purchase, like SHOCKS and SBC issues. It looks like I can afford to replace those, specially since I will be doing it myself, But I would like to avoid any issues like that right off the bat.

MBWorld Fanatic!

Joined: Oct 2011
Posts: 1,060
Likes: 38
From: USA
'06 E55 AMG
95ONE- I think I remember your username from Rennlist? I had a 944 with an LS2 swap...back when it wasn't cool. Maybe it still isn't though haha.
You have a good handle and start on the E55. I think you'd really enjoy one.
You have a good handle and start on the E55. I think you'd really enjoy one.
Member
Joined: Sep 2014
Posts: 190
Likes: 4
Subies
My life is starting to come back together after being sick for about 5 months. Doctors have NO IDEA what it was. Just glad it's over.
Your 944 is pretty damn cool.. always.
I'm really liking this car and would like to have a nice daily driver again. I'm after the Dual personality of this car. Houston doesn't have many turns, and everyone here is into power only. This car is a nice sleeper. I'm weighing heavily on buying one, and pretty sure I am. That could change at a moments notice... But I think this is the next one. When I start creeping around on forums, I've usually already made the decision.
Last edited by 95ONE; Oct 5, 2014 at 06:09 PM.
MBWorld Fanatic!
Joined: Oct 2011
Posts: 1,060
Likes: 38
From: USA
'06 E55 AMG
I think based upon your situation, and lack of twisty roads, you would enjoy the E55. It really does do the dual personality well. The turning is....good enough. It's very easy to work on and I recommend getting a STAR diagnostic through Shardul. Opens up all kinds of doors.
I personally like the Airmatic after living with coilovers on my DD for 10 years. Arnott is excellent to work with and offers a lifetime warranty. A lot of the cars you'll test drive will have a dead I/C pump. As long as you know that going in!


