


 keep up the good work, and good luck


M113k head gasket/long block rebuild

Thread Starter
Super Member
Joined: Feb 2013
Posts: 659
Likes: 25
From: SE MI
2005 Mercedes E55 AMG
M113k head gasket/long block rebuild
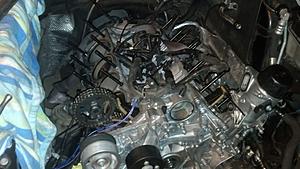
So I haven't been in the Mercedes game for very long, picked up my E55 in March of this year... but with all other platforms I've had, I'm never afraid to get dirty. I bought the car with around 95k on it and since day one I have experienced the slightest coolant consumption issue so I suspected the engine wasn't 100%. Recently, I had an intercooler hose failure (may have been my own doing) and had the engine get a bit hot (251�F). About a week later, I was doing a nice 150mph pull and I lifted the heads, pressurizing the coolant system and blowing the end tank on the radiator. Time for head gaskets.
Similar to a woman excusing the clutter when a visitor walks in the house, I'll say I don't own a 'shop' and my hands are always covered in dirt and oil so my pictures are messy and not meant to represent the level of care taken in my repairs, lol.
Tearing the car down, I was concerned that the excessive heat possibly warped the heads. The cams looked blued but Craig told me not to be worried.

I sent the heads out for a check and a clean up. I got the heads back, less one valve...
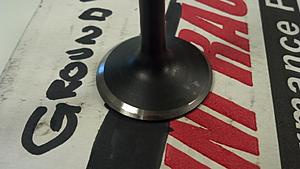
I'm not entirely sure when it happened, but I bent an intake valve. This could have happened due to valve float on a high speed run, during disassembly, or the machine shop could have mishandled it. Since the rest of the valvetrain looked fine, I put it back together stock. If something happens later, I'll go the modular 4V route and replace with beehive springs lightweight retainers.
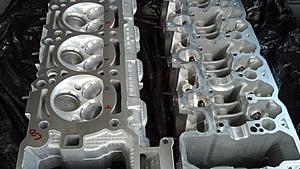
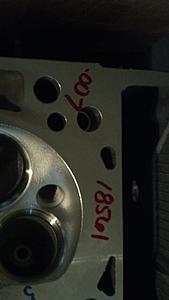
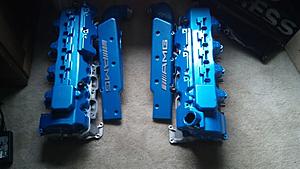
Heads looked good, small valve job and a redeck of .007 (well within sealing tolerance so the heads were thankfully not warped at 251�F).
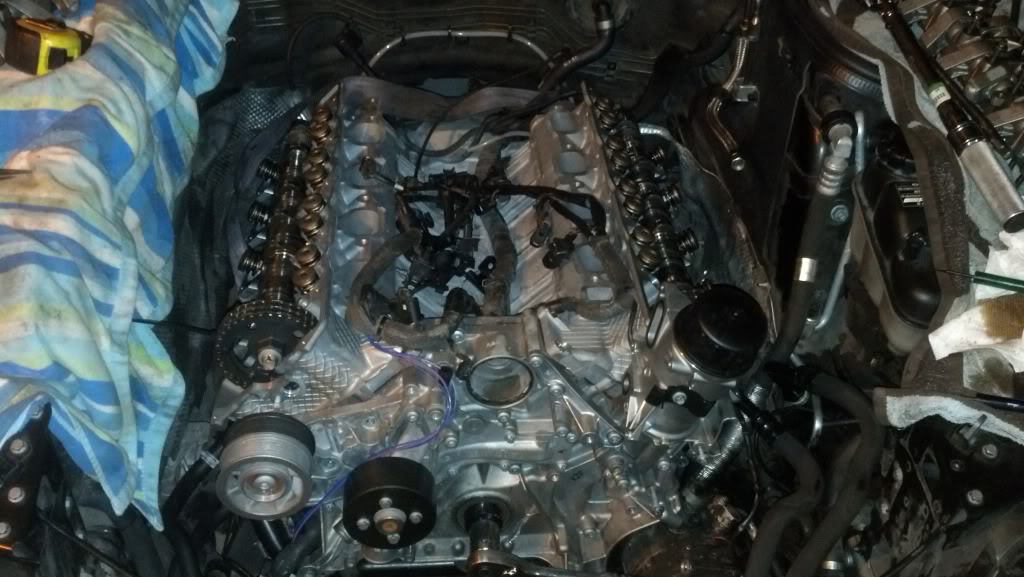
Reassembled

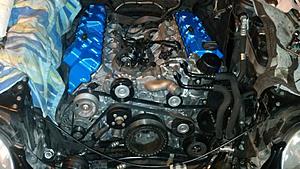
This time around I decided to run ARP studs. This was a mock up picture, the driver side studs actually have to be installed after the heads since the timing cover prevents the head from dropping straight onto the block.
Timing cover back on (REPLACE the two seals on the back of the timing cover! They're only $6!)
Heads back on, crank pulley about to go on to begin timing. Quick tip for the crank pulley (and any tight tolerance metal part for that matter), if you heat it to 250 in the oven the pulley will slip right on to the crank and slide all the way into position. This is due to material expansion. If you need a bearing inside a pocket, do the opposite and stick it in a freezer for a few hours.

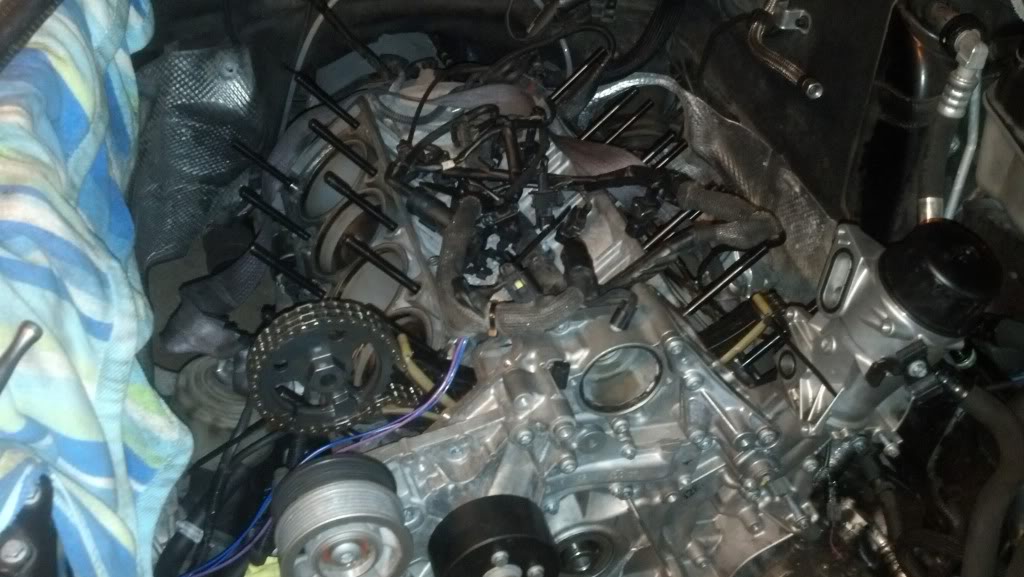
While everything was apart, I sent a few parts to my buddy for powder. The considered the timing cover but I ended up just cleaning it really well prior to reassembly.
So this is where I'm at now. I still need to reinstall the heads, blower, coolant system, etc. but the hard part is done. I'd really like to bring it up to MIR in November but I have a lot going on right now so we'll have to keep it a tentative. Not like I can get it out of the hole for a proper time with the damn Ventus RS3s.
The next time anything breaks, I'm building the short with high compression CPs and Carillos. Questions/concerns, let me know. I'm here to help, this forum has already helped me out quite a bit this year.
Similar to a woman excusing the clutter when a visitor walks in the house, I'll say I don't own a 'shop' and my hands are always covered in dirt and oil so my pictures are messy and not meant to represent the level of care taken in my repairs, lol.
Tearing the car down, I was concerned that the excessive heat possibly warped the heads. The cams looked blued but Craig told me not to be worried.
I sent the heads out for a check and a clean up. I got the heads back, less one valve...

I'm not entirely sure when it happened, but I bent an intake valve. This could have happened due to valve float on a high speed run, during disassembly, or the machine shop could have mishandled it. Since the rest of the valvetrain looked fine, I put it back together stock. If something happens later, I'll go the modular 4V route and replace with beehive springs lightweight retainers.
Heads looked good, small valve job and a redeck of .007 (well within sealing tolerance so the heads were thankfully not warped at 251�F).


Reassembled
This time around I decided to run ARP studs. This was a mock up picture, the driver side studs actually have to be installed after the heads since the timing cover prevents the head from dropping straight onto the block.

Timing cover back on (REPLACE the two seals on the back of the timing cover! They're only $6!)
Heads back on, crank pulley about to go on to begin timing. Quick tip for the crank pulley (and any tight tolerance metal part for that matter), if you heat it to 250 in the oven the pulley will slip right on to the crank and slide all the way into position. This is due to material expansion. If you need a bearing inside a pocket, do the opposite and stick it in a freezer for a few hours.
While everything was apart, I sent a few parts to my buddy for powder. The considered the timing cover but I ended up just cleaning it really well prior to reassembly.


So this is where I'm at now. I still need to reinstall the heads, blower, coolant system, etc. but the hard part is done. I'd really like to bring it up to MIR in November but I have a lot going on right now so we'll have to keep it a tentative. Not like I can get it out of the hole for a proper time with the damn Ventus RS3s.
The next time anything breaks, I'm building the short with high compression CPs and Carillos. Questions/concerns, let me know. I'm here to help, this forum has already helped me out quite a bit this year.
Thread Starter
Super Member
Joined: Feb 2013
Posts: 659
Likes: 25
From: SE MI
2005 Mercedes E55 AMG
 If you plan on taking the oil pan off (the lower or both), then I definitely suggest pulling the motor. The lower has to come off to remove the front timing cover but you can do head gaskets without removing the timing cover so if that's you're only aim then it won't be a big deal. I wanted to replace timing guides and chain since the motor has 107k but after looking at it all, I should have just replaced the tensioner, which will already be removed if you're doing head gaskets. The pans are a PAIN if the engine is still in and requires either the engine to be lifted about 10in or the front suspension to drop down.
Thanks! I was iffy but I think it's coming together. I plan on doing away with the stock air intakes so the valves covers should be a little more prominent later.
Thanks

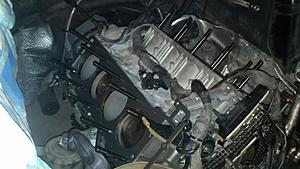
I got the blower, fuel rail, TB, water injection, surge tanks, misc. brackets, vac routing, upper pan, windage tray, and lower pan in place last night. Excuse the grainy pic, I don't take my good phone out to the garage, lol.

If I don't go out tonight, it'll be headers and FINALLY getting split cooling done. I just did NOT want to do the job with everything so confined at the front of the engine... now I have all the room in the world to do it correctly.
Last edited by rockthemullet; Oct 10, 2013 at 10:43 AM.

MBWorld Fanatic!


Joined: May 2010
Posts: 1,027
Likes: 55
05 E55 AMG, E320 CDI, Turbo E46 M3,IS300 2JZGTE,VQ35 Turbo Maxima, Mercedes 300D
Very nice ... respect for those that are willing to get their hands this dirty. I would have been too tempted to build the motor if the motor was apart this far  .
.
.
Trending Topics
MB World Stories
The Best of Mercedes & AMG

New Electric Mercedes-AMG GT 4-Door Coupe Unveiled: 10 Things You Need to Know
Verdad Gallardo
6 Mercedes Models That Did NOT Age Well (But Are Somehow Still Cool)
Verdad Gallardo
Manual Mercedes? 6 Times Sindelfingen Let Drivers Have All The Fun
Verdad Gallardo
Mercedes SLR McLaren 722 S Is Extremely Rare Example Modified by McLaren
Verdad Gallardo
8 Classic Boxy Mercedes Designs That Have Aged Like Fine Wine
Verdad Gallardo
Flawlessly Restored Mercedes 190E Evo II Heads to Auction
Verdad Gallardo
Electric Mercedes C-Class Unveiled: 11 Things You Need to Know
Verdad Gallardo
Mercedes EQS Gets A Major Update: Everything You Need to Know
Verdad Gallardo
5 Underrated Mercedes-Benz Models That Don't Get the Love They Deserve
Verdad Gallardo
Thread Starter
Super Member
Joined: Feb 2013
Posts: 659
Likes: 25
From: SE MI
2005 Mercedes E55 AMG
Thanks Craig! Trying to chase you down


Thread Starter
Super Member
Joined: Feb 2013
Posts: 659
Likes: 25
From: SE MI
2005 Mercedes E55 AMG
Don't you start! I considered it but I'll leave it to another longer build, lol.

Thread Starter
Super Member
Joined: Feb 2013
Posts: 659
Likes: 25
From: SE MI
2005 Mercedes E55 AMG
Alright Joncl, here you go.
The Aeromotives are not drop in, like I said... actually nothing installed into the stock baskets will be drop in. There are plastic retainers in the buckets that are sonic welded in and in order for the old pumps to come out and the new pumps to go in with an attached suction filter, these retainers have to be cut out and reinstalled. The old pumps can come out without cutting them out but there are tabs on the top that need to be broken in order for that to happen and there's no room in the bottom for a different suction filter without disassembly and modding of the base. I didn't drill holes in the bottom of the basket because there's a venturi effect being used to transfer fluid from one end of the tank to the other and I didn't want that the effect transfer (which is quite possible).


Recently, I got the heads up that these 340s have been failing. The returnless Cobras on E85 are dropping pumps but my buddies with return style DSMs and Supras so there's one of a few issues... There is a bad batch of 340s out there, the pumps are not actually E85 compatible, or the returnless (voltage variable) fuel system style is prematurely killing them. Walbros are meant to run at 13.5V continuous, which is why they need to be replaced often in a returnless system. I know Aeromotive states these are fine but I have my doubts now. I'll be running them until one drops and researching a better pumps that still fits in our packaging in the interim.
The Aeromotives are not drop in, like I said... actually nothing installed into the stock baskets will be drop in. There are plastic retainers in the buckets that are sonic welded in and in order for the old pumps to come out and the new pumps to go in with an attached suction filter, these retainers have to be cut out and reinstalled. The old pumps can come out without cutting them out but there are tabs on the top that need to be broken in order for that to happen and there's no room in the bottom for a different suction filter without disassembly and modding of the base. I didn't drill holes in the bottom of the basket because there's a venturi effect being used to transfer fluid from one end of the tank to the other and I didn't want that the effect transfer (which is quite possible).
Recently, I got the heads up that these 340s have been failing. The returnless Cobras on E85 are dropping pumps but my buddies with return style DSMs and Supras so there's one of a few issues... There is a bad batch of 340s out there, the pumps are not actually E85 compatible, or the returnless (voltage variable) fuel system style is prematurely killing them. Walbros are meant to run at 13.5V continuous, which is why they need to be replaced often in a returnless system. I know Aeromotive states these are fine but I have my doubts now. I'll be running them until one drops and researching a better pumps that still fits in our packaging in the interim.
Thread Starter
Super Member
Joined: Feb 2013
Posts: 659
Likes: 25
From: SE MI
2005 Mercedes E55 AMG
Thank you sir! I'm considering the 90mm too, but with a bit of a curve ball. We'll see what happens this winter.
Thread Starter
Super Member
Joined: Feb 2013
Posts: 659
Likes: 25
From: SE MI
2005 Mercedes E55 AMG
Alright, so update. The motor/car went back together last week and upon firing it up it had a NASTY idle (surging between 1000 and 1400rpm) and was popping/backfiring back through the blower. I was stumped. At first I thought it could be bad injectors, old E85, or low pressure. I datalogged and my throttle showed 100% all the time, I was seeing boost at idle (WTF), and I was getting a code for "Throttle/Pedal Position Sensor/Circuit Low Input". At key on, I noticed my throttle body instantly went to full open and stayed there so I thought it was the throttle body... maybe it got knocked around too much while the motor was apart. The boost at idle was really getting to me. Then I realized the bypass valve should be 100% open and if it was boosting then the bypass was closed. I MIXED UP THE CONNECTORS. Five minutes last night to swap the bypass and throttle body connectors and she purrs like a kitten. The connectors are identical (even down to wire colors) so please pay attention when you're putting yours back together.
I'll put it through a few heat cycles at idle and then I'll take it out for a spin probably this weekend to see how she feels. Probably do a compression and leak down this time around... I should have done it when I bought the car.
I'll put it through a few heat cycles at idle and then I'll take it out for a spin probably this weekend to see how she feels. Probably do a compression and leak down this time around... I should have done it when I bought the car.
Last edited by rockthemullet; Oct 23, 2013 at 01:19 PM.

MBWorld Fanatic!
iTrader: (1)
Joined: Jan 2012
Posts: 2,092
Likes: 29
From: Orlando
1967 Pro Touring turbo LSX Camaro
For sure man, I would have junked it too. I was just saying you didn't necessarily damage it yourself. Spun using the stem as an axis , if the head only had radial runout it probably came that way. If there was and vertical runout on the head causing a poor seal, you might have floated it and kissed the piston.
MBWorld Fanatic!
Joined: Jan 2009
Posts: 7,659
Likes: 68
From: Atlanta
2006 E55 AMG
Hey brotha, you running the e85 compliant fuel filters from lethal performance? Watch those 340lphs in there, went through 4 in a thousand miles. I just switched to aem 320lphs specifically for e85. Got them off lethals website for $135 shipped each.
Looking good brutha
Looking good brutha
Thread Starter
Super Member
Joined: Feb 2013
Posts: 659
Likes: 25
From: SE MI
2005 Mercedes E55 AMG
For sure man, I would have junked it too. I was just saying you didn't necessarily damage it yourself. Spun using the stem as an axis , if the head only had radial runout it probably came that way. If there was and vertical runout on the head causing a poor seal, you might have floated it and kissed the piston.
Hey brotha, you running the e85 compliant fuel filters from lethal performance? Watch those 340lphs in there, went through 4 in a thousand miles. I just switched to aem 320lphs specifically for e85. Got them off lethals website for $135 shipped each.
Looking good brutha
Looking good brutha


