
Supercharger makeover - Before and after pics
 05-03-2015 | 04:43 PM
#1
Thread Starter
MBWorld Fanatic!
Joined: Oct 2011
Posts: 2,279
Likes: 26
From: A to the Z (the state)
'06 E55
Supercharger makeover - Before and after pics
This one must have been from the Northeast. Lots of oxidation on the exterior, but the innards appear to be good. Let's get to work!
Here's the before:
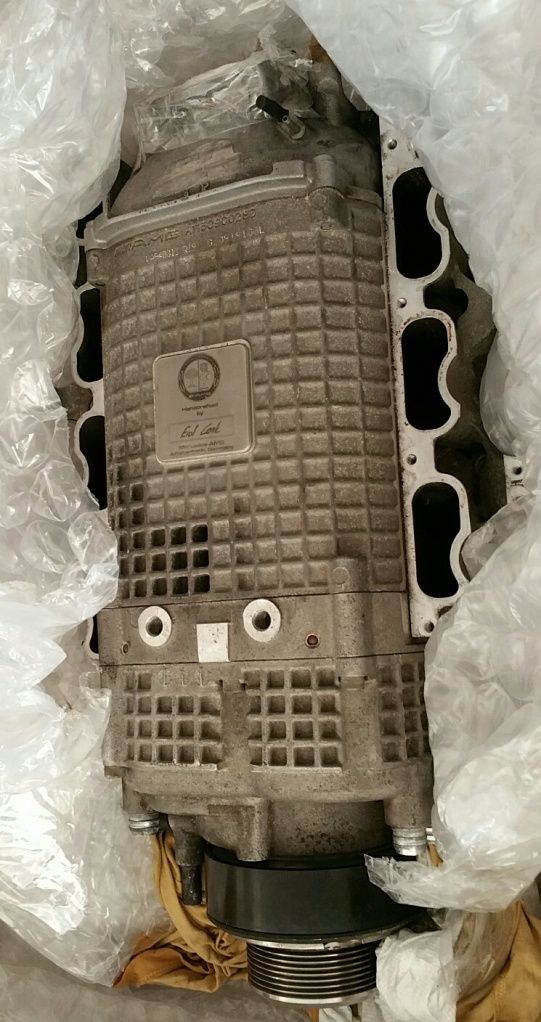
First, I wanted to seal up all the ports To keep the dust out. Since I was going to be changing the oil, I did it now. Pulled the drain plug, then tipped the supercharger several times to get it all out. I poured the old oil in my air vents because it smelled so terrific.
I took a wire brush to as much of the exterior as I could. I used one of those fine grit sandpaper sponge things for all of the gasket mating surfaces and other exposed metal parts on the top. The little metal post needed lots of TLC, so I used a strip of fine grit sandpaper.
I used a shop vac and compressed air to clean it off. Then I took it outside and hit it with a few light coats of Duplicolor caliper paint. Be sure to save some of the paint. Spray it into a paper bag, then breathe from the bag really hard. I was finally ready to enjoy the finished product.
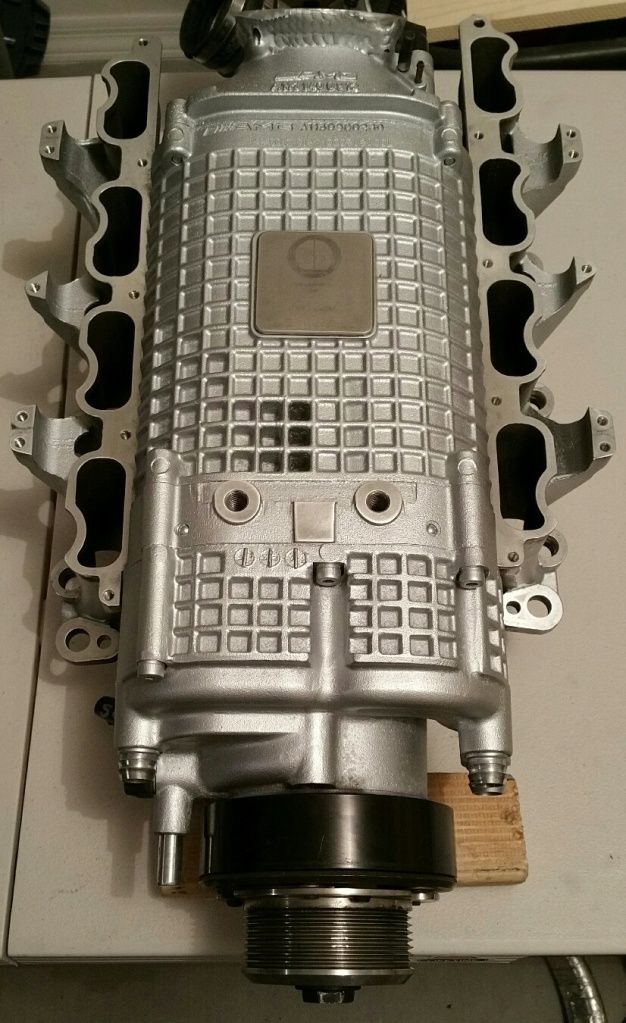
The surge tanks and intake pipes are at a shop getting powdercoated right now in a black wrinkle finish.
Here's the before:
First, I wanted to seal up all the ports To keep the dust out. Since I was going to be changing the oil, I did it now. Pulled the drain plug, then tipped the supercharger several times to get it all out. I poured the old oil in my air vents because it smelled so terrific.
I took a wire brush to as much of the exterior as I could. I used one of those fine grit sandpaper sponge things for all of the gasket mating surfaces and other exposed metal parts on the top. The little metal post needed lots of TLC, so I used a strip of fine grit sandpaper.
I used a shop vac and compressed air to clean it off. Then I took it outside and hit it with a few light coats of Duplicolor caliper paint. Be sure to save some of the paint. Spray it into a paper bag, then breathe from the bag really hard. I was finally ready to enjoy the finished product.
The surge tanks and intake pipes are at a shop getting powdercoated right now in a black wrinkle finish.

Trending Topics
05-13-2015 | 11:15 AM
#9
Senior Member
Joined: Apr 2015
Posts: 320
Likes: 39
From: DC Burbs
2016 E63s
You cleaned that thing up nicely. Cant wait to see the installed pics.
Be sure to save some of the paint. Spray it into a paper bag, then breathe from the bag really hard.
Now thats funny!!!
Be sure to save some of the paint. Spray it into a paper bag, then breathe from the bag really hard.
Now thats funny!!!
05-13-2015 | 12:58 PM
#12
Thread Starter
MBWorld Fanatic!
Joined: Oct 2011
Posts: 2,279
Likes: 26
From: A to the Z (the state)
'06 E55
Well, my fuel pump assembly arrived yesterday and I have fittings for the trunk tank hopefully arriving today. Should be up and running maybe this weekend.


")

 05-13-2015 | 04:26 PM
#16
MBWorld Fanatic!
Joined: May 2007
Posts: 6,380
Likes: 119
From: Clearwater Beach, Florida
2016 Cls63s AMG
05-13-2015 | 05:11 PM
#17
MBWorld Fanatic!
Joined: Feb 2004
Posts: 9,155
Likes: 19
From: Southern, CA.
V12-Biturbo
This one must have been from the Northeast. Lots of oxidation on the exterior, but the innards appear to be good. Let's get to work!
Here's the before:
First, I wanted to seal up all the ports To keep the dust out. Since I was going to be changing the oil, I did it now. Pulled the drain plug, then tipped the supercharger several times to get it all out. I poured the old oil in my air vents because it smelled so terrific.
I took a wire brush to as much of the exterior as I could. I used one of those fine grit sandpaper sponge things for all of the gasket mating surfaces and other exposed metal parts on the top. The little metal post needed lots of TLC, so I used a strip of fine grit sandpaper.
I used a shop vac and compressed air to clean it off. Then I took it outside and hit it with a few light coats of Duplicolor caliper paint. Be sure to save some of the paint. Spray it into a paper bag, then breathe from the bag really hard. I was finally ready to enjoy the finished product.
The surge tanks and intake pipes are at a shop getting powdercoated right now in a black wrinkle finish.
 05-13-2015 | 05:14 PM
#18
MBWorld Fanatic!
Joined: Feb 2004
Posts: 9,155
Likes: 19
From: Southern, CA.
V12-Biturbo

 05-14-2015 | 12:49 AM
#22
Thread Starter
MBWorld Fanatic!
Joined: Oct 2011
Posts: 2,279
Likes: 26
From: A to the Z (the state)
'06 E55
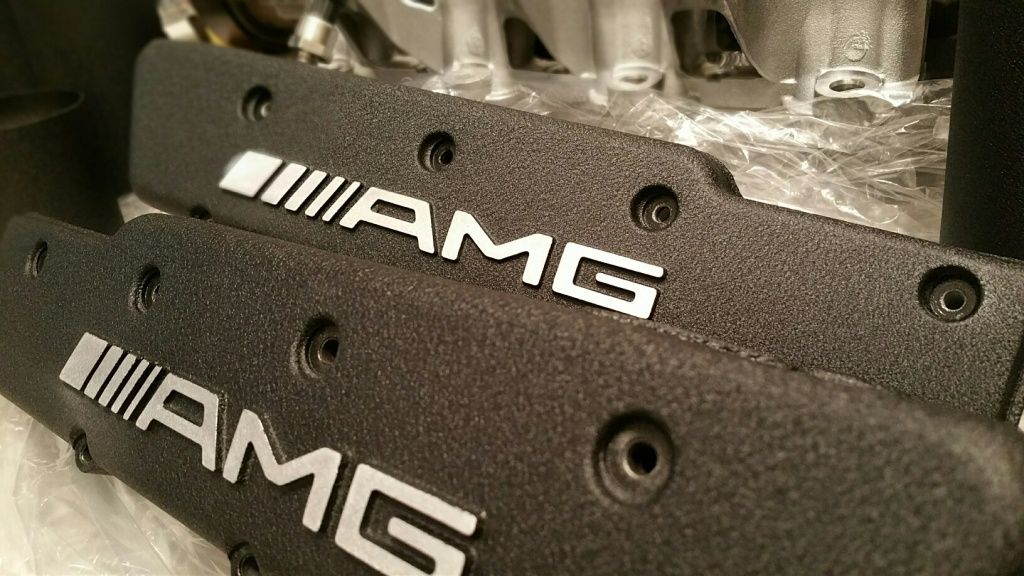
I did a rattlecan wrinkle black on the valve covers when i replaced the gaskets. Next time I take them off, I'll have them powdercoated.

 subscribing


