When you click on links to various merchants on this site and make a purchase, this can result in this site earning a commission. Affiliate programs and affiliations include, but are not limited to, the eBay Partner Network.
I'm writing this thread to document and share my experience with the ECUMaster DET3 piggyback fuel AND IGNITION controller. It is a piggback controller that intercepts and alters MAP sensor data (to tune fuel) and CPS sensor data (to tune spark) to the ECU. It has 4 aux inputs for 10 bit logging (1 must be used for the MAP sensor though), as well as power outputs that can be used to run various other systems/lightsts/etc based on adjustable criteria. It also has two independent, switchable map sets (which I plan to utilize for pump gas/race gas maps).
Big CON here: This thing does NOT have the ability to log ACTUAL ignition timing compared to TDC. Currently I'm working on a way to tie knock detection into an analog input that I will utilize for tuning timing which I will discuss further down.
Purchasing: I got this on E-Bay, international sellers, for a grand total of $280. If you buy it from a US vendor it will be $450. I also tried to purchase from an oversees store for even less who refunded my order and said US sales had to go through ECUMasterUSA or an authorized vendor. So if you want to buy this and save $150, wait the two weeks(for international shipping) and buy it on E-Bay ;-)
Installation: The DET3 user manual is here and contains a lot of good info, get familiar with it.
WARNING!!!: Solder everything! Solder your splices, taps, and molex connector crimps. A lot of these 0-5V signals and the crank position signal are very sensitive, if you don't have a good connection it will quickly send you down a rabbit hole (ask me how I know).
DET3 unfortunately does NOT come with a wire harness. The box contains the controller, a USB cable, and some cheap *** molex connectors and a plug for you to make your own harness out of. Here are the wires you definitely want ready (also, most likely, power out 1, 2, and power out ground if you want to drive anything else out of the controller such as meth, nos, warning light, etc)
It's probably best to buy a Molex crimping tool, as well as a Molex pin removal tool incase you need it. I soldered the base of each connector to make sure I would have good conductivity.
I labeled all the wires on my harness to cut down on install frustrations.
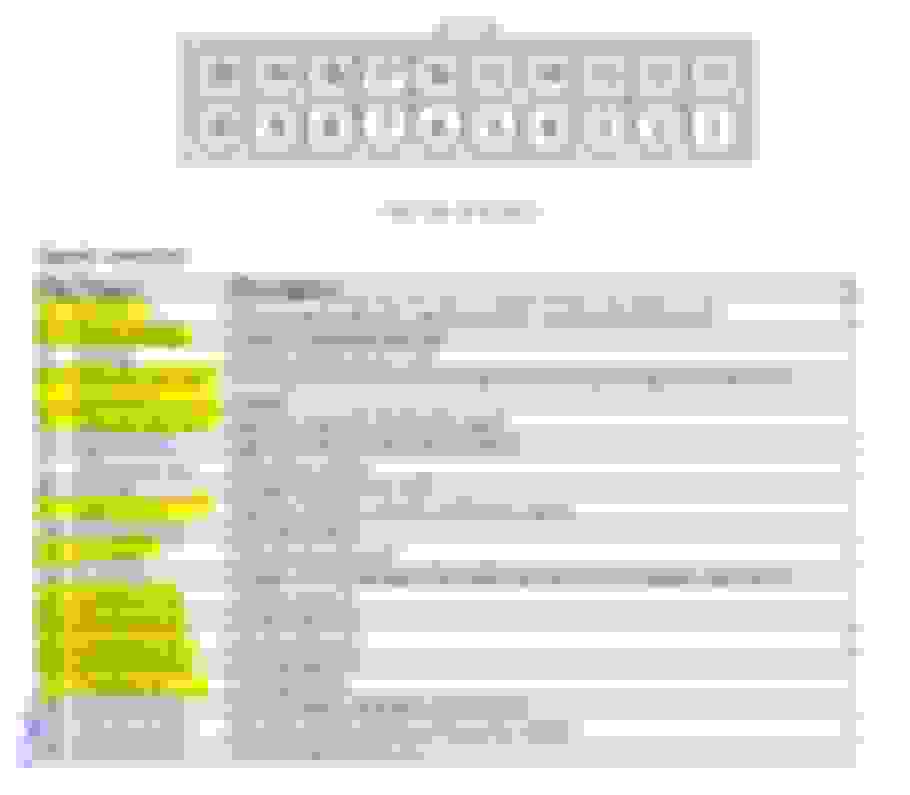
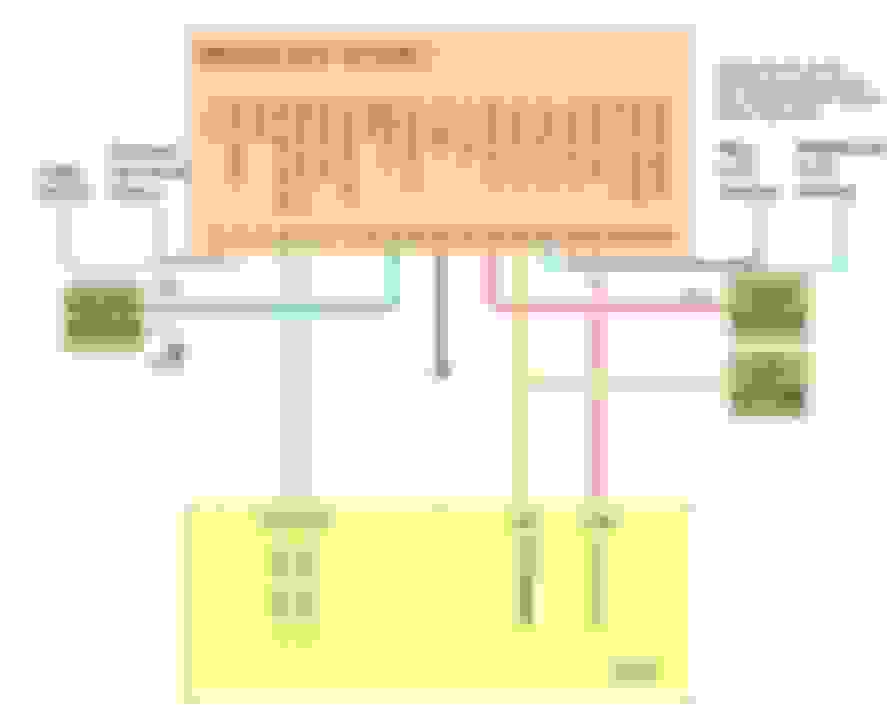
Cut wires! This link to the ECU pinout some one else posted here a long time ago was a big help during this. here is the ECU pinout and wiring you will do. The crank position sensor wires +/- bias are not labeled. I put an oscope on them to determine which was which, listed below.
DET pin 1 (12V) to a keyed power source. DO NOT use the ME(ECU) power supply on connecter E!! I was having a bunch of issues getting initial start after install and found that the keyed power supply on connecter E(which I originally tapped) was dipping to 7 volts on crank, which was too low and dropping power out to the DET3, killing the CPS signal to the ME and preventing the car from starting.
DET pin 2 (MAP Switch) to a switch in the cab, and then to ground. Flipping this switch will switch between two different sets of tune maps. (I will use one as a high octane MAP, and one as pump gas).
DET pin 4 (Bipolar ign out inverted) is going to go to the ME(ECU) side of the Green/Wht wire in the ME connector C, pin 13. This is the negatively biased signal from our crank position sensor. You must cut the Geen/Wht wire, connect the ME side of the wire to the DET, and the engine side of the wire gets grounded.
DET pin 5 (Bipolar ign out) is connected to the ME(ECU) side of the Green wire in the ME connector C, pin 26. This is the positively biased signal from our crank position sensor. You must cut the Green wire, connect the ME side of the wire to the DET, and the engine side of the wire will be connected to the DET ignition input.
DET pin 9 (Ignition in) is connected to the engine side of the green wire in ME connector C, pin 26.
DET pin 11 (ground) goes to any good ground.
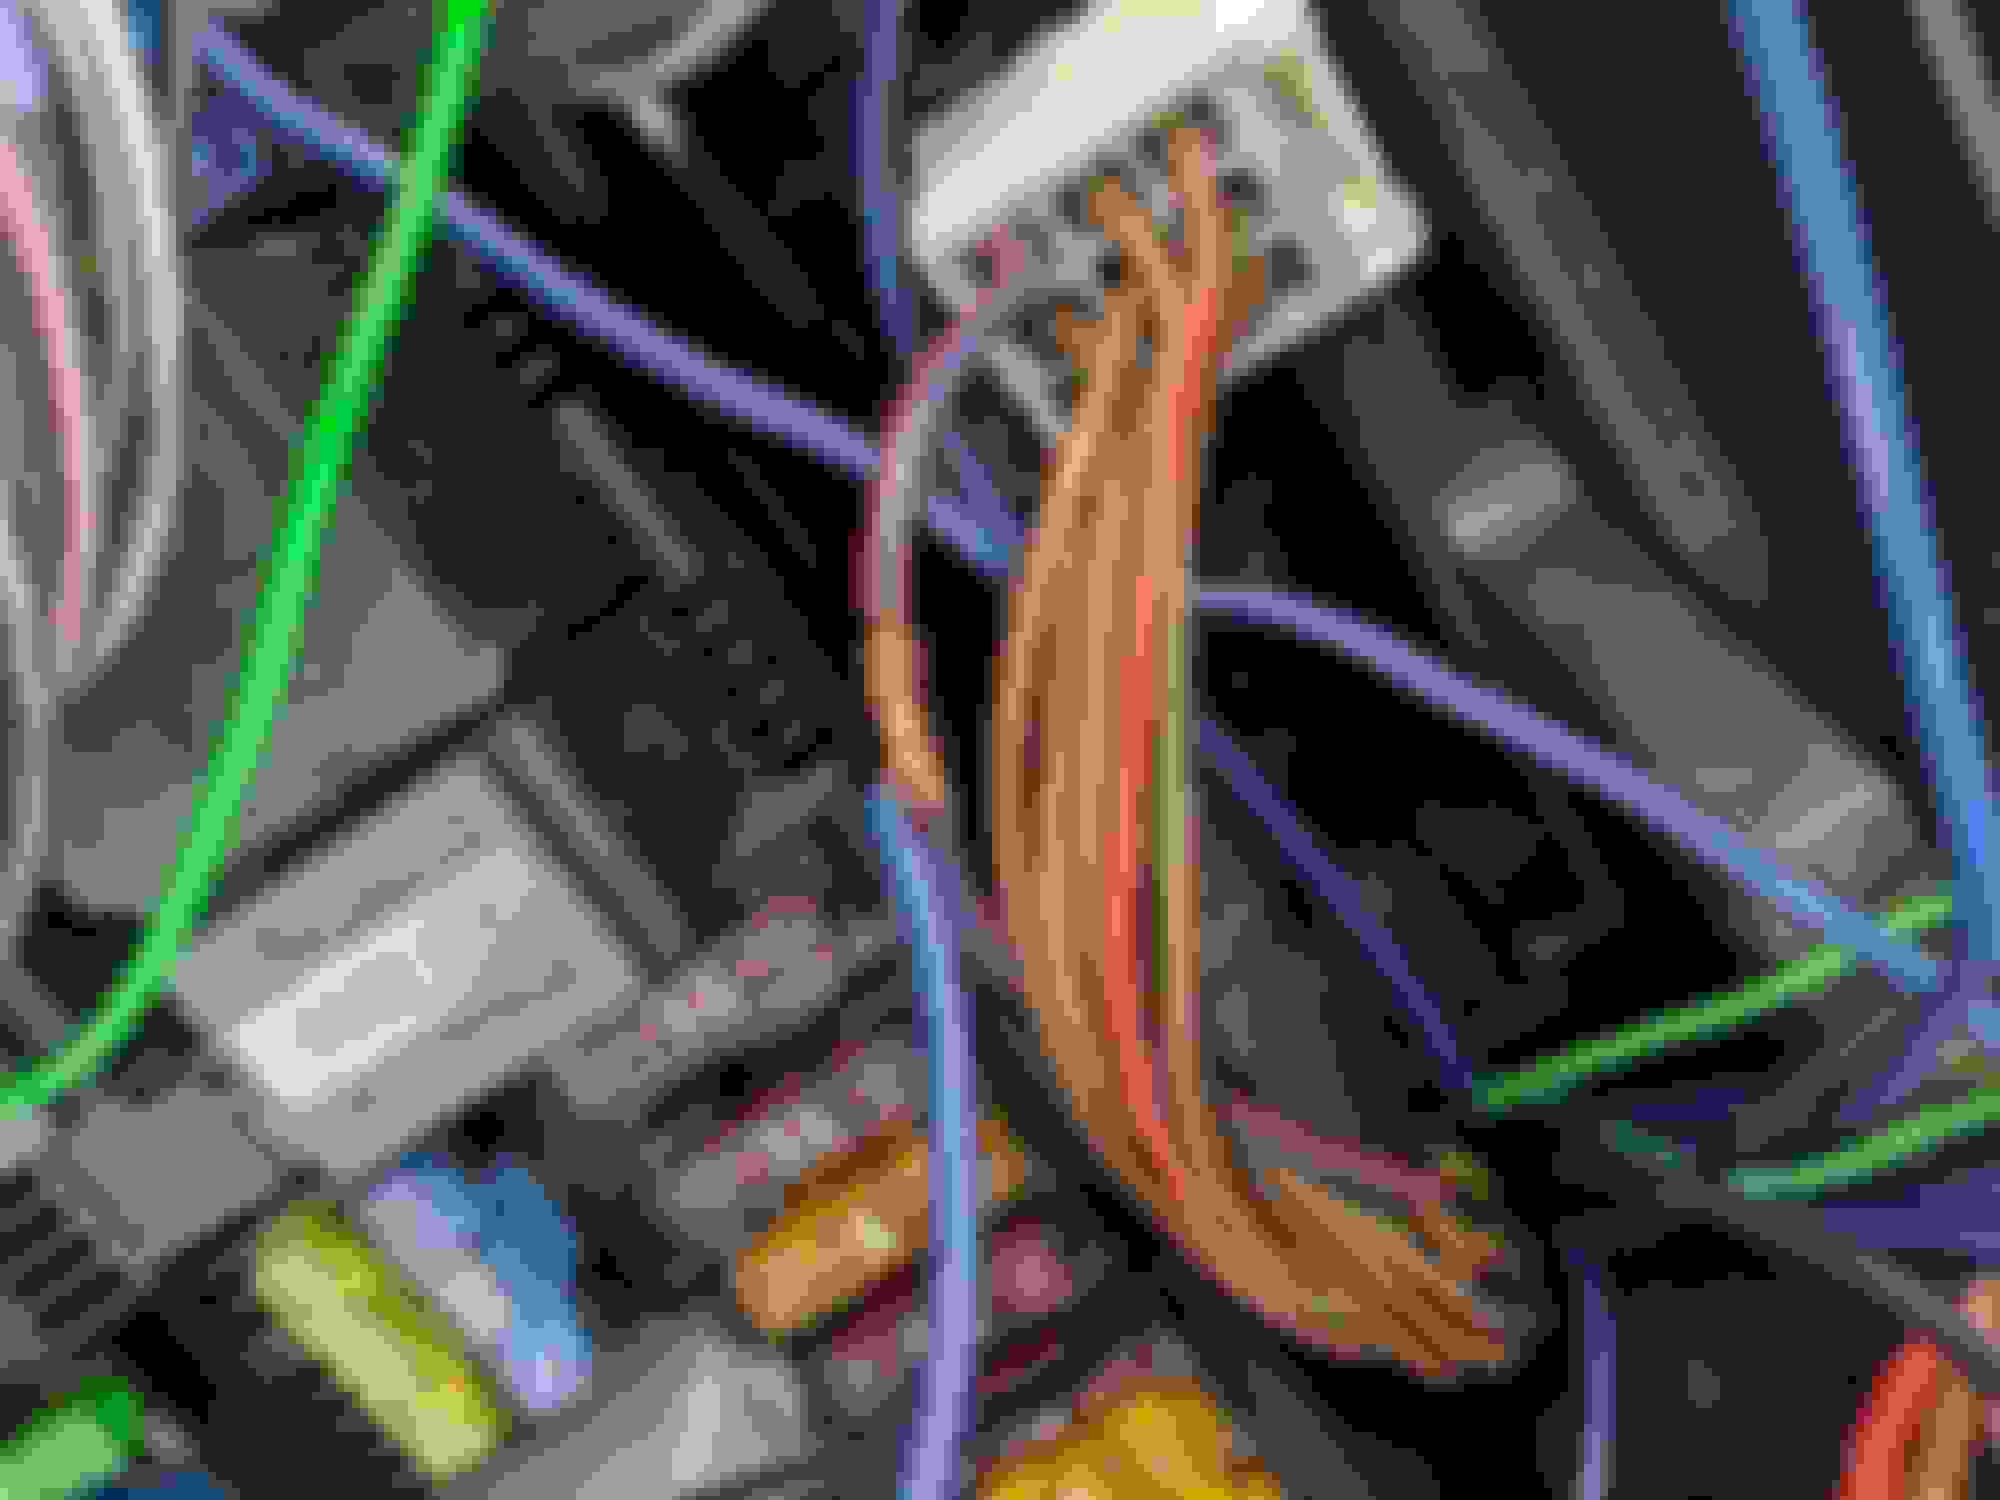
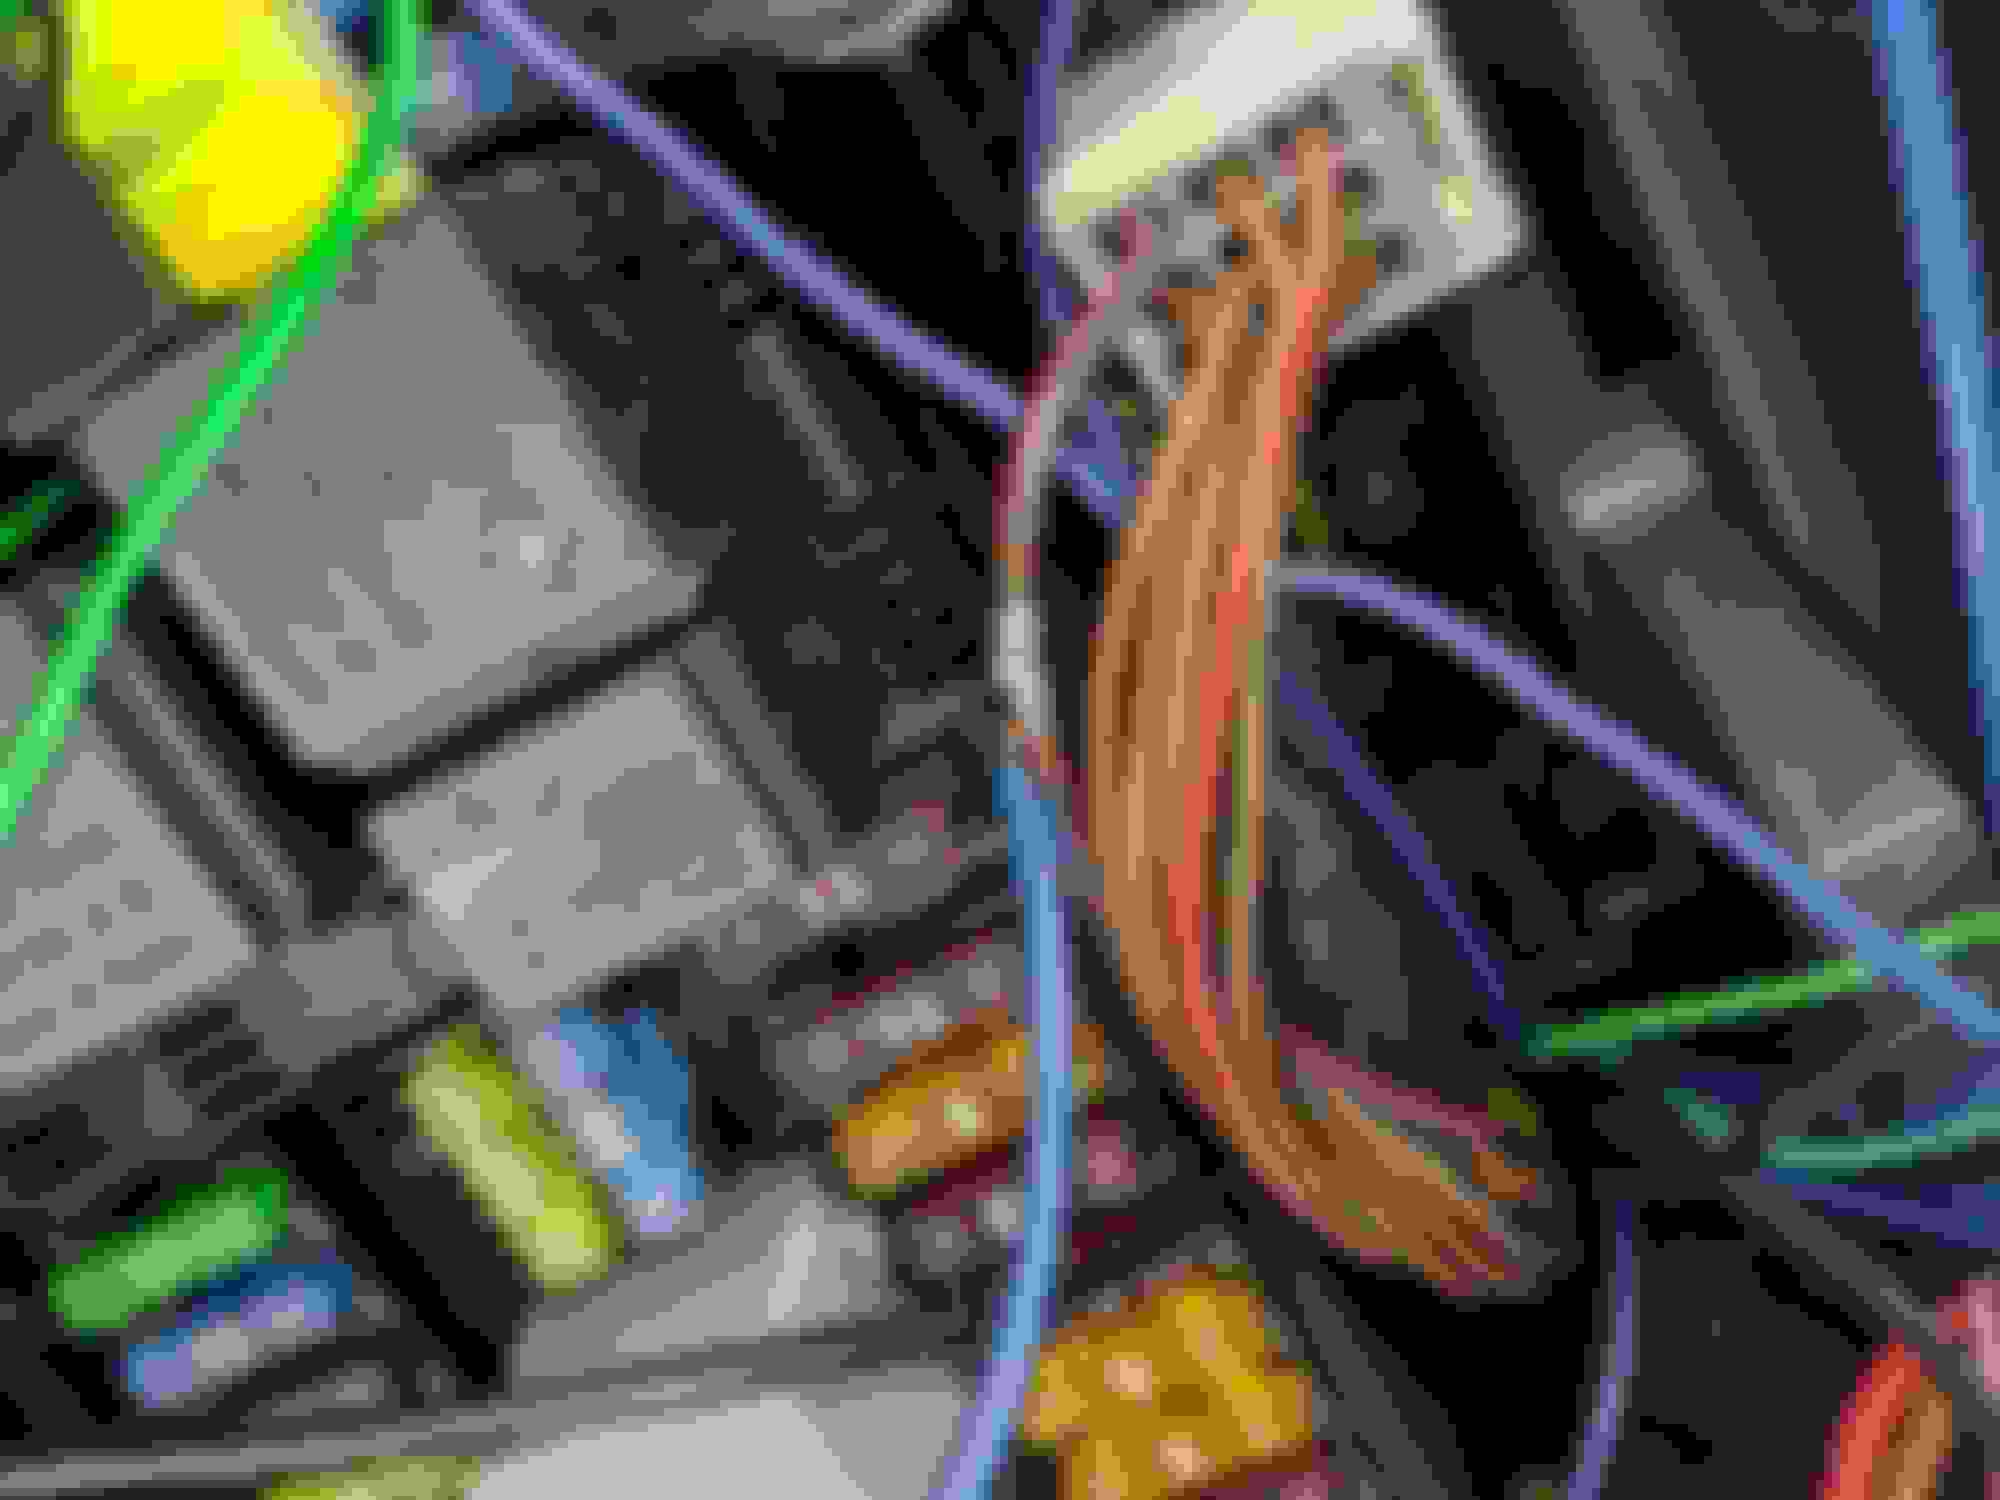
DET pin 13 (Analog in 1) goes to the engine side of the MAP sensor Red/Gry wire in ME connector C, pin 10. You will need to cut the map sensor wire. The ME side of the wire will go to DET analog output.
DET pin 14, 15, 16 (Analog in 2, 3, 4) gets tapped into which ever signals you want to log. DO NOT CUT here. What I did was carefully(surgically) use a fresh razor blade, cut the wire insulation off, and solder the wire on. I used IAT and Wideband Analog output. I'm currently working on a solution for knock monitoring for aux input 4 which I will discuss later. Here is how I spliced into the IAT signal:
DET pin 17 (Analog out) goes to the ME side of the Red/Gry wire on connector C, pin 10. This is your MAP sensor signal wire into the ME(ECU).
Overall splicing this in wasn't a very difficult or time consuming job, just make sure you do it well because of the DET3 looses power, or crank position input or output, your car will not run.
Run the USB cable (and any switch wires you want) through the firewall penetration under the ME. Its very easy to unplug the ME, remove it, and it's holder held in by two clips on feed cables through the firewall (I use a coat hanger). Undo the three torx bolts on the lower panel below the steering wheel and it will drop down and you can look up and see the penetration filled with some stuffing and trash bag looking material.
I tucked the entire DET3 under the fuse box with just a little bit of finagling. (I wanted to feed as much USB cable into the cab as I could, I ran mine into my spare cubby that I installed where the CD changer used to be)
Software Setup:
First you'll want to download the latest software and USB drivers from here. Should be DET3 V1.34 (Not the FI 1.46, that is for fuel implant mode where the DET3 is used to drive injectors).
Verify your software runs, and when you put key in pos 2 the DET3 powers up. The software will connect automatically and ask if you want to load the current DET3 map. Click yes.
Next make sure we are set up for our crank position sensor correctly. Click "Setup" then "Ignition Configuration" to get to this menu. We have a VR type, balanced(differential) CPS with a 60-2 tooth configuration. Make sure it's set up like this: (except you can raise max RPM if you want, it only affects the tuning tables axis).
Now, after every change I make I save it to a local MAP, as well as click the make permanent button which will save your changes to the MAP on the DET3. (Not available in the photo because I'm not connected right now).. You can make adjustments to various things while not connected to the DET3, save it to a local map, then load that map and click make permanent to the DET3 later when you are connected.
You should be good to start your car, and verify it runs without issue. If your car won't start there may be an issue some where with the CPS, power, or ground wiring. Go double check all your work.
Next you will want to set up your analog sensors. The software download comes with a pile of premade sensor formulas including linear 0-5V scales, 0-100% (if you use TPS), and a bunch of others these are in the "data" folder in your installation directory. So here is the skinny. I don't have the exact formula for our OEM MAP or IAT sensors, but what I did is take some of the existing sensor formulas, and plotted the difference through various pressure/temperature ranges for each of them using excel (compared to torque). One of the pressure sensors was spot on for pressure, but off for vacuum. Not sure how or why but I didn't care to dig into it, what I did do though is convert it from BAR to PSI. As for the IAT, the existing gm temp sensor document had a linear offset of about 19F(10.6C). I adjusted the existing one to read in F instead of C, and added a correction for the offset. I've logged/compared both of these with torque and they are spot on so I've not messed with them any more. If not knowing the exact formula for your analog input is going to bother you, you may need to resort to purchasing independent sensors instead.
If you want to try to make any of your own analog input formulas you must edit the "DEF" file in notepad. Here is what one of the analog input formulas look like (this is the MAP sensor I converted to PSI):
Now that you have your files available, you're going to go to "Setup" then "Scales Configuration". Here you will select each file for the appropriate analog input that you wired:
Once you have selected your four scales, save that as your default configuration. Each of your analog inputs should now show the correct ranges and units and the associated tables. Save your changes both to the device, and a local save as well. All of these changes can be done and saved to a local MAP and then copied to the DET later.
Setup your analog input ranges. Go to "Setup" then "Analog Inputs Configuration". These will not affect the range that the inputs can be graphed (that is based on the min/max in the DEF file), this ONLY affects the range that it shown on the tables. You want to try to limit this to the usable range to give you finer adjustments in the area you will actually be tweaking.
Save your changes both to the device, and a local save as well.
Set-up your tables by going to "Setup", then "Setup Tables". Here you can choose what input you modify (make sure this in analog 1 unless you connected your MAP to a different input), which input is seen as load(x axis), and what corrections are used. A note on this, the corrections are applied to the overall output of the MAP sensor (not just your adjustment). So if you use a correction it will linearly adjust your map signal to the ECU by that amount at all times. I can't think of a good way to use the corrections at all unless I get knock working correctly. The timing corrections are applied to your offset so it has the potential to be more useful.
Save your changes to local MAP and device!. (get the gist?)
In the analog output you can adjust how much MAP sensor voltage is changed for each step up or down on the fuel matrix. I left all this default.
If you are using a PWM output or power output (output 2 only) you can configure those as well in the PWM and/or Parametric output menus. Here is what the criteria you can use to activate the Parametric output looks like (While using PWM has their own fully adjustable matrix):
Your software should be pretty well set up at this point but there is a lot to play with and do in here and I didn't cover everything just the key points. Look through the manual and feel free to ask questions.
Tuning: So tuning with this is pretty straight foreward. The logging feature is pretty user friendly. Logs are ran real time and can be saved, and old ones loaded to review at any time. A very nice feature is the "ai1" "ai2" "ai3" and "ai4" buttons at the top of the DET3 actually takes info from the current log and lays it over top of which ever table you are currently looking at. So if you want to see exactly where your wideband AFR was recorded on the current log you can overlay that data to see which cells you want to adjust. Here is the overlay view:
I spent an hour ish playing yesterday (some where safe-ish) and I was able to fine tune fuel to get me pretty close to 12 across the board. What I found is I was knocking and had to pull too much timing. My car "felt" much better with extra fuel (low 11s) and more timing. I didn't want to run 12afr and less timing anyways but I did want to test that I could do it. Here is my fuel map putting me in the low 11s vs the fuel map putting me in the high 11s and the logs, and these are third gear runs:
I believe a good way to test your own tuning changes would be to use the "Road Dyno" function. You have to put in some gearing and aerodynamics info which I haven't messed with yet, but any recorded log you can choose start and end points and send to the road dyno graph. Comparing that graph with before and after changes may be a good tool to utilize.
Low 11s:
Note: each "unit" of change on the fuel map is a certain amount of voltage (adjustable in the aux output menu I talked about earlier) that is hidden from or added to the map sensor signal that actually goes to the ECU.
High 11s map:
Timing is a little bit tricky without a good way to monitor for detonation. Right now I'm using the graphing feature in torque. It's still very easy to see if you have detonation, but what you can't do is tune timing across the RPM range because you can't really tell what POINTS have detonation because the resolution is garbage. The goal would be to have a high resolution knock logging and squeek out as much timing throughout the whole RPM range without knocking. All I'm doing right now is really making adjustments to the entire MAP while keeping an eye on torque for knock. Here is two pulls on torque 30 seconds apart, the first one with knock and the second one after I pulled 1 degree of timing out across the board:
EDIT: Timing retards function in 6 degree increments in the software! Adding timing is 1 degree at a time but for some reason there is a note in the manual that I missed previously that states when retarding timing the reduction will not actually be 1* but the amount of timing of a tooth on the fly wheel (60 teeth, 360* of timing, hence the 6 degrees of retard).
3rd gear with erratic timing due to knock retard:
3rd gear pull about 30 seconds later after pulling 1 degree of timing across the board on the DET3:
Note: The timing you actually see via OBDII is the FOOLED timing being sent to the ECU. So the value you see logged here is actually +/- what ever you have added into your timing MAP on DET3.
Real Time Knock Logging Solution: I found a device called knocksenseMS(link to website here for more info) that can be wired in with the factory knock sensors. It has adjustable sensitivity and comes with both an LED indicating light as well as a 0-5V analog output that can be wired into the DET3 to (hopefully) precisely log knock and allow for some much better timing tuning instead of flat timing across the board. I have already made the purchase and it is on the way. After I'm able to install and test I'll provide some more info about it here.
There are two versions, the standard version does not have the analog output, but the MS(megasquirt) version does.
Edit: Got this up and running. Works great, tapped into my even side knock sensor wire, and it converts it to a 0-5V output with adjustable sensitivity. Doing some testing, if your timing is fuel quality limited (based on knock) I don't know that there is really much use for this. It seams that the ECU is very fast in responding to knock and adjusting timing accordingly. But, I have this, and it works, but unless I do some race gas tuning and get to the point where i can add more timing than what my tune is calling for I don't think it really provides much value.
Last edited by drothgeb; Jul 11, 2022 at 01:48 PM.
I would bet that timing changes with MAP (in does in every other engine on the planet). Just keep that in mind. Generically one would expect a higher MAP reading to correlate to less timing but unless someone knows the original calibration it's tough to say.
I would bet that timing changes with MAP (in does in every other engine on the planet). Just keep that in mind. Generically one would expect a higher MAP reading to correlate to less timing but unless someone knows the original calibration it's tough to say.
Something strange did happen yesterday, the car shut off on me twice. Both times it was when coming to a stop in a parking lot right as the RPMS hit kind of the low point it would idle at the car just died. Turned right back on no issues, no cells. I may try switching the CPS wires to shielded wire in case it's noise on the wires causing some issues. The knocksense I just bought is coming with a bunch of shielded wire so maybe I'll use some of the extra. I may also try turning up idle RPM via star and see if it happens any more (maybe just a bandaid I know). It only happened twice during several hours of stop and go traffic and lots of playing yesterday.
Originally Posted by C32owner
Great write up and thread, thanks for taking the time and effort to create this. Awesome work!!
Thanks! Also I forgot to mention in the aux output settings there is "Analog output max" which is what you would adjust if you needed to have a functional MAP clamp.
Something strange did happen yesterday, the car shut off on me twice. Both times it was when coming to a stop in a parking lot right as the RPMS hit kind of the low point it would idle at the car just died. Turned right back on no issues, no cells. I may try switching the CPS wires to shielded wire in case it's noise on the wires causing some issues. The knocksense I just bought is coming with a bunch of shielded wire so maybe I'll use some of the extra. I may also try turning up idle RPM via star and see if it happens any more (maybe just a bandaid I know). It only happened twice during several hours of stop and go traffic and lots of playing yesterday.
Thanks! Also I forgot to mention in the aux output settings there is "Analog output max" which is what you would adjust if you needed to have a functional MAP clamp.
i just commented on your thread in the Facebook groups, but I wanted to add that I recommend some way to check fuel pressure. I think you may find inadequate flow is causing the car to die after slowing down. I�ve seen this happen with clogged fuel filters and failing pumps
i just commented on your thread in the Facebook groups, but I wanted to add that I recommend some way to check fuel pressure. I think you may find inadequate flow is causing the car to die after slowing down. I’ve seen this happen with clogged fuel filters and failing pumps
Thanks but I have recently replaced my entire fuel system as well as spent a couple days monitoring fuel pressure via the schrader valve and a gauge placed on the windshield haha. My fuel system is solid, and this has only occurred since the install of the DET so it is really the primary culprate. Every where in the manual says to use shielded wires for CPS sensors due to sensitivity to noise. However our factory CPS wires are not shielded because it is a balanced signal from a negative and positive biased output which is much more inherently resistant to noise than a single ended signal. But because the DET effectively changes it into a single ended source and sends a duplicated, reversed output out to the ECU so it still sees a balanced signal it just may be that the noise is a little much for the ECU. Actually I may toss my oscope on the DET3 CPS output and compare, I have oscope shots of the factory balanced CPS output from when I was determining bias and tooth count.
Something strange did happen yesterday, the car shut off on me twice. Both times it was when coming to a stop in a parking lot right as the RPMS hit kind of the low point it would idle at the car just died. Turned right back on no issues, no cells. I may try switching the CPS wires to shielded wire in case it's noise on the wires causing some issues. The knocksense I just bought is coming with a bunch of shielded wire so maybe I'll use some of the extra. I may also try turning up idle RPM via star and see if it happens any more (maybe just a bandaid I know). It only happened twice during several hours of stop and go traffic and lots of playing yesterday.Thanks! Also I forgot to mention in the aux output settings there is "Analog output max" which is what you would adjust if you needed to have a functional MAP clamp.
Thanks for the tip on the aux output for the map clamping. Hopefully the shielding on the cls wiring sorts out your shutoff.
Car is running great, no issues what so ever with the DET3 since install, very functional and definitely zero regret in going this rout. Self tuning my fuel work great.
The shut off when coming to a stop did not happen another time after posting that it happened a couple times after initial install. Maybe it has to do with the adaptive crank signal or something along those lines, I can't really say but it has not happened again. I had planned to switch my crank signal wires to shielded wires but didn't end up needing to.
I found out that the timing retard function of the DET3 actually pulls 6 degrees of timing per -1 placed in the software. There are some notes in the manual that I missed at first that the timing retard function will reduce timing in increments of how ever many degrees are on the fly wheel teeth (60 teeth, 360* of timing, 6 degrees of timing actually pulled per -1 in the software). However adding timing works normally 1 degree at a time. So it's best too have a tune with too little of timing and use the software to add timing as needed because there is much less control in retarding timing.
I got the knock sensor adapter I linked above working. The value it provides is debatable because it has a manual sensitivity adjustment though, so how much value it provides is going to depend on how the user sets the sensitivity. However it does consistently convert the knock sensor signal to a 0-5V output that lights up and LED and is logged in the software consistently.
I have also done some test runs of the launch control (rev limit for drag racing, not traction control). It works by retarding timing by an adjustable amount and adding fuel for some extra cooling (since ignition is happening with the exh valve open already, get some flames in the headers probably). I figured the ECU would freak out and die when I tried to use this, but it did not! The only issue was breaks having trouble holding the tires. Could just be a function of fine tuning where the timing retard needs to be set, but I also got the idea from cnterline to wire the SC clutch in series with the launch control so there wouldn't be boost while trying to use the function. So now the idea is to wire a lunch control switch, in series with the break switch, to the DET3 to activate launch control as well as a relay controlling the SC clutch. I'm working on getting this sorted out and hopefully soon be able to share some feedback of the first E55 using launch control haha. Unfortunately the drag strip doesn't open until March here so 60ft testing will be a ways out.
Outstanding! Mine will be here in the next week or two (coming from Poland) and I can't wait to get started. I will be using the parametric output for meth activation and using my meth on off switch to switch maps when I have the meth activated. Then going to 50/50 and see what reduced fuel and a little timing will do.
I will also fine tune the main tune and if everything goes well I can send it to my tuner to hard code. With the dyno function even if the number are off the corresponding gain/loss should get very close to if not right on a dyno tune.
Really appreciate the time this took and the experimentation. I love that this platform can still see improvements 17 years later!
Mine is in! Thanks to drothgeb for the write up and help with definition files. No major issues installing .I did go a little different as I am using the parametric output for my meth system.
Currently logs are limited as I can not get any traction in 3rd gear. At all. Need to find a better spot to get some good logs. I found that traction control will close the throttle body as well as killing timing. I don't have the secondary logged anymore but I would think looking at the boost that i is opening up as well.
Interesting to see how the system works to keep traction. Hard to tune though.
OK so.....this system is actually starting from the existing tune already in the ECU and your building from that correct ?
Meaning if my current tune has 25* timing I am working off of that in either direction.
OK so.....this system is actually starting from the existing tune already in the ECU and your building from that correct ?
Meaning if my current tune has 25* timing I am working off of that in either direction.
Exactly. But timing retard is 6 degrees per unit. Advance is 1 degree. So if you need to remove timing it is a big jump.
I am looking more to use it to tune for 50/50 water meth. When i switch meth system on it changes maps so i can dial it in a little better..
Ability to fine tune current tune as well.. i have the dyno tool set up close but really im looking for relative change.
But with no traction it is tough as a lot goes into esp.
Wow. Self tuning, possible launch control, knock sensitivity adjustment and conversion to speed density for us Bosch 2.8 guys all for under $500? I am seriously interested now
I found something interesting Sean. An ethanol sensor with a 0-5v output. This could be used to modify timing on a linear scale(or how ever you wanted to set the scale) based on ethanol percent for ethanol mixes.
Now that you mentioned it I'm thinking about how much ethanol the stock fuel system can handle as well. Apparently the M157 EC tunes an E40 tune is very common because the factory fuel system can't supply E85. This one is sold out but I bet there are others that are similar: https://getyours.com/product/ethanol...-temp-display/
I thought of that as well. For now I will keep to meth but once I can get some parts to remove the restriction in the fuel lines I think it is more doable. With 630cc injectors and no restriction I should be able to keep up with fuel demand. I think if I can find a way to just change the line to remove the restriction it would help out a lot.
Also got the software to run on my Win10 tablet so I can have it displayed on my cd adapter in front of the radio. Makes dialing it in a little easier. Just need some traction!
Nice! I was doing the same gig for a while with an android tablet and torque lol. Now I have the Chinese android head unit and it looks too nice to have a tablet in front of it lol.
Just ordered the det3 kit for my twin turbo 113 build, I will be using raceiq cams, lower compression, bigger injectors, etc. I will try to report back as I go, I will be starting very conservatively� I understand adding and subtracting fueling for a safe afr, and a general sense of how ignition timing works, but I�m unsure how the tuning ties into cam selection
I'm writing this thread to document and share my experience with the ECUMaster DET3 piggyback fuel AND IGNITION controller. It is a piggback controller that intercepts and alters MAP sensor data (to tune fuel) and CPS sensor data (to tune spark) to the ECU. It has 4 aux inputs for 10 bit logging (1 must be used for the MAP sensor though), as well as power outputs that can be used to run various other systems/lightsts/etc based on adjustable criteria. It also has two independent, switchable map sets (which I plan to utilize for pump gas/race gas maps).
Big CON here: This thing does NOT have the ability to log ACTUAL ignition timing compared to TDC. Currently I'm working on a way to tie knock detection into an analog input that I will utilize for tuning timing which I will discuss further down.
Purchasing: I got this on E-Bay, international sellers, for a grand total of $280. If you buy it from a US vendor it will be $450. I also tried to purchase from an oversees store for even less who refunded my order and said US sales had to go through ECUMasterUSA or an authorized vendor. So if you want to buy this and save $150, wait the two weeks(for international shipping) and buy it on E-Bay ;-)
Installation: The DET3 user manual is here and contains a lot of good info, get familiar with it.
WARNING!!!: Solder everything! Solder your splices, taps, and molex connector crimps. A lot of these 0-5V signals and the crank position signal are very sensitive, if you don't have a good connection it will quickly send you down a rabbit hole (ask me how I know).
DET3 unfortunately does NOT come with a wire harness. The box contains the controller, a USB cable, and some cheap *** molex connectors and a plug for you to make your own harness out of. Here are the wires you definitely want ready (also, most likely, power out 1, 2, and power out ground if you want to drive anything else out of the controller such as meth, nos, warning light, etc)
It's probably best to buy a Molex crimping tool, as well as a Molex pin removal tool incase you need it. I soldered the base of each connector to make sure I would have good conductivity.
I labeled all the wires on my harness to cut down on install frustrations.
Cut wires! This link to the ECU pinout some one else posted here a long time ago was a big help during this. here is the ECU pinout and wiring you will do. The crank position sensor wires +/- bias are not labeled. I put an oscope on them to determine which was which, listed below.
DET pin 1 (12V) to a keyed power source. DO NOT use the ME(ECU) power supply on connecter E!! I was having a bunch of issues getting initial start after install and found that the keyed power supply on connecter E(which I originally tapped) was dipping to 7 volts on crank, which was too low and dropping power out to the DET3, killing the CPS signal to the ME and preventing the car from starting.
DET pin 2 (MAP Switch) to a switch in the cab, and then to ground. Flipping this switch will switch between two different sets of tune maps. (I will use one as a high octane MAP, and one as pump gas).
DET pin 4 (Bipolar ign out inverted) is going to go to the ME(ECU) side of the Green/Wht wire in the ME connector C, pin 13. This is the negatively biased signal from our crank position sensor. You must cut the Geen/Wht wire, connect the ME side of the wire to the DET, and the engine side of the wire gets grounded.
DET pin 5 (Bipolar ign out) is connected to the ME(ECU) side of the Green wire in the ME connector C, pin 26. This is the positively biased signal from our crank position sensor. You must cut the Green wire, connect the ME side of the wire to the DET, and the engine side of the wire will be connected to the DET ignition input.
DET pin 9 (Ignition in) is connected to the engine side of the green wire in ME connector C, pin 26.
DET pin 11 (ground) goes to any good ground.
DET pin 13 (Analog in 1) goes to the engine side of the MAP sensor Red/Gry wire in ME connector C, pin 10. You will need to cut the map sensor wire. The ME side of the wire will go to DET analog output.
DET pin 14, 15, 16 (Analog in 2, 3, 4) gets tapped into which ever signals you want to log. DO NOT CUT here. What I did was carefully(surgically) use a fresh razor blade, cut the wire insulation off, and solder the wire on. I used IAT and Wideband Analog output. I'm currently working on a solution for knock monitoring for aux input 4 which I will discuss later. Here is how I spliced into the IAT signal:
DET pin 17 (Analog out) goes to the ME side of the Red/Gry wire on connector C, pin 10. This is your MAP sensor signal wire into the ME(ECU).
Overall splicing this in wasn't a very difficult or time consuming job, just make sure you do it well because of the DET3 looses power, or crank position input or output, your car will not run.
Run the USB cable (and any switch wires you want) through the firewall penetration under the ME. Its very easy to unplug the ME, remove it, and it's holder held in by two clips on feed cables through the firewall (I use a coat hanger). Undo the three torx bolts on the lower panel below the steering wheel and it will drop down and you can look up and see the penetration filled with some stuffing and trash bag looking material.
I tucked the entire DET3 under the fuse box with just a little bit of finagling. (I wanted to feed as much USB cable into the cab as I could, I ran mine into my spare cubby that I installed where the CD changer used to be)
Software Setup:
First you'll want to download the latest software and USB drivers from here. Should be DET3 V1.34 (Not the FI 1.46, that is for fuel implant mode where the DET3 is used to drive injectors).
Verify your software runs, and when you put key in pos 2 the DET3 powers up. The software will connect automatically and ask if you want to load the current DET3 map. Click yes.
Next make sure we are set up for our crank position sensor correctly. Click "Setup" then "Ignition Configuration" to get to this menu. We have a VR type, balanced(differential) CPS with a 60-2 tooth configuration. Make sure it's set up like this: (except you can raise max RPM if you want, it only affects the tuning tables axis).
Now, after every change I make I save it to a local MAP, as well as click the make permanent button which will save your changes to the MAP on the DET3. (Not available in the photo because I'm not connected right now).. You can make adjustments to various things while not connected to the DET3, save it to a local map, then load that map and click make permanent to the DET3 later when you are connected.
You should be good to start your car, and verify it runs without issue. If your car won't start there may be an issue some where with the CPS, power, or ground wiring. Go double check all your work.
Next you will want to set up your analog sensors. The software download comes with a pile of premade sensor formulas including linear 0-5V scales, 0-100% (if you use TPS), and a bunch of others these are in the "data" folder in your installation directory. So here is the skinny. I don't have the exact formula for our OEM MAP or IAT sensors, but what I did is take some of the existing sensor formulas, and plotted the difference through various pressure/temperature ranges for each of them using excel (compared to torque). One of the pressure sensors was spot on for pressure, but off for vacuum. Not sure how or why but I didn't care to dig into it, what I did do though is convert it from BAR to PSI. As for the IAT, the existing gm temp sensor document had a linear offset of about 19F(10.6C). I adjusted the existing one to read in F instead of C, and added a correction for the offset. I've logged/compared both of these with torque and they are spot on so I've not messed with them any more. If not knowing the exact formula for your analog input is going to bother you, you may need to resort to purchasing independent sensors instead.
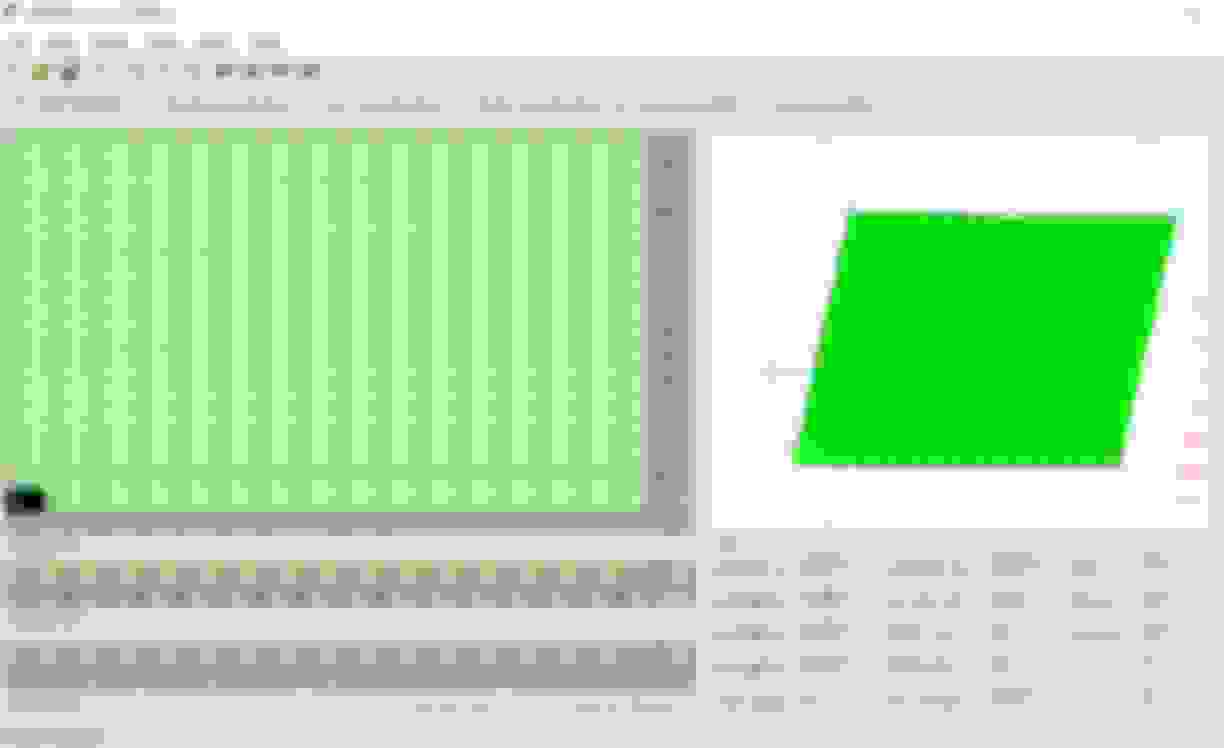
If you want to try to make any of your own analog input formulas you must edit the "DEF" file in notepad. Here is what one of the analog input formulas look like (this is the MAP sensor I converted to PSI):
Now that you have your files available, you're going to go to "Setup" then "Scales Configuration". Here you will select each file for the appropriate analog input that you wired:
Once you have selected your four scales, save that as your default configuration. Each of your analog inputs should now show the correct ranges and units and the associated tables. Save your changes both to the device, and a local save as well. All of these changes can be done and saved to a local MAP and then copied to the DET later.
Setup your analog input ranges. Go to "Setup" then "Analog Inputs Configuration". These will not affect the range that the inputs can be graphed (that is based on the min/max in the DEF file), this ONLY affects the range that it shown on the tables. You want to try to limit this to the usable range to give you finer adjustments in the area you will actually be tweaking.
Save your changes both to the device, and a local save as well.
Set-up your tables by going to "Setup", then "Setup Tables". Here you can choose what input you modify (make sure this in analog 1 unless you connected your MAP to a different input), which input is seen as load(x axis), and what corrections are used. A note on this, the corrections are applied to the overall output of the MAP sensor (not just your adjustment). So if you use a correction it will linearly adjust your map signal to the ECU by that amount at all times. I can't think of a good way to use the corrections at all unless I get knock working correctly. The timing corrections are applied to your offset so it has the potential to be more useful.
Save your changes to local MAP and device!. (get the gist?)
In the analog output you can adjust how much MAP sensor voltage is changed for each step up or down on the fuel matrix. I left all this default.
If you are using a PWM output or power output (output 2 only) you can configure those as well in the PWM and/or Parametric output menus. Here is what the criteria you can use to activate the Parametric output looks like (While using PWM has their own fully adjustable matrix):
Your software should be pretty well set up at this point but there is a lot to play with and do in here and I didn't cover everything just the key points. Look through the manual and feel free to ask questions.
Tuning: So tuning with this is pretty straight foreward. The logging feature is pretty user friendly. Logs are ran real time and can be saved, and old ones loaded to review at any time. A very nice feature is the "ai1" "ai2" "ai3" and "ai4" buttons at the top of the DET3 actually takes info from the current log and lays it over top of which ever table you are currently looking at. So if you want to see exactly where your wideband AFR was recorded on the current log you can overlay that data to see which cells you want to adjust. Here is the overlay view:
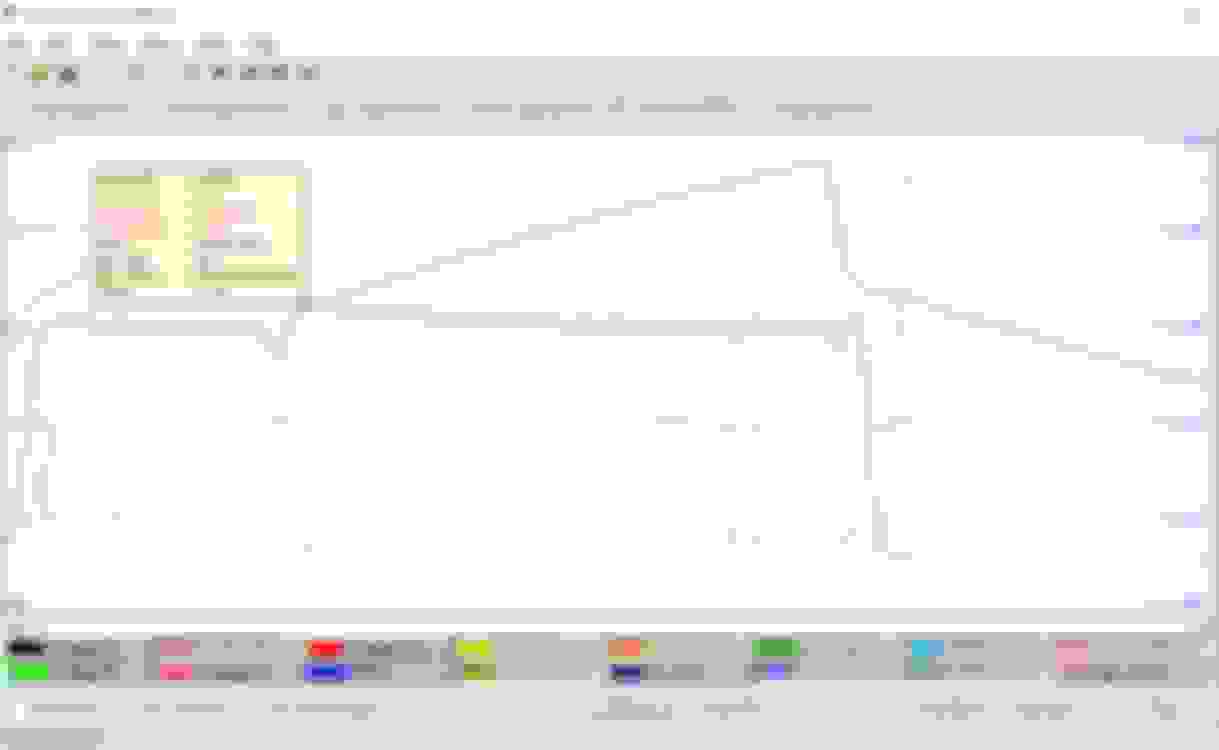
I spent an hour ish playing yesterday (some where safe-ish) and I was able to fine tune fuel to get me pretty close to 12 across the board. What I found is I was knocking and had to pull too much timing. My car "felt" much better with extra fuel (low 11s) and more timing. I didn't want to run 12afr and less timing anyways but I did want to test that I could do it. Here is my fuel map putting me in the low 11s vs the fuel map putting me in the high 11s and the logs, and these are third gear runs:
I believe a good way to test your own tuning changes would be to use the "Road Dyno" function. You have to put in some gearing and aerodynamics info which I haven't messed with yet, but any recorded log you can choose start and end points and send to the road dyno graph. Comparing that graph with before and after changes may be a good tool to utilize.
Low 11s:
Note: each "unit" of change on the fuel map is a certain amount of voltage (adjustable in the aux output menu I talked about earlier) that is hidden from or added to the map sensor signal that actually goes to the ECU.
High 11s map:
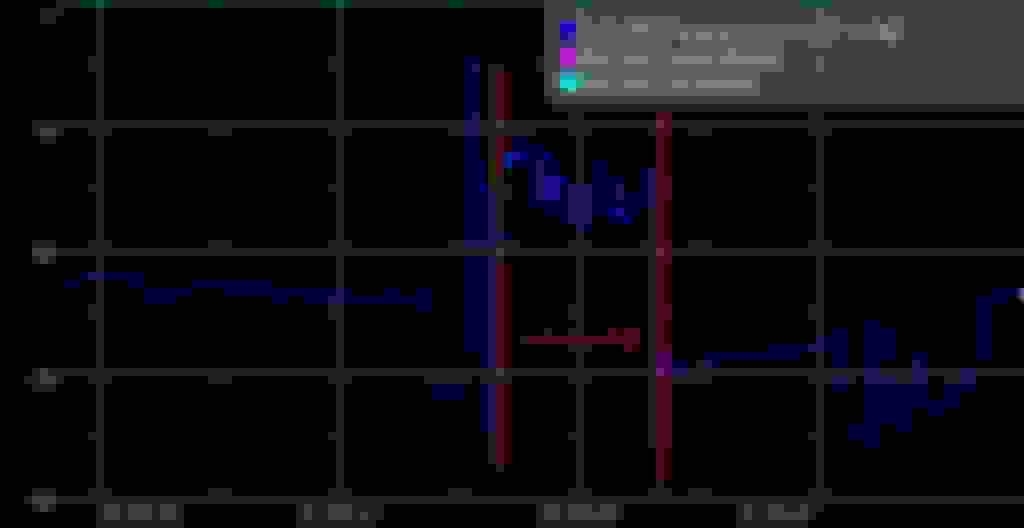
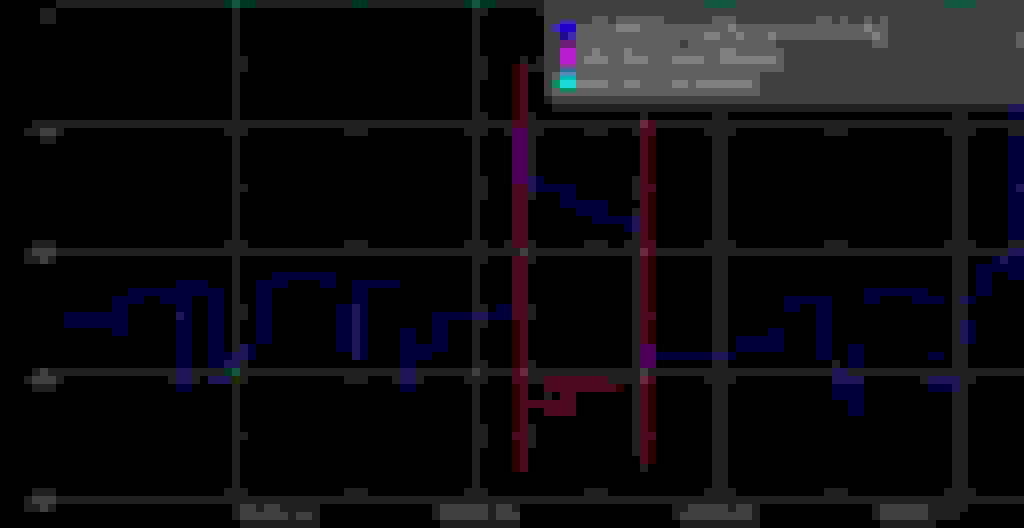
Timing is a little bit tricky without a good way to monitor for detonation. Right now I'm using the graphing feature in torque. It's still very easy to see if you have detonation, but what you can't do is tune timing across the RPM range because you can't really tell what POINTS have detonation because the resolution is garbage. The goal would be to have a high resolution knock logging and squeek out as much timing throughout the whole RPM range without knocking. All I'm doing right now is really making adjustments to the entire MAP while keeping an eye on torque for knock. Here is two pulls on torque 30 seconds apart, the first one with knock and the second one after I pulled 1 degree of timing out across the board:
EDIT: Timing retards function in 6 degree increments in the software! Adding timing is 1 degree at a time but for some reason there is a note in the manual that I missed previously that states when retarding timing the reduction will not actually be 1* but the amount of timing of a tooth on the fly wheel (60 teeth, 360* of timing, hence the 6 degrees of retard).
3rd gear with erratic timing due to knock retard:
3rd gear pull about 30 seconds later after pulling 1 degree of timing across the board on the DET3:
Note: The timing you actually see via OBDII is the FOOLED timing being sent to the ECU. So the value you see logged here is actually +/- what ever you have added into your timing MAP on DET3.
Real Time Knock Logging Solution: I found a device called knocksenseMS(link to website here for more info) that can be wired in with the factory knock sensors. It has adjustable sensitivity and comes with both an LED indicating light as well as a 0-5V analog output that can be wired into the DET3 to (hopefully) precisely log knock and allow for some much better timing tuning instead of flat timing across the board. I have already made the purchase and it is on the way. After I'm able to install and test I'll provide some more info about it here.
There are two versions, the standard version does not have the analog output, but the MS(megasquirt) version does.
Edit: Got this up and running. Works great, tapped into my even side knock sensor wire, and it converts it to a 0-5V output with adjustable sensitivity. Doing some testing, if your timing is fuel quality limited (based on knock) I don't know that there is really much use for this. It seams that the ECU is very fast in responding to knock and adjusting timing accordingly. But, I have this, and it works, but unless I do some race gas tuning and get to the point where i can add more timing than what my tune is calling for I don't think it really provides much value.
does anyone have a link to the map and IAT files mentioned? The Google drive link is down
Mercedes SLR McLaren 722 S Is Extremely Rare Example Modified by McLaren
Slideshow: A one-of-one U.S.-spec Mercedes-Benz SLR McLaren Roadster became even rarer after a factory-backed transformation at McLaren's headquarters.