Mercedes-Benz C-Class: How to Wrap Your Interior in Carbon Fiber Vinyl
Are you looking to set the interior of your Mercedes-Benz C-Class apart from the rest? This article will show you how to quickly and easily wrap your w204 interior with carbon fiber vinyl.
This article applies to the Mercedes-Benz C-Class w204 (2007-2014).
Carbon fiber vinyl wrap is an easy, inexpensive way to give your Mercedes-Benz C-Class's interior a custom look. Compared to real carbon fiber trim pieces, vinyl wrap will save you a ton of money with just a little bit of elbow grease, and a few hours of your time. You will also have the option to wrap whichever trim pieces you want in your C-Class w204 for a truly custom look. Keep reading as this article will show you how it is done.

Materials Needed
- Carbon fiber vinyl wrap
- 3M adhesive spray
- Heat gun
- Rubbing alcohol
- Trim removal tool
- X-ACTO knife or scissors
- Pencil and papers (optional)
- Flat head or Phillips screwdriver
- Owner's manual
Step 1 – Remove the trim pieces
Although the removal of the trim pieces is not absolutely necessary to wrap them, it will allow you to easily apply the wrap and get a cleaner look. If you choose not to remove the trim pieces, use a piece of paper and a pencil to outline each piece for proper fitment. Simply cut the wrap to fit with an X-ACTO knife or scissors.
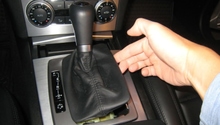
Most trim pieces, such as door inserts and console pieces, simply pop off with a trim removal tool, or they can be removed with a flat head or Phillips screwdriver. If you want to remove major interior parts, such as the dash or center console, refer to the owner's manual for specific instructions. Some pieces may require a precise method of removal, which prevents any damages to occur. Carefully set the pieces aside.

Step 2 – Wrap the interior trim piece
Thoroughly clean each trim piece with rubbing alcohol to remove any dirt or grime. Then, lay the adhesive side of the vinyl wrap to each trim piece, and trace along the outside of each piece. Leave at least a couple inches around each piece to provide enough vinyl for the rounded edges.
Apply a coat of adhesive spray to the trim piece, and then remove the adhesive from the corresponding piece of vinyl wrap. Beginning with the center of the trim piece, press the wrap down firmly and work your way toward the edges. Run a heat gun over the edges and corners of the wrap to ensure a tighter fit. Also, make sure there are no wrinkles or lines. Any excess wrap can be cut off or wrapped to the back of the trim piece.

Step 3 – Re-install the trim pieces
Allow each vinyl wrapped trim piece to fully bond for at least 30 minutes. Then, carefully re-install each piece to their appropriate places.
Related Discussions
- W204 Wrapping Interior Trim - MBWorld.org
- Carbon Fiber 3M Interior Wrapped - MBWorld.org
- Carbon Fiber Interior Wrap Complete - MBWorld.org