Mercedes-Benz E-Class: How to Change Automatic Transmission Fluid
Changing the ATF in your Mercedes-Benz E-Class is a regular part of your vehicle's maintenance cycle. And typically, it should be done every 40,000 miles. As it can be quite expensive to have the dealership change your vehicle's transmission fluid, the cost is far less if you do it yourself. Follow the directions below to learn how.
This article applies to the Mercedes-Benz E-Class w211/w212 (2002-Present).
While some may claim that you never need to change your transmission fluid, others recommend you do it at least once or twice during the lifetime of your vehicle. However, flushing and replacing transmission fluid depends on your vehicle's type of transmission. For the E-Class' 7-speed automatic transmission, a fluid change is required once every 40,000 miles, but for more advanced transmissions, such as the 7GTRONIC+, a fluid change is required once every 80,000 miles. Check your owner's manual for the correct maintenance cycle, and determine when Mercedes-Benz recommends you change the fluid. This how-to will guide you through the steps to change the fluid in your w211 or w212 E-Class.
Materials Needed
- 12 quarts of automatic transmission fluid (Shell ATF 134 recommended)
- Replacement transmission filter (Part# 140.277.00.95 for 722.6; Part# 221.277.01.95 for 722.9)
- Replacement O-ring seal
- Replacement transmission pan gasket
- Replacement transmission pan bolts
- Replacement transmission pan magnet (optional)
- T30 Torx screwdriver
- Flat head screwdriver
- Ratchet with 4mm hex socket
- 3-gallon drainage container
- Funnel (Form-A-Funnel recommended)
- Mercedes-Benz transmission dipstick tool (Part# 140.589.15.21.00 for 722.6)
- Fluid pump with the 722.9 drive line adapter (Assenmacher 1100-5 recommended)
- Jack and jack stands
- Paper towels
- Gloves
Note
For 722.6 transmissions, you need the dipstick and funnel. For 722.9 transmissions, you need the fluid pump and adapter.
Step 1 – Drain the old transmission fluid
Jack your car up and use jack stands to support it. The transmission's drain pan is located directly behind the front crossmember. Place a drainage container underneath the drain plug, and remove it using a T30 Torx screwdriver. Make sure the transmission fluid drains into the drainage container and does not spill.
Warning
Let the car cool down if you have just driven it because the transmission fluid may be very hot and dangerous to handle.
(Related Article: How to Jack Up Your Car - MBWorld.org)
Step 2 – Remove the transmission pan
When the draining slows down, you can start start to loosen the T30 Torx screws around the pan. First, remove four screws on the side of the drain plug to tip the pan, and then drain the excess fluid. Hold the pan up as you remove the remaining two screws to prevent the pan from falling and spilling.
Pro Tip
Have a friend hold up the pan, so it's easier to remove.
Step 3 – Change the transmission fluid filter
Keep your drainage container underneath the filter as some fluid may continue to drip out. Hold on to the open end of the fuel filter, then wiggle it up and down until it pops off. Before installing the new filter, place a new O-ring seal around the top of the filter. Then, place it in the same position as the old one and push up to secure it in place. You'll know it's properly seated when you hear it click into place.
Step 4 – Re-install the transmission pan
Wipe the inside of the transmission pan with a paper towel to sop up the remaining transmission fluid. Also, clean the magnet of any metal shavings, but if the magnet has lost its pull, you will need to replace it. Peel off the old transmission pan gasket, and firmly press the new one into place. To re-install the pan, hold it up and tighten the six T30 Torx screws in a diagonal pattern. Re-tighten each screw and make sure they are all tightly secure.
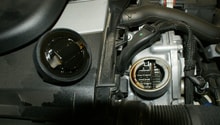
Step 5 – Pour in the new transmission fluid
Open the hood and find the transmission ATF fill tube. Remove the ATF tube lock pin, and then the ATF tube cap. Use a funnel to direct the new transmission fluid into the tube, and begin adding four or five quarts of transmission fluid. Start the engine, and let it idle for a few minutes to allow the fluid to warm up. Then, remove the ATF dipstick to check if the fluid level is between the indicated line marks. Add small amounts of fluid as necessary to reach the correct fluid level.
Pro Tip
If your E-Class has a 722.9 transmission, you'll need to buy or rent a fluid pump to fill the transmission. Connect the pump to the drain plug, and pump the ATF into the transmission tray. For proper fluid levels, your vehicle must be leveled and the fluid temperature must be between 104° and 113° Fahrenheit. Keep pumping transmission fluid into the tray until the drain plug overflows. Drain out any excess fluid, and then tighten the drain plug.
Featured Video: Automatic Transmission Flushing
Related Discussions, Video, and Site
- How to Check Transmission Fluid - MBWorld.org
- 722.9 7GTRONIC Fluid Change - MBWorld.org
- Need Help with Transmission Fluid - MBWorld.org
- 40K Mile Service Changed by MBUSA - MBWorld.org
- Mercedes 722.6 Automatic Transmission Fluid and Filter Change - YouTube.com
- W211 Automatic Transmission Fluid and Filter Change - PelicanParts.com