Moron's guide to aftermarket head unit installation

 11-19-2011, 02:33 AM
#1
MBWorld Fanatic!
Thread Starter
Moron's guide to aftermarket head unit installation
Moron- only because that is what I felt like when searching and trying to find answers, no offense to anyone.
There is so much fragmented information everywhere I decided to write up my experiences of installing my pioneer head unit. I have done dozens of installs on various cars mostly early 90's vehicles, subs, amps, head units, capacitors etc but the C-class is something else. I didn't know cars could have fiber optic systems, I assumed it was all still regular wire. My car is a 02 c32 amg with NON-bose system. If you have bose then simply use these instructions with the pacific accessory corporation products http://www.marcusfitzhugh.com/CLK/DIY/headunit2.html
So... in 2002 when this car was made I was already using mp3 cd's so the stock system is pretty limited. I personally like SD and also having the option for USB. I am full of iHate but I do have AUX in. Point is the easiest option is to ditch the stock radio and get something proper. I don't know anything about navigation nor do I want to but there is heaps of info it would seem on this topic on the forum so it is not covered here.
My system does not have a stock amp but it DOES have a stock subwoofer (yes really) in the parcel tray (rear deck). The sub is run off both of the rear speaker outputs.
Here is my original need help thread, there are lots of helpful links in it and more info on the exact products I looked at and what I ended up getting https://mbworld.org/forums/c-class-w...tall-help.html If you want to retain the steering wheel controls then you need a small box to convert the signal to something your head unit can understand. There are 2-3 ways of doing this. I used metra axxess "steering wheel control interface". This connects to the CANBUS (digital communications) in the car (specifically from the steering wheel) and converts it to a standard signal for your head unit. It auto detects you car model and head unit model. This is a very simple way of doing it.
The other option is to use SWI-CAN which converts the steering wheel interface signal to a universal one, then use SWI-JACK (or other) to convert the signal to the brand of head unit you have. JACK covers JVC, Alpine, Clarion, Kenwood, there is one for eclipse, panasonic/sony and a couple of others. This seemed more complicated for no reason so I did not go this way. If you have bose this is a good choice since you can use PAC-OEM to use the stock amplifier despite the optical cables.
You can program the buttons for both the axxess and PAC.
Anyway I purchased the axxess, a C-class install kit from ebay which included the radio wiring harness adapter, antenna adapter (from euro to everyone else) and the plastic 2x single DIN surround. It was an excellent product package. Even the wiring adapter was the exact correct one (70-9401). I also got a 5 meter RCA cable in case I amp the sub later, 5 meters of 8ga cable for the amp, inline fuse and some ring terminals.
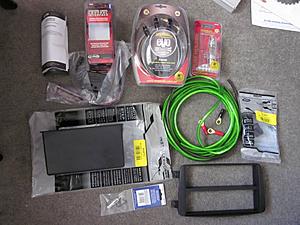
Lots of fun stuff.
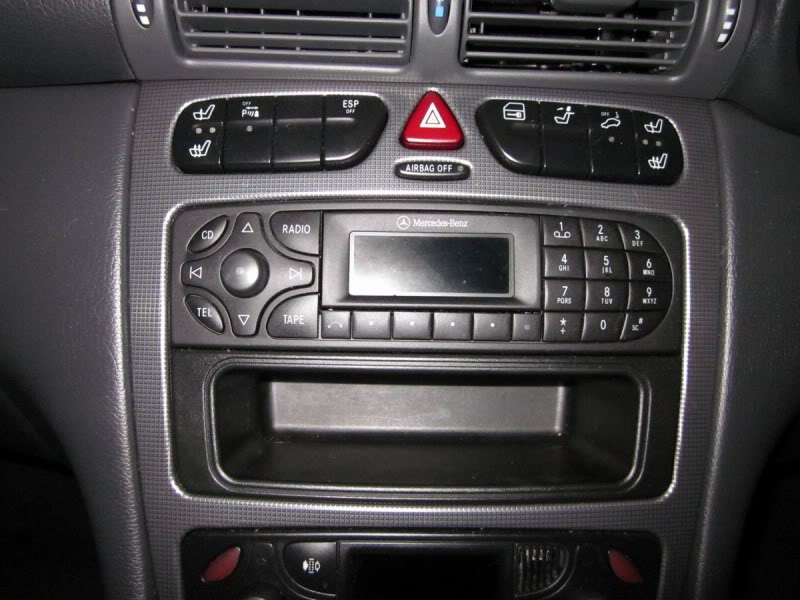
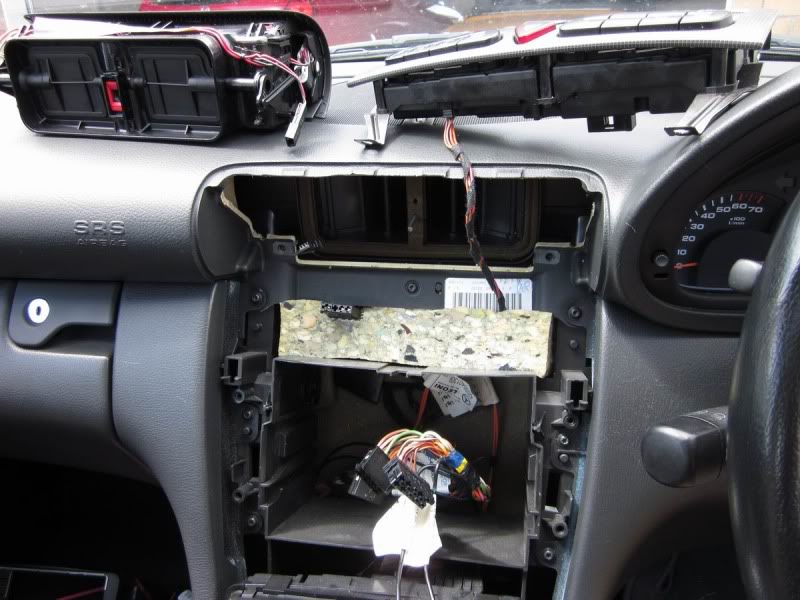
Stock- doesn't it look great.

Follow the instructions here to take it all apart https://mbworld.org/forums/c-class-w...tructions.html The only tips I can offer is you need a T20 torx screw driver (non-security version) and when you push down on the "hooks" to get the vent unit out you need to push down and pull the unit out at the same time. It took me a while to figure it all out.

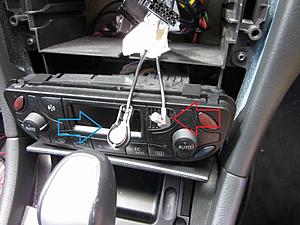
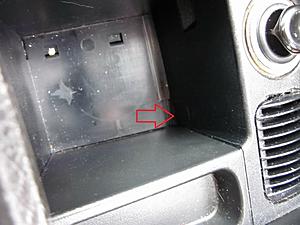
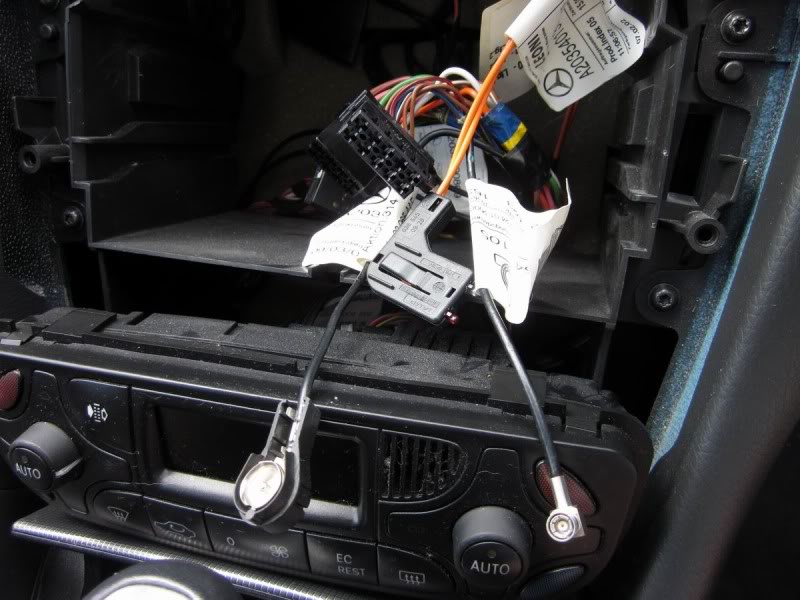
The blue arrow is the antenna, no idea what the other one is? I found it easiest to leave the climate control there since I could not get the wire out the back.
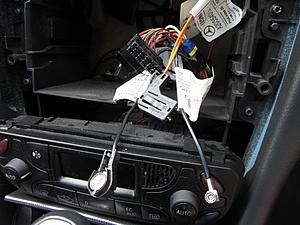
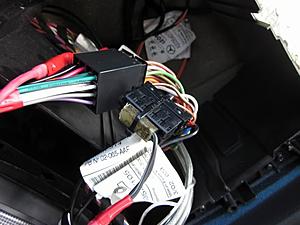
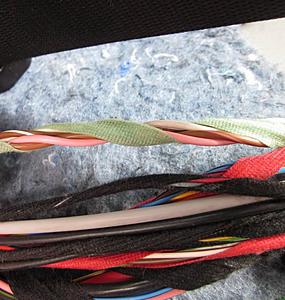
The orange double cable is the fiber optic cable. Don't bend it too much if you want to potentially put everything back to stock.

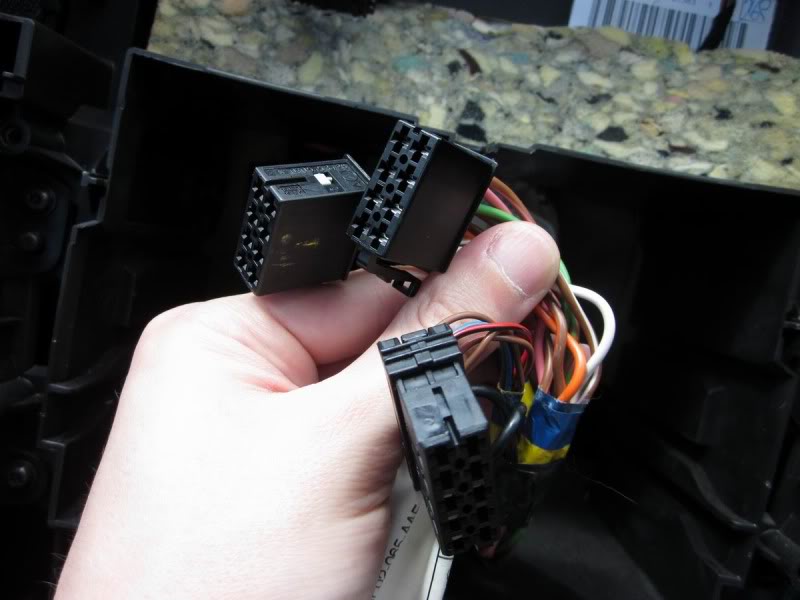
Top right plug is the power, ground etc for the radio. The bottom is the one with the 2 CAN wires. I don't know what the other wires are for in this plug. The left plug is the speaker wires only, grey, green, violet and white.
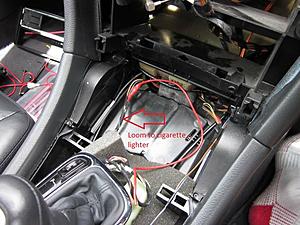
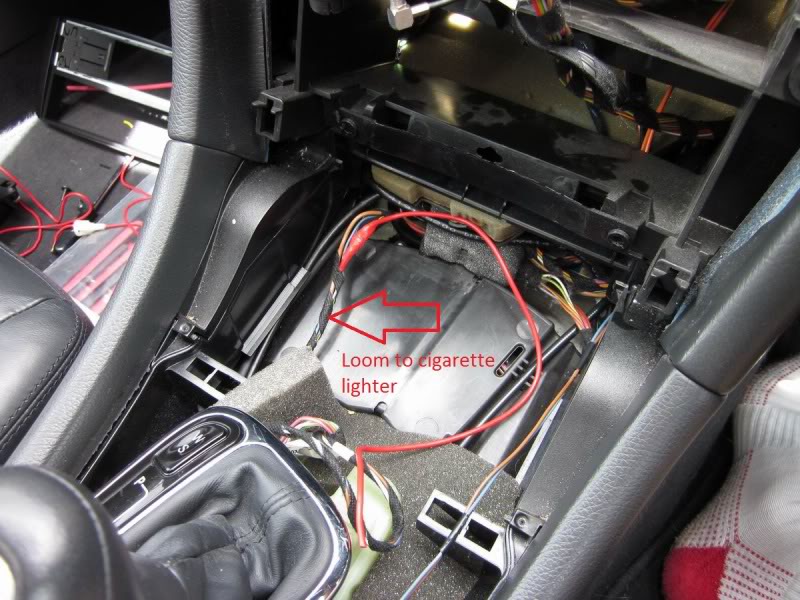
Next step after the stock unit is out is to find an ACC wire. The w203 does not have a switched 12V wire for the stock radio so you will need one for an aftermarket unit. The closest one is the cigarette lighter. To get to this you need to remove the centre console trim. After removing the ashtray you simply pull the trim up. Slowly but firmly pull the trim directly UP starting at the front and working backwards. You will find it easiest to remove the shifter surround which simply lifts out also. The trim slides forwards to undo completely.
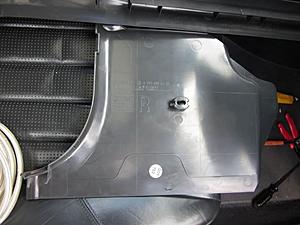
This is the trim lying upside down on the seat so you can see the clips. They simply pull apart, there is no prying or clips to undo.
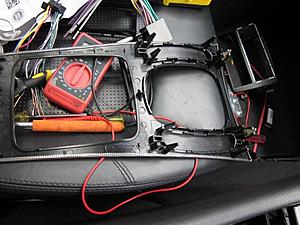
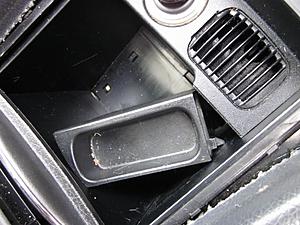
You do not need to do this next part but I had to because I did not know what to do. Remove the cup holder, then press the small piece of plastic the size of your fingertip down the bottom of the "hole" and the small shelf will twist up and out. https://mbworld.org/forums/attachmen...-cupholder.gif Then you can pull the cigarette lighter backwards (it folds back) and you can see the wiring harness. Mine had 3 wires, brown was ground (surprise) and yellow/black was switched 12V. There was a blue one, no idea what this did. Anyway you did not have to do all this as I discovered the harness simply runs around the outside of the shifter so you can tap into it much closer to the head unit. Run a wire up to the stock harness.
To get the little "shelf" thing on the right out you need to press this tiny plastic button down the bottom, took me a while to figure that one out. Then the cigarette lighter will come backwards when unclipped at the top.
Twist and pull up.
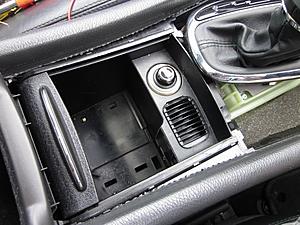
The accessory wire can be tapped into here.
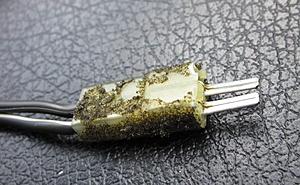
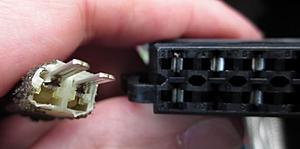
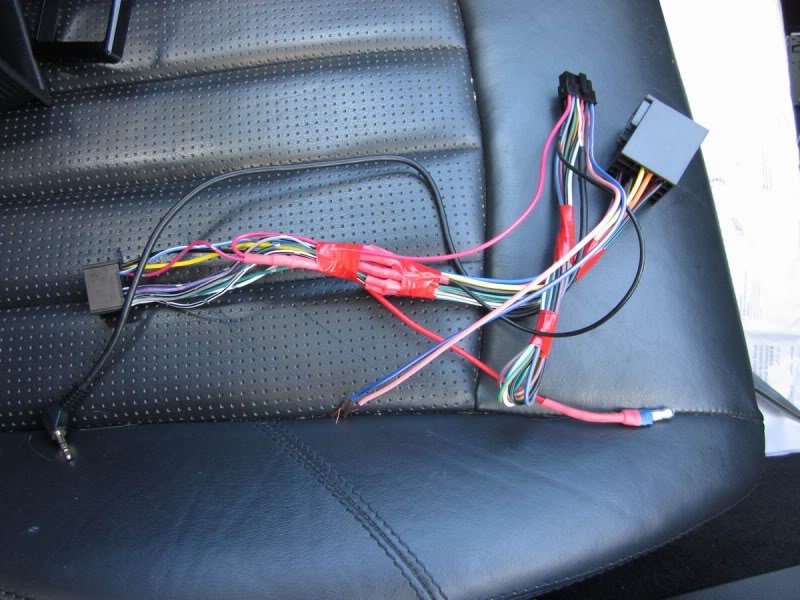
Wiring is a case of matching the audio wires from the metra harness to your head unit harness. The standard speaker colours are used making this very easy. Next you need to bring constant 12V from the car harness to the head unit one. Same with the radio antenna wire. The metra harness is labeled with each function. Now it becomes 5% more complicated. Match the 12V switched power wire you made to the head unit harness and also to the metra axxess since this does not use a constant 12V supply. Almost finally everything needs to be grounded, the axxess, the head unit and car harness all need to be joined. Finally the CAN wires need to be joined. Most of the axxess wires do not need to be used, the blue/pink and pink wires are the ones for the w203. Pink goes to "1" (labeled on the stock plug) and the blue/pink goes to "2". I was about to cut the stock plug off to wire them in when I spotted this in the garage. It was a plug for tweeters I removed from my gt4. They fit perfectly into the plug.
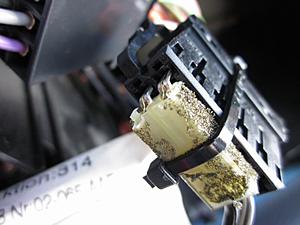
I put electrical tape on everything not being used and anything that could potentially touch anything it is not supposed to. I personally twist and heat shrink. Soldering is a great idea but I personally find overkill for car audio. You should have a monstrosity like this after you are finished...
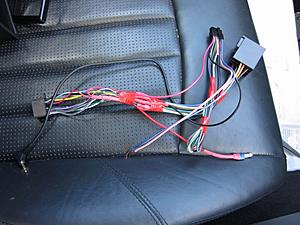
Now try and stuff all that crap into the DIN slots
Test fit everything.

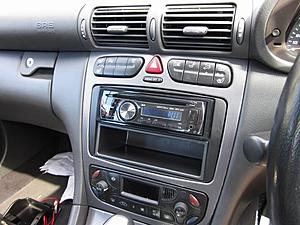
Finished!, unfortunately it does not show pioneer on the dash display but volume works, track up down works, telephone buttons are "attn" (halves volume) and "source" ie CD, SD, USB, tuner. Sound is maybe slightly better than stock but the rear required more gain since the head unit is powering both the rear speakers and the sub. The rear wires are 5.4ohms (2x speakers + sub) while the front are standard 4ohm speakers. I put RCA's in at the same time as the head unit and threaded them into the trunk. Sometime I will install my spare fusion amp 60rms x2 to power the stock sub.
If you want to run RCA's the easiest way is to pull up the trim along the door sills. The fronts simply pull up. You may need to removed the kick panel, it has a T20 torx screw in it under a small cover and it pulls outwards (with a lot of force)
At the back, take the side cushion thing out- you need to pull the bottom seat forward on its hinge and undo the 10mm bolt holding said cushion thing on. Also undo 10mm plastic nut holding the door trim on and it can be pulled up and out. Have fun!
Oh and the phone wont work with an aftermarket head unit so I removed it and also the 6 changer in the glove box. Take your CD's OUT BEFORE STARTING as it won't give them back once the stock radio is gone.
There is so much fragmented information everywhere I decided to write up my experiences of installing my pioneer head unit. I have done dozens of installs on various cars mostly early 90's vehicles, subs, amps, head units, capacitors etc but the C-class is something else. I didn't know cars could have fiber optic systems, I assumed it was all still regular wire. My car is a 02 c32 amg with NON-bose system. If you have bose then simply use these instructions with the pacific accessory corporation products http://www.marcusfitzhugh.com/CLK/DIY/headunit2.html
So... in 2002 when this car was made I was already using mp3 cd's so the stock system is pretty limited. I personally like SD and also having the option for USB. I am full of iHate but I do have AUX in. Point is the easiest option is to ditch the stock radio and get something proper. I don't know anything about navigation nor do I want to but there is heaps of info it would seem on this topic on the forum so it is not covered here.
My system does not have a stock amp but it DOES have a stock subwoofer (yes really) in the parcel tray (rear deck). The sub is run off both of the rear speaker outputs.
Here is my original need help thread, there are lots of helpful links in it and more info on the exact products I looked at and what I ended up getting https://mbworld.org/forums/c-class-w...tall-help.html If you want to retain the steering wheel controls then you need a small box to convert the signal to something your head unit can understand. There are 2-3 ways of doing this. I used metra axxess "steering wheel control interface". This connects to the CANBUS (digital communications) in the car (specifically from the steering wheel) and converts it to a standard signal for your head unit. It auto detects you car model and head unit model. This is a very simple way of doing it.
The other option is to use SWI-CAN which converts the steering wheel interface signal to a universal one, then use SWI-JACK (or other) to convert the signal to the brand of head unit you have. JACK covers JVC, Alpine, Clarion, Kenwood, there is one for eclipse, panasonic/sony and a couple of others. This seemed more complicated for no reason so I did not go this way. If you have bose this is a good choice since you can use PAC-OEM to use the stock amplifier despite the optical cables.
You can program the buttons for both the axxess and PAC.
Anyway I purchased the axxess, a C-class install kit from ebay which included the radio wiring harness adapter, antenna adapter (from euro to everyone else) and the plastic 2x single DIN surround. It was an excellent product package. Even the wiring adapter was the exact correct one (70-9401). I also got a 5 meter RCA cable in case I amp the sub later, 5 meters of 8ga cable for the amp, inline fuse and some ring terminals.

Lots of fun stuff.
Stock- doesn't it look great.
Follow the instructions here to take it all apart https://mbworld.org/forums/c-class-w...tructions.html The only tips I can offer is you need a T20 torx screw driver (non-security version) and when you push down on the "hooks" to get the vent unit out you need to push down and pull the unit out at the same time. It took me a while to figure it all out.

The blue arrow is the antenna, no idea what the other one is? I found it easiest to leave the climate control there since I could not get the wire out the back.
The orange double cable is the fiber optic cable. Don't bend it too much if you want to potentially put everything back to stock.
Top right plug is the power, ground etc for the radio. The bottom is the one with the 2 CAN wires. I don't know what the other wires are for in this plug. The left plug is the speaker wires only, grey, green, violet and white.
Next step after the stock unit is out is to find an ACC wire. The w203 does not have a switched 12V wire for the stock radio so you will need one for an aftermarket unit. The closest one is the cigarette lighter. To get to this you need to remove the centre console trim. After removing the ashtray you simply pull the trim up. Slowly but firmly pull the trim directly UP starting at the front and working backwards. You will find it easiest to remove the shifter surround which simply lifts out also. The trim slides forwards to undo completely.

This is the trim lying upside down on the seat so you can see the clips. They simply pull apart, there is no prying or clips to undo.
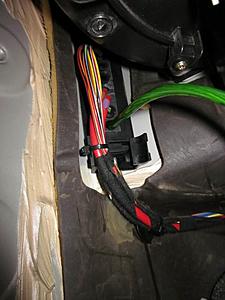
You do not need to do this next part but I had to because I did not know what to do. Remove the cup holder, then press the small piece of plastic the size of your fingertip down the bottom of the "hole" and the small shelf will twist up and out. https://mbworld.org/forums/attachmen...-cupholder.gif Then you can pull the cigarette lighter backwards (it folds back) and you can see the wiring harness. Mine had 3 wires, brown was ground (surprise) and yellow/black was switched 12V. There was a blue one, no idea what this did. Anyway you did not have to do all this as I discovered the harness simply runs around the outside of the shifter so you can tap into it much closer to the head unit. Run a wire up to the stock harness.

To get the little "shelf" thing on the right out you need to press this tiny plastic button down the bottom, took me a while to figure that one out. Then the cigarette lighter will come backwards when unclipped at the top.

Twist and pull up.

The accessory wire can be tapped into here.
Wiring is a case of matching the audio wires from the metra harness to your head unit harness. The standard speaker colours are used making this very easy. Next you need to bring constant 12V from the car harness to the head unit one. Same with the radio antenna wire. The metra harness is labeled with each function. Now it becomes 5% more complicated. Match the 12V switched power wire you made to the head unit harness and also to the metra axxess since this does not use a constant 12V supply. Almost finally everything needs to be grounded, the axxess, the head unit and car harness all need to be joined. Finally the CAN wires need to be joined. Most of the axxess wires do not need to be used, the blue/pink and pink wires are the ones for the w203. Pink goes to "1" (labeled on the stock plug) and the blue/pink goes to "2". I was about to cut the stock plug off to wire them in when I spotted this in the garage. It was a plug for tweeters I removed from my gt4. They fit perfectly into the plug.


I put electrical tape on everything not being used and anything that could potentially touch anything it is not supposed to. I personally twist and heat shrink. Soldering is a great idea but I personally find overkill for car audio. You should have a monstrosity like this after you are finished...
Now try and stuff all that crap into the DIN slots

Test fit everything.


Finished!, unfortunately it does not show pioneer on the dash display but volume works, track up down works, telephone buttons are "attn" (halves volume) and "source" ie CD, SD, USB, tuner. Sound is maybe slightly better than stock but the rear required more gain since the head unit is powering both the rear speakers and the sub. The rear wires are 5.4ohms (2x speakers + sub) while the front are standard 4ohm speakers. I put RCA's in at the same time as the head unit and threaded them into the trunk. Sometime I will install my spare fusion amp 60rms x2 to power the stock sub.
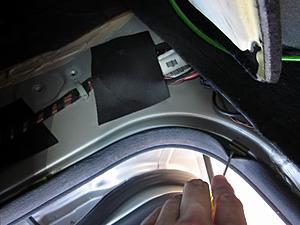
If you want to run RCA's the easiest way is to pull up the trim along the door sills. The fronts simply pull up. You may need to removed the kick panel, it has a T20 torx screw in it under a small cover and it pulls outwards (with a lot of force)

At the back, take the side cushion thing out- you need to pull the bottom seat forward on its hinge and undo the 10mm bolt holding said cushion thing on. Also undo 10mm plastic nut holding the door trim on and it can be pulled up and out. Have fun!
Oh and the phone wont work with an aftermarket head unit so I removed it and also the 6 changer in the glove box. Take your CD's OUT BEFORE STARTING as it won't give them back once the stock radio is gone.
Last edited by tw2; 11-19-2011 at 03:18 AM.
 11-19-2011, 03:13 AM
#2
MBWorld Fanatic!
Thread Starter
I should also add a couple of points since I was totally ignorant about all this stuff 1 month ago. To take the gear shift out of park with the key out you need to push forward a small lever through the coin slot with a thin screwdriver. Instructions for the axxess SWI are on their website but essentially you just switch the key to ACC and press the vol up button on the steering wheel continuously and it does everything else automatically.
I hope this helps someone. I would have found this invaluable when I started this project. Also this is 98% original but there is a sentence or two copied from other threads, hope no one minds.
I will add more when I install my amplifier. Also please let me know if there are any mistakes or any information on the things I did not know, like extra wires of which the functions are unknown to me.
11-19-2011, 03:06 PM
#3
MBWorld Fanatic!
Join Date: May 2009
Location: Toronto, NYC
Posts: 1,101
Likes: 0
Received 4 Likes
on
4 Posts
2002 Mercedes Benz C230 Coupe
Excellent write-up. 
Wish I had this when I was doing my HU install. Wouldve saved me tons of time in searching through multiple threads to find answers to specific questions.
Mods: I vote for sticky...and is there was way to prevent people from cluttering up this thread with questions..maybe close it off? So many questions come up about HU installs, that it makes sense to have this thread purely as a guide and not as a Q&A thread. The other HU install threads can serve as Q&A.
11-21-2011, 02:15 AM
#4
MBWorld Fanatic!
Thread Starter
Thanks for the compliment.
After driving around I have found that the track up/down buttons on the steering wheel will change the song and the dash display at the same time. This isn't an issue if you are on a 1 screen only option such as audio (obviously), malfunction, odometer but it will cycle you through the options when on the range/afterstart/sincereset display. I am not sure if this is a axxess problem or whether I just need to actually program it better than its auto settings.
After driving around I have found that the track up/down buttons on the steering wheel will change the song and the dash display at the same time. This isn't an issue if you are on a 1 screen only option such as audio (obviously), malfunction, odometer but it will cycle you through the options when on the range/afterstart/sincereset display. I am not sure if this is a axxess problem or whether I just need to actually program it better than its auto settings.
12-23-2011, 06:56 PM
#6
MBWorld Fanatic!
Thread Starter
Small update. The plastic pocket is easy to clip out of the surround on the dash kit I ordered. This means I can easily get to and see the LED on the metra axxess SWI. I reprogrammed it so now I have vol up and down as usual, telephone answer is change up track, hang up button is now change down track. The old up/down track buttons on the left of the steering wheel can now be used to change function on the cars computer without affecting the audio. It is now perfect, exactly how I want it. I recommend this to anyone especially if you don't use/want the telephone.
12-23-2011, 07:54 PM
#7
Senior Member

Join Date: Jun 2011
Location: Lumberton, TX
Posts: 264
Likes: 0
Received 2 Likes
on
2 Posts
2009 ML350, 2007 GL450, 1963 GMC, BMW 325i
Nice write-up!! Sticky vote x2.
I will definitely need this in the future.
I think in the pic with the blue arrow pointing to the antenna. The red arrow points to the WX(weather) band antenna.
I will definitely need this in the future.
I think in the pic with the blue arrow pointing to the antenna. The red arrow points to the WX(weather) band antenna.
Trending Topics
12-26-2011, 08:04 PM
#9
MBWorld Fanatic!
Thread Starter
01-05-2012, 03:04 AM
#10
MBWorld Fanatic!
Thread Starter
Guide part 2 complete. Once again, this is all my opinion, it is just how I did it. It is far from perfect but it is what worked for me and maybe it will help someone else.
Amplifier is installed! Just to clarify, I am using the stock standard NON-bose subwoofer in the parcel tray because it is already there, it is tucked up out of the way and is enough for me (I have done the whole "lots of subs" car audio thing when I was younger).
I have used an old fusion amplifier I had around. It is 66rms x2 channels. Since the stock sub is dual voice coil I have run both coils in parallel bridged at 2ohm which the amp is compatible with.
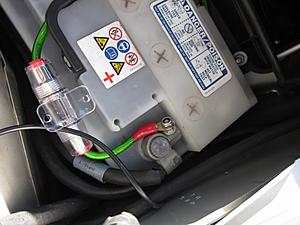
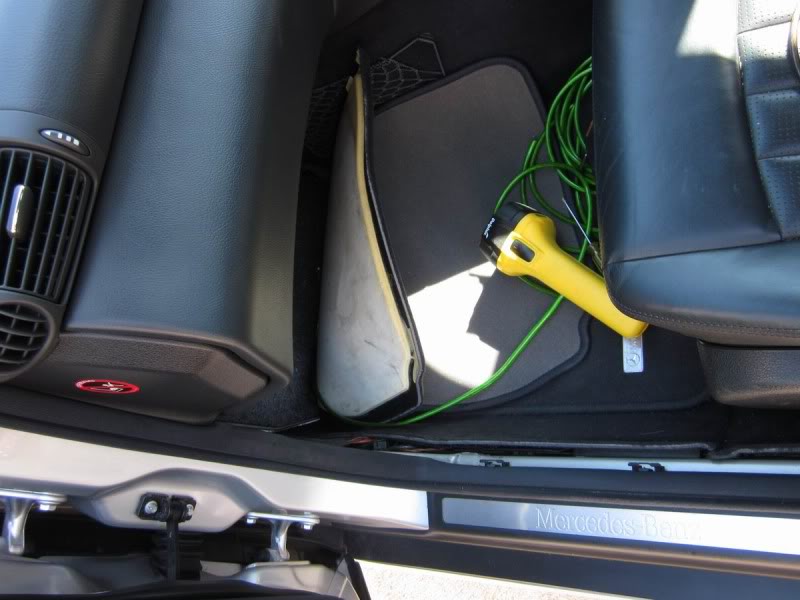
I used some fusion 8ga power cable. I got 5m which was more than enough length. My battery is on the left hand side of the car against the firewall. There are grommets you can pull out and pass the wire through to get to it.
The plastic trim running along the door openings simply pulls up. It can take some effort however.
To get to this point you need to take the plastic tray off the underneath of the glove box, it has 2 T20 torx screws holding it up. It kind of slides out. Next is the vertical plastic trim on the side. Flip the small piece of plastic out to reveal another torx screw. The plastic comes directly out from the wall. Be very careful as it is held by 2 plastic clips. It simply pulls out, but the clips hold it very very strongly and the plastic might break (I did a small amount of damage) before the clips give way. Carefully pry it up using a screwdriver inserted right next to the clip.

I found getting the cable through the grommets very difficulty. I could not remove the battery (not that I tried very hard) so I had to use a piece of guide wire to pull it through.
There is nothing at all to secure a fuse holder to around the battery so I ended up not securing it. What I did was wedge the 8ga cable into the handle grooves on top of the battery and cable tie them together.
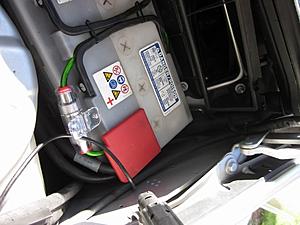
With the drainage tray (which has the air conditioning filter underneath) I was worried than any moisture might drain straight onto the fuse holder (which is water tight anyway) so you can see I have added some hose so that it definitely clears.
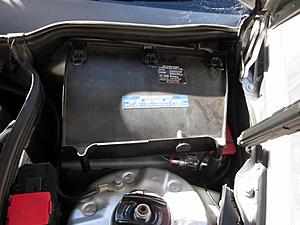
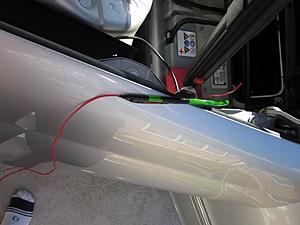
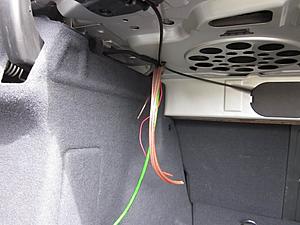
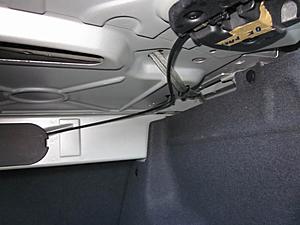
It is easy to neatly route the power cable through the cabin.

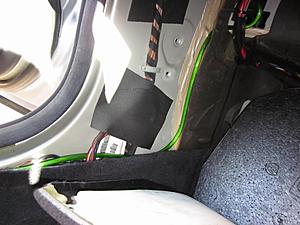
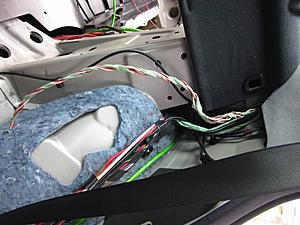
The rear door trim has a plastic nut under the rear seat but otherwise it pulls directly up just like the front. Flip the rear seat forward to get to it. To expose the wires running up the wheel well you need to remove the slim "cushion" on the sides of the upright portion of the seats. It has a 10mm bolt below, a clip midway and it pulls out of its clip at the top forwards. It can take some serious pulling to get this clip to come out. When routing the power cable up the back seat, I found it very helpful to stick it into the plastic "housing" where all the stock wires run. This plastic cage thing has 4 small clips to take the "lid" off.
Remove the truck lining (clip remover tool helps) and take the lining out. Here is the fuse box. You will need to get a switched power source for the amplifier here.
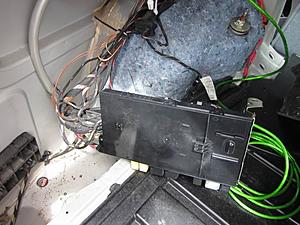
After lots of searching it seems everyone gets the power from fuse 7. I really am not sure how to do it properly. I am not proud of this but it works. I simply wrapped some wire around the metal "pin" of a 10A fuse and shoved it in the fuse 7 hole.

Add a ground cable.
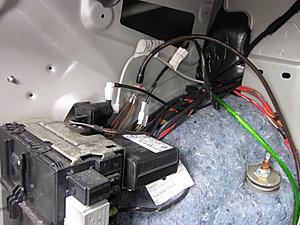
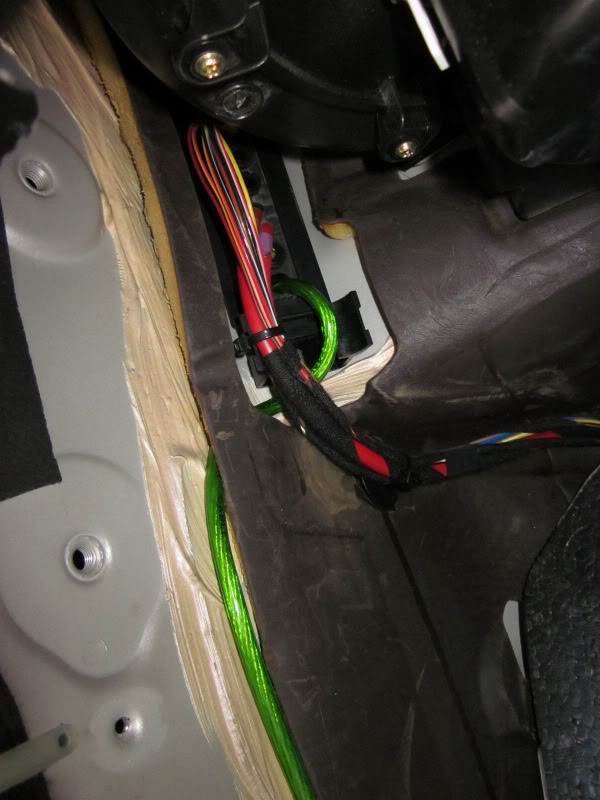
Next for me anyway was to rewire the sub. Since it has dual voice coils is also has two sets of wires. These conveniently run up the wheel well on the left side of the car (for me, my car is RHD). I simply cut them and threaded them through to the trunk.
Here I had wired extensions onto them since they did not comfortably reach where I wanted.
Amplifier is installed! Just to clarify, I am using the stock standard NON-bose subwoofer in the parcel tray because it is already there, it is tucked up out of the way and is enough for me (I have done the whole "lots of subs" car audio thing when I was younger).
I have used an old fusion amplifier I had around. It is 66rms x2 channels. Since the stock sub is dual voice coil I have run both coils in parallel bridged at 2ohm which the amp is compatible with.
I used some fusion 8ga power cable. I got 5m which was more than enough length. My battery is on the left hand side of the car against the firewall. There are grommets you can pull out and pass the wire through to get to it.

The plastic trim running along the door openings simply pulls up. It can take some effort however.
To get to this point you need to take the plastic tray off the underneath of the glove box, it has 2 T20 torx screws holding it up. It kind of slides out. Next is the vertical plastic trim on the side. Flip the small piece of plastic out to reveal another torx screw. The plastic comes directly out from the wall. Be very careful as it is held by 2 plastic clips. It simply pulls out, but the clips hold it very very strongly and the plastic might break (I did a small amount of damage) before the clips give way. Carefully pry it up using a screwdriver inserted right next to the clip.

I found getting the cable through the grommets very difficulty. I could not remove the battery (not that I tried very hard) so I had to use a piece of guide wire to pull it through.

There is nothing at all to secure a fuse holder to around the battery so I ended up not securing it. What I did was wedge the 8ga cable into the handle grooves on top of the battery and cable tie them together.
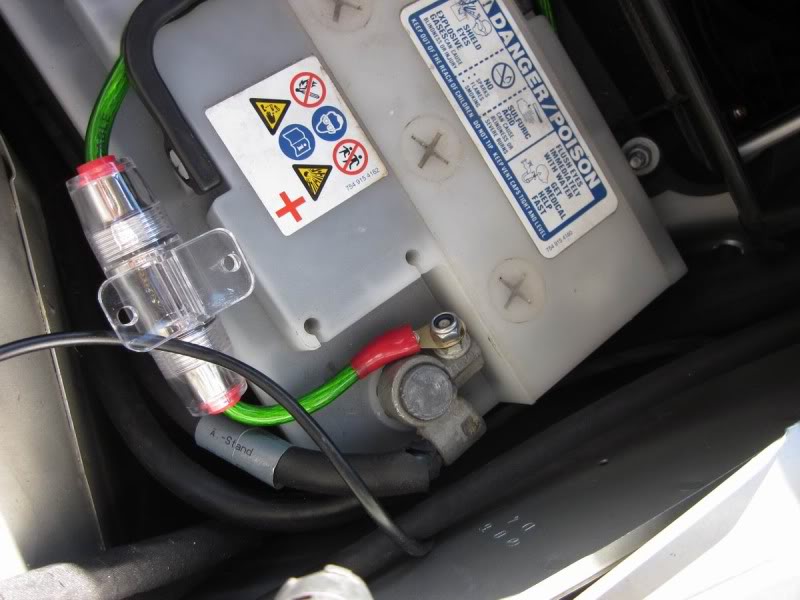

With the drainage tray (which has the air conditioning filter underneath) I was worried than any moisture might drain straight onto the fuse holder (which is water tight anyway) so you can see I have added some hose so that it definitely clears.

It is easy to neatly route the power cable through the cabin.

The rear door trim has a plastic nut under the rear seat but otherwise it pulls directly up just like the front. Flip the rear seat forward to get to it. To expose the wires running up the wheel well you need to remove the slim "cushion" on the sides of the upright portion of the seats. It has a 10mm bolt below, a clip midway and it pulls out of its clip at the top forwards. It can take some serious pulling to get this clip to come out. When routing the power cable up the back seat, I found it very helpful to stick it into the plastic "housing" where all the stock wires run. This plastic cage thing has 4 small clips to take the "lid" off.

Remove the truck lining (clip remover tool helps) and take the lining out. Here is the fuse box. You will need to get a switched power source for the amplifier here.

After lots of searching it seems everyone gets the power from fuse 7. I really am not sure how to do it properly. I am not proud of this but it works. I simply wrapped some wire around the metal "pin" of a 10A fuse and shoved it in the fuse 7 hole.

Add a ground cable.

Next for me anyway was to rewire the sub. Since it has dual voice coils is also has two sets of wires. These conveniently run up the wheel well on the left side of the car (for me, my car is RHD). I simply cut them and threaded them through to the trunk.


Here I had wired extensions onto them since they did not comfortably reach where I wanted.

Last edited by tw2; 01-05-2012 at 03:08 AM.
01-05-2012, 03:10 AM
#11
MBWorld Fanatic!
Thread Starter
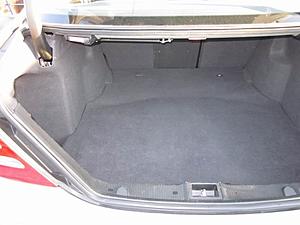
My idea of a car audio setup (now that I am an adult) is to have everything neatly out of the way. I certainly do not want amps mounted all over the place ready for crap in the trunk to knock the wires out and start a fire. I do not like to mount them upside down, I realize they often work fine and don't melt into a ball of sludge the first time you do it but none the less they are not designed to do this. I don't like them on the floor since they take up valuable room and I also do not like drilling new holes.
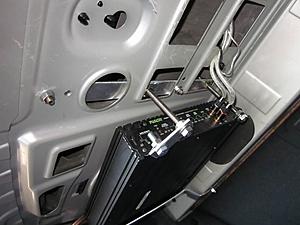
So with all that, the only suitable place is hanging from the rear deck (parcel tray) with the amp mounted the correct way up. So this is what I have done. It is by no means perfect but it suits my needs. I can still pack my trunk full of ****. The wires are well away from anything sliding around. I did not drill a single hole. I used original empty holes. Every bolt, nut or threaded rod is M8x1.25 so it is not going anywhere. All metal is 3mm aluminium (aluminum) which is easy to work with and strong enough to hold a light amp.

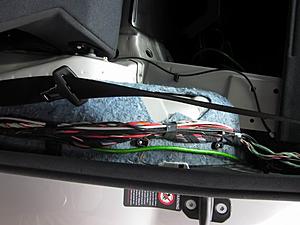
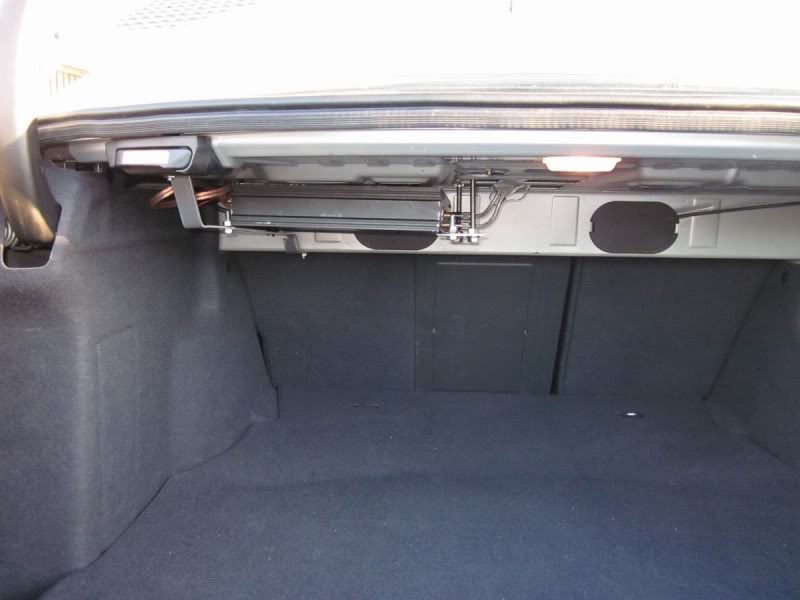
RCA's from head unit routed down the right side of the car (opposite the power cable) since I did not want interference (not that I think it would matter for a sub). Here they are heading under the lining of the rear deck and along to the amp.
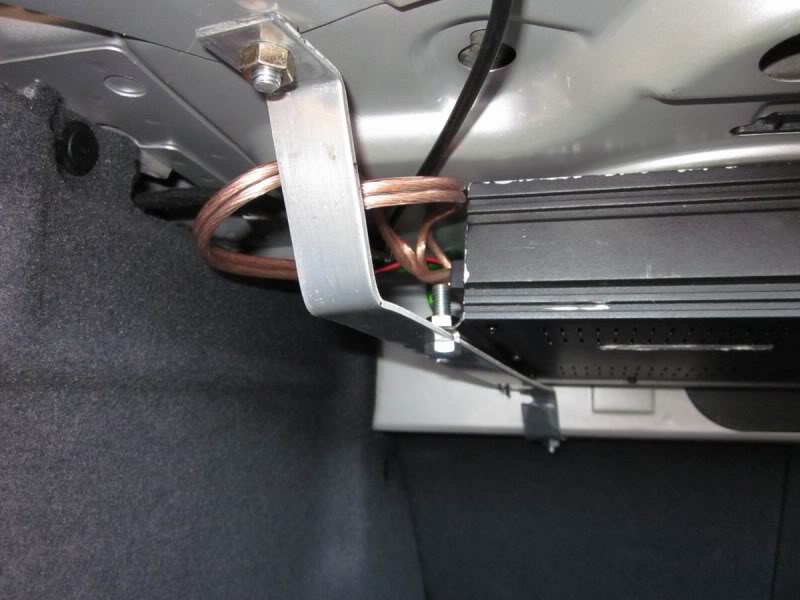
Here you can see my not very pretty job of mounting it. The left side is a metal strap that runs underneath. What I did on the other side of the amp is to run some of the same metal on top of the metal of the rear deck for strength. I then used threaded rod to extend down to the amp. The amp is mounted very very securely. It doesn't budge in the slightest. There is no way it is going anywhere no matter how much braking, acceleration and cornering it is put through.
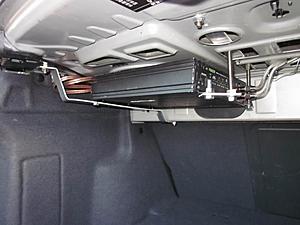
The bracing strip is attacked with 2 M6 bolts since M8 does not fit through those holes. You can see the ugly short piece of metal I needed since it was impossible to have the rod in the correct place without destroying the rear deck a little.

You can hardly see the amp which was the aim.

For all factory speakers, this setup sounds great. With all the functions of the head unit plus all the adjustability of the amplifier you can have the bass however you want it. The stock sub is not ginormous but it takes a surprising amount of power. I ended up having the level on the amp on full and the sub gain on the head unit at 0 (-24 to 6). While no one will here me coming from 5 blocks away, it now has some decent punch and most importantly does not steal power from the rear speakers. It doesn't matter that it does this with the stock radio since I guess it is designed for it. It does matter with an aftermarket head unit since you need to heavily fade to the rear to get the front and rear speakers at a similar volume.
So with all that, the only suitable place is hanging from the rear deck (parcel tray) with the amp mounted the correct way up. So this is what I have done. It is by no means perfect but it suits my needs. I can still pack my trunk full of ****. The wires are well away from anything sliding around. I did not drill a single hole. I used original empty holes. Every bolt, nut or threaded rod is M8x1.25 so it is not going anywhere. All metal is 3mm aluminium (aluminum) which is easy to work with and strong enough to hold a light amp.

RCA's from head unit routed down the right side of the car (opposite the power cable) since I did not want interference (not that I think it would matter for a sub). Here they are heading under the lining of the rear deck and along to the amp.

Here you can see my not very pretty job of mounting it. The left side is a metal strap that runs underneath. What I did on the other side of the amp is to run some of the same metal on top of the metal of the rear deck for strength. I then used threaded rod to extend down to the amp. The amp is mounted very very securely. It doesn't budge in the slightest. There is no way it is going anywhere no matter how much braking, acceleration and cornering it is put through.

The bracing strip is attacked with 2 M6 bolts since M8 does not fit through those holes. You can see the ugly short piece of metal I needed since it was impossible to have the rod in the correct place without destroying the rear deck a little.

You can hardly see the amp which was the aim.

For all factory speakers, this setup sounds great. With all the functions of the head unit plus all the adjustability of the amplifier you can have the bass however you want it. The stock sub is not ginormous but it takes a surprising amount of power. I ended up having the level on the amp on full and the sub gain on the head unit at 0 (-24 to 6). While no one will here me coming from 5 blocks away, it now has some decent punch and most importantly does not steal power from the rear speakers. It doesn't matter that it does this with the stock radio since I guess it is designed for it. It does matter with an aftermarket head unit since you need to heavily fade to the rear to get the front and rear speakers at a similar volume.
Last edited by tw2; 01-05-2012 at 03:14 AM.
The following users liked this post:
andeify (04-19-2019)
01-31-2012, 11:44 PM
#12
Newbie

Join Date: Oct 2011
Posts: 9
Likes: 0
Received 0 Likes
on
0 Posts
C32, GL450
bose
http://www.marcusfitzhugh.com/CLK/DIY/headunit2.html
I used this link as a guide to install an Alpine IDA-305bt on my C23 and it didn't work. The VW harness on this guide is male and female is needed. I have not been able to find the correct harness to make it work.
Also are the speakers hooked up via fiber optic. Some say yes and some say no.
I used this link as a guide to install an Alpine IDA-305bt on my C23 and it didn't work. The VW harness on this guide is male and female is needed. I have not been able to find the correct harness to make it work.
Also are the speakers hooked up via fiber optic. Some say yes and some say no.
02-01-2012, 01:29 AM
#13
MBWorld Fanatic!
Thread Starter
The speakers run with regular wires but they are not your average 4ohms hence all the trouble with aftermarket amps. As far as I am aware only the communications are fiber optic ie steering wheel to head unit, head unit to amp, head unit to cd stacker etc.
Sorry can't help with the harness. The one I used obviously was perfect for the C32. Do you mean the one on marcus' website? I forget which car he has but it is not a regular c-class, this might be the difference.
Sorry can't help with the harness. The one I used obviously was perfect for the C32. Do you mean the one on marcus' website? I forget which car he has but it is not a regular c-class, this might be the difference.
02-11-2012, 11:05 AM
#14
MBWorld Fanatic!
Join Date: Jul 2010
Location: A Canadian in Dubai, United Arab Emirates
Posts: 4,748
Likes: 0
Received 0 Likes
on
0 Posts
'05 C200K SS, '05 Kleemann CLK500K, '08 Hummer H3 & '92 Z34 5sp (track car in Canada)
Nice write up, good to see lots of pictures to help other DIY
04-04-2013, 08:21 AM
#15
Super Member
The speakers run with regular wires but they are not your average 4ohms hence all the trouble with aftermarket amps. As far as I am aware only the communications are fiber optic ie steering wheel to head unit, head unit to amp, head unit to cd stacker etc.
Sorry can't help with the harness. The one I used obviously was perfect for the C32. Do you mean the one on marcus' website? I forget which car he has but it is not a regular c-class, this might be the difference.
Sorry can't help with the harness. The one I used obviously was perfect for the C32. Do you mean the one on marcus' website? I forget which car he has but it is not a regular c-class, this might be the difference.
1) Now that it's been a year, how well is the stock sub working out? Are you still using it or did you switch to an aftermarket unit?
2) How did you wire the stock sub to the your amp? Are the voice coils wired in series, parallel, or separate channels? I am a bit concerned about wiring in parallel with such a tiny magnet on the speaker.
3) Have you had any issues with noise over the speaker wires that are close to the power cable?
4) Have you had any issues with vibration from the sub affecting the amp?
Thanks. John
Last edited by jkowtko; 04-04-2013 at 03:50 PM.
04-05-2013, 01:40 AM
#18
MBWorld Fanatic!
Thread Starter
Nice writeup -- thanks! I have a few questions:
Your welcome.
1) Now that it's been a year, how well is the stock sub working out? Are you still using it or did you switch to an aftermarket unit?
I sold the car a few months ago but I had it for about a year after I did this install. Stock sub the whole time, no problems at all. Sounded the same all the way through. I would not have ever changed it. It had just the right amount of punch for me. Certainly not attracting any attention outside the car but gave off decent sound.
2) How did you wire the stock sub to the your amp? Are the voice coils wired in series, parallel, or separate channels? I am a bit concerned about wiring in parallel with such a tiny magnet on the speaker.
Its been a while.... I am pretty sure I ran one channel to each voice coil but it obviously only works one way around since the polarity will cause the coils to fight each other if its wrong. It takes a surprisingly large amount of power.
3) Have you had any issues with noise over the speaker wires that are close to the power cable?
No, in my novice experience most noise comes from running the rca's close to power sources but the speaker wires make very little difference. I don't think there is any stage where they are very close anyway. I used highish quality RCA's (or at least they were shielded and not super cheap) so didn't have any problems.
4) Have you had any issues with vibration from the sub affecting the amp?
No, most amps are designed with this in mind. People mount them on sub boxes all the time and the stock sub is not very substantial.
07-02-2013, 03:52 AM
#19
MBWorld Fanatic!
Thread Starter
Just a PM I got, posting here in case it helps anyone else.
You have good timing. I am planning on doing the whole lot again with my CLK which is the same. The ebay deal I got no longer exists. I will be getting the parts from www.amazon.com
You need this part to connect the antenna from the car to the head unit. It just plugs in.
To tap into the cigarette wire I simply cut some of the insulation off, wrapped the new wire around it and taped it up. You don't need to worry about going back to stock HU as this extra wire will not be used and the stock unit will plug back in.
None of the rest is really plug and play. The wiring adapter I have linked to above will plug into the stock wiring loom. The other end is just wires so you have to manually wire the head unit wires to this essentially making a complete adapter harness. Its not technically very difficult. The pioneer probably has green/white/purple/grey wires for the speakers. These connect to the brown/white/pink wires on the car side but the adapter above takes care of this so it is just green to green, grey to grey etc, very easy. The rest is just connecting to the power, ground etc.
Hello, I just read this thread and had some questions. I didn't quite understand everything, sorry for that..
So I just bought a pioneer headunit but don't know how to wire it. I know I need a acc wire from the cigarette output, but do I need to do anything else, or is it just plug and play? I don't have the steering wheel control adapters etc. which you bought.
And how did you tap the acc wire? Did you just cut it and solder/heatshrink a new wire to it? I don't like cutting the wires because I might put the original HU back later.
And how do you connect the radio antenna? I don't see where to fit the antenna cable?
And one more thing: Where did you find your single din frame on eBay? I can't seem to find it anywhere!
Thanks in advance!
You need this part to connect the antenna from the car to the head unit. It just plugs in.
To tap into the cigarette wire I simply cut some of the insulation off, wrapped the new wire around it and taped it up. You don't need to worry about going back to stock HU as this extra wire will not be used and the stock unit will plug back in.
None of the rest is really plug and play. The wiring adapter I have linked to above will plug into the stock wiring loom. The other end is just wires so you have to manually wire the head unit wires to this essentially making a complete adapter harness. Its not technically very difficult. The pioneer probably has green/white/purple/grey wires for the speakers. These connect to the brown/white/pink wires on the car side but the adapter above takes care of this so it is just green to green, grey to grey etc, very easy. The rest is just connecting to the power, ground etc.
12-02-2013, 05:34 PM
#20
Super Member
Join Date: Jun 2005
Location: So. Cal.
Posts: 651
Likes: 0
Received 5 Likes
on
5 Posts
'02 C320 Wagon, '78 308 GTS, '06 Highlander Hybrid
Antenna Connections?
Again, great post.
I just replaced my Bose headunit and amp with an aftermarket OEM style from a SL55. It took some modifications, but I got it cheap. Now I have Nav, DVD, and bluetooth. But I have very poor radio reception. I figure this is because I don't have power going to the antenna amp. I have a wagon and the Bose amp was in the right rear. The connection to the amp was power, ground, 4 speakers + center, and three other wires (black, brown, & white). These wires lead up to the top of the hatch, where the antenna is. I've heard some say that I just need to provide +12V to the black wire...is that correct? If that is true, does anyone know what the brown and white wires go to? I'm planning on putting a Soundstream low profile sub where the Bose amp was. Should fit fine.
I just replaced my Bose headunit and amp with an aftermarket OEM style from a SL55. It took some modifications, but I got it cheap. Now I have Nav, DVD, and bluetooth. But I have very poor radio reception. I figure this is because I don't have power going to the antenna amp. I have a wagon and the Bose amp was in the right rear. The connection to the amp was power, ground, 4 speakers + center, and three other wires (black, brown, & white). These wires lead up to the top of the hatch, where the antenna is. I've heard some say that I just need to provide +12V to the black wire...is that correct? If that is true, does anyone know what the brown and white wires go to? I'm planning on putting a Soundstream low profile sub where the Bose amp was. Should fit fine.
02-16-2014, 06:22 PM
#21
Member

Join Date: Jan 2014
Posts: 87
Likes: 0
Received 0 Likes
on
0 Posts
c240 2002
How do you know if its bose ? I have stock sub and 6 disc cd chager but nothing says bose. My speakers sound like azz and I want to swap them out for new ones as well as the headunit for aux integration since I cant find the soundgate aux mb1
02-17-2014, 01:12 AM
#22
MBWorld Fanatic!
Thread Starter
You will have a amplifier under the carpets in the trunk. If you pull the radio out it wont have individual speaker wires, it will have optical cable instead. The top of the sub in the parcel tray will probably have bose on the back, you can carefully remove the individual cover on that side to look. There are probably more ways but I'm not sure since I never had it.

 04-30-2014, 04:04 PM
#24
Super Member
Join Date: Jun 2005
Location: So. Cal.
Posts: 651
Likes: 0
Received 5 Likes
on
5 Posts
'02 C320 Wagon, '78 308 GTS, '06 Highlander Hybrid
Here's what mine looks like...
I got the headunit for $90 shipped, the sub for something like $150, used the old Bose speakers and it sounds much better than OEM. It was a cheap mod and now I have bluetooth, Nav, DVD & IPOD hookups.
I got the headunit for $90 shipped, the sub for something like $150, used the old Bose speakers and it sounds much better than OEM. It was a cheap mod and now I have bluetooth, Nav, DVD & IPOD hookups.
Last edited by hanknum; 05-01-2014 at 03:39 PM.
The following users liked this post:
SergioBrazil (03-28-2021)
05-09-2014, 11:31 PM
#25
Member
Join Date: Jan 2014
Posts: 87
Likes: 0
Received 0 Likes
on
0 Posts
c240 2002
my number 7 fuse doe not give me any remote power.. why is this? i wrapped it round the doohickey and shoved in in the hole (10 amp fuse) and nadda!! zip!! zilch!! zero!! nothing!! no bang for my buck..
Edit: sub is now banging
Edit: sub is now banging
Last edited by kanadian; 05-20-2014 at 12:34 AM.


