


 Jun 29, 2015, 03:28 PM
Last edit by: IB Advertising
See related guides and technical advice from our community experts:
Browse all: Interior Guides
- Mercedes-Benz C-Class: How to Remove Center Console Trim
Step by step instructions for do-it-yourself repairs
Browse all: Interior Guides

DIY: Audio 10 Install Pics / W203 ('01-'04) Center Console Removal Instructions
Thread Starter
MBWorld Fanatic!
Joined: May 2002
Posts: 8,189
Likes: 1
From: SF
2007 VW GTI
DIY: Audio 10 Install Pics / W203 ('01-'04) Center Console Removal Instructions
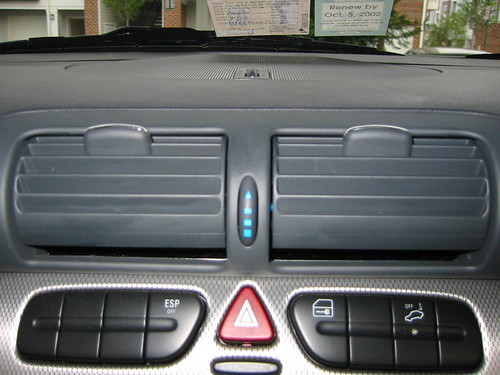
I promised I would post all of my pics of the install, so here they are, accompanied by the instructions to go with each.
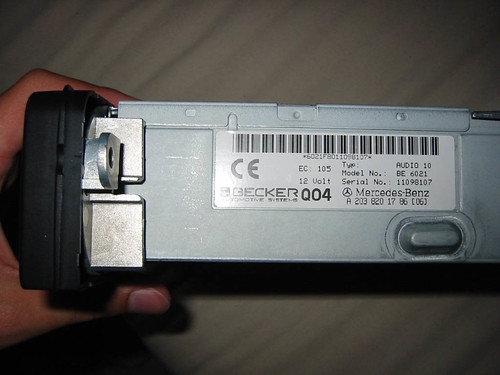
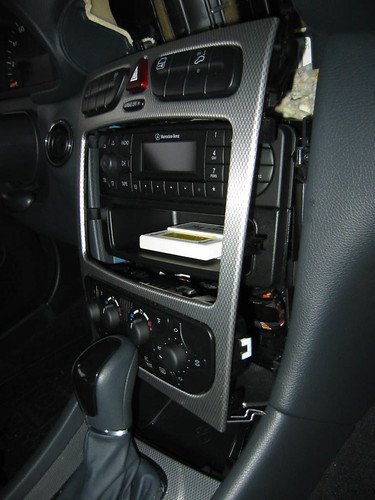
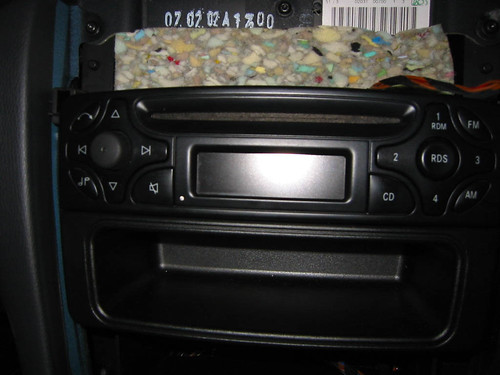
Firstly, the "before" pics of the unit itself.
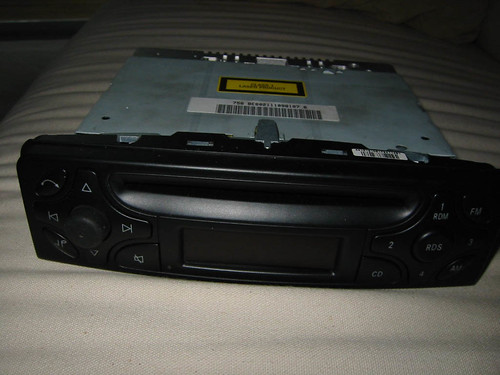
Firstly, the "before" pics of the unit itself.
Last edited by session; Nov 26, 2003 at 09:22 AM.
Thread Starter
MBWorld Fanatic!
Joined: May 2002
Posts: 8,189
Likes: 1
From: SF
2007 VW GTI
OK, for the install you'll need a thin flat-blade screwdriver, a long T20 torx screwdriver, a pen light and about 40 minutes.
You'll first need to undo the silver tabs on the bottom of the silver console trim. To do this, open up the ash tray cover about halfway and shine the pen light into the gap. You will see on the far left and right sides two silver clasps holding the trim in place. Take the thin screwdriver and pry these clasps down; they are hinged in the front so pry them from further back. (I don't have photos since the gap is too small)
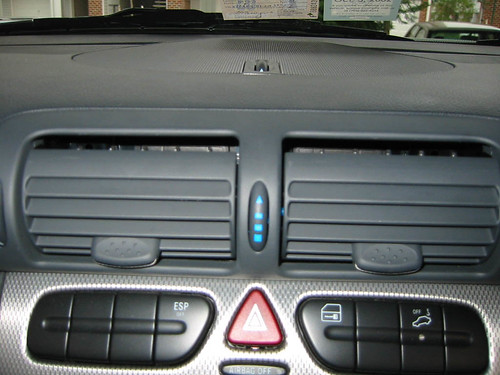
Next is the removal of the air vents.
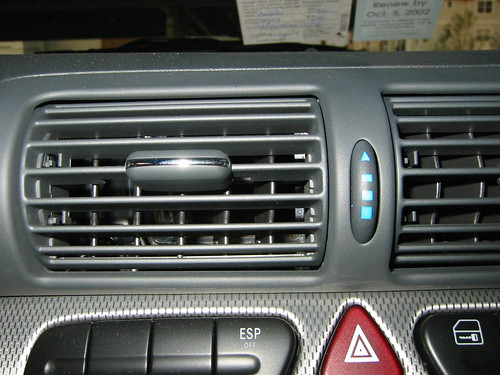
Take the thin screw driver and gently push the bottom plastic tabs on the left side of each vent to the right. While doing this, push the vent upward.
You'll first need to undo the silver tabs on the bottom of the silver console trim. To do this, open up the ash tray cover about halfway and shine the pen light into the gap. You will see on the far left and right sides two silver clasps holding the trim in place. Take the thin screwdriver and pry these clasps down; they are hinged in the front so pry them from further back. (I don't have photos since the gap is too small)
Next is the removal of the air vents.
Take the thin screw driver and gently push the bottom plastic tabs on the left side of each vent to the right. While doing this, push the vent upward.
Last edited by session; Nov 26, 2003 at 09:23 AM.
Thread Starter
MBWorld Fanatic!
Joined: May 2002
Posts: 8,189
Likes: 1
From: SF
2007 VW GTI
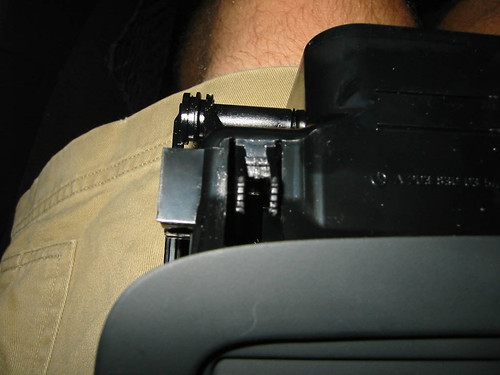
You should be able to now turn the vents up even further than normal, creating a gap below them as seen below.
Shine the pen light into this gap and you should see two torx screws on the far left of the left vent and the far right of the right vent. Be sure to close the white dials on each vent (turn all the way down) so you won't lose the screws. Once this is done, remove the screws using the torx screwdriver.
Shine the pen light into this gap and you should see two torx screws on the far left of the left vent and the far right of the right vent. Be sure to close the white dials on each vent (turn all the way down) so you won't lose the screws. Once this is done, remove the screws using the torx screwdriver.
Last edited by session; Nov 26, 2003 at 09:24 AM.
Thread Starter
MBWorld Fanatic!
Joined: May 2002
Posts: 8,189
Likes: 1
From: SF
2007 VW GTI
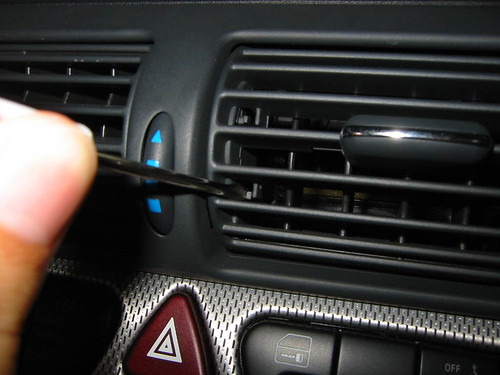
Now, you need to turn the vents down to create a gap on top. Gently push the top plastic tab to the right while pulling the vent down and you should create a gap as seen here.
Shine the light into this gap and you will see two "hooks" on each side of the vents... You will need to use the thin screwdriver to pull these down. They have teeth to hold them in place; pulling them down is a bit tricky so be sure not to damage the teeth.
Shine the light into this gap and you will see two "hooks" on each side of the vents... You will need to use the thin screwdriver to pull these down. They have teeth to hold them in place; pulling them down is a bit tricky so be sure not to damage the teeth.
Last edited by session; Nov 26, 2003 at 09:25 AM.
Trending Topics
MB World Stories
The Best of Mercedes & AMG

Manual Mercedes? 6 Times Sindelfingen Let Drivers Have All The Fun
Verdad Gallardo
Mercedes SLR McLaren 722 S Is Extremely Rare Example Modified by McLaren
Verdad Gallardo
8 Classic Boxy Mercedes Designs That Have Aged Like Fine Wine
Verdad Gallardo
Flawlessly Restored Mercedes 190E Evo II Heads to Auction
Verdad Gallardo
Electric Mercedes C-Class Unveiled: 11 Things You Need to Know
Verdad Gallardo
Mercedes EQS Gets A Major Update: Everything You Need to Know
Verdad Gallardo
5 Underrated Mercedes-Benz Models That Don't Get the Love They Deserve
Verdad Gallardo
Mercedes 300D Has Pushed Well Past 1 Million Miles and It Ain't Stopping
Verdad Gallardo
10 Most Reliable Mercedes-Benz Models You Can Buy Used
Verdad Gallardo
Thread Starter
MBWorld Fanatic!
Joined: May 2002
Posts: 8,189
Likes: 1
From: SF
2007 VW GTI
Once these hooks are pulled down enough, you can simultaneously pull out on the vent unit and pull it out of the console. Be sure not to damage the trim when doing so, but this may take a bit of force.
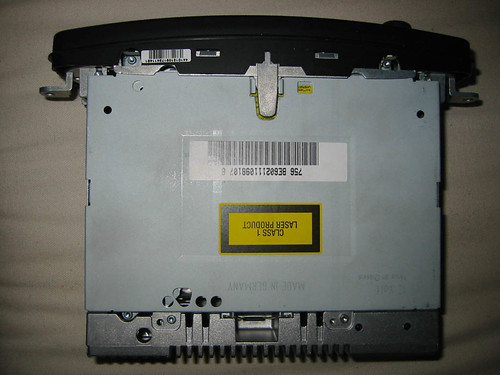
Here's what the back of the unit looks like.
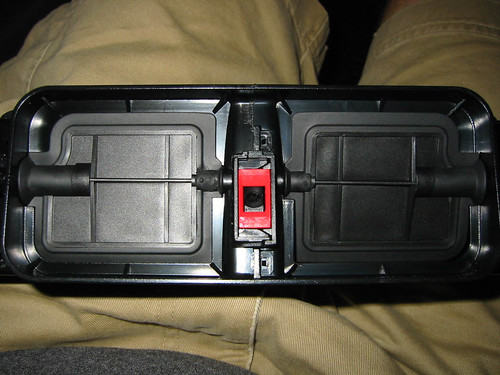
Here's what the back of the unit looks like.
Last edited by session; Nov 26, 2003 at 09:26 AM.
Thread Starter
MBWorld Fanatic!
Joined: May 2002
Posts: 8,189
Likes: 1
From: SF
2007 VW GTI
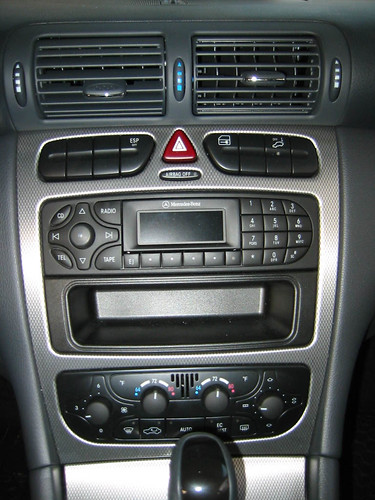
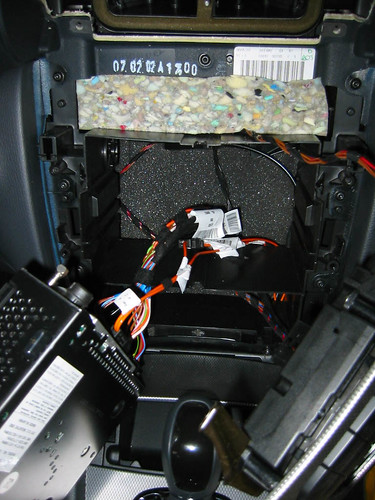
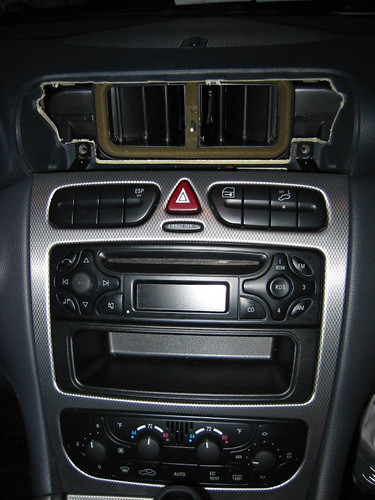
Here's what the console looks like when the vents are removed.
Notice the metal parts attached near the screw holes to hold the console aluminum trim in place. Pull out on the trim and it should come right off since nothing is holding it in place (you already removed the screws on top and the metal clasps on the bottom)
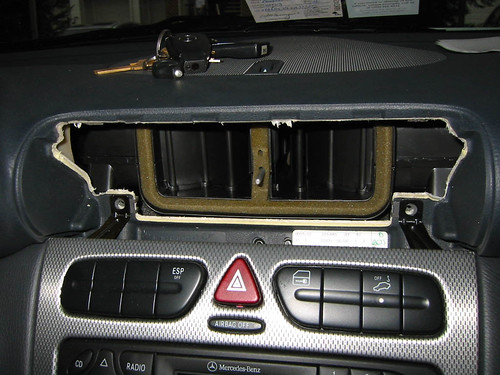
Notice the metal parts attached near the screw holes to hold the console aluminum trim in place. Pull out on the trim and it should come right off since nothing is holding it in place (you already removed the screws on top and the metal clasps on the bottom)
Last edited by session; Nov 26, 2003 at 09:26 AM.
Thread Starter
MBWorld Fanatic!
Joined: May 2002
Posts: 8,189
Likes: 1
From: SF
2007 VW GTI
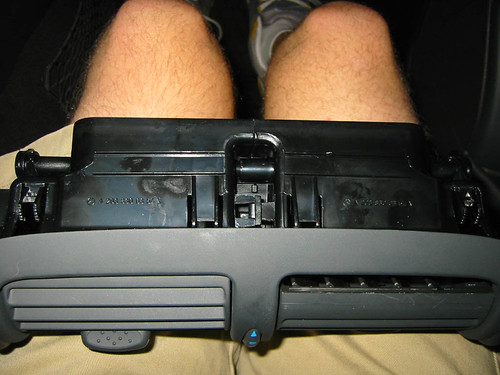
Here's a shot of the aluminum trim being removed.
You may have to be careful in working the trim around the shifter. Mine took a little wrestling to remove properly while the car was in Park.
You may have to be careful in working the trim around the shifter. Mine took a little wrestling to remove properly while the car was in Park.
Last edited by session; Nov 26, 2003 at 09:27 AM.
Thread Starter
MBWorld Fanatic!
Joined: May 2002
Posts: 8,189
Likes: 1
From: SF
2007 VW GTI
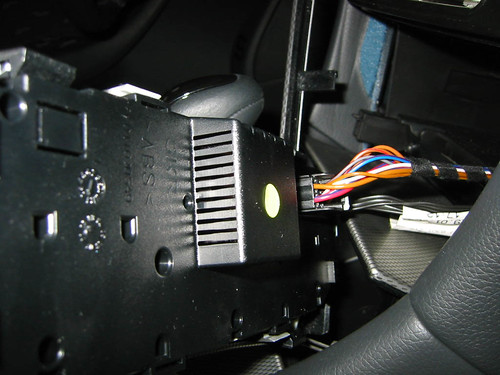
Here's the cables connected to the back of the climate control unit. You may remove these to make removing the trim easier, although I didn't.
Last edited by session; Nov 26, 2003 at 09:28 AM.
Thread Starter
MBWorld Fanatic!
Joined: May 2002
Posts: 8,189
Likes: 1
From: SF
2007 VW GTI
Console explosion!
Once the trim is removed, unscrew the two torx screws on each side of the radio and remove it by pulling straight out.
Once the trim is removed, unscrew the two torx screws on each side of the radio and remove it by pulling straight out.
Last edited by session; Nov 26, 2003 at 09:29 AM.
Thread Starter
MBWorld Fanatic!
Joined: May 2002
Posts: 8,189
Likes: 1
From: SF
2007 VW GTI
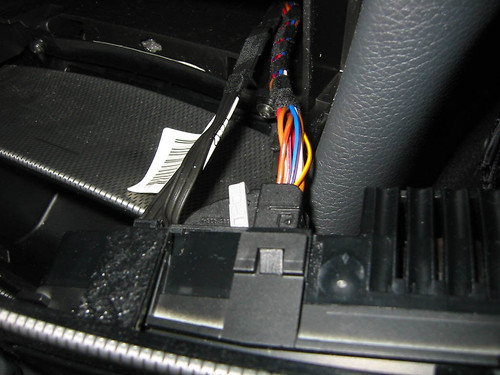
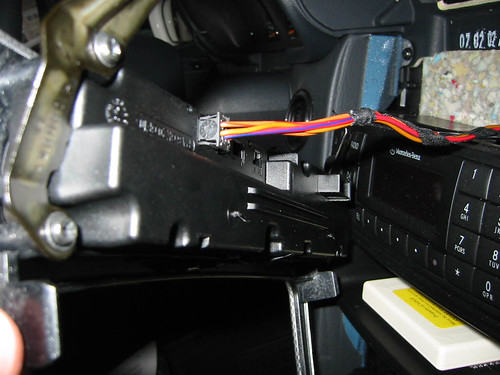
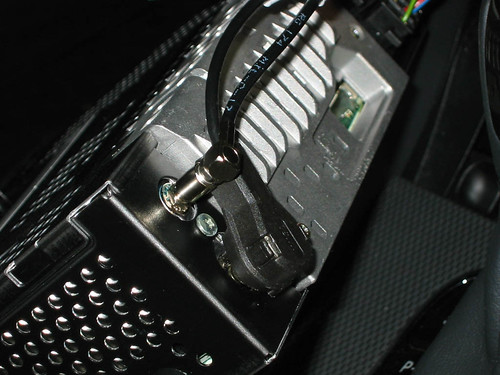
Once the radio is removed, unplug everything from it. These two plugs require some force and feel like they won't come off, but trust me they will. Just pull straight out. (Thanks Buellwinkle  )
)
)
Last edited by session; Nov 26, 2003 at 09:30 AM.
Thread Starter
MBWorld Fanatic!
Joined: May 2002
Posts: 8,189
Likes: 1
From: SF
2007 VW GTI
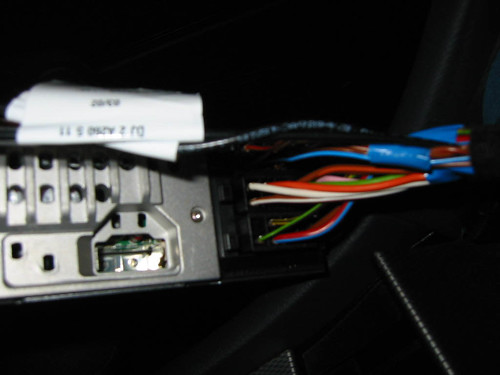
Here's the other plugs minus the one that's obviously been removed. They are fairly easy to remove; just press the tab on the left side and pull out.
Last edited by session; Nov 26, 2003 at 09:30 AM.
Thread Starter
MBWorld Fanatic!
Joined: May 2002
Posts: 8,189
Likes: 1
From: SF
2007 VW GTI
It's smooth sailing from here on out. Plug the cables into the exact same positions on the Audio 10 and slide the unit into place. The plastic tray below the radio just hangs onto the bottom -- it's pretty obvious how to connect it. Be sure to balance it while pushing the radio back into the hole.
Be sure EVERYTHING is plugged in, and you'll be set to test it out before putting everything back together. This is the first boot of my audio 10!
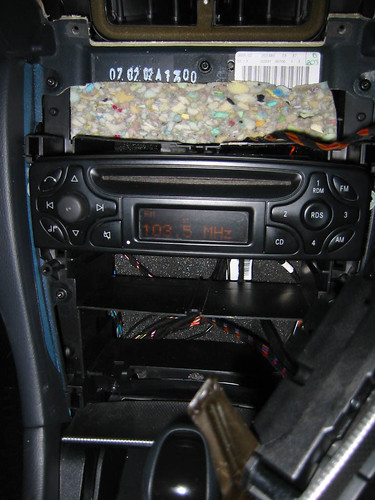
Be sure EVERYTHING is plugged in, and you'll be set to test it out before putting everything back together. This is the first boot of my audio 10!
Last edited by session; Nov 26, 2003 at 09:31 AM.
Thread Starter
MBWorld Fanatic!
Joined: May 2002
Posts: 8,189
Likes: 1
From: SF
2007 VW GTI
Now, do everything essentially in reverse. Put the console trim back in place and push the silver clasps on the bottom (in the gap on top of the ashtray) back into their positions in the trim. This may take some work; it's hard to see in there to line them up properly. They should just snap back into place.
Last edited by session; Nov 26, 2003 at 09:32 AM.
Thread Starter
MBWorld Fanatic!
Joined: May 2002
Posts: 8,189
Likes: 1
From: SF
2007 VW GTI
Now slide the air vents back into position, making sure the metal rod slides through the hole in the red plastic piece in the middle (the air distribution rod). The plastic hooks with teeth on top should clip back into place. Just repeat the procedure to turn the vents up (creating a gap on the bottom) and screw in the two torx screws you removed. BE SURE THE VENTS ARE CLOSED SO YOU WON'T LOSE THE SCREWS!
After this is completed, turn you car on and test everything out. Enjoy your Audio 10!

After this is completed, turn you car on and test everything out. Enjoy your Audio 10!
Last edited by session; Nov 26, 2003 at 09:33 AM.

Junior Member
Joined: Jul 2002
Posts: 17
Likes: 0
Nice! I just did this yesterday (minus the installing audio 10 part). Just be careful of the hooks below the center console/above the ash tray. They wouldn't lock back into place after the install and I kind of scratched the aluminum cover of the ash try part when I was trying to close it.
And yeah, it might be better to turn the key to "on" and move the shifter from park to like neutral.
Great pics, I wish I saw this BEFORE I took mine apart! =)
And yeah, it might be better to turn the key to "on" and move the shifter from park to like neutral.
Great pics, I wish I saw this BEFORE I took mine apart! =)
Thread Starter
MBWorld Fanatic!
Joined: May 2002
Posts: 8,189
Likes: 1
From: SF
2007 VW GTI
the install took about an hour and a half, including the time to go to sears and get the T20 screwdriver and to ask Buellwinkle how to remove the two plugs on the left side of the stereo.
install time itself takes about 40 minutes the first time, but i could do it in about 15-20 now.
install time itself takes about 40 minutes the first time, but i could do it in about 15-20 now.
MBWorld Fanatic!
Joined: Nov 2001
Posts: 1,148
Likes: 16
From: Berkshire, UK
2004 SL55, 2015 A250d, 2016 GLC250d
Great pics - just one note of caution - the black connector with the orange (two) cables is fibre optic, so you need to take care of it as fibre optic mustn't be bent much to far (or crushed). "session" is a bit close to damaging it in that photo ...
- its best to remove it first before you start twisting the radio [and fighting the other connector] - theres a bit half way down one of the long sides that you push on to release the clip - and of course install it last and be careful it doesnt get crushed when putting the radio back in
- if you dont have CD/Teleaid etc, you may not have that connector at all -
Cheers
R
Thread Starter
MBWorld Fanatic!
Joined: May 2002
Posts: 8,189
Likes: 1
From: SF
2007 VW GTI
Originally posted by Richard
Great pics - just one note of caution - the black connector with the orange (two) cables is fibre optic, so you need to take care of it as fibre optic mustn't be bent much to far (or crushed). "session" is a bit close to damaging it in that photo ...
- its best to remove it first before you start twisting the radio [and fighting the other connector] - theres a bit half way down one of the long sides that you push on to release the clip - and of course install it last and be careful it doesnt get crushed when putting the radio back in
- if you dont have CD/Teleaid etc, you may not have that connector at all -
i don't have the cd changer nor teleaid, but i still had that cable.


