MBH Headers/Mids/X + Carbonio airboxes + radiator blockoff plate DIY INSTALL/REVIEW
 03-17-2015, 05:08 AM
#1
MBWorld Fanatic!
Thread Starter
Join Date: Jun 2008
Location: Los Angeles
Posts: 8,045
Received 2,810 Likes
on
1,664 Posts
2012 P31 C63 Coupe Trackrat, 2019 GLE63S Coupe Beast
MBH Headers/Mids/X + Carbonio airboxes + radiator blockoff plate DIY INSTALL/REVIEW
The nice weather to hit the East Coast finally motivated me to get off my *** and get working on my car again. 4 months of being parked was driving me crazy, and I had collected a few parts that I was dying to put on. 
First of all, big thanks to Nelson for the MBH goods and Carbonio airboxes. Great guy to deal with, and whoever ends up with his C63BS is in for an immaculately maintained car if my new parts are anything to go by - absolutely pristine!
Secondly, without the help from my good friends friends Josh and Nate at JNZ Tuning, I never would have been able to complete this. Access to a lift, full compliment of air/power tools, and the three of us figuring out how to get certain steps done... I just don't see how this would have been at all possible without. And now that they've gone through this with me and know what needs to be done, I HIGHLY recommend anyone in the Philly area that needs help to go there for the install! ( http://www.jnztuning.com/ )
MBH HEADERS, 200 CEL CATS, X-PIPE
This job took us a solid 8hrs start to finish. The MBH header primaries are absolutely enormous, and to say that it's a tight fit isn't doing it justice.
They fit beautifully once on, but to get them in place *requires* a lift, a LOT of patience and creative thinking (at least the MBH ones, I'm sure some of the skinnier headers you can do on your back with ramps/stands). Didn't have to remove any heat shields, everything is back in place with the exception of the thick aluminum subframe crossbrace where the X-pipe goes.
The biggest problem anyone will face, is getting to the header nuts. They are 11mm copper nuts, and you need to get 16 new ones as they are one-time use. After removing all of the underbody panels, you'll have access to the bottom ones, either from directly beneath with a 1/4" drive ratchet or 11mm ratchet wrench, or through the wheelwell using a super long 3/8" extension and swivel head. Most of the top nuts can be reached from above, but you need to really squeeze your hands in there, using a 11mm ratchet wrench or offset box wrench, and going by feel only since you can't see a thing. I am not joking that some of the nuts took 30min to remove, often getting only a 1/8th turn at a time before coming off the nut. Also, be prepared for some of the studs to come out, especially if you have a car that sees weather as the stud ends get corroded preventing the nuts from coming off. About half of the studs came out, but were easily threaded back in with some antiseize, and my car spent most of its life in CA before coming out here. Your patience will be severely tested!
Fishing the stock manifolds out is pretty easy. Getting the MBH headers in is a different story altogether. You need new exhaust manifold gaskets, coat them with a bit of copper RTV, and put them on first.
On the passenger side, the trick (found after trying to wrestle it in for 45min), is to get the header on the forwardmost lower stud, then rotating the header clockwise up into place over the top studs. There is literally no other way to do it, as there's no space and you'll find yourself banging the header into the upper studs repeatedly. Once in place, there's a lot more room to tighten the nuts from top and bottom as before. The header flanges are constructed differently, with room between the runners to give more space for wrenches and sockets.
On the drivers side, you're going to need to remove a few things. The steering column is completely in the way. There is no way around this. One bolt, and the column will slide off the splines and give you enough play to move out of the way. No worries about realignment, as it only goes back on one way. Also no need to drop the entire steering rack. There are a couple of small heat shields around the column that need to come off also. Once that's done, the drivers side header goes on more easily. However, the nuts are harder to reach - again, creativity and a wide assortment of wrenches and extensions and flex attachments is key.
Once the headers are on and tightened up, the rest of the exhaust is pretty simple but time consuming to get the alignment right. Don't forget to reattach the steering column and angle sensor! Remove the secondary O2 sensors from the plug and wrap it in electrical tape, you won't need them anymore. Screw in the upstream O2s with antiseize. The junction for the X-pipe to the rest of the OE exhaust is a pain in the ***. There is a metallic 'donut' on the drivers side that you will probably reuse - take it off the OE pipe carefully, and hammer it on the new X with a hammer and pipe. I bought a new one, but it ended up being too big for the space that we had to deal with. The passenger side connection is like a socket, which gives you some play. The rest of the connections from X to mids, and mids to headers, are slip fit and give you some play, but are very tight. It takes a good deal of time and muscle to get it all in place, and you'll need another set of hands to pull the stock exhaust back on the rubber hangers to get it all to 'snap' into place.
Importantly, after all of the wrestling with the rest of the exhaust, we found that the header nuts were not as tight as we had thought, so you'll have to go back and check them. They were ALL loose again.
Now tighten all of the exhaust clamps, and start the car to check for exhaust leaks. There will be many, find them and fix them all. Time consuming.
Now load in your new headers tune (big thanks to Jerry at EuroCharged!), and take the car for a spin. I don't even know what to tell you - it's like a totally different thing now. The car is an absolute ANIMAL. Scared my buddy Nate to death on the first run. Here's a video of me messing around with the traction control off, almost wrecking it because I'm stupid and didn't have the wheel straight.
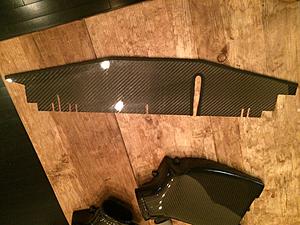
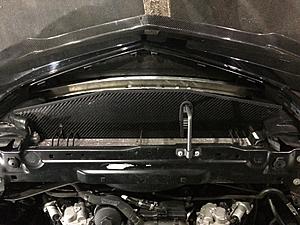
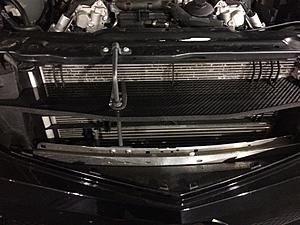
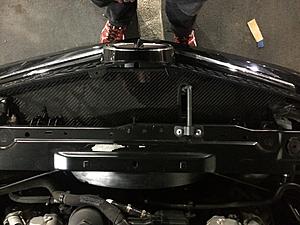
CARBONIO AIR BOXES AND RADIATOR BLOCKOFF PLATE
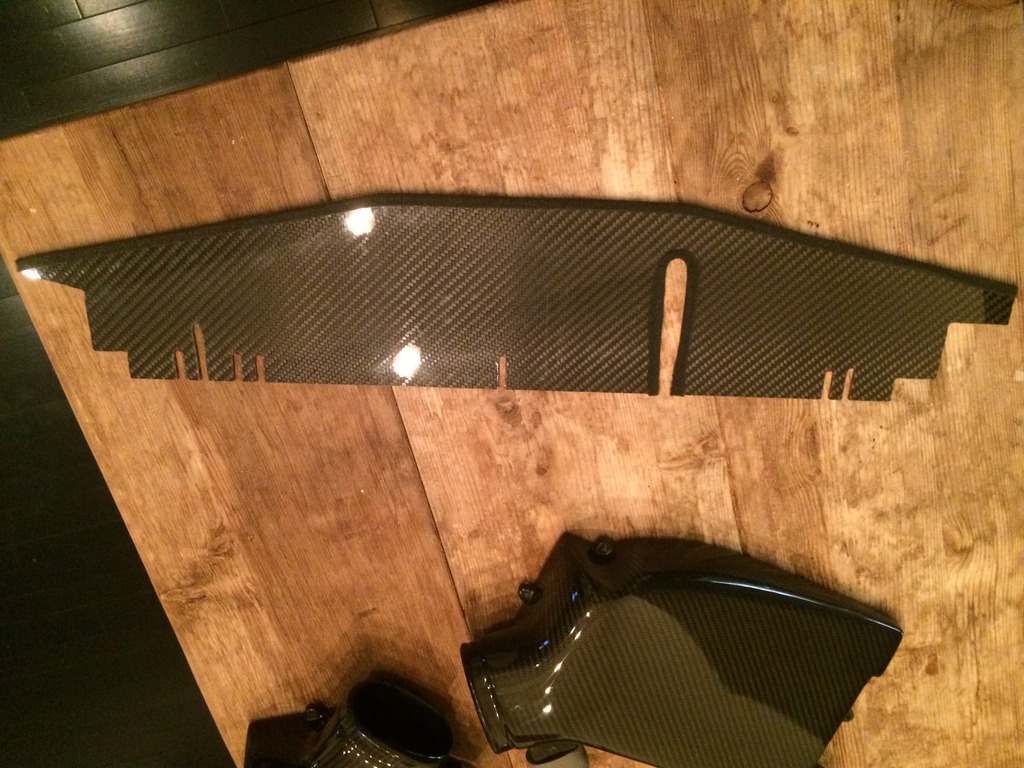
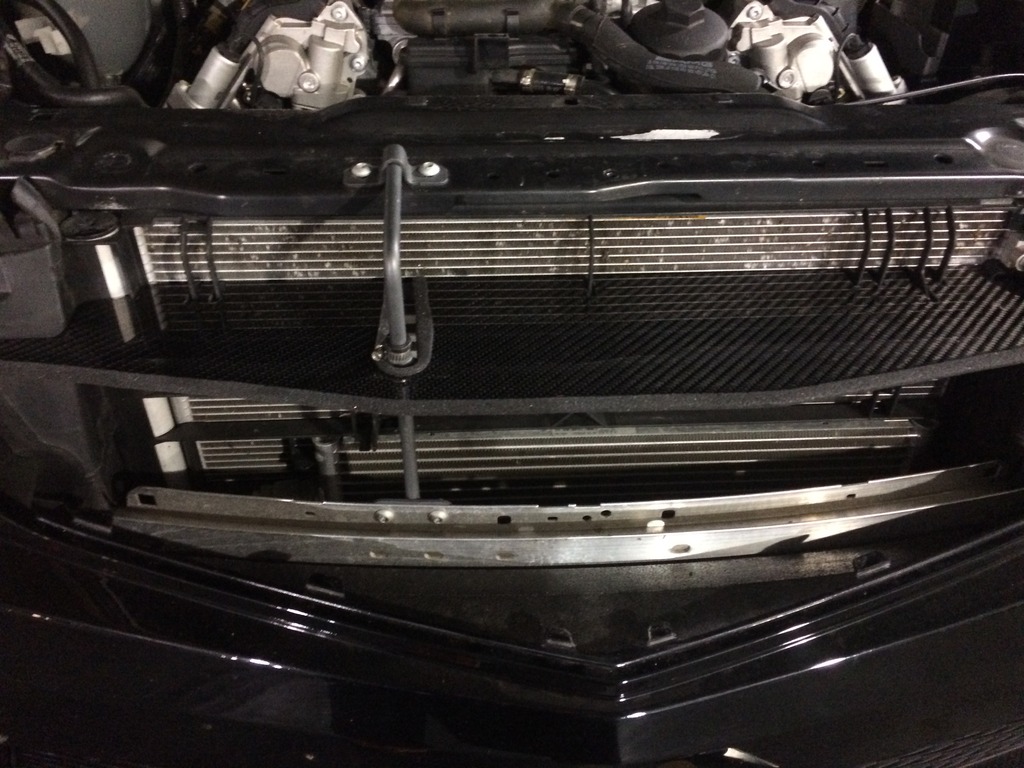
Finished the blockoff plate late last night, so I decided to put these on too. Got the idea for the radiator blockoff plate from the AutoTech Racing guys (thread here: https://mbworld.org/forums/c63-amg-w...your-cool.html). Seems to keep oil temps down, avoiding limp-mode. Took some trial and error to get it right, the first plate I made was out of 5mm carbon fiber and way too thick. Settled on 1.7mm plate, measured, made a cardboard cutout, test fit, then cut. The facelift car radiator supports are a little more complicated than PFL, but it was pretty straightforward. Attached to the radiator supports with 3M Heavy Duty double-sided tape, and some GE black silicone caulk. Tight fit with the grill in place, but looks like it will do the job of preventing hot radiator air from entering the air intakes. We will see at Limerock in 2 weeks...
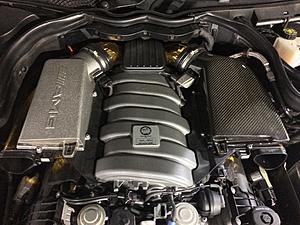
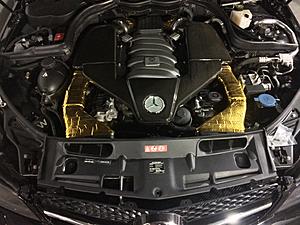
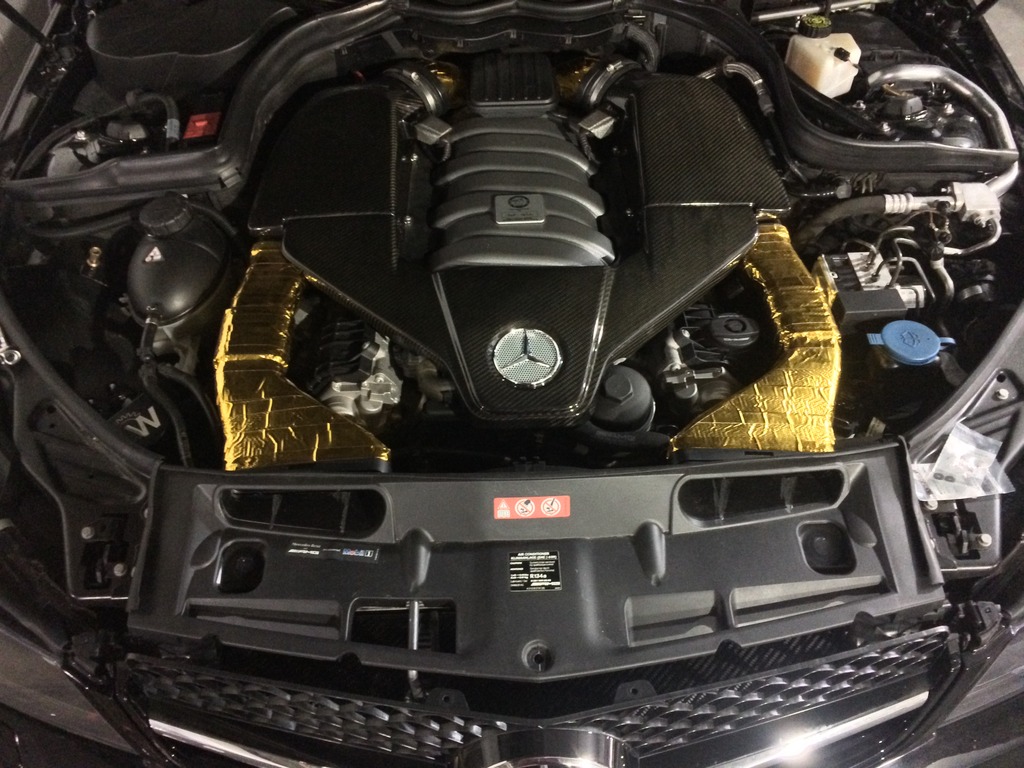
The Carbonio airboxes were as straightforward as it gets. I was surprised by how much more volume they have, even over the ROW airboxes. Big difference. Fit was OE-quality. Rubber washers on the screws to protect the carbon fiber. Transfer the clips from the old engine cover to the new one, and you're done. Super easy, and I do expect a slight improvement over the ROW boxes. They definitely sound different too.
ALL DONE
Overall I'm super happy with this combination. I can't believe how much faster the car is now, how much more easily she breathes, and when not on it how much it sounds like stock. BUT when you do get on it, it sounds like machine gun fire next to your ear. I can't describe how loud it is, and I have cats. To me, this is how the car should have been from the factory. Response is instant, torque is always there, and you light up the tires at will. Going to Atco on Friday night if the snow holds off, so we will see what the improvement is (previous best was 12.10@116.93mph - on drag radials).
Good luck to anyone doing this themselves. There's nothing like the feeling of accomplishment, taking on something like this and having amazing results. If you've ever wrenched on cars before, and have the necessary equipment, you should absolutely do it. You won't regret it, even if you curse your head off during the process.
First of all, big thanks to Nelson for the MBH goods and Carbonio airboxes. Great guy to deal with, and whoever ends up with his C63BS is in for an immaculately maintained car if my new parts are anything to go by - absolutely pristine!
Secondly, without the help from my good friends friends Josh and Nate at JNZ Tuning, I never would have been able to complete this. Access to a lift, full compliment of air/power tools, and the three of us figuring out how to get certain steps done... I just don't see how this would have been at all possible without. And now that they've gone through this with me and know what needs to be done, I HIGHLY recommend anyone in the Philly area that needs help to go there for the install! ( http://www.jnztuning.com/ )
MBH HEADERS, 200 CEL CATS, X-PIPE
This job took us a solid 8hrs start to finish. The MBH header primaries are absolutely enormous, and to say that it's a tight fit isn't doing it justice.
They fit beautifully once on, but to get them in place *requires* a lift, a LOT of patience and creative thinking (at least the MBH ones, I'm sure some of the skinnier headers you can do on your back with ramps/stands). Didn't have to remove any heat shields, everything is back in place with the exception of the thick aluminum subframe crossbrace where the X-pipe goes.
The biggest problem anyone will face, is getting to the header nuts. They are 11mm copper nuts, and you need to get 16 new ones as they are one-time use. After removing all of the underbody panels, you'll have access to the bottom ones, either from directly beneath with a 1/4" drive ratchet or 11mm ratchet wrench, or through the wheelwell using a super long 3/8" extension and swivel head. Most of the top nuts can be reached from above, but you need to really squeeze your hands in there, using a 11mm ratchet wrench or offset box wrench, and going by feel only since you can't see a thing. I am not joking that some of the nuts took 30min to remove, often getting only a 1/8th turn at a time before coming off the nut. Also, be prepared for some of the studs to come out, especially if you have a car that sees weather as the stud ends get corroded preventing the nuts from coming off. About half of the studs came out, but were easily threaded back in with some antiseize, and my car spent most of its life in CA before coming out here. Your patience will be severely tested!
Fishing the stock manifolds out is pretty easy. Getting the MBH headers in is a different story altogether. You need new exhaust manifold gaskets, coat them with a bit of copper RTV, and put them on first.
On the passenger side, the trick (found after trying to wrestle it in for 45min), is to get the header on the forwardmost lower stud, then rotating the header clockwise up into place over the top studs. There is literally no other way to do it, as there's no space and you'll find yourself banging the header into the upper studs repeatedly. Once in place, there's a lot more room to tighten the nuts from top and bottom as before. The header flanges are constructed differently, with room between the runners to give more space for wrenches and sockets.
On the drivers side, you're going to need to remove a few things. The steering column is completely in the way. There is no way around this. One bolt, and the column will slide off the splines and give you enough play to move out of the way. No worries about realignment, as it only goes back on one way. Also no need to drop the entire steering rack. There are a couple of small heat shields around the column that need to come off also. Once that's done, the drivers side header goes on more easily. However, the nuts are harder to reach - again, creativity and a wide assortment of wrenches and extensions and flex attachments is key.
Once the headers are on and tightened up, the rest of the exhaust is pretty simple but time consuming to get the alignment right. Don't forget to reattach the steering column and angle sensor! Remove the secondary O2 sensors from the plug and wrap it in electrical tape, you won't need them anymore. Screw in the upstream O2s with antiseize. The junction for the X-pipe to the rest of the OE exhaust is a pain in the ***. There is a metallic 'donut' on the drivers side that you will probably reuse - take it off the OE pipe carefully, and hammer it on the new X with a hammer and pipe. I bought a new one, but it ended up being too big for the space that we had to deal with. The passenger side connection is like a socket, which gives you some play. The rest of the connections from X to mids, and mids to headers, are slip fit and give you some play, but are very tight. It takes a good deal of time and muscle to get it all in place, and you'll need another set of hands to pull the stock exhaust back on the rubber hangers to get it all to 'snap' into place.
Importantly, after all of the wrestling with the rest of the exhaust, we found that the header nuts were not as tight as we had thought, so you'll have to go back and check them. They were ALL loose again.
Now tighten all of the exhaust clamps, and start the car to check for exhaust leaks. There will be many, find them and fix them all. Time consuming.
Now load in your new headers tune (big thanks to Jerry at EuroCharged!), and take the car for a spin. I don't even know what to tell you - it's like a totally different thing now. The car is an absolute ANIMAL. Scared my buddy Nate to death on the first run. Here's a video of me messing around with the traction control off, almost wrecking it because I'm stupid and didn't have the wheel straight.
CARBONIO AIR BOXES AND RADIATOR BLOCKOFF PLATE
Finished the blockoff plate late last night, so I decided to put these on too. Got the idea for the radiator blockoff plate from the AutoTech Racing guys (thread here: https://mbworld.org/forums/c63-amg-w...your-cool.html). Seems to keep oil temps down, avoiding limp-mode. Took some trial and error to get it right, the first plate I made was out of 5mm carbon fiber and way too thick. Settled on 1.7mm plate, measured, made a cardboard cutout, test fit, then cut. The facelift car radiator supports are a little more complicated than PFL, but it was pretty straightforward. Attached to the radiator supports with 3M Heavy Duty double-sided tape, and some GE black silicone caulk. Tight fit with the grill in place, but looks like it will do the job of preventing hot radiator air from entering the air intakes. We will see at Limerock in 2 weeks...


The Carbonio airboxes were as straightforward as it gets. I was surprised by how much more volume they have, even over the ROW airboxes. Big difference. Fit was OE-quality. Rubber washers on the screws to protect the carbon fiber. Transfer the clips from the old engine cover to the new one, and you're done. Super easy, and I do expect a slight improvement over the ROW boxes. They definitely sound different too.

ALL DONE
Overall I'm super happy with this combination. I can't believe how much faster the car is now, how much more easily she breathes, and when not on it how much it sounds like stock. BUT when you do get on it, it sounds like machine gun fire next to your ear. I can't describe how loud it is, and I have cats. To me, this is how the car should have been from the factory. Response is instant, torque is always there, and you light up the tires at will. Going to Atco on Friday night if the snow holds off, so we will see what the improvement is (previous best was 12.10@116.93mph - on drag radials).
Good luck to anyone doing this themselves. There's nothing like the feeling of accomplishment, taking on something like this and having amazing results. If you've ever wrenched on cars before, and have the necessary equipment, you should absolutely do it. You won't regret it, even if you curse your head off during the process.
Last edited by BLKROKT; 03-17-2015 at 05:11 AM.

The following 3 users liked this post by BLKROKT:
03-17-2015, 05:27 AM
#2
MBWorld Fanatic!

Good stuff. Thanks for the writeup! Def some sick/quality parts you got there. Def sounds nasty!
03-17-2015, 06:11 AM
#3
FANCY making me a radiator block off plate??? Lol
Sick job mate
Sick job mate
03-17-2015, 06:16 AM
#4
MBWorld Fanatic!
Great Write up. forum need more threads like this.
btw. whens lime rock. i did the AMG school at lime rock and always wanted to take my car on the track . what does it cost to get it on the track for the day?
btw. whens lime rock. i did the AMG school at lime rock and always wanted to take my car on the track . what does it cost to get it on the track for the day?
 03-17-2015, 07:54 AM
#6
MBWorld Fanatic!
Nice so you picked up Nelsons Carbonio setup! I was contemplating it just for that engine cover 
Install is tight, no matter what LT headers you have. You have to have some patience for sure. Im no contortionist by any means, but I feel you have to be to get these done DIY. Its a straight forward install, just takes time and patience.
Salut to you my friend for taking on the job on your own
Install is tight, no matter what LT headers you have. You have to have some patience for sure. Im no contortionist by any means, but I feel you have to be to get these done DIY. Its a straight forward install, just takes time and patience.
Salut to you my friend for taking on the job on your own
Trending Topics
03-17-2015, 08:14 AM
#8
Super Member
Very informative, thanks for the post and the crazy video
I want to install MBH Headers one of these days. Will save your post as a guide
I want to install MBH Headers one of these days. Will save your post as a guide
03-17-2015, 09:30 AM
#9
MBWorld Fanatic!
Thread Starter
Join Date: Jun 2008
Location: Los Angeles
Posts: 8,045
Received 2,810 Likes
on
1,664 Posts
2012 P31 C63 Coupe Trackrat, 2019 GLE63S Coupe Beast
Thanks for the kind words guys. I also hope to see more of these on the forum. Such an amazing platform and engine, and so rewarding to get it performing like a beast. I'm particularly interested in the head stud install thread, and if anyone does a DIY on a supercharger install...
Thanks dude! Love the sound. RUDE!
Haha. No. I've inhaled enough carbon fibers dremeling away in my NYC apartment, thank you. But I am going to measure out the plate template, and post a diagram with measurements so that forum members can make their own. There are a bunch of little details you need to pay attention to, making the plate anti-lift, cushioning against the bumper support, and weatherstriping to seal against the front grill, etc. The template will hopefully get you guys started at least. I think it will make a big difference.
Here's the link for Limerock: https://www.nasaproracing.com/events/1970
Here's Watkins Glen one month later: https://www.nasaproracing.com/events/1951
I'll be at both. Hoping the car isn't too loud now, needs to pass noise test somehow...
Would be great to see other AMG guys there!
If you're comfortable working on your car, def go for it - it's just exhaust work afterall. With that said, you will NEED your friend to help. And to be honest, I don't see how you can do this without the car significantly off the ground, due to some of the angles and leverage you will need. Patience is key, and taking your time, remembering where everything goes along the way. If you stay organized, and make sure you have all necessary tools and spare parts/clamps/etc you won't have a problem. Feel free to give me a shout if you run into any issues.
Yeah, after seeing how nice the headers were, I jumped on the Carbonios. Significantly bigger than OEM, I'm looking forward to seeing what they do. Def dress up the engine bay a lot too!
And I didn't do it on my own. I can't stress enough how much I needed my friends to help. Having 3 different viewpoints along the way, along with just the amount of hands needed to wrestle things into place or to take turns wrecking our hands wrenching in tight spots - couldn't have done this without them (even if it did strain our friendship - I owe them a lot of free manual labor at the shop ) We are definitely not 3 20 year-olds working on DSMs all night drinking beers anymore. EVERYTHING hurts!
Thanks! Tried to remember everything, and sorry there aren't more pictures to help guide. Nobody was in the mood for photos. Seriously.
Haha awesome man, thanks. I'm sure this will be a breeze for you!
Haha. No. I've inhaled enough carbon fibers dremeling away in my NYC apartment, thank you. But I am going to measure out the plate template, and post a diagram with measurements so that forum members can make their own. There are a bunch of little details you need to pay attention to, making the plate anti-lift, cushioning against the bumper support, and weatherstriping to seal against the front grill, etc. The template will hopefully get you guys started at least. I think it will make a big difference.
Here's Watkins Glen one month later: https://www.nasaproracing.com/events/1951
I'll be at both. Hoping the car isn't too loud now, needs to pass noise test somehow...
Would be great to see other AMG guys there!
Nice so you picked up Nelsons Carbonio setup! I was contemplating it just for that engine cover
Install is tight, no matter what LT headers you have. You have to have some patience for sure. Im no contortionist by any means, but I feel you have to be to get these done DIY. Its a straight forward install, just takes time and patience.
Salut to you my friend for taking on the job on your own
Install is tight, no matter what LT headers you have. You have to have some patience for sure. Im no contortionist by any means, but I feel you have to be to get these done DIY. Its a straight forward install, just takes time and patience.
Salut to you my friend for taking on the job on your own
And I didn't do it on my own. I can't stress enough how much I needed my friends to help. Having 3 different viewpoints along the way, along with just the amount of hands needed to wrestle things into place or to take turns wrecking our hands wrenching in tight spots - couldn't have done this without them (even if it did strain our friendship - I owe them a lot of free manual labor at the shop
) We are definitely not 3 20 year-olds working on DSMs all night drinking beers anymore. EVERYTHING hurts!Thanks! Tried to remember everything, and sorry there aren't more pictures to help guide. Nobody was in the mood for photos. Seriously.
Haha awesome man, thanks. I'm sure this will be a breeze for you!
03-17-2015, 09:33 AM
#10
MBWorld Fanatic!
Thread Starter
Join Date: Jun 2008
Location: Los Angeles
Posts: 8,045
Received 2,810 Likes
on
1,664 Posts
2012 P31 C63 Coupe Trackrat, 2019 GLE63S Coupe Beast
One other thing. You're going to need new primary (upstream pre-cat) O2 sensors for sure. Mine are dead, causing a random misfire prob from fouled plugs already. Make sure your tune also accounts for the missing secondary O2 sensors. If you don't, the car will throw a CEL. Ask me how I know...
Found OE Bosch sensors on Amazon for $95 each.
https://mbworld.org/forums/c63-amg-w...t-17016-a.html
Found OE Bosch sensors on Amazon for $95 each.
https://mbworld.org/forums/c63-amg-w...t-17016-a.html
03-17-2015, 10:10 AM
#12
MBWorld Fanatic!
03-17-2015, 03:23 PM
#15
MBWorld Fanatic!
Thread Starter
Join Date: Jun 2008
Location: Los Angeles
Posts: 8,045
Received 2,810 Likes
on
1,664 Posts
2012 P31 C63 Coupe Trackrat, 2019 GLE63S Coupe Beast
For anyone in the NYC area, there's a Bergen Cars & Coffee this Sunday March 22nd. 9:30am-Noon at the Ramsey Panera Bread on Rt 17 North in Ramsey NJ. Need some more AMGs to represent there!
mthis I have a quick question for you:
I removed my passenger seat recently and decided to put it back in. I thought the Passenger airbag sensor would reset after reinstalled, but it hasn't. Any idea how to do it - pull battery, dealer, etc?
I have an autoenginuity tool if it helps, but it's not showing as a 'code' when I load it up, so there is nothing to clear technically.
Thanks
I have an autoenginuity tool if it helps, but it's not showing as a 'code' when I load it up, so there is nothing to clear technically.
Thanks
I have the AutoEnginuity scan tool with the MB extended pack. No code shown. For the life of me I can't figure out where I need to go to reset the drivers side airbag light. Do you have any idea? It's driving me nuts, any help would be much appreciated!
03-17-2015, 04:11 PM
#16
MBWorld Fanatic!

Join Date: Feb 2010
Posts: 5,493
Received 431 Likes
on
354 Posts
2012 C63;1971 280SE 3.5(Sold);2023 EQS 450 SUV 4 Matic (Wife's)
Nice write up on the header install. I did this by myself last winter from the floor. I am going to check my header nuts again just too be sure they stayed tight. My O2 are good so far and no MIL. Brought back some memories....LOL. My system is the same as yours and I love it.
03-17-2015, 09:26 PM
#17
MBWorld Fanatic!
Awesome man, would be great to have you there! PM me if you decide to go and maybe we can caravan up there as I know a couple guys in the area who might also go.
For anyone in the NYC area, there's a Bergen Cars & Coffee this Sunday March 22nd. 9:30am-Noon at the Ramsey Panera Bread on Rt 17 North in Ramsey NJ. Need some more AMGs to represent there!
mthis I have a quick question for you:
I removed my steering wheel airbag recently to do the trim, and my airbag light is now on and won't go off. I disconnected the battery during the process, redid everything, etc and still no joy.
I have the AutoEnginuity scan tool with the MB extended pack. No code shown. For the life of me I can't figure out where I need to go to reset the drivers side airbag light. Do you have any idea? It's driving me nuts, any help would be much appreciated!
As for the install great write up. I still have my ARH to put on as well. I like the idea of the block off plate. How do you attach it?
 03-17-2015, 10:48 PM
#20
MBWorld Fanatic!
03-17-2015, 11:05 PM
#21
MBWorld Fanatic!
Thread Starter
Join Date: Jun 2008
Location: Los Angeles
Posts: 8,045
Received 2,810 Likes
on
1,664 Posts
2012 P31 C63 Coupe Trackrat, 2019 GLE63S Coupe Beast
Tape around the intakes and airboxes as well as the Y-intake to the manifold is this stuff:
Anything within reason and my ability I can do to reduce heat, I'll try it.
03-17-2015, 11:09 PM
#22
MBWorld Fanatic!
Thread Starter
Join Date: Jun 2008
Location: Los Angeles
Posts: 8,045
Received 2,810 Likes
on
1,664 Posts
2012 P31 C63 Coupe Trackrat, 2019 GLE63S Coupe Beast
03-17-2015, 11:49 PM
#23
MBWorld Fanatic!
Awesome man, would be great to have you there! PM me if you decide to go and maybe we can caravan up there as I know a couple guys in the area who might also go.
For anyone in the NYC area, there's a Bergen Cars & Coffee this Sunday March 22nd. 9:30am-Noon at the Ramsey Panera Bread on Rt 17 North in Ramsey NJ. Need some more AMGs to represent there!
mthis I have a quick question for you:
I removed my steering wheel airbag recently to do the trim, and my airbag light is now on and won't go off. I disconnected the battery during the process, redid everything, etc and still no joy.
I have the AutoEnginuity scan tool with the MB extended pack. No code shown. For the life of me I can't figure out where I need to go to reset the drivers side airbag light. Do you have any idea? It's driving me nuts, any help would be much appreciated!
For anyone in the NYC area, there's a Bergen Cars & Coffee this Sunday March 22nd. 9:30am-Noon at the Ramsey Panera Bread on Rt 17 North in Ramsey NJ. Need some more AMGs to represent there!
mthis I have a quick question for you:
I removed my steering wheel airbag recently to do the trim, and my airbag light is now on and won't go off. I disconnected the battery during the process, redid everything, etc and still no joy.
I have the AutoEnginuity scan tool with the MB extended pack. No code shown. For the life of me I can't figure out where I need to go to reset the drivers side airbag light. Do you have any idea? It's driving me nuts, any help would be much appreciated!
Ill check in the morning and send u a pm.
03-18-2015, 12:03 AM
#24
MBWorld Fanatic!
Thread Starter
Join Date: Jun 2008
Location: Los Angeles
Posts: 8,045
Received 2,810 Likes
on
1,664 Posts
2012 P31 C63 Coupe Trackrat, 2019 GLE63S Coupe Beast
Thanks dude!
I called AutoEnginuity today, and the guy on the phone was clueless, although he was kind enough to update my software version which he said was "really old". Maybe that does the trick, but if you find it before I do please let me know thanks!
I called AutoEnginuity today, and the guy on the phone was clueless, although he was kind enough to update my software version which he said was "really old". Maybe that does the trick, but if you find it before I do please let me know thanks!


