
AMG aftermarket Body Kit by Extreme Dimensions (Duraflex) installation
 03-18-2011, 06:33 PM
#1
Member
Thread Starter
Join Date: May 2010
Location: SoCal
Posts: 154
Likes: 0
Received 6 Likes
on
6 Posts
'91 C124 300CE,'06 ML 500 W164, '00 BMW MCOUPE, '65 COBRA REPL.
OK gents, here is how I installed the body kit, by myself in my garage.
I ordered the kit from ebay. Do a search on ebay for "W124 body kit"
There are a bunch of ebay sellers that sell the same product by Extreme Dimensions and it is made out of duraflex. Supposed to be somewhat better than fiberglass. (More on this later). The prices are around $600 plus shipping for an entire kit consisting of front bumper (AMG Gen I or the C36 [very similar to AMG Gen II] side skirts (I guess these are similar to AMG Gen I) and rear bumper (AMG gen II similar or C36) Fro the rear they also have AMG Gen I type.
They also sell the front or rear bumper by itself for those that do not want the entire package.
I picked it up for $575, so local Southern Californians who want to do this are lucky. I sent an email and asked what was the price for cash, out the door if I picked it up. Deal was made and brought the pieces home.
First impression:
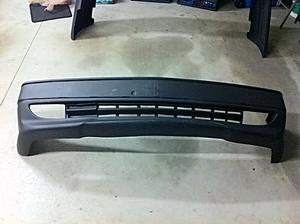
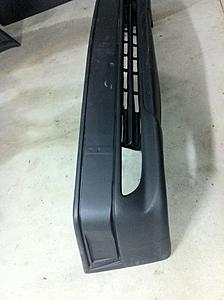
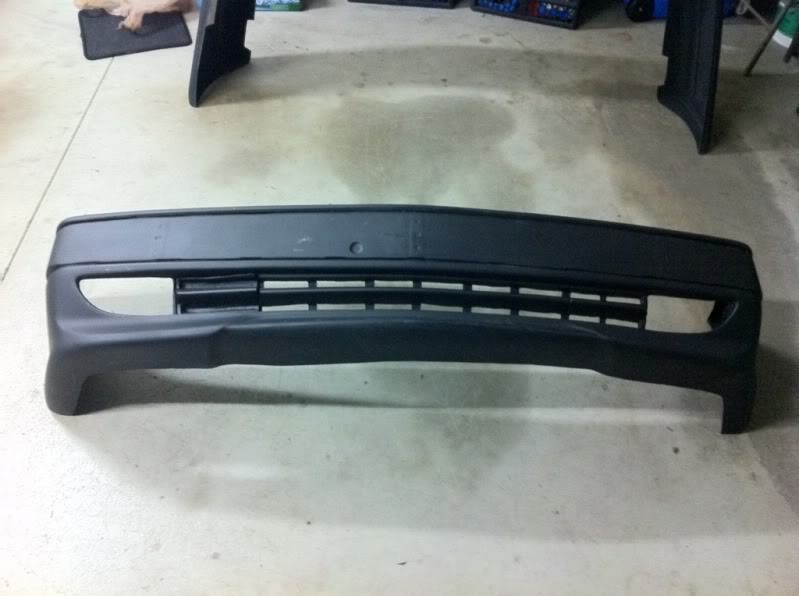
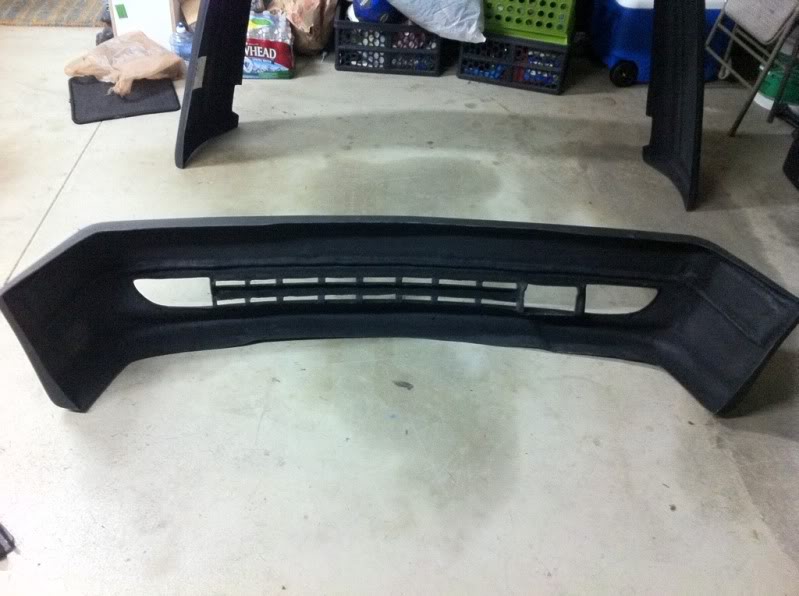
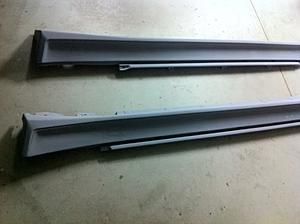
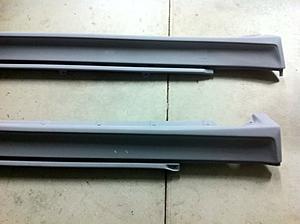
The finish is very good to excellent on all pieces. They are primered and ready to paint.
Here are some pictures of the pieces.
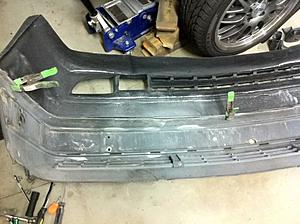
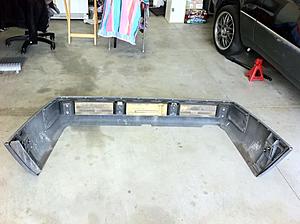
Front Bumper (AMG gen II look or C36 look)

I ordered the kit from ebay. Do a search on ebay for "W124 body kit"
There are a bunch of ebay sellers that sell the same product by Extreme Dimensions and it is made out of duraflex. Supposed to be somewhat better than fiberglass. (More on this later). The prices are around $600 plus shipping for an entire kit consisting of front bumper (AMG Gen I or the C36 [very similar to AMG Gen II] side skirts (I guess these are similar to AMG Gen I) and rear bumper (AMG gen II similar or C36) Fro the rear they also have AMG Gen I type.
They also sell the front or rear bumper by itself for those that do not want the entire package.
I picked it up for $575, so local Southern Californians who want to do this are lucky. I sent an email and asked what was the price for cash, out the door if I picked it up. Deal was made and brought the pieces home.
First impression:
The finish is very good to excellent on all pieces. They are primered and ready to paint.
Here are some pictures of the pieces.
Front Bumper (AMG gen II look or C36 look)

 03-18-2011, 06:33 PM
#2
Member
Thread Starter
Join Date: May 2010
Location: SoCal
Posts: 154
Likes: 0
Received 6 Likes
on
6 Posts
'91 C124 300CE,'06 ML 500 W164, '00 BMW MCOUPE, '65 COBRA REPL.
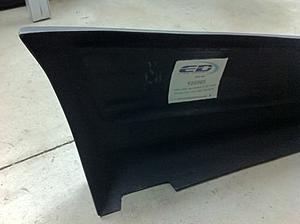
Side moldings (note, the cut outs for the jack are not there, but they have been molded to give the look of the cut outs. I will NOT be cutting them out).


The following users liked this post:
HAMMER HEAD (06-16-2019)
03-18-2011, 06:37 PM
#4
Member
Thread Starter
Join Date: May 2010
Location: SoCal
Posts: 154
Likes: 0
Received 6 Likes
on
6 Posts
'91 C124 300CE,'06 ML 500 W164, '00 BMW MCOUPE, '65 COBRA REPL.
Now to the installation of the front bumper including removal of the existing bumper.
The front of the car needs to be raised on jack stands. Please be safe with this, do it right and you will get to enjoy your ride!
There are 5 points where the bumper attahes to the car.
Get under the car and look for them. If you can't do this stop and take the car to a shop.
I did not feel like playing with a camera while under the car, but you can't miss them.
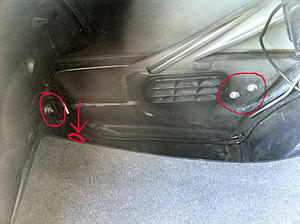
Here is the front bumper removed and you can see those brackets.
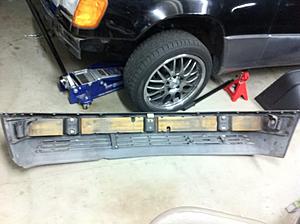
This is a shot from the outer ones that attach right in front of the wheels. (1 per side).
The front of the car needs to be raised on jack stands. Please be safe with this, do it right and you will get to enjoy your ride!
There are 5 points where the bumper attahes to the car.
Get under the car and look for them. If you can't do this stop and take the car to a shop.
I did not feel like playing with a camera while under the car, but you can't miss them.
Here is the front bumper removed and you can see those brackets.

This is a shot from the outer ones that attach right in front of the wheels. (1 per side).
 03-18-2011, 06:38 PM
#5
Member
Thread Starter
Join Date: May 2010
Location: SoCal
Posts: 154
Likes: 0
Received 6 Likes
on
6 Posts
'91 C124 300CE,'06 ML 500 W164, '00 BMW MCOUPE, '65 COBRA REPL.
Now it's time to take apart the OEM bumper as you will need all the parts from it for the new bumper.
Remove the impact strip. This is held in with three Phillips head screws (per side) at the ends of the bumper and with tabs on the inside of the bumper. Easy for you to figure out what to do here.

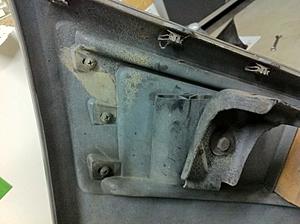
Once the impact strip is out of the way, remove the brackets that hold the bumper to the car. You can see these in the following picture. The ones on the front part are attache to the bumper with 5mm alan bolts.
Remove them and mark where they go.
The ones on the sides are attached to the bumper with stainless rivets and need to be drilled out.
If you have the chrome molding on the top of your bumper and you want to place those on the new bumper, remove them by removing the clips on the inside of the bumper.
Now to transfer all that stuff to the new bumper.
I will start with the most difficult, which is the impact strip. Not real hard, but takes some time.
The clips that are fixed on the impact strip need to have cut outs on the new bumper like the OEM bumper. Those are not there. You will need to cut them out. (This is the same for the rear, so I will only describe it here).
A dremmel is the best tool to use for this application. I used a thin and a thick cut off wheel,
a 1/8 drill bit and went at it. Prepare for a big mess. Best to use a vacuum held close to the area you are working on to suck up most of the dust.
Place the impact strip on the bumper and mark how wide and where you will need to make the notches. Do what you have to make them, and be careful not mess the new bumper up.
Don't forget the 6 screws (3 per side). Do this only when the imp. strip is sitting on the bumper and the tabs are inserted into the cut outs you made. If the imp. strip is not sitting in far enough, there might be some build up of material. Remove some with the dremel or any means you have, check, remove some more, check etc. but be careful not to remove all the material. Go slow here!!!
To make the holes for the 6 screws, place some blue painters tape on the bumper approximately where the holes are to be made. Place the screws on the imp. strip and stretch the impact strip and have the screw heads scratch the tape. Drill and screw.
If you chose to attach the chrome moldings, remove the impact strip that you just installed,
hold the 2 bumpers with the fronts facing the floor. Grip them together with some clamps and mark the original holes to the new bumper. Separate the two bumpers and drill the holes to the new bumper. Make the holes bigger (but not too big, use logic) so the molding can be positioned right.
Remove the impact strip. This is held in with three Phillips head screws (per side) at the ends of the bumper and with tabs on the inside of the bumper. Easy for you to figure out what to do here.

Once the impact strip is out of the way, remove the brackets that hold the bumper to the car. You can see these in the following picture. The ones on the front part are attache to the bumper with 5mm alan bolts.
Remove them and mark where they go.
The ones on the sides are attached to the bumper with stainless rivets and need to be drilled out.
If you have the chrome molding on the top of your bumper and you want to place those on the new bumper, remove them by removing the clips on the inside of the bumper.

Now to transfer all that stuff to the new bumper.
I will start with the most difficult, which is the impact strip. Not real hard, but takes some time.
The clips that are fixed on the impact strip need to have cut outs on the new bumper like the OEM bumper. Those are not there. You will need to cut them out. (This is the same for the rear, so I will only describe it here).
A dremmel is the best tool to use for this application. I used a thin and a thick cut off wheel,
a 1/8 drill bit and went at it. Prepare for a big mess. Best to use a vacuum held close to the area you are working on to suck up most of the dust.
Place the impact strip on the bumper and mark how wide and where you will need to make the notches. Do what you have to make them, and be careful not mess the new bumper up.
Don't forget the 6 screws (3 per side). Do this only when the imp. strip is sitting on the bumper and the tabs are inserted into the cut outs you made. If the imp. strip is not sitting in far enough, there might be some build up of material. Remove some with the dremel or any means you have, check, remove some more, check etc. but be careful not to remove all the material. Go slow here!!!
To make the holes for the 6 screws, place some blue painters tape on the bumper approximately where the holes are to be made. Place the screws on the imp. strip and stretch the impact strip and have the screw heads scratch the tape. Drill and screw.
If you chose to attach the chrome moldings, remove the impact strip that you just installed,
hold the 2 bumpers with the fronts facing the floor. Grip them together with some clamps and mark the original holes to the new bumper. Separate the two bumpers and drill the holes to the new bumper. Make the holes bigger (but not too big, use logic) so the molding can be positioned right.
 03-18-2011, 06:38 PM
#6
Member
Thread Starter
Join Date: May 2010
Location: SoCal
Posts: 154
Likes: 0
Received 6 Likes
on
6 Posts
'91 C124 300CE,'06 ML 500 W164, '00 BMW MCOUPE, '65 COBRA REPL.
With the impact strip removed or before you even do the above mentioned work for the impact strip install do the following.
Make the hole for the outside temp sensor (marked on new bumper)
The holes for the brackets that hold the bumper to the car are pre marked and are accurate so go ahead and drill and place the brackets on the bumper. Do not forget to also put the foam pads in the right positions between the brackets.
To place the 2 outer brackets, use Phillips head bolts on the outside (so they are flat enough for the impact strip to fit over) and lock nuts on the inside. Or use large and long rivets again.
Make sure you put some fender washer on the outside.
Install all the stuff you have removed, and install the bumper on the car.
The fit should be very good. Mine was almost excellent!!!
03-18-2011, 06:38 PM
#7
Member
Thread Starter
Join Date: May 2010
Location: SoCal
Posts: 154
Likes: 0
Received 6 Likes
on
6 Posts
'91 C124 300CE,'06 ML 500 W164, '00 BMW MCOUPE, '65 COBRA REPL.
On to the side skirts:
Open the door(s) and remove the side sill. There should be screws which you will remove (a bit different between coupe and sedan).
Remove the front and rear side moldings. First from the top, then the bottom. This requires force and be careful.
On the coupe there is a screw aft the door.
Under the car there are a bunch of screws.
The installation is the reverse. Some enlarging of the screw holes on the new side skirts might be required, but the overall fit is very OEM. That is all that is required for the side skirts. Took me 1+/- hour for both sides.
Trending Topics
03-18-2011, 06:39 PM
#8
Member
Thread Starter
Join Date: May 2010
Location: SoCal
Posts: 154
Likes: 0
Received 6 Likes
on
6 Posts
'91 C124 300CE,'06 ML 500 W164, '00 BMW MCOUPE, '65 COBRA REPL.
The rear bumper is very similar to the front.
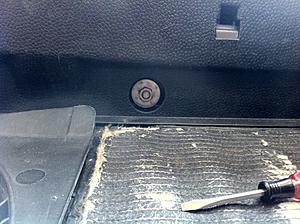
The bolts that hold the bumper to the car are on the inside of the trunk, not under the car.
In the following picture, the small screw driver is resting on the trunk floor and you can see one bolt. there are 2 singles towards the middle, 2 pair towards the corner (under the lights) and 2 pairs, 1 pair on the quarter panels by the antenna (dr. side) and under the fuel filler (pas. side) These 4 last ones are 10mm, all others are 13mm.
Remove the bumper and take it apart like the front one.
Follow the same procedures for the impact strip, brackets etc as you did to the front.
To install the chrome strips, I did not do the same as the front. I could not get the alignment right. Instead I started from the middle piece. I centered it best I could, brought it to the inner edge about 1/16" and mark the holes, drilled and installed. Then I just placed the other 2 to a satisfying location, marked, drilled and installed.
The hardest part of the rear bumper (not as bad as many have mentioned or feared) is the installation of the outer bracket (one closest to the tires).
When I read a post from another member on this I was skeptical, so I went to the junk yard and took apart a bumper and removed that bracket which is glued on to the bumper. Well, not glued but held on by melting parts of the bumper and the bracket together.
Just brake those melted points and the entire assembly will come off the bumper.
These will be attached here.
For those of you going with the AMG Gen I rear bumper, the impact strips are shorter than mine (AMG Gen II or C36) so you will just attach it to the bumper at the same location as the original (Assuming you have W124 up to 93.
To do so, I bought some Loctite Plastic 2 part epoxy from Home Depot. It is very strong!
Just place the assembly at the proper location, and glue it. That's it!!
For me and for those that go with the AMG Gen II or C36 look one and you have a pre 94 W124, things are more complicated.
First the original impact strip will nor fit, it is too short. You will need an impact strip from 94-95.
Second, the above mentioned bracket assembly is not made for this bumper and it will not fit properly. You will need to remove this assembly from a 94-95 bumper.
Ideally you can find a 94-95 for cheap and use the parts from that one.
I could not find one, so I bought the imp. strip from rmeuropean auto parts for $87.18 (free shipping) which also has smooth finish for those that will have it painted.
I then modified extensively the bracket from my pre 94 to make it work.
(instructions and pictures coming for this)
The bolts that hold the bumper to the car are on the inside of the trunk, not under the car.
In the following picture, the small screw driver is resting on the trunk floor and you can see one bolt. there are 2 singles towards the middle, 2 pair towards the corner (under the lights) and 2 pairs, 1 pair on the quarter panels by the antenna (dr. side) and under the fuel filler (pas. side) These 4 last ones are 10mm, all others are 13mm.


Remove the bumper and take it apart like the front one.
Follow the same procedures for the impact strip, brackets etc as you did to the front.
To install the chrome strips, I did not do the same as the front. I could not get the alignment right. Instead I started from the middle piece. I centered it best I could, brought it to the inner edge about 1/16" and mark the holes, drilled and installed. Then I just placed the other 2 to a satisfying location, marked, drilled and installed.
The hardest part of the rear bumper (not as bad as many have mentioned or feared) is the installation of the outer bracket (one closest to the tires).
When I read a post from another member on this I was skeptical, so I went to the junk yard and took apart a bumper and removed that bracket which is glued on to the bumper. Well, not glued but held on by melting parts of the bumper and the bracket together.
Just brake those melted points and the entire assembly will come off the bumper.
These will be attached here.

For those of you going with the AMG Gen I rear bumper, the impact strips are shorter than mine (AMG Gen II or C36) so you will just attach it to the bumper at the same location as the original (Assuming you have W124 up to 93.
To do so, I bought some Loctite Plastic 2 part epoxy from Home Depot. It is very strong!
Just place the assembly at the proper location, and glue it. That's it!!
For me and for those that go with the AMG Gen II or C36 look one and you have a pre 94 W124, things are more complicated.
First the original impact strip will nor fit, it is too short. You will need an impact strip from 94-95.
Second, the above mentioned bracket assembly is not made for this bumper and it will not fit properly. You will need to remove this assembly from a 94-95 bumper.
Ideally you can find a 94-95 for cheap and use the parts from that one.
I could not find one, so I bought the imp. strip from rmeuropean auto parts for $87.18 (free shipping) which also has smooth finish for those that will have it painted.
I then modified extensively the bracket from my pre 94 to make it work.
(instructions and pictures coming for this)
Last edited by semis1; 03-18-2011 at 06:43 PM.
03-18-2011, 06:39 PM
#9
Member
Thread Starter
Join Date: May 2010
Location: SoCal
Posts: 154
Likes: 0
Received 6 Likes
on
6 Posts
'91 C124 300CE,'06 ML 500 W164, '00 BMW MCOUPE, '65 COBRA REPL.
Everything has turned out great till now.
Impressions:
Duraflex is indeed a bit more flexible than fiberglass.
The fit and finish on the Extreme dimensions is much better than any aftermarket fiberglass parts I have ever seen for this car, or installed. (I had installed an RS4 look body kit on my 1999 Audi A4 a while back.)
The front tow hook cover is not great. It needs some massaging, but not very visible and it works ok. I will affix it permanently to the bumper, as I have never had a use for a tow hook on any car in my 23 years of driving.
The slots on the front bumper are a bit rough, but nice enough.
The AMG Gen II or C36 look front bumper uses fog lights from a C36 or driving lights from an AMG Gen II bumper. These are very hard to find and/or very EXPENSIVE!!! $300-400 per light!!!! I will be putting some mesh in that location, till I locate some.
Side skirts were a perfect match.
Rear bumper was a very very good fit.
It took me Saturday from 7pm to 12am and most of Sunday to finish this, minus the rear impact strip which I was waiting to be delivered.
I ordered from http://www.rmeuropean.com/ the rear impact strip for 95-95 W124 because of the mentioned need for one part #124-885-13-21 for $87.18
and a front impact strip for a 94-95 W124 part # 124-885-14-21 for $30.07 because mine is not smooth and I did not feel like sanding it make it paintable.
The above parts are of excellent quality.
Very doable by a smart, resourceful and average DIYer. Go for it!!!
(I have no affiliation with the sellers of these kits)
03-18-2011, 06:41 PM
#10
Member
Thread Starter
Join Date: May 2010
Location: SoCal
Posts: 154
Likes: 0
Received 6 Likes
on
6 Posts
'91 C124 300CE,'06 ML 500 W164, '00 BMW MCOUPE, '65 COBRA REPL.
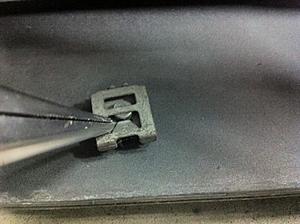
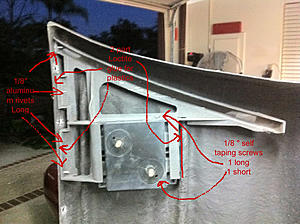
OK, here is how I modified the outer brackets (toward the rear tires) for the rear bumper.
This procedure is for those using pre 94 OEM bumpers as donors and an AMG gen II or C36 look rear bumper with the longer impact strips.
(Those using the AMG gen I bumper, remove these brackets and glue them on the new one.)
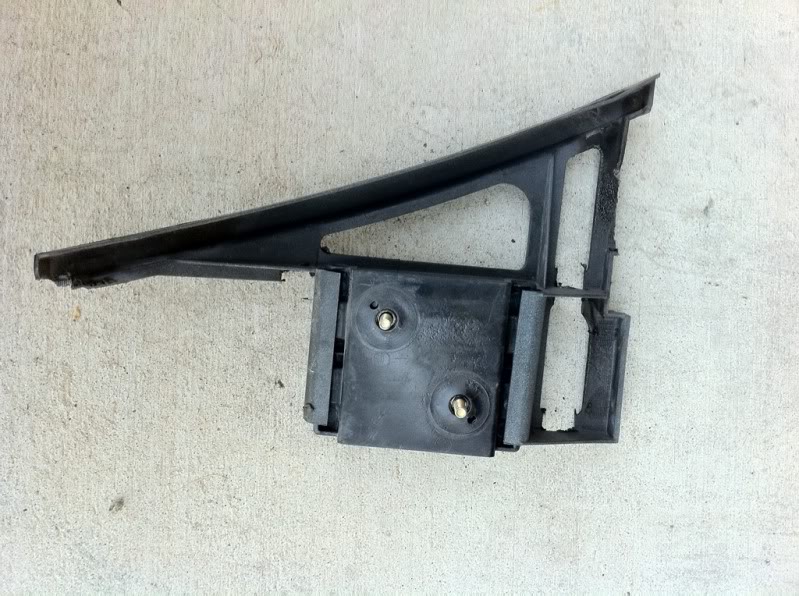
Remove the entire bracket from the bumper. This is hard but doable. Do not break them, take your time.
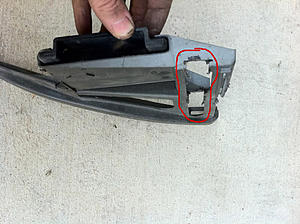
Cut off some parts with the dremel to look like this.

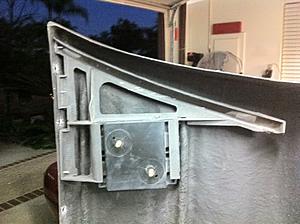
Now, you need to use the dremel to take off some material so it will clear the channels where the impact strip sits. Like this:
How to attach:
This procedure is for those using pre 94 OEM bumpers as donors and an AMG gen II or C36 look rear bumper with the longer impact strips.
(Those using the AMG gen I bumper, remove these brackets and glue them on the new one.)
Remove the entire bracket from the bumper. This is hard but doable. Do not break them, take your time.
Cut off some parts with the dremel to look like this.
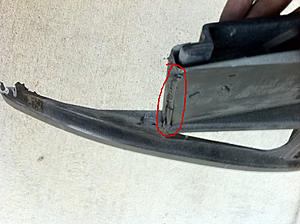
Now, you need to use the dremel to take off some material so it will clear the channels where the impact strip sits. Like this:


How to attach:

The following users liked this post:
HAMMER HEAD (06-16-2019)
03-18-2011, 06:41 PM
#11
Member
Thread Starter
Join Date: May 2010
Location: SoCal
Posts: 154
Likes: 0
Received 6 Likes
on
6 Posts
'91 C124 300CE,'06 ML 500 W164, '00 BMW MCOUPE, '65 COBRA REPL.
How they look when they are attached to the bumper.
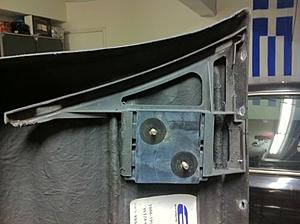
Before gluing the brackets to the bumper, I did not rivet them yet, but I used 1/8 self taping screws (same size as the rivets) and I screwed the brackets to the bumper to test fit.
Mine was spot on.
If you find that the bumper does not go up high enough and there is a gap between the quarter panels and the bumpers, you can increase the diameter of the holes on the body (the ones closest to the tires) but not too big, check the size of the inside washers.
Mine fit perfect with the first try.
Then I removed the self taping screws and inserted the rivets. The reason I used the rivets instead of the self tap screws was that I installed the chrome molding and the screw heads would not let the molding sit flush. The rivet heads were flat enough where the problem was eliminated.
Put everything together and enjoy the new look.
Pictures of my car will soon be posted. I have not moved the car out of the garage yet as I am about to change the hood to a 94-95 one and then off to paint.
I hope this helps someone out there who is thinking of installing this kit to their cars.
If anyone has any questions or issues, please feel free to contact me thru PM or here.
The following users liked this post:
HAMMER HEAD (06-16-2019)
03-19-2011, 11:50 AM
#13
MBWorld Fanatic!
Thanks for the write-up Semis! This combined with Ed's mostly positive story of the E.D kits gives me some faith that when I eventually get around to that, I won't be totally screwed/disappointed.
 03-19-2011, 02:27 PM
#15
Member
Thread Starter
Join Date: May 2010
Location: SoCal
Posts: 154
Likes: 0
Received 6 Likes
on
6 Posts
'91 C124 300CE,'06 ML 500 W164, '00 BMW MCOUPE, '65 COBRA REPL.
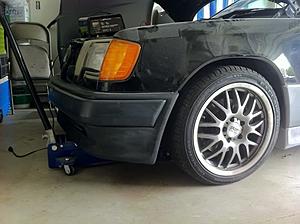
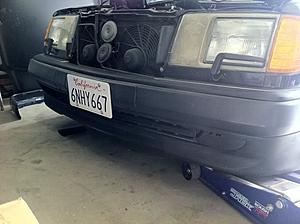
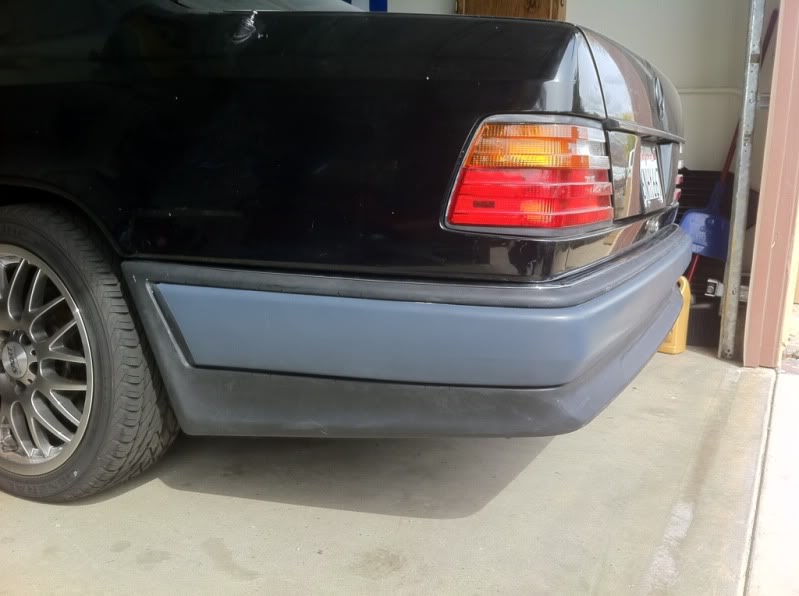
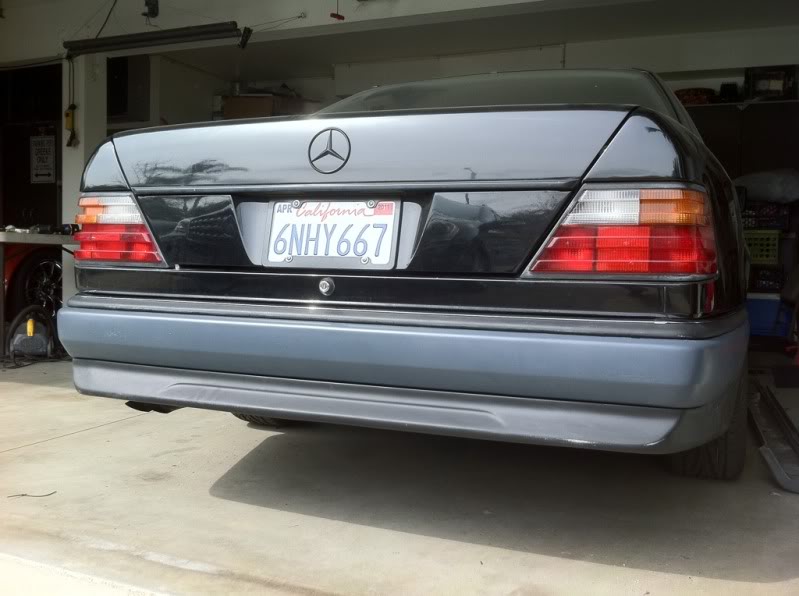
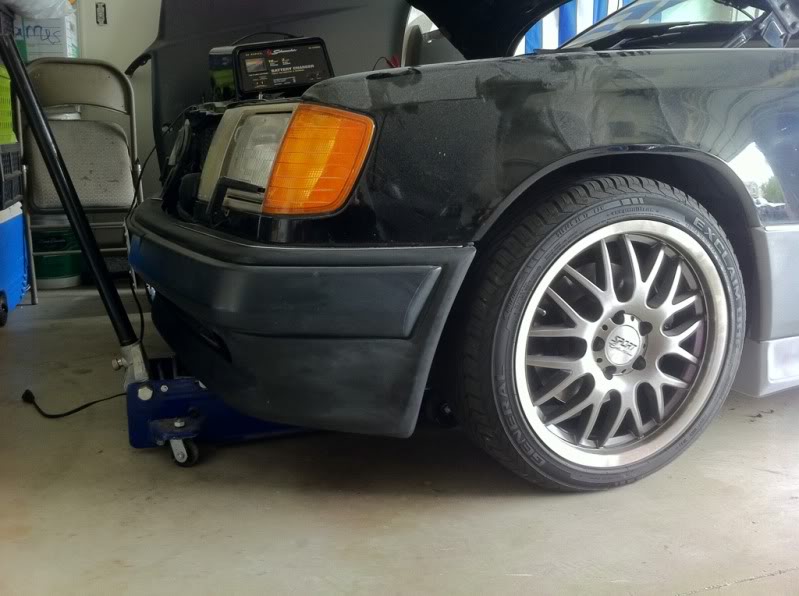
OK, here are some I just took.
Sorry the car is in the garage and I am working on it so I could not move it out for better pictures, but you should get an idea of the fit and the look.


Sorry the car is in the garage and I am working on it so I could not move it out for better pictures, but you should get an idea of the fit and the look.


The following users liked this post:
HAMMER HEAD (06-16-2019)
03-19-2011, 03:02 PM
#17
Member
Thread Starter
Join Date: May 2010
Location: SoCal
Posts: 154
Likes: 0
Received 6 Likes
on
6 Posts
'91 C124 300CE,'06 ML 500 W164, '00 BMW MCOUPE, '65 COBRA REPL.
There are NO waves and NO fitment issues!!!
Only the fitment of the OEM bumper parts which are a bit labor
intensive but not bad at all.
I am very happy with it.
Only the fitment of the OEM bumper parts which are a bit labor
intensive but not bad at all.
I am very happy with it.
03-22-2011, 04:35 PM
#23
Member
Thread Starter
Join Date: May 2010
Location: SoCal
Posts: 154
Likes: 0
Received 6 Likes
on
6 Posts
'91 C124 300CE,'06 ML 500 W164, '00 BMW MCOUPE, '65 COBRA REPL.
Thank you gents!!!
Dj, I am not sure. No time to be a part of it even if there is...the forums are about as close as it gets for me. (Work, family etc.)
ZedStyle, is is lower, not by TOO much, but I will measure later on and post it here....stay tuned...
Dj, I am not sure. No time to be a part of it even if there is...the forums are about as close as it gets for me. (Work, family etc.)
ZedStyle, is is lower, not by TOO much, but I will measure later on and post it here....stay tuned...
03-24-2011, 04:38 PM
#24
Senior Member

Damn nice pick up that looks great. Did you try to bend and twist the bumpers? i was just curious about the duriflex material. Im going to pickup a kit for my w140 here soon too.
03-25-2011, 02:39 AM
#25
Member
Thread Starter
Join Date: May 2010
Location: SoCal
Posts: 154
Likes: 0
Received 6 Likes
on
6 Posts
'91 C124 300CE,'06 ML 500 W164, '00 BMW MCOUPE, '65 COBRA REPL.
The Duraflex does not seem to be as flexible as they show on the
Video, but it is better than ur average fiberglass
It is not OEM AMG but I am happy with the finish and the fit.
For the price, can't go wrong.
Video, but it is better than ur average fiberglass
It is not OEM AMG but I am happy with the finish and the fit.
For the price, can't go wrong.


