
SL/R230: Installing illuminated door sills. (Instructions)
 08-05-2005, 06:49 PM
#1
Member
Thread Starter
Join Date: Oct 2004
Location: Stockholm, Sweden
Posts: 162
Likes: 0
Received 2 Likes
on
2 Posts
SL 600 640bhp/1000Nm
This morning I got my illuminated door sills that I order from formymercedes.com.
Now a couple of hours later I’m done with the installation and they look sweet!
But since the sills did not came with a installation instruction I thought I would share my experience with You.
Well there is an general description that followed: "The red wire requires a constant power source while the black wire is for the door switch."
I’m not affiliated (its that the right expression?) with the company that sold me these. I just think its nice to be able to share if others is interesting in doing this.
Please forgive any bad grammar and spelling since I’m from Sweden and I skipped most of school..")
I assume that You have some basic understanding of electrical wiring and I will not explain in detail how things works.
Please do not attempt this if You are not sure what You are doing.. You may damage Your car.. Do it at Your own risk.. With that said I must say it was quite easy to do the install.
Just one final note before we begin. This is the easy way of doing the installation. The official Mercedes way is way more complected and takes about 4-6 hours(?) to do.
They re-route the wiring and make the door sills to dim with the interior light.
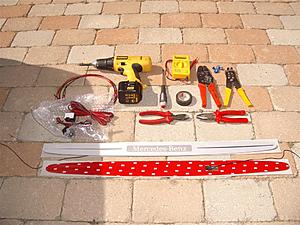
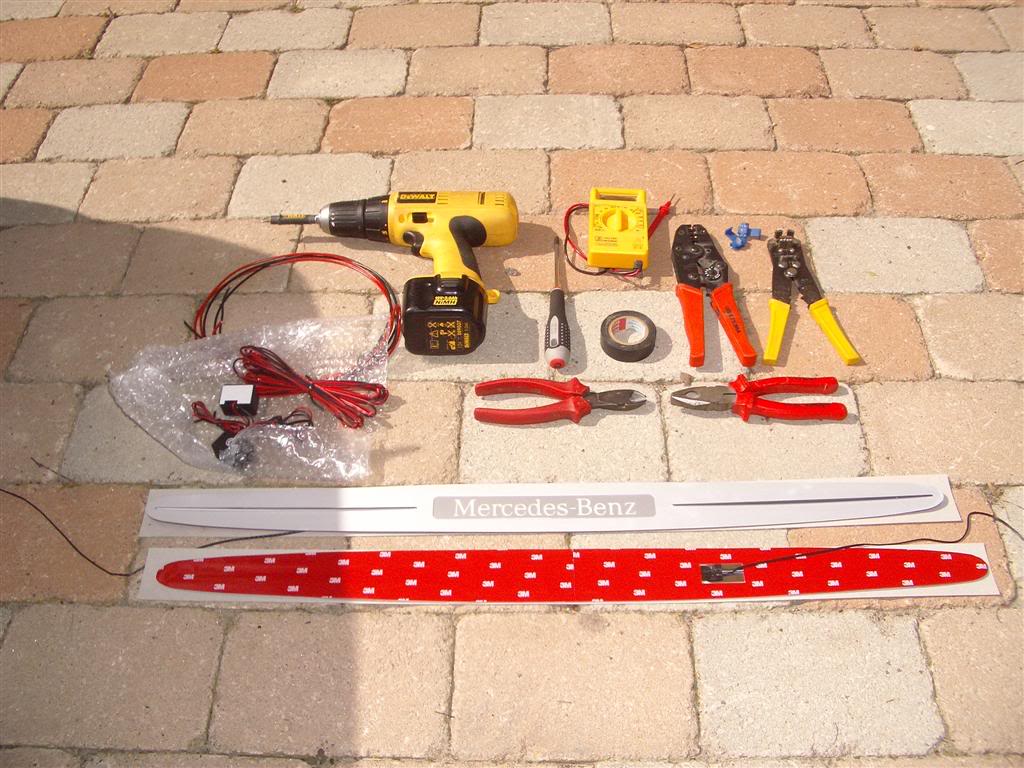
This is the tools I used. You can of course use a regular screwdriver instead of the DeWalt and a test light instead of a voltmeter.
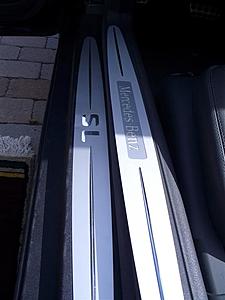
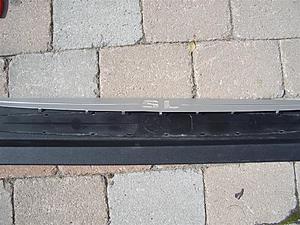
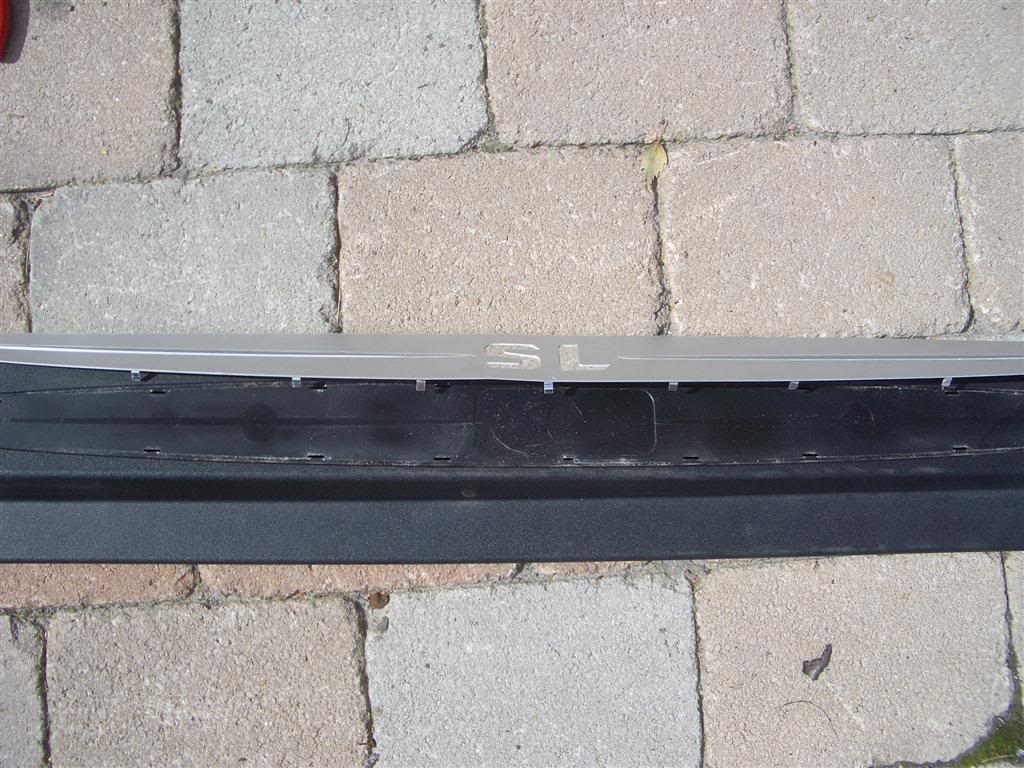
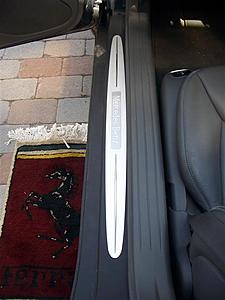
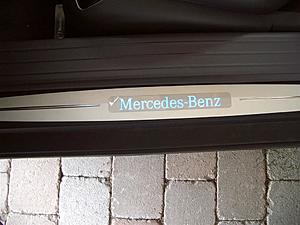
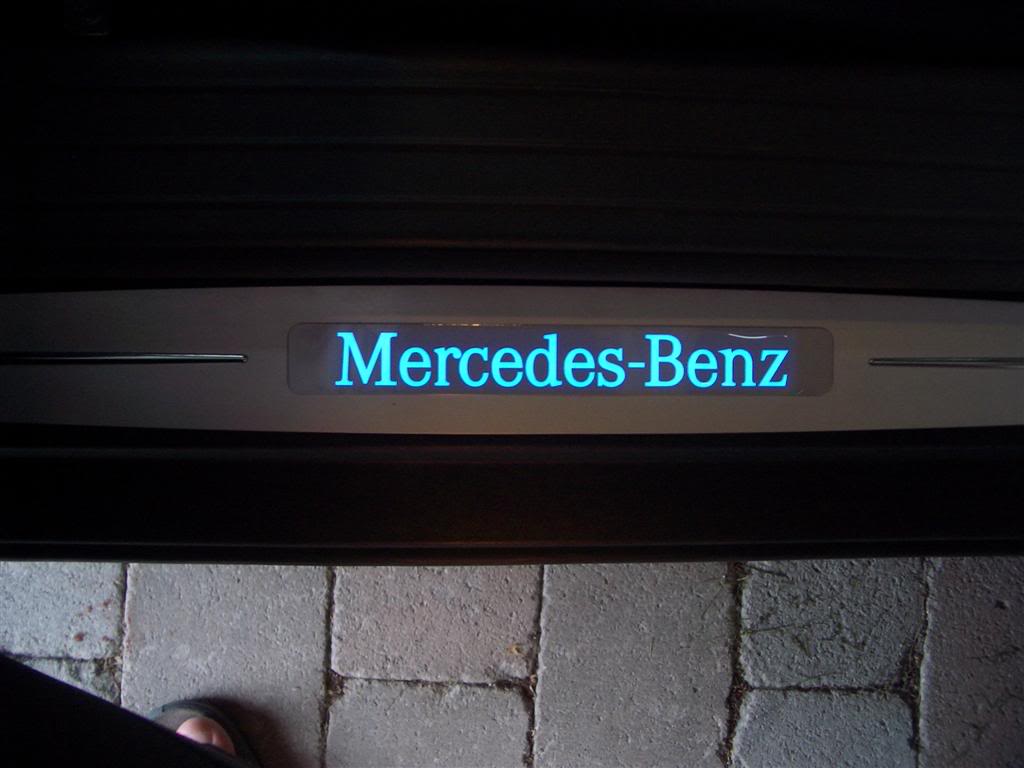
Here You can also see the new sills with the Mercedes-Benz logo. If you want they have other graphics like AMG, Brabus, Carlsson.
The original and new side by side.
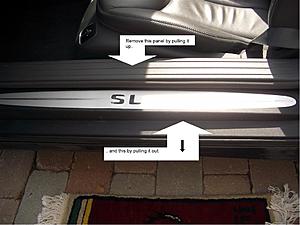
Now start to remove the sills by pulling the panel closest to the seat straight up.
Then remove the outside sill by pulling it out/up, just be careful not to brake the pin that is located at the front of this panel.
Se next pic that shows the reverse side of the panels to better understand how they will be removed.
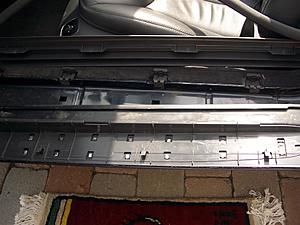
Reverse side. The inner sill is no problem. But look at the sill closer to the camera. There You see the hooks, They are the reason You need to pull out/up to remove it.
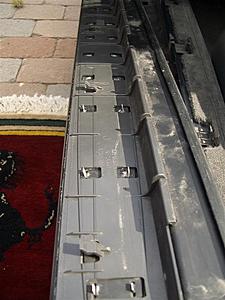
Then You need to bend up the ??? that holds the original sill into place.
After that they will come right of.

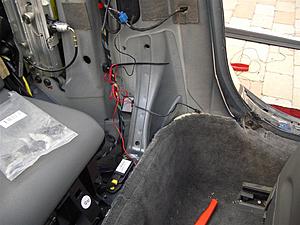
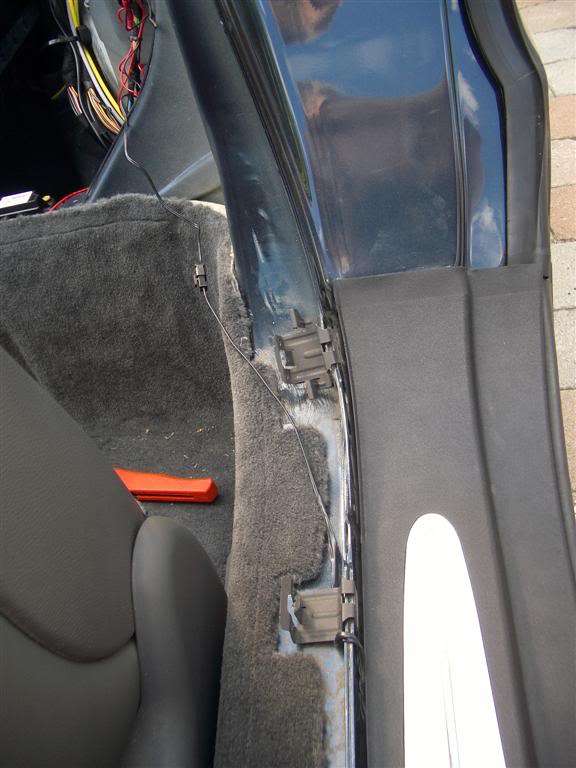
Remove the panel behind the driver seat by pulling it out at the top and then just lift it up.
Remove the torx screw that hold the panel to the right.
From this stage forward I will only describe the left side. But You must remove the same panels on the right side in the same way. And do it before You continue with the electrical wiring since the constant power is on the right side.
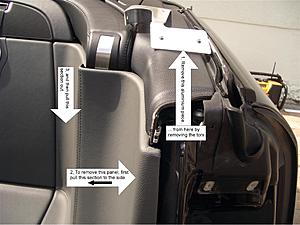
Then You unscrew the aluminum piece (1) after that the panel should come out by pulling it to Your left at the section closest to the camera (2) and then pull it in the direction of the camera (3).
Part two will follow.
Now a couple of hours later I’m done with the installation and they look sweet!
But since the sills did not came with a installation instruction I thought I would share my experience with You.
Well there is an general description that followed: "The red wire requires a constant power source while the black wire is for the door switch."
I’m not affiliated (its that the right expression?) with the company that sold me these. I just think its nice to be able to share if others is interesting in doing this.
Please forgive any bad grammar and spelling since I’m from Sweden and I skipped most of school..
I assume that You have some basic understanding of electrical wiring and I will not explain in detail how things works.
Please do not attempt this if You are not sure what You are doing.. You may damage Your car.. Do it at Your own risk.. With that said I must say it was quite easy to do the install.
Just one final note before we begin. This is the easy way of doing the installation. The official Mercedes way is way more complected and takes about 4-6 hours(?) to do.
They re-route the wiring and make the door sills to dim with the interior light.
This is the tools I used. You can of course use a regular screwdriver instead of the DeWalt and a test light instead of a voltmeter.
Here You can also see the new sills with the Mercedes-Benz logo. If you want they have other graphics like AMG, Brabus, Carlsson.

The original and new side by side.

Now start to remove the sills by pulling the panel closest to the seat straight up.
Then remove the outside sill by pulling it out/up, just be careful not to brake the pin that is located at the front of this panel.
Se next pic that shows the reverse side of the panels to better understand how they will be removed.

Reverse side. The inner sill is no problem. But look at the sill closer to the camera. There You see the hooks, They are the reason You need to pull out/up to remove it.

Then You need to bend up the ??? that holds the original sill into place.
After that they will come right of.

Remove the panel behind the driver seat by pulling it out at the top and then just lift it up.
Remove the torx screw that hold the panel to the right.
From this stage forward I will only describe the left side. But You must remove the same panels on the right side in the same way. And do it before You continue with the electrical wiring since the constant power is on the right side.

Then You unscrew the aluminum piece (1) after that the panel should come out by pulling it to Your left at the section closest to the camera (2) and then pull it in the direction of the camera (3).
Part two will follow.
 08-05-2005, 06:50 PM
#2
Member
Thread Starter
Join Date: Oct 2004
Location: Stockholm, Sweden
Posts: 162
Likes: 0
Received 2 Likes
on
2 Posts
SL 600 640bhp/1000Nm
Part two.
Now use the voltmeter (or test light) to determent with one of the two cables from the door switch gives a broken ground when You push in the door switch. In my car, as I’m sure it will be in all but please check to be sure, it was the grey one.
Just use a tap splice to connect the black wire from the EL transformer that came with the illuminated sills with that grey cable.
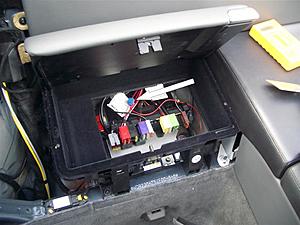
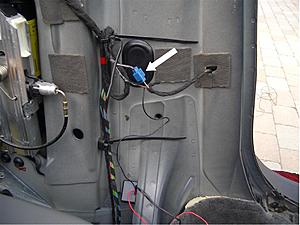
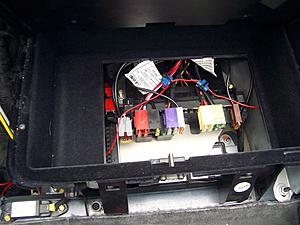
Behind the passenger seat You will find some fuses under the floor in the compartment box. There You will find Your constant power supply. Use a extension wire and one more tap splice too hook up the red wire from the left EL transformer.
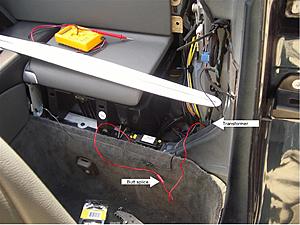
Hook up the red extension wire with the red wire from the transformer with a butt splice.
Then You tie everything up neatly.
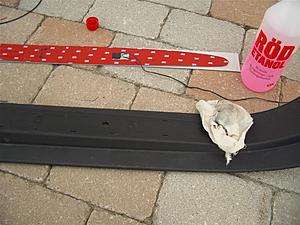
Clean the original sill so the new one will stick properly.
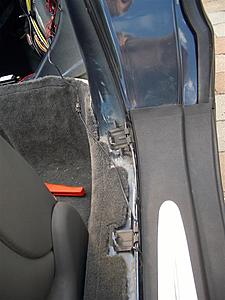
Here You see the only hole that needs to be drilled. Its for the cables from the EL to the transformer.
Put the outer sill back in place and hide the cable to the transformer under the sills and carpet. Repeat the steps above for the right side and after that You put everything back in reverse order.
All done and it looks like it came straight out of the factory. Damn I’m good
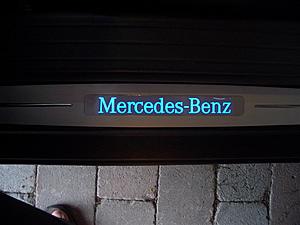
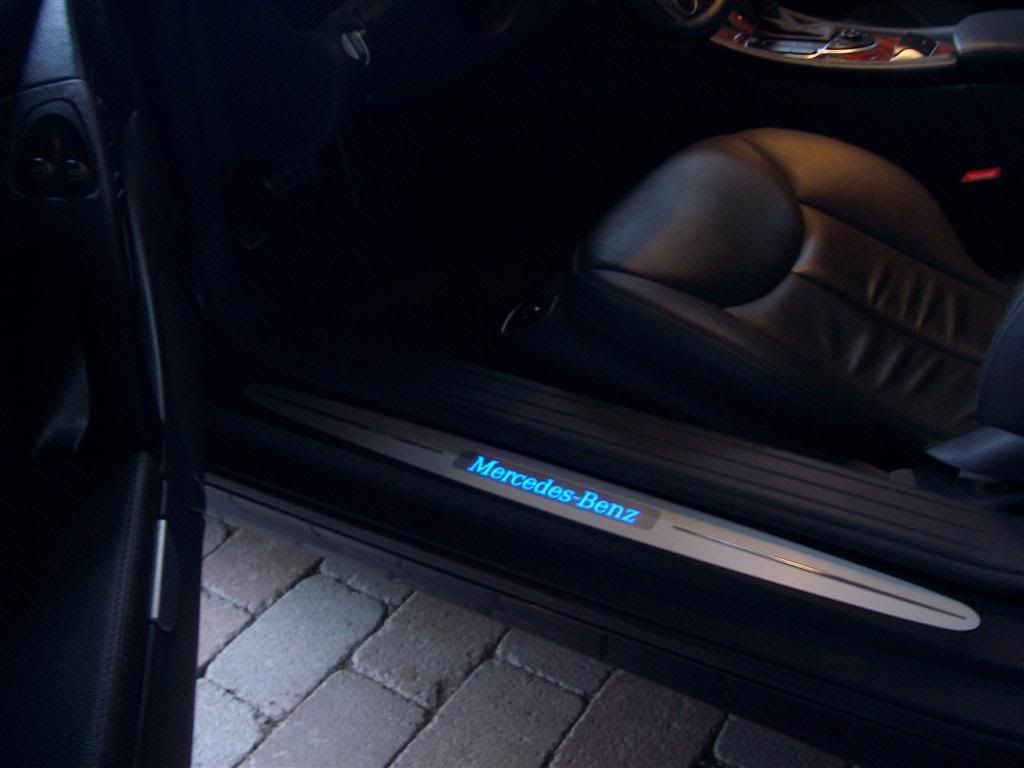
Its quite hard to take pics in the dark without flash but I think You will get the idea how they look.
I think they look awsome in the dark!!
Once again: don’t try this if You don’t know Yor way around car electronics and how to remove panels.
Use a professional car stereo or alarm expert if You are unsure

Now use the voltmeter (or test light) to determent with one of the two cables from the door switch gives a broken ground when You push in the door switch. In my car, as I’m sure it will be in all but please check to be sure, it was the grey one.
Just use a tap splice to connect the black wire from the EL transformer that came with the illuminated sills with that grey cable.

Behind the passenger seat You will find some fuses under the floor in the compartment box. There You will find Your constant power supply. Use a extension wire and one more tap splice too hook up the red wire from the left EL transformer.

Hook up the red extension wire with the red wire from the transformer with a butt splice.


Then You tie everything up neatly.

Clean the original sill so the new one will stick properly.
Here You see the only hole that needs to be drilled. Its for the cables from the EL to the transformer.
Put the outer sill back in place and hide the cable to the transformer under the sills and carpet. Repeat the steps above for the right side and after that You put everything back in reverse order.

All done and it looks like it came straight out of the factory. Damn I’m good

Its quite hard to take pics in the dark without flash but I think You will get the idea how they look.
I think they look awsome in the dark!!
Once again: don’t try this if You don’t know Yor way around car electronics and how to remove panels.
Use a professional car stereo or alarm expert if You are unsure
The following users liked this post:
celmem (08-19-2019)
08-06-2005, 05:48 PM
#6
MBWorld Fanatic!

Join Date: Jul 2005
Location: Sydney, Australia
Posts: 3,220
Likes: 0
Received 10 Likes
on
6 Posts
W203 slightly modified
Probably the roughest install I have seen in a while. Partly because of the fact that the OEM door sill harness is probably just near the door sill like it was when I did some work on these cars, secondly because you didnt bother with going through the cabling tunnel which was plugged with nothing more than a spongue. 
If I was to attempt this mod I would at least consider using the original harness be it in the car already or sold as a single item. That would at least give me the fuse connection and wiring lengths I need to make a professional job and can be easily adapted to conform to the aftermarket sill wiring.
If I was to attempt this mod I would at least consider using the original harness be it in the car already or sold as a single item. That would at least give me the fuse connection and wiring lengths I need to make a professional job and can be easily adapted to conform to the aftermarket sill wiring.
08-07-2005, 07:45 AM
#7
Member
Thread Starter
Join Date: Oct 2004
Location: Stockholm, Sweden
Posts: 162
Likes: 0
Received 2 Likes
on
2 Posts
SL 600 640bhp/1000Nm
Originally Posted by benzmodz
Probably the roughest install I have seen in a while. Partly because of the fact that the OEM door sill harness is probably just near the door sill like it was when I did some work on these cars, secondly because you didnt bother with going through the cabling tunnel which was plugged with nothing more than a spongue.
If I was to attempt this mod I would at least consider using the original harness be it in the car already or sold as a single item. That would at least give me the fuse connection and wiring lengths I need to make a professional job and can be easily adapted to conform to the aftermarket sill wiring.
If I was to attempt this mod I would at least consider using the original harness be it in the car already or sold as a single item. That would at least give me the fuse connection and wiring lengths I need to make a professional job and can be easily adapted to conform to the aftermarket sill wiring.
But like I said: this is the easy way of doing this. Not the MB way.
I did not have the original harness at the door sill. Maybe because its an early SL, build 11/01. And I did not know that MB sold a separate harness for this installation. You learn something new every day. Thank You.
Yes, I could have through the cabling tunnel but the end result is still the same. All cables are well hidden and secure behind the panels.
But I agree with You. With everything You do You can always look back and say that something could have been done better. This was the first time I tried this installation and if I would have done it again I might done it differently.
I was just trying to share how the sills could be installed but there will of course be more skilled people then me that could do a better installation.
I still think I did quite a good job for an amateur.
So I better say this one more time: If You are not sure about this installation, use an professional!
Trending Topics
08-07-2005, 07:48 AM
#8
Member
Thread Starter
Join Date: Oct 2004
Location: Stockholm, Sweden
Posts: 162
Likes: 0
Received 2 Likes
on
2 Posts
SL 600 640bhp/1000Nm
Oh, I forgot.
Thanks to the people that think i did a good job!
Its funny, You get a few good responses and one bad. But all You can think about is that bad one..
Thanks to the people that think i did a good job!
Its funny, You get a few good responses and one bad. But all You can think about is that bad one..
08-07-2005, 02:09 PM
#9
Senior Member
Join Date: Feb 2005
Location: Exeter, CA USA
Posts: 254
Likes: 0
Received 0 Likes
on
0 Posts
2002 BMW 745Li Black/beige, 2006 SL600 Capri Blue/Black still on order
Originally Posted by R230_Nicke
Oh, I forgot.
Thanks to the people that think i did a good job!
Its funny, You get a few good responses and one bad. But all You can think about is that bad one..
Thanks to the people that think i did a good job!
Its funny, You get a few good responses and one bad. But all You can think about is that bad one..
08-07-2005, 03:03 PM
#10
Newbie

Join Date: Oct 2004
Posts: 2
Likes: 0
Received 0 Likes
on
0 Posts
Bra gjort!!
Tyckte att det var en fin beskrivning och roligt att se hur det ser ut bakom nĺgra av panelerna. Jag skulle inte riktigt vĺga att ta bort dessa paneler pĺ min bil dĺ det ser ut som dem sitter ordentligt men om jag mĺste dĺ vet jag hur man gör. Post gärna mer om det bli fler mods!!

Fin bil ocksĺ!!
MVH
Kerry
-02 SL 500 silver
Uppsala
Fin bil ocksĺ!!
MVH
Kerry
-02 SL 500 silver
Uppsala
08-07-2005, 08:18 PM
#11
MBWorld Fanatic!
Join Date: Jul 2005
Location: Sydney, Australia
Posts: 3,220
Likes: 0
Received 10 Likes
on
6 Posts
W203 slightly modified
Originally Posted by R230_Nicke
Oh, I forgot.
Thanks to the people that think i did a good job!
Its funny, You get a few good responses and one bad. But all You can think about is that bad one..
Thanks to the people that think i did a good job!
Its funny, You get a few good responses and one bad. But all You can think about is that bad one..
A NORMAL response ...... " I might look into some time later and take some new photos"
YOUR REPLY ..... " Im not good at this but I really hate being corrected "
08-08-2005, 02:44 AM
#13
MBWorld Fanatic!
I bought the official MB upgrade kit and the instructions there have you running the power cable over the sill edge; they do tell you that you should put some self adhesive felt over the sharp edge to avoid the risk of the wires chaffing.
The ones I had a small power "brick", one each side, with three wires - ground, fused permanent 12v obtained via a new fuse in the fuse block visible, and an on/off wire which connects to one of the wires to the door switch so that it is connected to ground when the door is opened.
Like others, I have no idea what a spong-ue is either. It's possible Aussies get taught how to wire cars but they sure as hell don't get taught how to spell. Lighten up benzmodz!
08-08-2005, 02:46 AM
#14
Originally Posted by blueSL
Like others, I have no idea what a spong-ue is either. It's possible Aussies get taught how to wire cars but they sure as hell don't get taught how to spell. Lighten up benzmodz!
08-08-2005, 09:15 AM
#15
MBWorld Fanatic!
Join Date: Jul 2005
Location: Sydney, Australia
Posts: 3,220
Likes: 0
Received 10 Likes
on
6 Posts
W203 slightly modified
Originally Posted by blueSL
I bought the official MB upgrade kit and the instructions there have you running the power cable over the sill edge; they do tell you that you should put some self adhesive felt over the sharp edge to avoid the risk of the wires chaffing.
The ones I had a small power "brick", one each side, with three wires - ground, fused permanent 12v obtained via a new fuse in the fuse block visible, and an on/off wire which connects to one of the wires to the door switch so that it is connected to ground when the door is opened.
Like others, I have no idea what a spong-ue is either. It's possible Aussies get taught how to wire cars but they sure as hell don't get taught how to spell. Lighten up benzmodz!
The ones I had a small power "brick", one each side, with three wires - ground, fused permanent 12v obtained via a new fuse in the fuse block visible, and an on/off wire which connects to one of the wires to the door switch so that it is connected to ground when the door is opened.
Like others, I have no idea what a spong-ue is either. It's possible Aussies get taught how to wire cars but they sure as hell don't get taught how to spell. Lighten up benzmodz!
08-08-2005, 10:21 PM
#17
Senior Member

Join Date: May 2005
Location: san diego
Posts: 397
Received 11 Likes
on
11 Posts
2001 viper rt-10, 2007 SL65
johnny vincent
Originally Posted by benzmodz
Knowing how to correct me doesnt make your install more-good-er does it. People prattle on about things as if they are a good idea and the first person to ask about the alternate method is cast as Lex-Luthor.
 08-11-2005, 04:04 PM
#18
Senior Member
Join Date: Feb 2005
Location: Exeter, CA USA
Posts: 254
Likes: 0
Received 0 Likes
on
0 Posts
2002 BMW 745Li Black/beige, 2006 SL600 Capri Blue/Black still on order
Took the dealer ALL DAY
Originally Posted by ano0oj
I love the illuminated door sills! Maybe the next project if dad agrees, highly unlikely.
 08-11-2005, 09:29 PM
#19
Newbie

Join Date: Apr 2005
Posts: 20
Likes: 0
Received 0 Likes
on
0 Posts
Originally Posted by tandan
... i don't find it a shock our aussie friend would like to stir things up a bit.
I also think he put in a great deal of effort to document his experience with photos, comments and photo-editing. You can imagine how much time that took. Be grateful when someone does something nice for the NG.
Reno
08-13-2005, 09:17 AM
#21
MBWorld Fanatic!
Join Date: Jul 2005
Location: Sydney, Australia
Posts: 3,220
Likes: 0
Received 10 Likes
on
6 Posts
W203 slightly modified
Originally Posted by Reno
"Stirring up the discussion" is one thing but being overly negative and unappreciative is something else altogether. I think R230_Nicke did an excellent job. This is not something he has done many times. This is his first time; he didn't break anything and the installation should last.
I also think he put in a great deal of effort to document his experience with photos, comments and photo-editing. You can imagine how much time that took. Be grateful when someone does something nice for the NG.
Reno
I also think he put in a great deal of effort to document his experience with photos, comments and photo-editing. You can imagine how much time that took. Be grateful when someone does something nice for the NG.
Reno
The American fear of not being praised is mind blowing to an outsider.
The following users liked this post:
Kissmyaura! (10-14-2021)
08-13-2005, 11:42 AM
#22
Newbie
Join Date: Apr 2005
Posts: 20
Likes: 0
Received 0 Likes
on
0 Posts
Originally Posted by benzmodz
The American fear of not being praised is mind blowing to an outsider.
Some people make an extra contribution by actually documenting their ideas and experiences rather than only talk about them. If you feel you can do better then you can post your instructions with pictures as well.
Reno
Last edited by Reno; 08-13-2005 at 11:46 AM.
01-20-2008, 12:25 PM
#24
Senior Member
Join Date: Oct 2007
Location: Kilmarnock, Scotland, UK
Posts: 481
Likes: 0
Received 0 Likes
on
0 Posts
clk 500 2003
all i can say is it looks great, i will prob just as you recommended get a professional. although with the instructions i was really thinking about trying.
01-20-2008, 02:58 PM
#25
Senior Member

Join Date: Aug 2002
Location: Honolulu, HI
Posts: 372
Likes: 0
Received 0 Likes
on
0 Posts
06' E500 Estate, '08 S65, '05 S430


