When you click on links to various merchants on this site and make a purchase, this can result in this site earning a commission. Affiliate programs and affiliations include, but are not limited to, the eBay Partner Network.
Alright it�s time to finally put this remote entry module in! it�s warming up and I am
using my car more but can only get in from the trunk. Not te best for security and convenience but my door locks only work from inside, the key can�t trigger the unlock.
I have the t-connectors for splicing but there are many wires on this module and I don�t think all are needed. If I share the diagram can someone help me set up the wiring?
And can I easily add a modern beep? I want the triple chirp that my w211 does
190E 2.6L 1989, 190E 2.6L 1988, BMW 535dXdrive 2014, BMW 428i 2015
You actually have figure F. Pneumatic control.
And make sure the jumper on the unit is switched to pneumatic, it changes the trigger period to be longer.
Got it! I believe I understand the diagram�is it saying they all (orange,white,orange/black,white/black) should be connected together into two main lines that then tap into the cars mainline; in addition to the positive (yellow/black) going to a 12v source and the ground(yellow) to the car?
I made need a different type of connector for the unit than the t-taps i will use when connecting It to the car
190E 2.6L 1989, 190E 2.6L 1988, BMW 535dXdrive 2014, BMW 428i 2015
Yes those 3 wires need ganged. It is shown that one wire needs to be cut. You should try to not cut that wire but disconnect it from the connector instead.
As far as I remember, I did not cut any wires but had to tap into the power and ground only with a T connector.
Unfortunately, I did not take any pictures during of after the installation but you'll be OK without that reference.
One last thing, when you are done, and you are happy with the results, immediately order another unit that you can swap in, in case this one does not last long.
My first one lasted only 5 years and luckily the same unit was available 5 years later, but in case they are not, it sure would be good to have another one to swap in without having to rewire, just plug and play.
On the chirper, I intended to add one in but you need a chirper that works by just powering up it's power line. Some of them actually need an audio signal. This units does not have an audio output. It just pulses a chirper power signal for 1 second or two. I never added the chirper.
Apologies if I�m overly cautious, never wired anything before lol. Worst case it just won�t work right? This is what I�ll do
step 1: orange and white/black connect to each other
step 2: white and orange/black to the car unit main line, a line will need to be disconnected
step 3: yellow to ground and yellow/black to positive on car
step 4: change to pneumatic lag switch
step5: connect it to the appropriate wires for the lights�.don�t necessarily care for this though I just don�t want to keep using my trunk to open the car
Last edited by BetterDaze; Mar 20, 2024 at 12:40 PM.
Glad you're back Betterdaze! Maybe I missed it but your ignition key won't open your driver's side door and unlock all of the door locks in addition to the trunk? My ignition key does so for my car. I also suggest that you take Dolucassi's advise and don't cut any wires. Cutting the wrong wire has the potential for causing you some serious electrical system grief.
Thanks 190E fan, yes the ignition key will physically turn in each door but the car does not lock or unlock. I just keep it unlocked when stored and have to use the trunk to get into the car in public. I�ve had my door locks fixed multiple times and wanted the keyless entry so I don�t have to worry about it
i won�t be cutting anything on the car, and am trying to prep the unit before I install it.
my t taps are too big so I got some from Amazon coming. I got these cheap ones from advance they don�t fit
Last edited by BetterDaze; Mar 20, 2024 at 04:15 PM.
190E 2.6L 1989, 190E 2.6L 1988, BMW 535dXdrive 2014, BMW 428i 2015
Originally Posted by BetterDaze
Apologies if I�m overly cautious, never wired anything before lol. Worst case it just won�t work right? This is what I�ll do
step 1: orange and white/black connect to each other
step 2: white and orange/black to the car unit main line, a line will need to be disconnected
step 3: yellow to ground and yellow/black to positive on car
step 4: change to pneumatic lag switch
step5: connect it to the appropriate wires for the lights�.don�t necessarily care for this though I just don�t want to keep using my trunk to open the car
Yes, the steps above are correct Betterdaze. Remember Step "-1" and step "0"
Step -1: Disconnect battery
Step - 0: Never solder anything while the connector the wire is connected to the unit. So disconnect the electronics before you solder. You can damage the electronics because the soldering iron is conductive and will blow up a powered line or active circuits.
Make sure the T-connector joint is soldered. Otherwise the wedged in contact will most likely be inoperative or intermittent.
I�ll make sure to hopefully tomorrow. I was actually kinda fearful of the t-tap crimps slipping off and I got these connectors instead they screw on and should hold nicely without soldering. I saw a few ppl install similar units on YouTube
190E 2.6L 1989, 190E 2.6L 1988, BMW 535dXdrive 2014, BMW 428i 2015
Not familiar with this type. These appear to need you to cut the power lines, insert one wire to one end and jam 2 wires into the other. I would not use those.
If you are willing to cut the power/ground lines, then use a bullet connectors, or even W201 3-terminal connectors for a professional finish.
If cut there are also quick-connect connectors that are super reliable, will not require soldering. I can send you a photo or a link if you want.
Let us know if my assessment is correct in how those connectors you ordered are used.
Go to the 2:45 mark of this video. They seem to be a bit more ergonomic than the other t-taps, and the wire gauge on the keyless unit is super small(22-20). There are two types, t-tap and Inline I ordered. I do need to expose wire on the unit side but not on the car
190E 2.6L 1989, 190E 2.6L 1988, BMW 535dXdrive 2014, BMW 428i 2015
Now I understand. Not sure if they are good enough as you can not even solder those (as opposed to an exposed T connector).
If you are planning on not soldering, that is better than the standard T connector. Let us know how they turn out.
They are snug after exposing a bit of the wire and twisting them on. It�s ready to go into car having prepared all the �central lock diagram� wires�.I noticed there are two, red(with a fuse) and black ,wires that say go to the battery?
where do they need to go? I haven�t taken the seat off yet to be fair
190E 2.6L 1989, 190E 2.6L 1988, BMW 535dXdrive 2014, BMW 428i 2015
When you take the seat off it will be obvious. Brown is always ground on the car electrical system, I can not recall the color of the 12V but it will be obvious.
The other control inputs are yellow green and blue if my memory serves me right. You can use one that is operational on the lock side.
The 3 signals correspond to driver door, front passenger door and the trunk locks. Since activating any one of them activate the pump you just need to use on of them, any one of 3.
Betterdaze, I hope for your sake that this works. I can't help but wonder if the culprit is the pump. If the pump has gone bad then neither a key or electronic system can overcome a bad pump.
Thanks 190efan, I don�t think it�s the pump but whatever component inside the keyhole that lifts the lock tab is not making contact. I actually heard it pop and break when trying to get in. The tab went halfway up I heard a pop and it became inoperable with the key. I will open my door cards eventually to fix it the right way but this is a cheap and convenient addition for now.
Side note�.i witnessed a drunk driver hit my neighbors car last night in a spot I normally would have had mine. I won�t be parking it at my apartment anymore and will have to travel back and forth to the 190e as time allows
Last edited by BetterDaze; Mar 25, 2024 at 03:24 PM.
Thanks 190efan, I don�t think it�s the pump but whatever component inside the keyhole that lifts the lock tab is not making contact. I actually heard it pop and break when trying to get in. The tab went halfway up I heard a pop and it became inoperable with the key. I will open my door cards eventually to fix it the right way but this is a cheap and convenient addition for now.
Side note�.i witnessed a drunk driver hit my neighbors car last night in a spot I normally would have had mine. I won�t be parking it at my apartment anymore and will have to travel back and forth to the 190e as time allows
I hope for your sake that it works. BTW, I'm sorry your neighbor's car was damaged but I agree that storage for your car is the much safer option.
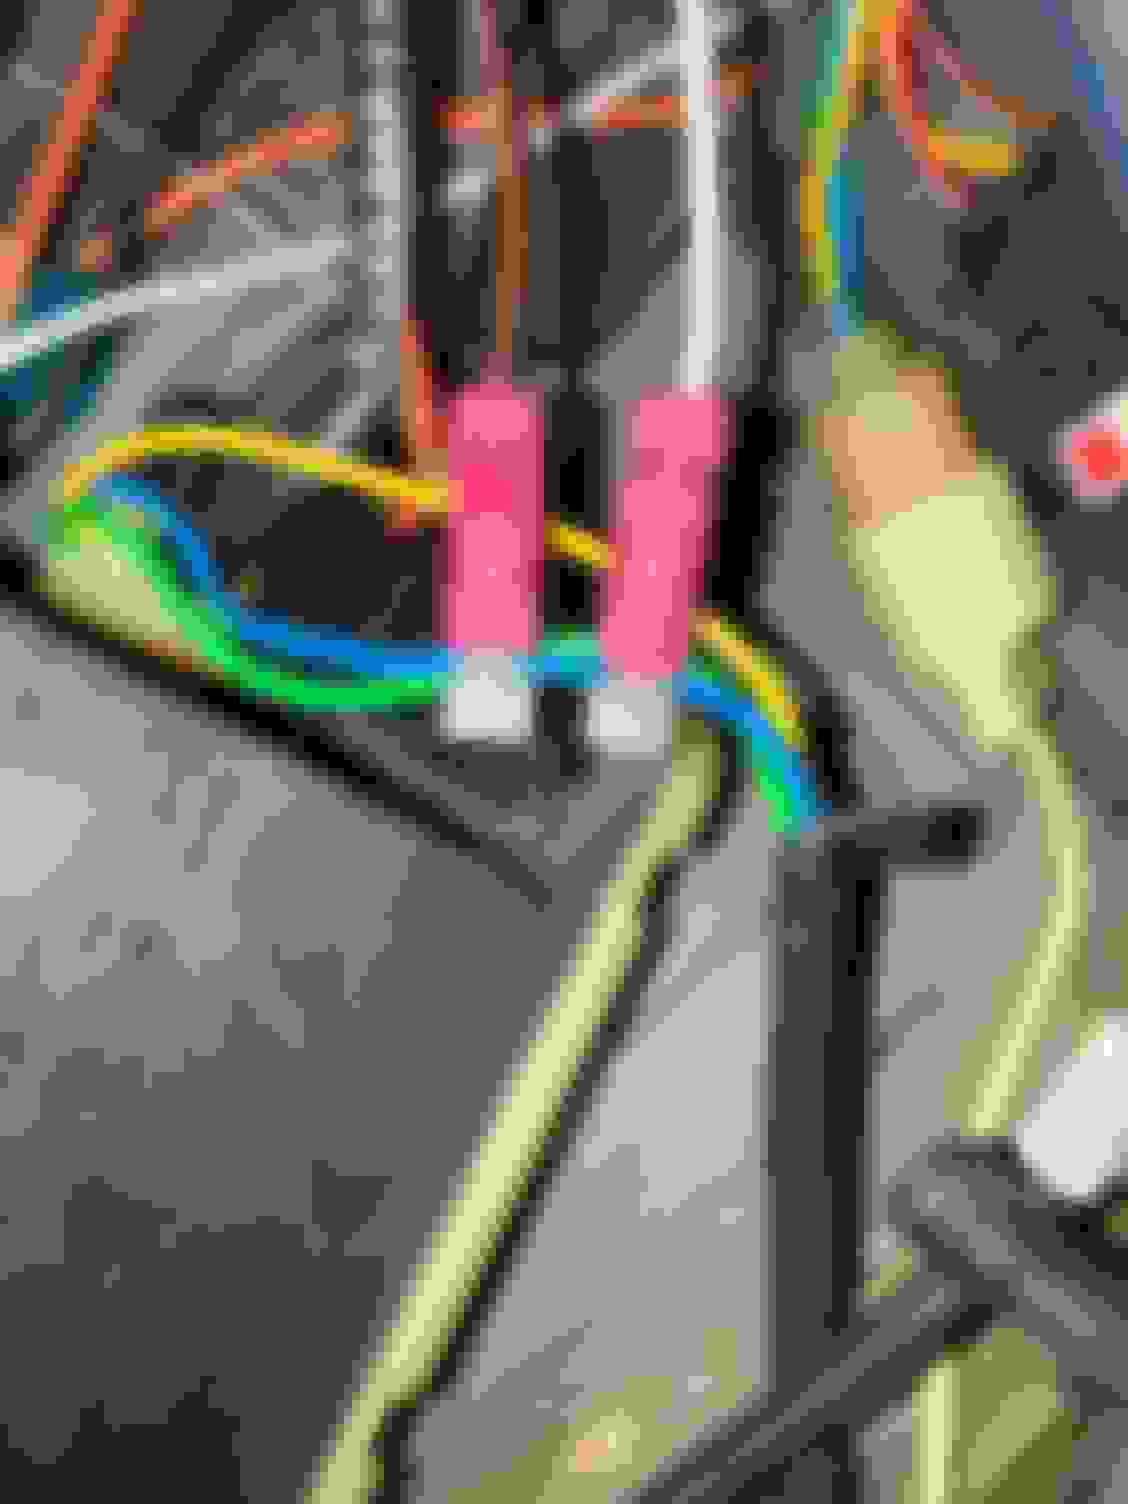
Okay it is in the car now but I don�t understand what line needs to be disconnected. I have the white and orange/black wires t-connected to the blue line on the car.
My keyless unit is missing the button for the pneumatic switch smh�.but everything else seemed straight forward. The unit is clicking but not affecting the doors at all
Last edited by BetterDaze; Mar 30, 2024 at 04:39 PM.
190E 2.6L 1989, 190E 2.6L 1988, BMW 535dXdrive 2014, BMW 428i 2015
Originally Posted by BetterDaze
Okay it is in the car now but I don�t understand what line needs to be disconnected. I have the white and orange/black wires t-connected to the blue line on the car.
My keyless unit is missing the button for the pneumatic switch smh�.but everything else seemed straight forward
Your unit has a jumper as shown in the instructions. You either remove it it over one slot.
You have to make a cut in the blue line as shown in the diagram remember, did you do that?. Blue line has to go thru the remote unit as shown.
No only because I thought I was to not cut any wires on the car, but this blue one I can snip and leave as is? I have WAGO connectors too that snap one end to the other of two wires
Last edited by BetterDaze; Mar 30, 2024 at 05:18 PM.
190E 2.6L 1989, 190E 2.6L 1988, BMW 535dXdrive 2014, BMW 428i 2015
Remember Betterdaze I said do not cut the wire but instead disconnect it from the plug. This way you can always reverse the installation.
You can cut the blue wire in between the 2 T connections you have on the posted photo but instead take the wire out of the original connector somehow.
I believe I took the wire out of the connector and created a harness off my own. But in the end the blue wire has to come from the car's harness go to the orange/black of the wireless and the white from the wireless has to go to the pump where the blue wire was.
Also make sure those are not switched around. Double check the diagram.
Basically, that blue wire needs to go thru the wireless unit. It will be using the input from the lock mechanism and also driving the lock mechanism.
Okay so disconnect blue, tap it to orange/black. Remove my t-tap for white and put white where blue came from? How do I do that? I have no soldering tools
Thanks for reiterating I didn�t want to rip the blue out of the plastic connector but I see I have to. I will double check
Last edited by BetterDaze; Mar 30, 2024 at 10:30 PM.
190E 2.6L 1989, 190E 2.6L 1988, BMW 535dXdrive 2014, BMW 428i 2015
Your picture is too close, can you back up and send another picture showing all the wires. Aside from the blue wire not being disconnected properly, it appears you have the wires backwards.
White needs to go to the pump and the black/orange needs to go to the door lock side. Can you not take the blue wire out of the socket without destroying it?
When you are all done with this and are happy with the results, go back to the same seller and purchase a second unit as back-up. You want to be able to just plug and play when/if this unit goes down and not mess with wiring again. If you do not want to loose the second unit, just place it next to the unit that is plugged in under the seat. That way you know where it is.
Mercedes SLR McLaren 722 S Is Extremely Rare Example Modified by McLaren
Slideshow: A one-of-one U.S.-spec Mercedes-Benz SLR McLaren Roadster became even rarer after a factory-backed transformation at McLaren's headquarters.