


Tie rods worn out!
Thread Starter
Super Member
Joined: Oct 2004
Posts: 761
Likes: 0
From: Oregon
2005 C55, 1988 260E, 2000 Chevrolet Silverado
Tie rods worn out!
I just was replacing my transmission filter and was checking things under the car. When I grabed the steering rods and they made a clunking sound. After checking with the service manual, I found they needed replacing. I have 80,000 miles and stuff is wearing out. I thought at first I might be feeling the thrust arms going but not this time. Those will go out next week. And then on my way to work last night a giant rock came over the divider on I-5 and broke my winshield. I should just stay home for the rest of the week.
Thread Starter
Super Member
Joined: Oct 2004
Posts: 761
Likes: 0
From: Oregon
2005 C55, 1988 260E, 2000 Chevrolet Silverado
So like I thought my thrust arm bushings are starting now. Good news is the arm bearings (203 333 10 14) are only $18 a piece, no big deal. I ordered the puller (171 589 00 33 00) because my full set of suspension pullers will not work. I purchased this set of four sizes to use on ball joints and tie rod ends for most all cars and trucks and not one will fit the Mercedes correctly.
So I did some research on the front end. And Mercedes has a few things to look at when they start making noise. The first on is the thrust arm bearings, the second is the sway bar links, the third is the sway bar bushings, fourth is the bump stop on the top of the strut, then there is the thrust arm end link. My fear is that if I get the whole thing appart and find out that the thrust arm end link is worn to. Well good news, if you purchase the complete thrust arm with bearing installed it is $147 for one side and $150 for the other side. If you purchase the arm without the bearing it is only $59, so if you buy the bearing and arm seperate its only $77, if you buy it together it is $147. Just buy them seperate and press it in yourself if you can. Just thought I would pass this on, because I think this will be a on going problem with Mercedes. Searched the Forum and all models are having this problem.
Arm parts without bearing
Left # 203 330 39 11
Right # 203 330 40 11

MBWorld Fanatic!


Joined: Oct 2004
Posts: 4,152
Likes: 60
From: NJ, NYC
Something Slow
true i did lower and upper control arms , inner and outter tie rods.. cost me a grip like 350-400 in parts
i got some new sway bushing from H&R so i will be installing them this weekend hopefully that stop the squeaks
i got some new sway bushing from H&R so i will be installing them this weekend hopefully that stop the squeaks
Thread Starter
Super Member
Joined: Oct 2004
Posts: 761
Likes: 0
From: Oregon
2005 C55, 1988 260E, 2000 Chevrolet Silverado
Good choice on the H&R, I love mine. Makes the car handle a lot better. The fronts I had no problems with but the rear is tight and makes an awful noise if you do not lube it. I know the instruction tell you not to, but save yourself some time and frustration and get some silcone grease. Put it all over the inside of the rear bushings and that will stop it from making noise. If you run into any problems send me a message and maybe I can help, good luck!
Super Moderator
Joined: Jul 2006
Posts: 3,365
Likes: 12
From: Orange County, CA
GMC - Miata - Trek - P-Car
You are a veritable cornucopia of useful technical information.
Nothing quite like successful undercar tasks to make a man feel good. Except for driving 'em afterwards.

Trending Topics
Thread Starter
Super Member
Joined: Oct 2004
Posts: 761
Likes: 0
From: Oregon
2005 C55, 1988 260E, 2000 Chevrolet Silverado
The first time I did and that was when I found the tie rod ends worn. The newer clunking is not as much while turning, it's more when you are going over several bump. Like a poor road or some speed bumps, it clunks from the repeated suspension movement. I will post more info when I get this thing apart in a few days. I plan to take some pictures, maybe DIY or just for info.
MB World Stories
The Best of Mercedes & AMG

Manual Mercedes? 6 Times Sindelfingen Let Drivers Have All The Fun
Verdad Gallardo
Mercedes SLR McLaren 722 S Is Extremely Rare Example Modified by McLaren
Verdad Gallardo
8 Classic Boxy Mercedes Designs That Have Aged Like Fine Wine
Verdad Gallardo
Flawlessly Restored Mercedes 190E Evo II Heads to Auction
Verdad Gallardo
Electric Mercedes C-Class Unveiled: 11 Things You Need to Know
Verdad Gallardo
Mercedes EQS Gets A Major Update: Everything You Need to Know
Verdad Gallardo
5 Underrated Mercedes-Benz Models That Don't Get the Love They Deserve
Verdad Gallardo
Mercedes 300D Has Pushed Well Past 1 Million Miles and It Ain't Stopping
Verdad Gallardo
10 Most Reliable Mercedes-Benz Models You Can Buy Used
Verdad Gallardo
Thread Starter
Super Member
Joined: Oct 2004
Posts: 761
Likes: 0
From: Oregon
2005 C55, 1988 260E, 2000 Chevrolet Silverado
Oh the disc is right here! lol call 1-800-FOR-Mercedes and ask for number P-2700-203-06 Should be about $60.00 plus shipping. I have tried to use this to post pics when we are talking about tech stuff but it won't even let me do that. So its protected pretty well. On your strut there should be a plastic cap you pulled off. Using a combination of the closed end wrench and either a Torx or Allen wrench on the end of the strut shaft, should be able to tighten that nut all the way. Just hold the strut shaft with the allen wrench and tighten the nut with the wrench.
MBWorld Fanatic!


Joined: Jun 2002
Posts: 7,263
Likes: 169
From: So. Oregon Coast
C230 Sport Coup + 2006 W164 ML350 + 99 Ford Escort RIP
I did, I will look up some info and get back to you later. I have to take the wife to the Dentist.
Oh the disc is right here! lol call 1-800-FOR-Mercedes and ask for number P-2700-203-06 Should be about $60.00 plus shipping. I have tried to use this to post pics when we are talking about tech stuff but it won't even let me do that. So its protected pretty well. On your strut there should be a plastic cap you pulled off. Using a combination of the closed end wrench and either a Torx or Allen wrench on the end of the strut shaft, should be able to tighten that nut all the way. Just hold the strut shaft with the allen wrench and tighten the nut with the wrench.
Oh the disc is right here! lol call 1-800-FOR-Mercedes and ask for number P-2700-203-06 Should be about $60.00 plus shipping. I have tried to use this to post pics when we are talking about tech stuff but it won't even let me do that. So its protected pretty well. On your strut there should be a plastic cap you pulled off. Using a combination of the closed end wrench and either a Torx or Allen wrench on the end of the strut shaft, should be able to tighten that nut all the way. Just hold the strut shaft with the allen wrench and tighten the nut with the wrench.
Ha, well, my extended warranty included I think all the items you mentioned, as in I managed to get them replaced.
Thrust arms have oil in them, correct?
Ha, I complained about the gasket on the tranny for sensor (known issue)
causing small amount of tranny fluid to leak, and instead they replaced these.
Then, I had it serviced in Sac, and asked them to look for anything they might find. Dayy-mm. I was impressed with the service at Sac.
They replaced the end links and bushings without me asking, along with a whole bunch of other things.
I took it in for an oil change and tranny flush, both of which were cheaper than the bay area. Initially they were just going to come pick me up when it was done, and then ended up keeping the car a week, and even gave me a free loaner car. They did so much stuff, including cleaning the intercooler and all associated piping, IR sensor on passenger side, new keys...updated wiring harnesses.
And my only request was to look it over since the warranty was ending.
Anyway, getting off the subject, but yes, extended warranty was definitely worth it.
Now I'm on my own.
Too bad they don't have a web based star diagnostic system.
MBUSA has an order form...ha, only 20 grand, made to order, shipped from the fatherland, with a 90 day lead time.
Ordering my DVD tomorrow, and hoping it's still 60 bucks!
Other places on the web it's 100.
It looks quite awesome though, especially compared to WIS.
Moderator Alumni
Joined: Apr 2006
Posts: 3,255
Likes: 22
From: Seattle
w203 m112
:Bump: an old thread :x
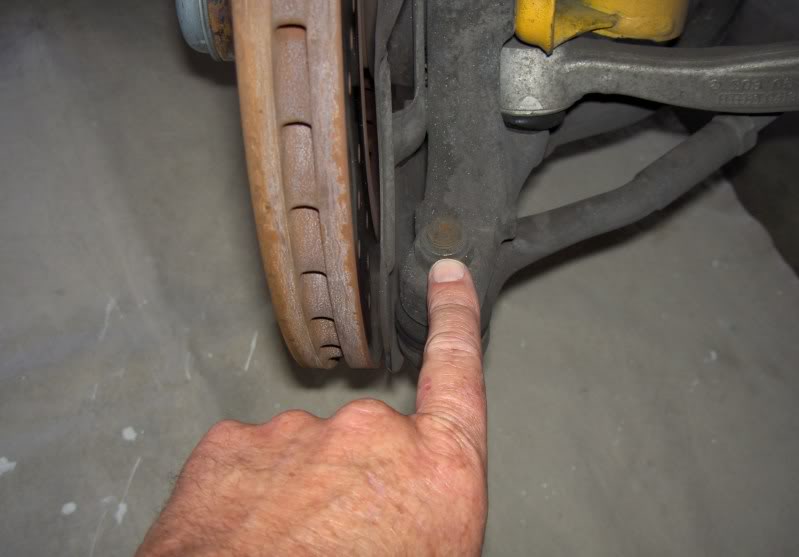
Wavey/Russell.. Did you guys have any issues w/ the ball joint bolt being stuck in the knuckle?
Ive got all of my suspension out of the way, but I cant for the life of me get the bolt out. Sprayed it down with brake cleaner, hammered at it a bunch, but it JUST wont come out. Suggestions would be greatly appreciated.
Thanks!
MBWorld Fanatic!

Joined: Jan 2006
Posts: 3,212
Likes: 8
From: Pasadena, CA
2002 C230K, 2013 BMW 328, 2015 BMW X5
:Bump: an old thread :x
Wavey/Russell.. Did you guys have any issues w/ the ball joint bolt being stuck in the knuckle?
Ive got all of my suspension out of the way, but I cant for the life of me get the bolt out. Sprayed it down with brake cleaner, hammered at it a bunch, but it JUST wont come out. Suggestions would be greatly appreciated.
Thanks!
E
Moderator Alumni
Joined: Apr 2006
Posts: 3,255
Likes: 22
From: Seattle
w203 m112
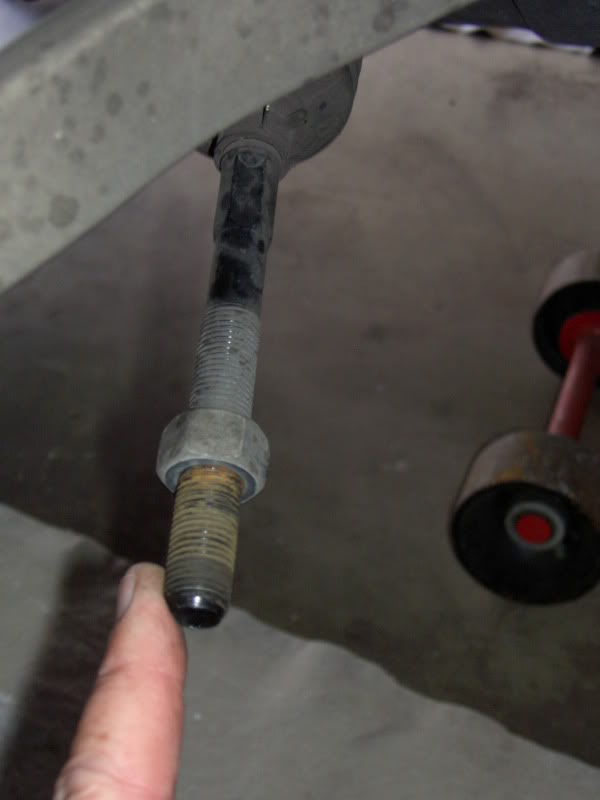
I thought about doing this, but in order for the car to place weight on the lower part of the ball join's threads, I would have to place the strut back in place, but the strut is RIGHT above the other end of the ball joint. I suppose a pic would help.
MBWorld Fanatic!
Joined: Jan 2006
Posts: 3,212
Likes: 8
From: Pasadena, CA
2002 C230K, 2013 BMW 328, 2015 BMW X5
E
Moderator Alumni
Joined: Apr 2006
Posts: 3,255
Likes: 22
From: Seattle
w203 m112

MBWorld Fanatic!
Joined: Jan 2006
Posts: 3,212
Likes: 8
From: Pasadena, CA
2002 C230K, 2013 BMW 328, 2015 BMW X5
E
Moderator Alumni
Joined: Apr 2006
Posts: 3,255
Likes: 22
From: Seattle
w203 m112

Oh well. Car goes into the shop tomorrow.
edit: big F'in hammer? I tried that, but since i was working by myself and had the strut off... I would hammer the bolt from the bottom and would just jolt the whole knuckle.
I honestly needed another set of hands... I'm pretty sure I coulda got it off, but at this point the clunking sounds so bad, I just want it taken care of before it could potentially do any damage to other parts.
Last edited by TruTaing; Oct 6, 2008 at 02:07 PM.
Super Moderator
Joined: Jul 2006
Posts: 3,365
Likes: 12
From: Orange County, CA
GMC - Miata - Trek - P-Car
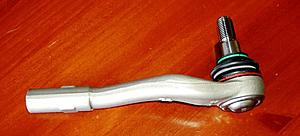
Replaced the outer tie rod ends.
After 75,000 miles, their looseness had gradually increased such that replacement resulted in a dramatic improvement in steering feel and directional stability.
203 330 39 03 (LH) & 203 330 40 03 (RH). Went with the OEM Lemf�rder pieces; ~$40 each.
Less expensive replacement hardware is available. With the critical role these parts provide in a car’s safety and performance, it’s false economy to save a few dollars when shopping for these components by specifying bargain brands.
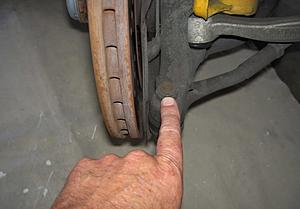
A spritz of PB Blaster or equivalent will help to ease disassembly.
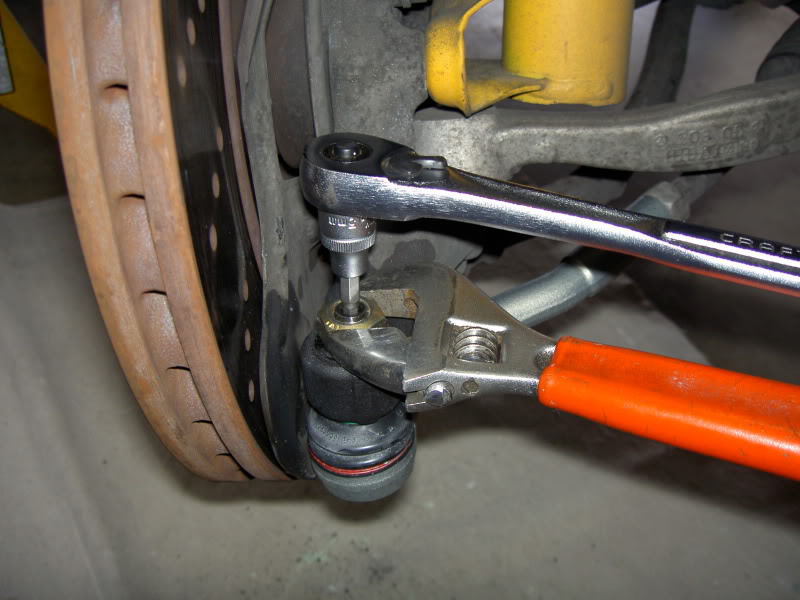
My universal tie rod/pitman arm puller wouldn’t fit...so a healthy swing of the BFH had them separated from the steering knuckle in no time.
Slightly loosen the jam nut to allow the rod end to be unscrewed from the rack’s shaft.
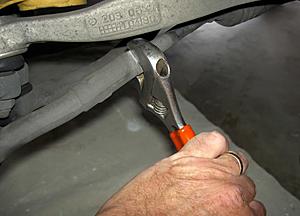
By maintaining the same relative position of the nut on the shaft prior to its loosening, alignment adjustments upon reassembly will be minimized.
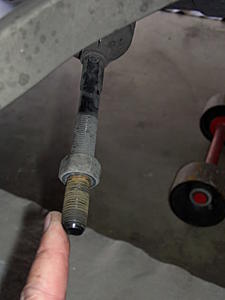
Because the new mounting nut is self-locking, the joint’s shaft must be prevented from turning while tightening it. Once the conically-shaped shaft is sufficiently seated, it will remain stationary to enable proper torquing.
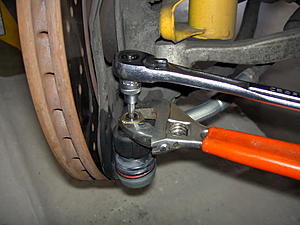
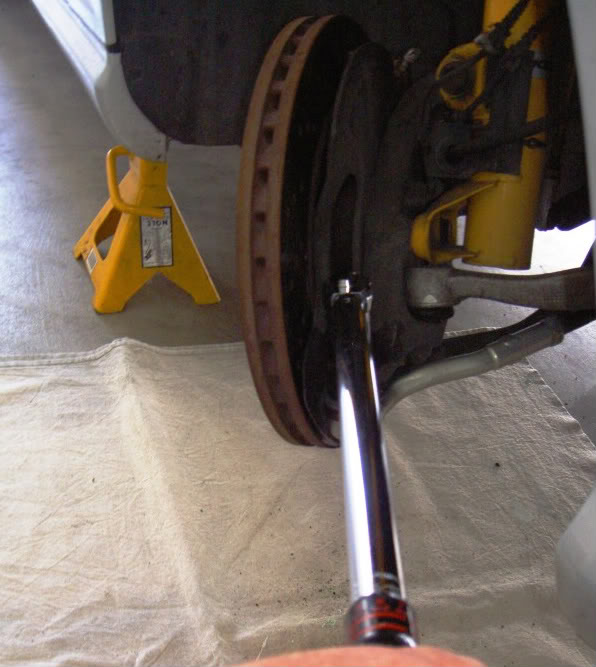
With the steering wheel turned to full lock toward the side on which you’re working, there is sufficient room to reach the nut with a torque wrench. Torque requirement is 50Nm/37 ft-lbs plus an additional sixty degrees.

Adjust toe to specification or your preferred setting.
After 75,000 miles, their looseness had gradually increased such that replacement resulted in a dramatic improvement in steering feel and directional stability.
203 330 39 03 (LH) & 203 330 40 03 (RH). Went with the OEM Lemf�rder pieces; ~$40 each.
Less expensive replacement hardware is available. With the critical role these parts provide in a car’s safety and performance, it’s false economy to save a few dollars when shopping for these components by specifying bargain brands.

A spritz of PB Blaster or equivalent will help to ease disassembly.
My universal tie rod/pitman arm puller wouldn’t fit...so a healthy swing of the BFH had them separated from the steering knuckle in no time.
Slightly loosen the jam nut to allow the rod end to be unscrewed from the rack’s shaft.

By maintaining the same relative position of the nut on the shaft prior to its loosening, alignment adjustments upon reassembly will be minimized.
Because the new mounting nut is self-locking, the joint’s shaft must be prevented from turning while tightening it. Once the conically-shaped shaft is sufficiently seated, it will remain stationary to enable proper torquing.
With the steering wheel turned to full lock toward the side on which you’re working, there is sufficient room to reach the nut with a torque wrench. Torque requirement is 50Nm/37 ft-lbs plus an additional sixty degrees.
Adjust toe to specification or your preferred setting.
Last edited by splinter; Oct 6, 2010 at 07:02 AM.

Super Moderator

Joined: Jun 2008
Posts: 19,942
Likes: 192
From: Llandudno, Cape Town, South Africa
late 2009 CLK 350 Coupe Elegance, '65 Jaguar S Type wires
BFH - LOL That's what the dealers do even with the correct tools 
No pic of BFH & errant joint
Another excellent pdf for the file. (it pains me to admit)
No pic of BFH & errant joint
Another excellent pdf for the file. (it pains me to admit)
Last edited by Glyn M Ruck; Jun 8, 2009 at 06:26 AM.


