


1998 C230 owned by little old lady who only drove it on Sunday with a few questons
Thread Starter
Senior Member
Joined: Jun 2012
Posts: 431
Likes: 44
From: Portsmouth, VA
2010 E350, Sold 1998 C230
1998 C230 owned by little old lady who only drove it on Sunday with a few questons
Hi
Finally found a Benz that needed some love. Its a '98 C230 and it was owned by an older lady who never drove it for the last 8 years so it only has 68K on the clock. She passed recently and her sons sold off the car as part of the estate. Mechanically the car is fairly solid. Engine runs fine, transmission shifts well and is smooth. Front end is tight and the car tracks straight on the highway and does not wander. Had it up to 85 on the ride home and it seemed to like it. The car had 4 new Yokohama tires and a new battery so that is all good. Now for the bad.
The car was very dirty on the inside and has several spots where the vinyl on the doors was nicked or cut. Probably not much I can do about that. Looked like there was a coke spilled and never cleaned up and there were tons of petrified french fries under the seats along with several dollars worth of coinage and old pens and kids toys. I've made some headway on cleaning the carpets and have gotten most of the soda stain up. Probably going to have to remove the front seats so that is my first question, how do they come out? It has one power seat and one non-power.
Along with the trashed carpet, the headliner is destroyed. To add insult to injury, they tried to hold it up by stapling it in the middle and used duct tape by the back window. So I am in the process of trying to remove the residue from the tape without damaging the heating wires in the glass. Slow going there. But this all leads me to my second question, and that is how do I get the headliner board out so I can scrape off what is left and recover it? It looks like I have to remove all the trim around the edges as well as the light fixtures. Has anybody done this before and documented it? I've found lots of info on laying down the new fabric, but nothing about how the trim on the edges comes out.
Of course the car had a few other issues. The front seat belt buckle didn't work, it had some "paper" in it. Turns out it was a plastic part that was out of place. I managed to open it up, but the thing is beyond help. Ended up ordering a replacement from the local dealer, 130 bucks. Found it online, but with shipping it would be around 118 or so and who knows how long it will take to get here. The tail lights were not working either, so I start to get into them and pulled the assembly that holds all the sockets and noticed that some of the sockets were falling apart. On the outside of the lights, there was a dimple of sorts on both sides that I gather happened from overheating of the plastic with too large a bulb. Ended up ordering some replacement tail lights off an ebay vendor for 68 bucks shipped. Hopefully they will be decent or at least serviceable. And the radio was kerput. Not loosing sleep there, it was only a cassette job so I've ordered an Alpine cdt133bt that has Bluetooth installed. Got to have that for sure.
So what did this diamond in the rough cost? An even 4 grand. Not the best price but certainly not the worst. Going to be my daily driver once I get through all the little problems. Appreciate any advice, especially on taking out the headliner and removing the front seats. Here are a few pix of the new ride:
Finally found a Benz that needed some love. Its a '98 C230 and it was owned by an older lady who never drove it for the last 8 years so it only has 68K on the clock. She passed recently and her sons sold off the car as part of the estate. Mechanically the car is fairly solid. Engine runs fine, transmission shifts well and is smooth. Front end is tight and the car tracks straight on the highway and does not wander. Had it up to 85 on the ride home and it seemed to like it. The car had 4 new Yokohama tires and a new battery so that is all good. Now for the bad.
The car was very dirty on the inside and has several spots where the vinyl on the doors was nicked or cut. Probably not much I can do about that. Looked like there was a coke spilled and never cleaned up and there were tons of petrified french fries
under the seats along with several dollars worth of coinage and old pens and kids toys. I've made some headway on cleaning the carpets and have gotten most of the soda stain up. Probably going to have to remove the front seats so that is my first question, how do they come out? It has one power seat and one non-power. Along with the trashed carpet, the headliner is destroyed. To add insult to injury, they tried to hold it up by stapling it in the middle and used duct tape by the back window. So I am in the process of trying to remove the residue from the tape without damaging the heating wires in the glass. Slow going there. But this all leads me to my second question, and that is how do I get the headliner board out so I can scrape off what is left and recover it? It looks like I have to remove all the trim around the edges as well as the light fixtures. Has anybody done this before and documented it? I've found lots of info on laying down the new fabric, but nothing about how the trim on the edges comes out.
Of course the car had a few other issues. The front seat belt buckle didn't work, it had some "paper" in it. Turns out it was a plastic part that was out of place. I managed to open it up, but the thing is beyond help. Ended up ordering a replacement from the local dealer, 130 bucks. Found it online, but with shipping it would be around 118 or so and who knows how long it will take to get here. The tail lights were not working either, so I start to get into them and pulled the assembly that holds all the sockets and noticed that some of the sockets were falling apart. On the outside of the lights, there was a dimple of sorts on both sides that I gather happened from overheating of the plastic with too large a bulb. Ended up ordering some replacement tail lights off an ebay vendor for 68 bucks shipped. Hopefully they will be decent or at least serviceable. And the radio was kerput. Not loosing sleep there, it was only a cassette job so I've ordered an Alpine cdt133bt that has Bluetooth installed. Got to have that for sure.
So what did this diamond in the rough cost? An even 4 grand. Not the best price but certainly not the worst. Going to be my daily driver once I get through all the little problems. Appreciate any advice, especially on taking out the headliner and removing the front seats. Here are a few pix of the new ride:

Senior Member
Joined: May 2012
Posts: 453
Likes: 12
C230
Have fun, as I have a lot of those PITA problems as well. Thankfully no headliner.
I paid a bit more for the same car as yours in May, and the body is mint, and that is where it ends. I also have to pull the seats to replace the bottom seat covers. That was a 700.00 touch for the original upholstery. Radio wouldn't work, and I found that someone removed the amp. Speakers were all shot, front end and brakes needed major repair, and a new air conditioning compressor and water pump, and 1 window won't go down. I am still going at it piece by piece. To answer yiu question about the seat removal, you will need a torx socket #12, and lots of patience. Center arm rest needs to be removed, and all the seat belts etc.
Keep me posted, and we can cry together.
Thread Starter
Senior Member
Joined: Jun 2012
Posts: 431
Likes: 44
From: Portsmouth, VA
2010 E350, Sold 1998 C230
Thanks for the reply. Been going over the car and cleaning. Ordered some headliner material from Miami corp online. It was 1/8" material that is supposedly what is called for with cars that have sunroofs. Reasonable price, 9 bucks a yard and I ordered two yards. Probably should have ordered 3 yards as I think I will recover the trim pieces as well so they all match. Still a bit leery about the whole job, but I'll give it a go. Will try and document the process with some pix as well.
So far I had the back seat bottom out, that is fairly easy. I also saw how to remove the back seat back, only a couple of bolts on either side should take it out. I tried working on the front seats, one of the star head bolts is already stripped so I will have to get a vise grip on it and see if it will turn.
Radio came yesterday. Easy to remove the old one if you buy the five dollar tool along with it. Will try and install it this weekend and see how the speakers sound. Lights and headliner should be here next week so hopefully I can have it ready for inspection next week.
I didn't mention it above, but the ac isn't working as well. Got some cans of freon to charge it up, neighbor is coming over Sunday with his gauges. Hopefully that will get it blowing cold again, compressor is turning and doesn't appear to be leaking.
I pulled all four wheels. Brakes are serviceable, probably the original rotors and maybe pads as well. Still some lining left, so I'll try and see if it passes. I plan on new rotors and pads in the next few months, just want to space out the cost a bit. Also needs shocks, but they look simple enough. Haven't found any rust at all, so that is a big plus. This is a southern car, Fl and TX for all of its life.
Senior Member
Joined: May 2012
Posts: 453
Likes: 12
C230
Interesting!
The car I bought had 2 owners. Original owner was from Texas, and the second owner was from Florida. Maybe they were twins.
I have done a head liner before, and the big secret is having the receiving area ABSOLUTELY clean of any residue, such as glue and so on. A fine sandpaper would be fine, as long as it's done evenly without any heavy sanding pressure to harder areas.
Lay out your material back to front, and form it with you hands to get the right amount. It a wise idea to do some edge trimming, but the final trim can be done at the end. You can use simple straight pins to assist. in forming.
When you start to apply the head liner, you should have 2 people doing it. One applying to the contact cement that should be applied about 15 to 20 minutes prior to installation. and one SLOWLY feeding the material as you work yourself towards the front.
Nothing is easy when your working upside down, unless your a monkey.
If the material you are using is foam backed, you should test a small piece on a piece of cardboard (if you going to use contact cement), as the contact cement may, and likely will, have a chemical reaction to the foam backing, especially if to try to apply to quickly after the cement has been applied, and not set up. We are talking a feather touch application of the material.
You will never get 100% coverage with a contact cement, the finished product may come out blotchy looking.
It`s a art form to get it right, so better run a test first.
Keep me posted......
Thread Starter
Senior Member
Joined: Jun 2012
Posts: 431
Likes: 44
From: Portsmouth, VA
2010 E350, Sold 1998 C230
Upside down?
Thanks again for the reply. Guess it's just you and me on this. Just want to make sure I'm understanding you correctly, did you replace the headliner with it still in the car? My understanding is that it has to come out and then all the residue cleaned off with a wire brush of sorts and then you reapply the material 1/2 at a time, spraying the cement on both the board and the back of the fabric, letting it dry till tacky and then carefully laying it back down, smoothing it as you go. Several U tube videos on the subject at least. Where I get a bit dicey is removing all the trim beforehand as well as the front lights and mirror assembly and whatever it is that keeps it tight around the sunroof. One local shop quoted me 500 to do the job but not touching the sunroof or 200 if I pulled the liner board out and brought it to him. I figure if I can get it out, then the rest is fairly straightforward. From reading, you have to have the back seat out, remove the headrest on passenger side seat and put the seat back down as far as it will go so you can maneuver the headliner board out the passenger side door. Installation should be the reverse procedure. And since I have to remove all the trim (pillers) I will recover them as well so it all matches. Not so sure about the sunroof shade, that I may try and do in the car depending on how complicated it looks to remove.
Bob
Bob
Senior Member
Joined: May 2012
Posts: 453
Likes: 12
C230
Is the material your using sponge backed, or just material?
Is the material wide enough to go side to side in one piece, and long enough to go from back to front?
The trim around the doors are simply pull off, but taking out the whole "cap" is not an easy chore. I did it in the car, with enough edge fabric available to tuck behind moldings.
I am going to look at my head liner tonight and see exactly how it is set up.
Sounds like the $500.00 is not too bad.
By the way, I live in Guatemala, not the US. so things here are really cheap to do when it comes to labor.
I just ordered from GAFF in California, 2 front leather seat bottoms, as mine are fairly worn out. I guess the guy who drove it ate a lot of doughnuts, so it needs re padding as well. Total labor cost to remove and install both seat bottoms....A pocket book breaking $100.00. I didn't try to negotiate on that one. Also, 4 new rotors, brake pads, a drag link, front wheel bearings, oil change, filter and air filter, a new MAF plus some other minor things, parts and labor $500.00
This is one of the reasons I live where I do :-)
I will get back to you when I take a look at the head liner.
Have a good weekend.
Last edited by ptcruiser; Jun 30, 2012 at 07:01 PM. Reason: Missed a word
Thread Starter
Senior Member
Joined: Jun 2012
Posts: 431
Likes: 44
From: Portsmouth, VA
2010 E350, Sold 1998 C230
The material is 1/8" foam backed and is wide enough to go side to side. Should be plenty long for front to back. If I need more, I'll order it, just have to wait a couple of days for it to come in. Seats in mine are ok, they are the mb tex, so no leather.
I can imagine that the buck goes alot farther down there. My wife probably wouldnt mind it either, she already speaks the language...
I can imagine that the buck goes alot farther down there. My wife probably wouldnt mind it either, she already speaks the language...
Trending Topics
Senior Member
Joined: May 2012
Posts: 453
Likes: 12
C230
Once you get the material, be sure to do a small sample with the contact cement, and see what the reaction is to the foam backing before forging ahead.
Where is your wife from, or is she just bilingual from education in the US?
I landed her 23 years ago without a word of Spanish, and sometimes I think I am right back to where I started from, but a lot better than shoveling snow up in Canada.
Send a few photos if you can, and I got home a little late, so I will double check the head liner tomorrow morning and give you my opinionated opinion. If you send photos, send it to bfwilson2000@gmail.com
Talk to you later as things progress.
MB World Stories
The Best of Mercedes & AMG

Manual Mercedes? 6 Times Sindelfingen Let Drivers Have All The Fun
Verdad Gallardo
Mercedes SLR McLaren 722 S Is Extremely Rare Example Modified by McLaren
Verdad Gallardo
8 Classic Boxy Mercedes Designs That Have Aged Like Fine Wine
Verdad Gallardo
Flawlessly Restored Mercedes 190E Evo II Heads to Auction
Verdad Gallardo
Electric Mercedes C-Class Unveiled: 11 Things You Need to Know
Verdad Gallardo
Mercedes EQS Gets A Major Update: Everything You Need to Know
Verdad Gallardo
5 Underrated Mercedes-Benz Models That Don't Get the Love They Deserve
Verdad Gallardo
Mercedes 300D Has Pushed Well Past 1 Million Miles and It Ain't Stopping
Verdad Gallardo
10 Most Reliable Mercedes-Benz Models You Can Buy Used
Verdad Gallardo
Thread Starter
Senior Member
Joined: Jun 2012
Posts: 431
Likes: 44
From: Portsmouth, VA
2010 E350, Sold 1998 C230
Wife is from Colombia originally. Her English is much better than my Spanish.
Hopefully will start to get my parts and supplies tomorrow or Tuesday. This evening I was able to remove all the front seat bolts and had the passenger seat out, driver side I need to get closer to disconnect the power seat harness. I managed to pull out the mirror, that wasnt too bad. Have removed both A pillars, and the passenger side B pillar. I'll take some pix tomorrow to document where the clips are. Both pillars come out better if you start at the bottom and work up. The rear seat comes out very easily, two metal spring tabs on either side and it lifts up and out for the bottom. The seat back will come out after two more bolts which should free up both C pillars. I should be able to pull down the headliner after that. I'll take pix tomorrow to help document it all.
Since both power mirrors were not moving (can hear the motor, but no movement) I tried to release the passenger side housing to have a looksee. I don't think I pushed it back all that far, but something snapped. Turns out I broke off a cast aluminum tab that holds the tensioning spring. Now I have that to fix as well to get it inspected. Ordered a donor mirror off ebay for 30 bucks shipped. I think it will be a direct fit though from the pictures I see on the web, there are some subtle differences depending on the year and model car. But most of the mirrors are essentially the same design which I'm starting to see is how Mercedes does things. If you can figure it out on a c class, you probably figured it out on an E, etc.
I also wired in the new Alpine bluetooth radio, sounded great on back speakers, but the fronts were terrible. Pulled one out and the cone suspension is destroyed. So I ordered two new Polk Audio shallow mount speakers. I don't think they will be anything close to a plug and play installation, but I'll try and take some more pix as well. Still haven't tried to recharge the AC, the friend that offered to help was missing a hose for his gauges. Hopefully that will get fixed this week as well.
So the punch list to get it on the road is:
- Seat belt buckle from the stealership (ordered, in tomorrow)
- Aftermarket Tail lamp assemblies (Ebay, sometime this week)
- Headliner recover, waiting on material and glue (ordered, hopefully early this week)
- Repair passenger mirror so it is at least functional (I have a plan for that)
- Charge AC
- Install new front speakers, finish head unit install
- Don't break anything else

Senior Member
Joined: May 2012
Posts: 453
Likes: 12
C230
I sent a reply this morning, but it didn't seem to post?
Anyway, I looked up the Polk Audio shallow mount speakers, and they are showing min 6.5 inch Dia. I need to replace all mine, and have the original baskets that I removed the speakers from. I assume you didn't use the baskets? I certainly want mine to be behind the original speaker grills.
How are you installing those?
Thread Starter
Senior Member
Joined: Jun 2012
Posts: 431
Likes: 44
From: Portsmouth, VA
2010 E350, Sold 1998 C230
I did some research on Crutchfield's website, they say this speaker fits, but when you get farther into the site, they tell you there may be some mods needed like removing the cup in the door that isolates the speaker. I guess I will find out, there are the DB 651 slim mount speakers which have good ratings overall. Really cant find a direct replacement speaker that would fit that funky mounting they have, so you have to customize some. I think there is enough clearance to have them hide behind the original grills. I guess I will find out one way or another.
BTW, I started a separate thread on the headliner job since I don't think people would find it otherwise. It is located here: https://mbworld.org/forums/c-class-w...renew-pix.html
BTW, I started a separate thread on the headliner job since I don't think people would find it otherwise. It is located here: https://mbworld.org/forums/c-class-w...renew-pix.html
Senior Member
Joined: May 2012
Posts: 453
Likes: 12
C230
I took out my speakers from the basket that holds them. You would swear it was a 1 piece unit, as the speaker is so finely fit in the basket.
I ran a small screwdriver around the inside of the basket where you can see a little glue, turned it upside down with the magnet facing up, and whacked the screwdriver on the edge of the speaker, moving around about 30% of the diameter, and they just popped out with no damage to the basket
I ran a small screwdriver around the inside of the basket where you can see a little glue, turned it upside down with the magnet facing up, and whacked the screwdriver on the edge of the speaker, moving around about 30% of the diameter, and they just popped out with no damage to the basket
Thread Starter
Senior Member
Joined: Jun 2012
Posts: 431
Likes: 44
From: Portsmouth, VA
2010 E350, Sold 1998 C230
Modifying the speaker mounts for new polk speakers
Since I had some time this morning, I went out and took one of the new speakers with me to see the potential fit in the door. Not quite enough clearance with or without the plastic "cup" in the door.
So I decided to see if I could pop out the original speakers and somehow reuse that cup which is what I think the crutchfield boys talk about anyway. As it turns out it is pretty simple to get the old speakers out by running a small screwdriver where you can see a bit of the black silicone that glued them in. After I did that, I was able to use the tip of the screwdriver to pry the joint apart and without too much fuss the speakers were removed. But sitting the new speakers on the top of the mount wouldn't work, they would not clear plastic door grill. So I decided to be creative.
The diameter of the speaker behind the front flange seemed to match the inner diameter where the original speaker sat. So I had to cut the outer edge of the plastic frame down about a half inch. I didn't have a rotary tool with a little saw blade so I ended up mounting a hack saw in a vise blade side up and judiciously slide the mount back and forth sawing through keeping an eye toward not cutting myself. Worked well and the speaker will sit about as far out as the original mount. I need to get some black silicone so I can run a bead on the mount to glue it to the back of the speaker frame very similar to how the originals came. Hopefully the pix will help to tell the story:
Sawing the outer edge off the mount:


Excess material removed:

How the new speaker will sit in the mount:

So I decided to see if I could pop out the original speakers and somehow reuse that cup which is what I think the crutchfield boys talk about anyway. As it turns out it is pretty simple to get the old speakers out by running a small screwdriver where you can see a bit of the black silicone that glued them in. After I did that, I was able to use the tip of the screwdriver to pry the joint apart and without too much fuss the speakers were removed. But sitting the new speakers on the top of the mount wouldn't work, they would not clear plastic door grill. So I decided to be creative.
The diameter of the speaker behind the front flange seemed to match the inner diameter where the original speaker sat. So I had to cut the outer edge of the plastic frame down about a half inch. I didn't have a rotary tool with a little saw blade so I ended up mounting a hack saw in a vise blade side up and judiciously slide the mount back and forth sawing through keeping an eye toward not cutting myself. Worked well and the speaker will sit about as far out as the original mount. I need to get some black silicone so I can run a bead on the mount to glue it to the back of the speaker frame very similar to how the originals came. Hopefully the pix will help to tell the story:
Sawing the outer edge off the mount:
Excess material removed:
How the new speaker will sit in the mount:
Thread Starter
Senior Member
Joined: Jun 2012
Posts: 431
Likes: 44
From: Portsmouth, VA
2010 E350, Sold 1998 C230
Radio and speakers done.
Cross one item off the punch list, the radio and speaker upgrade are done. The original MB radio was long dead and it was only a cassette. I might be an old guy but I like my tunes when I'm driving and I want hands free for the cell phone. This is a budget car after all, so I looked around online and ended up with an Alpine unit that had Bluetooth built in and all the standard modern day features like USB and MP3 compatibility. Not bad for 150 bucks give or take. When I initially powered it up a week ago, I found out the front speakers were shot and ordered two Polk shallow mount speakers as mentioned above. Yesterday I finally had a chance to pick up some silicone (no black, only clear available at Lowes) and used that to glue the speakers to the back of the modified mounts as the originals were also glued in. Put the speakers in this morning and they rock. Wonderful sound all around. Found out I have speakers in the rear doors, thought this was only a 4 speaker car. Very cool. And I should not have to worry about these speakers going south, they are marine grade so humidity and moisture should not affect the cone.
I also discovered you can't believe everything you read on the web. I had downloaded wiring data for this year and class stereo hookup and it had said the pink/green wire was 12v constant and the blue/red was switched. I knew there was a problem because the radio never remembered its last settings. I spent well over an hour troubleshooting fuses to no avail. Finally happened to chance checking what I thought was the switched wire when the ignition was off only to find it had power. Hmmmmm..... So I then switched the ignition on and the "constant" wire now had power. So somewhere along the line either my car got screwed up or more likely somebody transposed those two wires in the listings and nobody has yet caught it.
Since we all like pix here are some of the progress:
Polk speaker attached with silicone to the modified mount:

Mounted in the door:

Cover fits nicely:

New Alpine head unit, not too flashy and sounds great:

Still on the list:
Fix the mirror I broke
Recover the headliner and trim and reinstall
Fix the AC
Put the seats back in and drive it
I also discovered you can't believe everything you read on the web. I had downloaded wiring data for this year and class stereo hookup and it had said the pink/green wire was 12v constant and the blue/red was switched. I knew there was a problem because the radio never remembered its last settings. I spent well over an hour troubleshooting fuses to no avail. Finally happened to chance checking what I thought was the switched wire when the ignition was off only to find it had power. Hmmmmm..... So I then switched the ignition on and the "constant" wire now had power. So somewhere along the line either my car got screwed up or more likely somebody transposed those two wires in the listings and nobody has yet caught it.
Since we all like pix here are some of the progress:
Polk speaker attached with silicone to the modified mount:
Mounted in the door:
Cover fits nicely:
New Alpine head unit, not too flashy and sounds great:
Still on the list:
Fix the mirror I broke
Recover the headliner and trim and reinstall
Fix the AC
Put the seats back in and drive it
Last edited by aquinob; Jul 7, 2012 at 12:19 PM.
Thread Starter
Senior Member
Joined: Jun 2012
Posts: 431
Likes: 44
From: Portsmouth, VA
2010 E350, Sold 1998 C230
Charged the AC today. Took about 1 lb of r134. Going to watch it for a while and see if it holds the charge. Very little maintenance history with this car so nothing else to go by. Blowing cold now, happy about that.
A new problem has cropped up though. 3rd brake light wasn't working so I pulled on it and it fractured into about 3 parts. Lovely old plastic that bakes in the sun. Think I've been here before. This is one of those LED versions, has 5 LED's in two rows. Unfortunately, they are not lighting up. Not sure whats going on with it, I will probably take a ride out to the junkyard tomorrow and see if I can grab the one off the car I picked on Friday. Hopefully that one isn't toasty like mine. Otherwise I may just wire in a light for now till I can find one cheap on the bay.
A new problem has cropped up though. 3rd brake light wasn't working so I pulled on it and it fractured into about 3 parts. Lovely old plastic that bakes in the sun. Think I've been here before. This is one of those LED versions, has 5 LED's in two rows. Unfortunately, they are not lighting up. Not sure whats going on with it, I will probably take a ride out to the junkyard tomorrow and see if I can grab the one off the car I picked on Friday. Hopefully that one isn't toasty like mine. Otherwise I may just wire in a light for now till I can find one cheap on the bay.
Senior Member
Joined: May 2012
Posts: 453
Likes: 12
C230
Your making great progress, congratulations......
Did you change all the speakers, or just the front, and did you rewire it from the radio to the speakers, or just feed into the existing wires?
I bought one of those flip up radios (Jensen) with a touch screen, but it isn't here yet. I know the flip up screen will block the AC face plate, but I can live with that.
Some of the photos show a bit of your workshop, and I can tell you, I am jealous, as it looks like you can build an Arc in that garage.
Thread Starter
Senior Member
Joined: Jun 2012
Posts: 431
Likes: 44
From: Portsmouth, VA
2010 E350, Sold 1998 C230
I only changed out the fronts. Rears sounded fine and I have to maintain somewhat of a budget on this car, the sky is definitely not the limit. Only rewiring I did was to cut the wires to the original plugs that went into the radio and spliced them into the new alpine harness. I had bought a metra adapter harness but it turned out to be the wrong one so I said screw it, and wired it directly. I doubt I will be swapping out radios too often and even if I do, there is plenty of wire left to use.
I had thought about using one of the Power Acoustik head units that had the oversized display that hangs down. I figured I didn't care about the cassette storage and would like to have a backup camera as well as a gps mounted in the car. But looking at the reviews on Amazon on most of their units didn't give me a big warm fuzzy compared to the Alpine. I wanted the bluetooth as a requirement along with playing music off a thumb drive so this unit fit the bill. I am thinking about putting one of the Magellan 7" GPS units below the radio. They have a video input that I can wire into a backup camera. I have my gps in the truck mounted low and I like it because I can see it while it is still fairly unobtrusive.
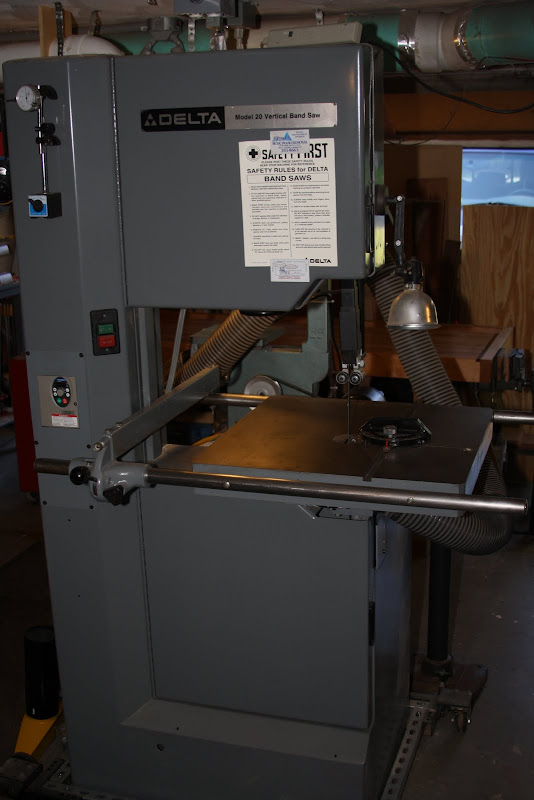
Yeah, the workshop is fairly extensive and quite full. I have a full complement of woodworking tools as well as a metal lathe and a mill I am learning to use. All of the tools are older, ex industrial or school machines that I have bought fairly cheap and have rebuilt and or restored. The older machinery is much better built than the stuff coming out of china these days and you can really buy it for pennies on the dollar. That has been my main hobby for about the last five years, though I have been into woodworking for much longer than that. So finding an old car and fixing it up isn't too far off the mark for me, though I am not really a "gearhead" in the truest sense of the word, I look at car maintenance as a necessary evil. I would rather spend my time woodworking or playing with these old tools. I guess I see a Mercedes in the same light, a high quality machine for a fairly bargain basement price that with some work can made to shine again.
This is the picture of the bandsaw I was working on with the speakers:
The metal lathe and mill on the right:

Table saw and workbench in less cluttered days:

I had thought about using one of the Power Acoustik head units that had the oversized display that hangs down. I figured I didn't care about the cassette storage and would like to have a backup camera as well as a gps mounted in the car. But looking at the reviews on Amazon on most of their units didn't give me a big warm fuzzy compared to the Alpine. I wanted the bluetooth as a requirement along with playing music off a thumb drive so this unit fit the bill. I am thinking about putting one of the Magellan 7" GPS units below the radio. They have a video input that I can wire into a backup camera. I have my gps in the truck mounted low and I like it because I can see it while it is still fairly unobtrusive.
Yeah, the workshop is fairly extensive and quite full. I have a full complement of woodworking tools as well as a metal lathe and a mill I am learning to use. All of the tools are older, ex industrial or school machines that I have bought fairly cheap and have rebuilt and or restored. The older machinery is much better built than the stuff coming out of china these days and you can really buy it for pennies on the dollar. That has been my main hobby for about the last five years, though I have been into woodworking for much longer than that. So finding an old car and fixing it up isn't too far off the mark for me, though I am not really a "gearhead" in the truest sense of the word, I look at car maintenance as a necessary evil. I would rather spend my time woodworking or playing with these old tools. I guess I see a Mercedes in the same light, a high quality machine for a fairly bargain basement price that with some work can made to shine again.
This is the picture of the bandsaw I was working on with the speakers:
The metal lathe and mill on the right:
Table saw and workbench in less cluttered days:
Senior Member
Joined: May 2012
Posts: 453
Likes: 12
C230
My wife says that if she got the same attention as I give to my cars, she would be in Heaven. I said that cars and women cost about the same, but the cars don't have access to my bank account.
If I had your shop, I would probably never be seen again......
You also mentioned something about age in a post. I have no idea what your pushing, but I am over the 70 hump, and still going strong.
A kid at heart.
If I had your shop, I would probably never be seen again......
You also mentioned something about age in a post. I have no idea what your pushing, but I am over the 70 hump, and still going strong.
A kid at heart.
Thread Starter
Senior Member
Joined: Jun 2012
Posts: 431
Likes: 44
From: Portsmouth, VA
2010 E350, Sold 1998 C230
Well, you got me by about 15 years, but I still feel old lots of the time. I gotta remember that line about women and cars. 
I probably don't spend nearly as much time lately in the shop. Built a couple of Adirondack chairs this last month, that was the most I have done with woodworking in quite a while. Still have one or two more to do and a side table or two, but the bandsaw needs bearings (I never did them when I originally had it apart, my bad but it was one of the first machines I did) so that has put a halt to that project till I get them changed. You can see parts of the spindle assembly in some of those photos with the speakers. I've been back at school these last 3 years for a career change from IT to Nursing, so I don't have all the spare time I used to. Hopefully that will change when I graduate this Dec.
And on the good side with the car, I was able to find a spare 3rd brake light on that same wreck I picked on Friday. It was toasty like mine so I bargained it down to 15 bucks. It was also an LED version and I didn't know if it would work. Mine is dead. Luckily this one worked and between the two I had enough pieces to make one complete light assembly, although its been glued up some to be functional. Really all about getting it past inspection at this point and getting it back on the road.
I'm also expecting the 4 yds of new suede material I ordered for the headliner to come in today, so I may get to recover the board this evening, otherwise won't be till Wed. Always something to do...
Senior Member
Joined: May 2012
Posts: 453
Likes: 12
C230
I pray for a couple of days to do nothing, but my prayers have yet to be answered. 7 days a week, 12 to 14 hours a day.
IT to nursing? that seem like a strange trade off. I thought IT was the in thing to be doing.
On the 24th, all of the parts and pieces should be here, so I can get back at it.
Right now, I think I am coming down with the flu, so I think I will head out early and just crash.
Have a good day, and keep the post going.
Thread Starter
Senior Member
Joined: Jun 2012
Posts: 431
Likes: 44
From: Portsmouth, VA
2010 E350, Sold 1998 C230
Update on the car. Headliner is back in, front a pillar trim is done, still waiting on the b and c pillars, have a friend going to help with the backs. Seats are back in, lights are fixed, mirror is swapped and working on passenger side now, ac recharged and seems to be working. Taking it for inspection tomorrow.
Thread Starter
Senior Member
Joined: Jun 2012
Posts: 431
Likes: 44
From: Portsmouth, VA
2010 E350, Sold 1998 C230
Still working on this car. Got it inspected last friday, so its been on the road a few days. Found I had a problem with the passenger side front inner fender rubbing on the tire. The previous owner had a propensity to drive over things she shouldn't have and did a number on that bumper as well as the right side plastic trim. I spent the morning re-securing the front bumper and inner wheel well so it is nice and tight again and won't rub.
AC and sunroof still giving me fits. Sunroof would only want to move in the open direction, so I have been using a metric hex wrench to close it. The part must be made of pot metal, Started to slip and now I am at the point where it wont take any torque before it slips, so if I continue to mess with it, I may not have a way of closing the roof. May have to go out and look for a donor motor. I have tried several times to resync the damn thing, but it never seems to take. I cleaned and lubed the tracks as well, that didnt do anything for it either. At a loss of what to do right now.
AC operation is intermittent and sporadic. Car will cool when it wants to and not when I want it to. Coming home Sunday morning from a night shift at the hospital was interesting, very foggy and the def would not clear anything. Been investigating this one as well, got into the diag mode on the ac system and am thinking it may be the evap temp sensor which is a known problem spot. From what I can see, the reading for that particular sensor is awol, it should be sensor 05, but the system does not display a value for that one, jumps right over it. Might just try shotgunning it by replacing the sensor and see if that corrects it, supposedly not that hard a part to get to or terribly expensive either. I also cleared all the codes which again may help to get the system to cool, not sure, but it cant hurt.
And if all that were not enough, there looks to be some sort of vacuum leak to the controls that regulate the ac duct-work under the dash. As I am driving, depending on engine speed you can here the air blowing out of different parts of the dash. Hard acceleration it goes one way, constant speed its another. Bought a subscription to alldata so hopefully I can muddle my way through this mess.
Senior Member
Joined: May 2012
Posts: 453
Likes: 12
C230
I am not sure of the system for the duct switching from top, bottom and defrost, but from our earlier discussions, the car has spent most of its time in hot weather areas.
Years ago, I bought a 230 coupe in California, and spent a winter restoring it.
When everything was finally finished, I had the same problem.
There were 2 (I believe) vacuum canisters under the dash, and the rubber diaphragms had rotted out, like yours (and mine) speakers.
I got new ones, and problem solved.
Hot weather cars beat the crap out of rubber and plastic pieces, and most things I have removed, just crumble when you try to snap them out.
Rear package shelf speaker covers are a prime example.
The canisters have a vacuum line attached, and I just disconnected them, and held my finger on the hose end to be sure there was vacuum pressure, so it became obvious the the diaphragms were not working.
Thread Starter
Senior Member
Joined: Jun 2012
Posts: 431
Likes: 44
From: Portsmouth, VA
2010 E350, Sold 1998 C230
I think I found a workaround for the ac, at least it seems to cool consistently, if not exactly working like it should. I leave it set on "lo" and it always cools down. I also cleared out the codes it had stored for climate control, I'm thinking that as long as it see's there are codes, it shuts down to prevent damage. I did order the evap temp sensor and will put that in next week. That's definitely shotgunning it, but it's a known issue and I don't even see a reading for that sensor in the diagnostics so I'm thinking it gone. And it shouldn't be too bad to access it, I'm hoping.
As for the diaphragms, not really sure that they are rotted out. They seem to hold with consistent vacuum, it's only when vac changes with engine load that they let go. From what I see on alldata there is a part that has multiple vac lines coming in and is computer controlled to switch those lines to the appropriate vent solenoid. Just wondering how hard that part is to get to to check. Not really looking to disassemble this car again too soon, just got it on the road for a week and want to put some miles on it for all the time and effort.
As for the diaphragms, not really sure that they are rotted out. They seem to hold with consistent vacuum, it's only when vac changes with engine load that they let go. From what I see on alldata there is a part that has multiple vac lines coming in and is computer controlled to switch those lines to the appropriate vent solenoid. Just wondering how hard that part is to get to to check. Not really looking to disassemble this car again too soon, just got it on the road for a week and want to put some miles on it for all the time and effort.
Senior Member
Joined: May 2012
Posts: 453
Likes: 12
C230
As all things change with time, I found them under the dash. One on the right side, and one on the left, and mounted slightly above the side kick panel.
The ones I had were round, and had an arm that moved in and out with vacuum.
Anyway, it was just a thought. I am sure you will get it worked out.
The ones I had were round, and had an arm that moved in and out with vacuum.
Anyway, it was just a thought. I am sure you will get it worked out.


