


iPod option: Install of Harman Kardon Drive and Play 2
Thread Starter
Member
Joined: Mar 2008
Posts: 219
Likes: 1
From: Kansas City, MO
'05 C230K SS
iPod option: Install of Harman Kardon Drive and Play 2
For anyone who is looking for an iPod option different (and possibly cheaper) than MB's kit, you might take a look at Harman Kardon's Drive and Play 2 (DP2). If you're unfamiliar with it, Crutchfield has a lot of information about it, and there is a pretty good review on iLounge.com. One of the big reasons I went with it is that it is supposed to have Bluetooth and Sirius satellite radio add-on capability. (Not sure when HK will get around to actually making those kits available, though.)

The DP2 has a couple FM-related options (an internal transmitter and an FM adapter that can be wired in directly) for the audio connection, but I only got it with the AUX stereo plug option in mind. So, I also did the AUX input install on my car first. If you want the best audio with the Drive and Play, here's what you'll need, and estimates for what it will cost:
1. HK Drive and Play 2 ($329.99 from Vanns.com, shipping included);
2. MB Aux Cable, Part No. A 210 440 50 05 ($40-50 depending on your local dealer); and
3. Some sort of noise filter, plus any necessary adapters (bought one from Radio Shack, about $30).
I wanted a clean install, and figure that the screen should be able to fit into the ashtray/lighter area and be recessed far enough so that the door would still close. I didn't want an add-on screen just sitting on top of my dash. Aesthetically and security-wise, I didn't think that would be a good idea. The DP2 hub, cables, and iPod I planned on running into and/or storing in my center console.
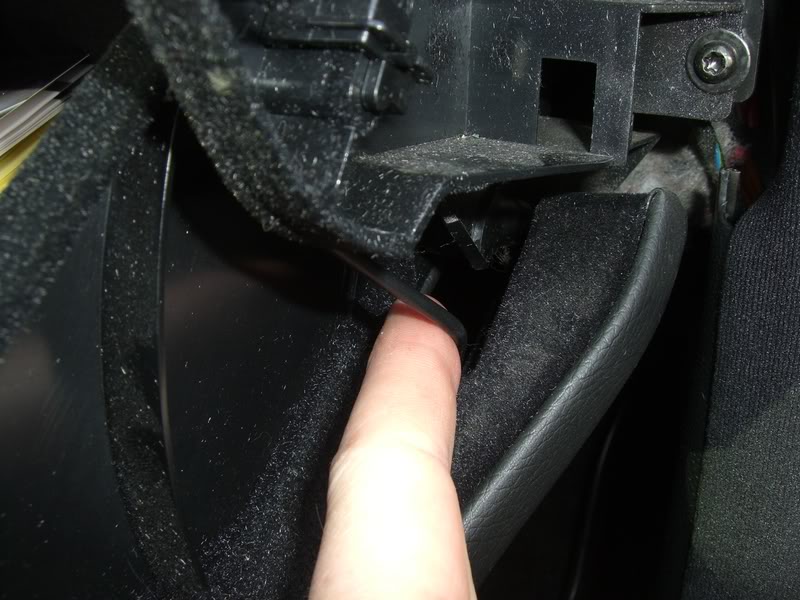
A. Running the HK AUX input cable - The DP2 comes with an AUX cable (male-to-male stereo plug) that is long enough to run to the center console. I plugged it into the AUX port, and ran it down the right side of the glove box:
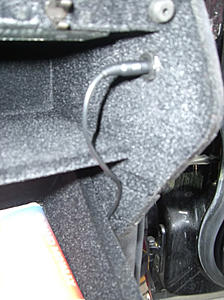
There is enough space at the bottom right corner of the glove box to run the audio cable through the gap in the door shown here:
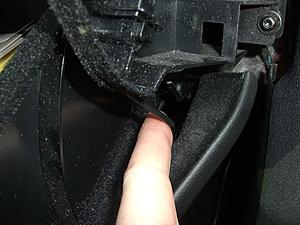
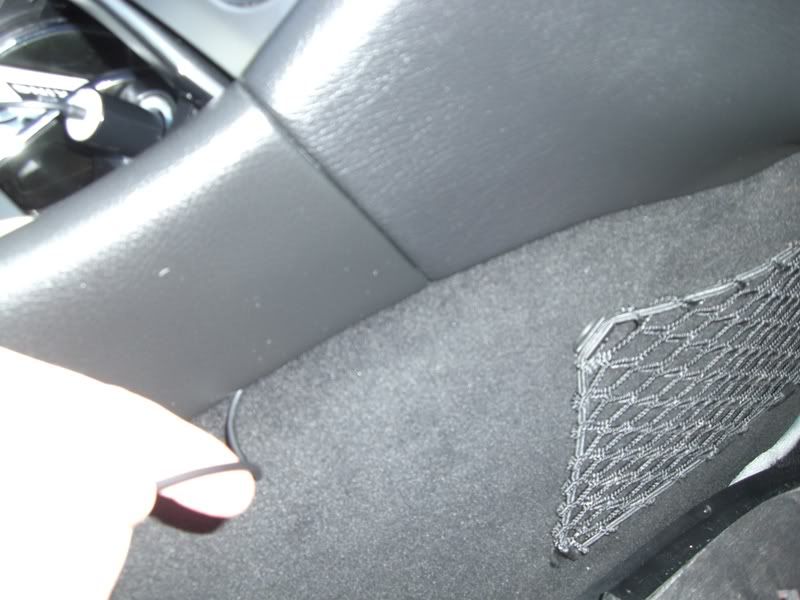
Once I got the cable to the underside of the glove box, it was easy to run it around the passenger footwell by simply tucking it under the panels:
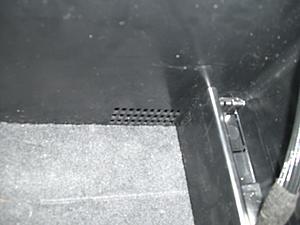
When I got to about the spot where the passenger-side seat belt sits, the side panel of the console flares out slightly at the bottom. On the inside of the center console, there is a grid or grill-like pattern in the plastic. All I needed to do was drill/Dremel out a couple lines, and you've got a perfect entry point for the audio cable:
B. Powering the DP2 Hub - Since I planned on mounting the screen in the ashtray assembly, I knew that I would lose the ability to use the lighter for anything else. The screen would block it, and I wouldn't be able to get the door to close without modding the "box" where the lighter was mounted.
First, I removed the shifter panel part of the center console by following Sanf's extremely useful Head Unit removal thread. The ashtray assembly slid right out after moving the two tabs on either side:
The assembly was obviously still connected to the car by the lighter cable harness. Since I was going to have to mod the assembly anyway, I just Dremeled the entire front portion of the mounting "box" out of the assembly. (If you plan on trying this, be very careful that you don't get close to any of the wires. They aren't hard to avoid, but just be aware what's on the back side of the assembly.) Once I got the lighter out, I trimmed the mounting plastic off and checked the DP2's lighter adapter with the Hub:
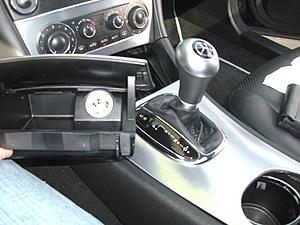
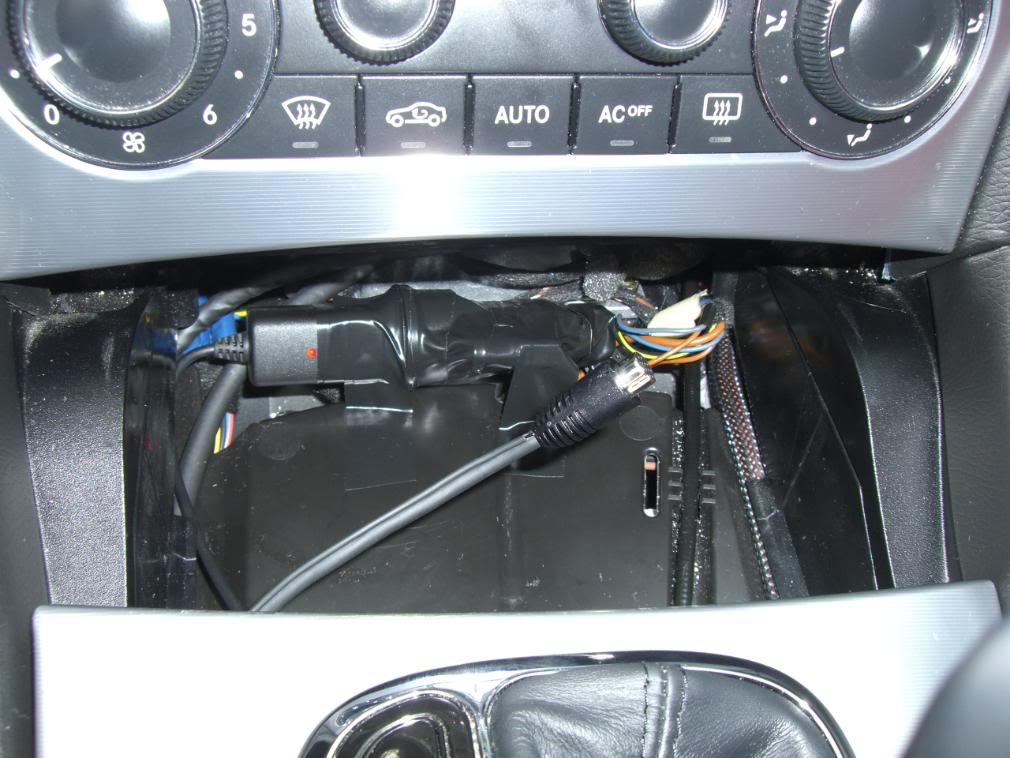
It worked, so I knew I still had power. I ran the lighter adapter's cable down the driver's side of the shifter panel space. I drilled/Dremeled a large enough hole into the front driver's corner of the center storage console, and made sure it was big enough to get both the power cable and screen cable through:
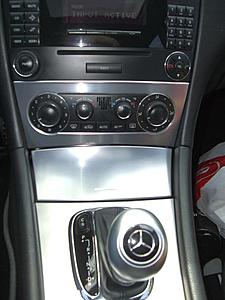
Knowing I had power, I went ahead and taped up the lighter and DP2 lighter adapter. Although I planned on placing it horizontally (as shown in the pic below), I realized later I would need to turn it vertically and stick it down the passenger side of the center console to give the ashtray assembly enough clearance (the loose cable is for the DP2 screen).
C. Mounting the screen - Now came the part that required a little creative ability with the Dremel (and before this project I was a Dremel rookie). I needed to remove enough of the plastic "box" where the lighter formerly resided to give the screen clearance for the door to close, but I wanted to keep enough of it there to use as a mounting point.
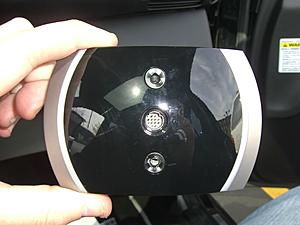
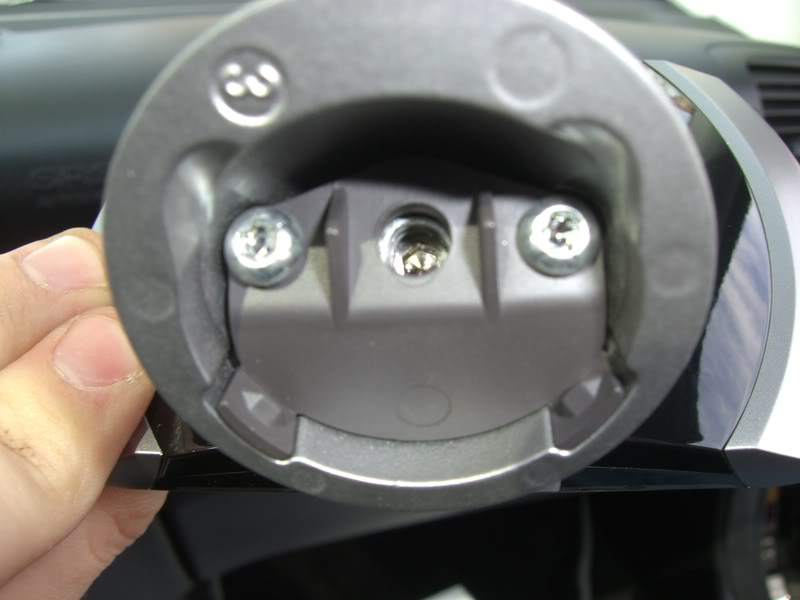
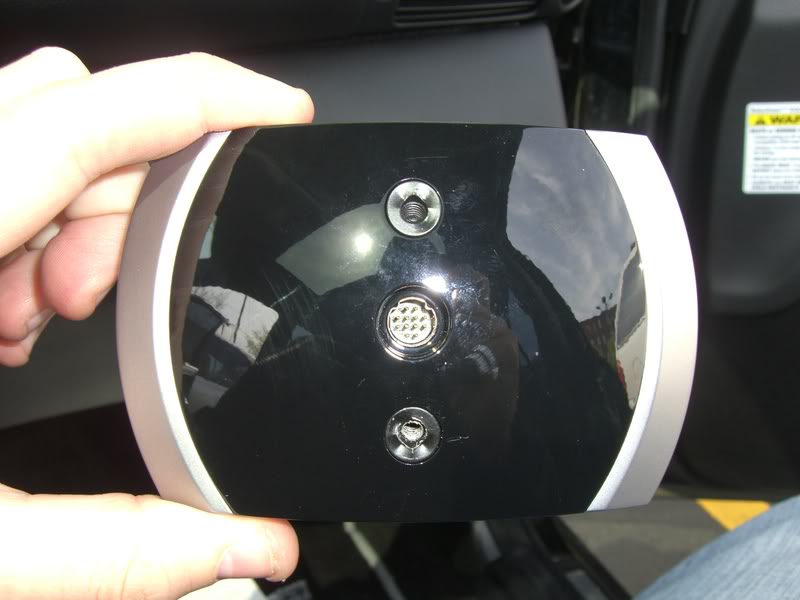
Before all that, however, I needed to remove the mounting base that came pre-attached to the back of the screen. Here is a shot of the bottom of the mounting base. If you look in the center, you can see a small allen screw:

A few turns of an allen wrench (included, but I used my own) later, the mounting base is gone:
I took the ashtray assembly into the house to have any easier space to work with. If you want to attempt this install, the only advice I can give is to work at the "box" a bit at a time with the Dremel, placing the screen on it every so often and trying the door to see if it will clear. Once I got enough of the plastic removed so that I was satisfied it would work, I cut some velcro patches I had gotten from a craft store (they had "industrial strength" adhesive on the back already). One large patch basically covered over the hole in the "box" that I had created, and I mounted another narrow strip on the part of the assembly under the bottom of the door (facing back toward the front of the assembly). I placed some corresponding patches on the bottom and back of the screen, and I had a pretty solid (but not permanent) mount for the screen. You can see part of the large velcro patch to the right of the screen (but it's not very noticeable):
Also, before putting away the Dremel, I remembered to drill/cut a big enough hole in the back of the assembly for the screen's cable to run.
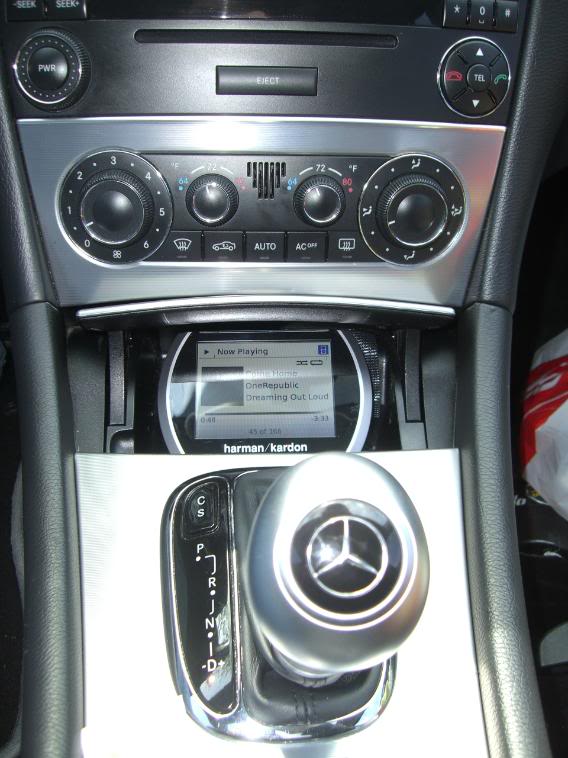
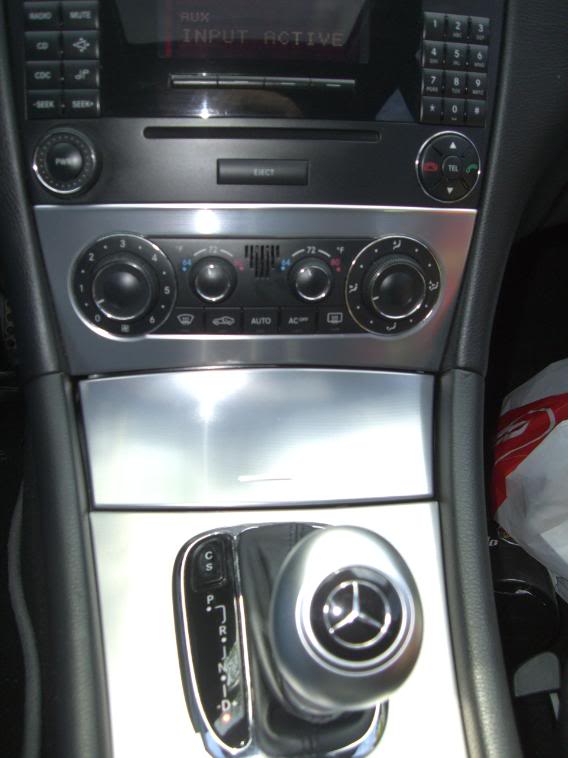
D. The finished product - While testing the system, I was initially very disappointed with a lot of noise coming through the audio (due to powering the system through the lighter). I went by Radio Shack, got a noise filter and some necessary adapters, and fortunately it completely eliminated the noise. One negative side effect was that it made the center storage compartment a little messier than I wanted:
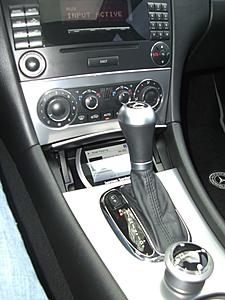
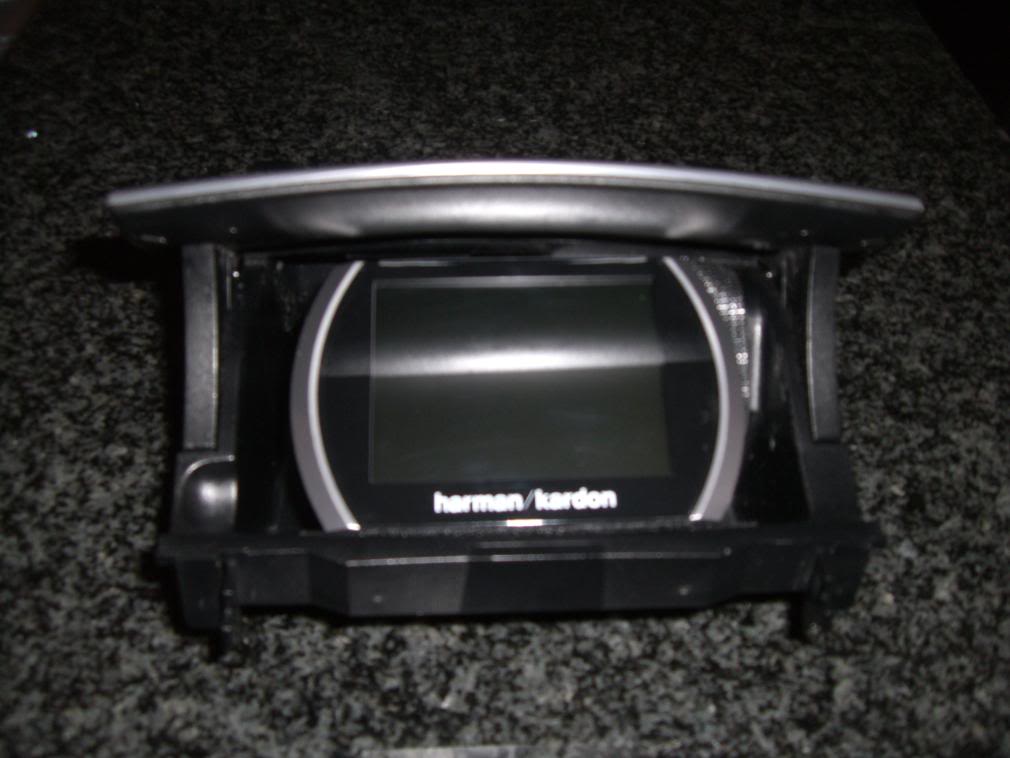
At least all the wires are completely hidden, as opposed to hanging/laying all around the dash and center console. After one final test, I remounted the ashtray assembly, and closed up the shifter panel. The last step is mounting the wireless controller, which I did with the included 3M double-sided patch right between the shifter and the cup holder. Here are some pics of the finished product:
Overall, I'm pretty happy with the DP2, and I think that it's a better option than the MB kit, if for no other reason than the promise of future Bluetooth and satellite radio integration for the same (or lower) price. It also allows complete integration of all that while keeping a stock look (with the exception of the wireless controller sitting on the console). There are a few very minor issues with the system that could be improved, namely the contrast of the color/font so the screen would be more easily readable (you can change color schemes, but it doesn't make much of a difference as far as readability). Bottom line, if you want to add iPod, Bluetooth, and satellite radio integration but don't want to spend the money on an aftermarket head unit, the DP2 is the best option out there IMO.
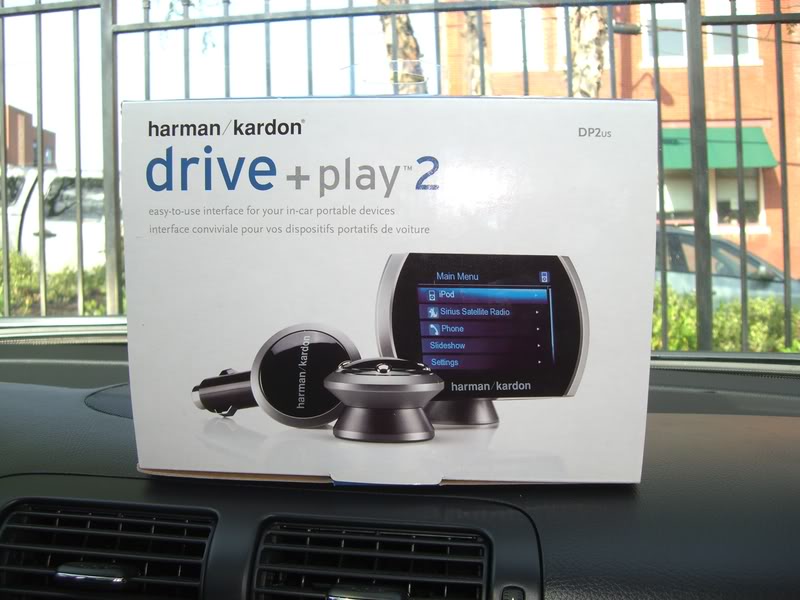
The DP2 has a couple FM-related options (an internal transmitter and an FM adapter that can be wired in directly) for the audio connection, but I only got it with the AUX stereo plug option in mind. So, I also did the AUX input install on my car first. If you want the best audio with the Drive and Play, here's what you'll need, and estimates for what it will cost:
1. HK Drive and Play 2 ($329.99 from Vanns.com, shipping included);
2. MB Aux Cable, Part No. A 210 440 50 05 ($40-50 depending on your local dealer); and
3. Some sort of noise filter, plus any necessary adapters (bought one from Radio Shack, about $30).
I wanted a clean install, and figure that the screen should be able to fit into the ashtray/lighter area and be recessed far enough so that the door would still close. I didn't want an add-on screen just sitting on top of my dash. Aesthetically and security-wise, I didn't think that would be a good idea. The DP2 hub, cables, and iPod I planned on running into and/or storing in my center console.
A. Running the HK AUX input cable - The DP2 comes with an AUX cable (male-to-male stereo plug) that is long enough to run to the center console. I plugged it into the AUX port, and ran it down the right side of the glove box:

There is enough space at the bottom right corner of the glove box to run the audio cable through the gap in the door shown here:
Once I got the cable to the underside of the glove box, it was easy to run it around the passenger footwell by simply tucking it under the panels:
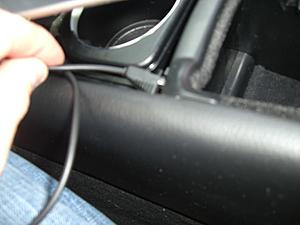
When I got to about the spot where the passenger-side seat belt sits, the side panel of the console flares out slightly at the bottom. On the inside of the center console, there is a grid or grill-like pattern in the plastic. All I needed to do was drill/Dremel out a couple lines, and you've got a perfect entry point for the audio cable:

B. Powering the DP2 Hub - Since I planned on mounting the screen in the ashtray assembly, I knew that I would lose the ability to use the lighter for anything else. The screen would block it, and I wouldn't be able to get the door to close without modding the "box" where the lighter was mounted.
First, I removed the shifter panel part of the center console by following Sanf's extremely useful Head Unit removal thread. The ashtray assembly slid right out after moving the two tabs on either side:

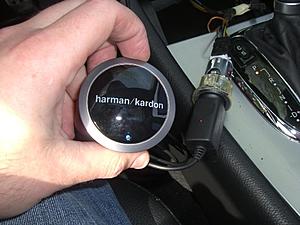
The assembly was obviously still connected to the car by the lighter cable harness. Since I was going to have to mod the assembly anyway, I just Dremeled the entire front portion of the mounting "box" out of the assembly. (If you plan on trying this, be very careful that you don't get close to any of the wires. They aren't hard to avoid, but just be aware what's on the back side of the assembly.) Once I got the lighter out, I trimmed the mounting plastic off and checked the DP2's lighter adapter with the Hub:

It worked, so I knew I still had power. I ran the lighter adapter's cable down the driver's side of the shifter panel space. I drilled/Dremeled a large enough hole into the front driver's corner of the center storage console, and made sure it was big enough to get both the power cable and screen cable through:

Knowing I had power, I went ahead and taped up the lighter and DP2 lighter adapter. Although I planned on placing it horizontally (as shown in the pic below), I realized later I would need to turn it vertically and stick it down the passenger side of the center console to give the ashtray assembly enough clearance (the loose cable is for the DP2 screen).
C. Mounting the screen - Now came the part that required a little creative ability with the Dremel (and before this project I was a Dremel rookie). I needed to remove enough of the plastic "box" where the lighter formerly resided to give the screen clearance for the door to close, but I wanted to keep enough of it there to use as a mounting point.
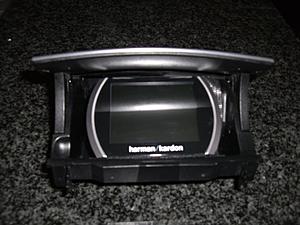
Before all that, however, I needed to remove the mounting base that came pre-attached to the back of the screen. Here is a shot of the bottom of the mounting base. If you look in the center, you can see a small allen screw:
A few turns of an allen wrench (included, but I used my own) later, the mounting base is gone:
I took the ashtray assembly into the house to have any easier space to work with. If you want to attempt this install, the only advice I can give is to work at the "box" a bit at a time with the Dremel, placing the screen on it every so often and trying the door to see if it will clear. Once I got enough of the plastic removed so that I was satisfied it would work, I cut some velcro patches I had gotten from a craft store (they had "industrial strength" adhesive on the back already). One large patch basically covered over the hole in the "box" that I had created, and I mounted another narrow strip on the part of the assembly under the bottom of the door (facing back toward the front of the assembly). I placed some corresponding patches on the bottom and back of the screen, and I had a pretty solid (but not permanent) mount for the screen. You can see part of the large velcro patch to the right of the screen (but it's not very noticeable):
Also, before putting away the Dremel, I remembered to drill/cut a big enough hole in the back of the assembly for the screen's cable to run.
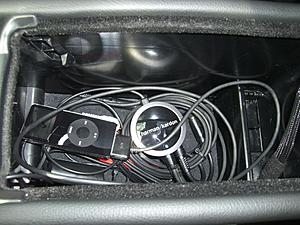
D. The finished product - While testing the system, I was initially very disappointed with a lot of noise coming through the audio (due to powering the system through the lighter). I went by Radio Shack, got a noise filter and some necessary adapters, and fortunately it completely eliminated the noise. One negative side effect was that it made the center storage compartment a little messier than I wanted:

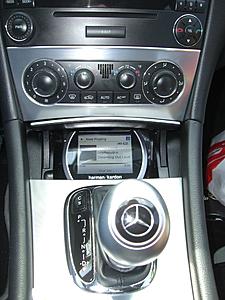
At least all the wires are completely hidden, as opposed to hanging/laying all around the dash and center console. After one final test, I remounted the ashtray assembly, and closed up the shifter panel. The last step is mounting the wireless controller, which I did with the included 3M double-sided patch right between the shifter and the cup holder. Here are some pics of the finished product:

Overall, I'm pretty happy with the DP2, and I think that it's a better option than the MB kit, if for no other reason than the promise of future Bluetooth and satellite radio integration for the same (or lower) price. It also allows complete integration of all that while keeping a stock look (with the exception of the wireless controller sitting on the console). There are a few very minor issues with the system that could be improved, namely the contrast of the color/font so the screen would be more easily readable (you can change color schemes, but it doesn't make much of a difference as far as readability). Bottom line, if you want to add iPod, Bluetooth, and satellite radio integration but don't want to spend the money on an aftermarket head unit, the DP2 is the best option out there IMO.

Super Member
Joined: Sep 2005
Posts: 846
Likes: 0
From: Tampa, FL
'14 CLA 45
I have the first version of the HK sound in my car and I put the control module in the ashtray and the display on top of the dashboard in the left corner so I wouldnt have to take my eyes of the road to see the display.
Im curious though - is there any max volume difference when you play it over the HK compared to CD or radio? Because for some reason my HK is 30-40% less loud which is kinda annoying for good songs
Im curious though - is there any max volume difference when you play it over the HK compared to CD or radio? Because for some reason my HK is 30-40% less loud which is kinda annoying for good songs
Thread Starter
Member
Joined: Mar 2008
Posts: 219
Likes: 1
From: Kansas City, MO
'05 C230K SS
It definitely isn't in my direct line of sight when driving, but I don't spend much time checking out the screen unless I have to. I mostly just keep a mix of my current favorite songs and then cycle through it on shuffle. Plus, I like being able to close up the ashtray door to keep it out of sight when I want to.
MBWorld Fanatic!
Joined: Feb 2005
Posts: 1,155
Likes: 0
From: Jakarta
1996 MB E320 & 2010 Nissan Elgrand
I like it!
Now, it feels like you have a Bimmer's iDrive on your centre console
I'd consider this if I have the AUX input in my 04. I couldn't find the AUX mark in my glovebox..
Now, it feels like you have a Bimmer's iDrive on your centre console
I'd consider this if I have the AUX input in my 04. I couldn't find the AUX mark in my glovebox..
Thread Starter
Member
Joined: Mar 2008
Posts: 219
Likes: 1
From: Kansas City, MO
'05 C230K SS
The only problem that I've noticed after the fact is that there isn't enough room for the cupholder to swing out. Oops.
 I don't use it that often, but fortunately I only used the adhesive mounting option (instead of the included self-tapping screws). So I can correct that mistake later if I really want to.
Trending Topics
MBWorld Fanatic!
Joined: Feb 2005
Posts: 1,155
Likes: 0
From: Jakarta
1996 MB E320 & 2010 Nissan Elgrand
The only problem that I've noticed after the fact is that there isn't enough room for the cupholder to swing out. Oops.
I don't use it that often, but fortunately I only used the adhesive mounting option (instead of the included self-tapping screws). So I can correct that mistake later if I really want to. MB World Stories
The Best of Mercedes & AMG

Manual Mercedes? 6 Times Sindelfingen Let Drivers Have All The Fun
Verdad Gallardo
Mercedes SLR McLaren 722 S Is Extremely Rare Example Modified by McLaren
Verdad Gallardo
8 Classic Boxy Mercedes Designs That Have Aged Like Fine Wine
Verdad Gallardo
Flawlessly Restored Mercedes 190E Evo II Heads to Auction
Verdad Gallardo
Electric Mercedes C-Class Unveiled: 11 Things You Need to Know
Verdad Gallardo
Mercedes EQS Gets A Major Update: Everything You Need to Know
Verdad Gallardo
5 Underrated Mercedes-Benz Models That Don't Get the Love They Deserve
Verdad Gallardo
Mercedes 300D Has Pushed Well Past 1 Million Miles and It Ain't Stopping
Verdad Gallardo
10 Most Reliable Mercedes-Benz Models You Can Buy Used
Verdad Gallardo
Thread Starter
Member
Joined: Mar 2008
Posts: 219
Likes: 1
From: Kansas City, MO
'05 C230K SS
You could still install a DP2 without an AUX port, but I've heard that neither one of the FM-connected options sound as good as you'd probably want.
Member
Joined: Aug 2006
Posts: 140
Likes: 0
From: LA to LBC
'05 C230Kss
cool DIY.
its nice that the DP2 can compensate and increase output to the aux in. different mp3 players and phones i've used all sound softer and the volume needs to be cranked up just to get the volume to a decent level. then switching back to my radio or cd/cd-changer sucks
in regards to the MB aux input price, you can get the aux cable for a little over $30 (~$35 including tax is what I got mine for if I remember correctly). Theres a thread somewhere that has the prices and you can ask the parts dept of your stealership to match it (basically match another stealership that has the low price)
Thread Starter
Member
Joined: Mar 2008
Posts: 219
Likes: 1
From: Kansas City, MO
'05 C230K SS
cool DIY.
its nice that the DP2 can compensate and increase output to the aux in. different mp3 players and phones i've used all sound softer and the volume needs to be cranked up just to get the volume to a decent level. then switching back to my radio or cd/cd-changer sucks
in regards to the MB aux input price, you can get the aux cable for a little over $30 (~$35 including tax is what I got mine for if I remember correctly). Theres a thread somewhere that has the prices and you can ask the parts dept of your stealership to match it (basically match another stealership that has the low price)
its nice that the DP2 can compensate and increase output to the aux in. different mp3 players and phones i've used all sound softer and the volume needs to be cranked up just to get the volume to a decent level. then switching back to my radio or cd/cd-changer sucks
in regards to the MB aux input price, you can get the aux cable for a little over $30 (~$35 including tax is what I got mine for if I remember correctly). Theres a thread somewhere that has the prices and you can ask the parts dept of your stealership to match it (basically match another stealership that has the low price)
I didn't think about asking them to match the price. I figured they would just tell me to call up the dealership with the lower price and order it directly. Then I would have been looking at about $10 to ship it, so I thought it would just be a wash. I'll definitely do a price-match if I ever order any more expensive parts in the future.


Thread Starter
Member
Joined: Mar 2008
Posts: 219
Likes: 1
From: Kansas City, MO
'05 C230K SS
Thanks. As far as I know. I cycled through the language options and it has everything from German and Spanish, to Japanese, Chinese, Korean (I think...I don't speak or read any of them), even Greek.
MBWorld Fanatic!
Joined: Feb 2005
Posts: 1,155
Likes: 0
From: Jakarta
1996 MB E320 & 2010 Nissan Elgrand
HAHA could be alot of work to trade our cupholders..
That's OK. I'll just get a HU that has IPOD connection if I ever do this
Enjoy your DP2
That's OK. I'll just get a HU that has IPOD connection if I ever do this
Enjoy your DP2
They changed the design of the cupholder assembly (among other things) in the '05+ interior facelift. Instead of flipping straight out to the side, the newer ones rise straight up and then pivot clockwise on a hinge in the upper right corner. With the "iDrive" in its current position the cupholder can't pivot on its hinge. Maybe I should trade you cupholders. I wonder if you could rig a pre-05 cupholder in an '05+?
You could still install a DP2 without an AUX port, but I've heard that neither one of the FM-connected options sound as good as you'd probably want.
You could still install a DP2 without an AUX port, but I've heard that neither one of the FM-connected options sound as good as you'd probably want.
Thread Starter
Member
Joined: Mar 2008
Posts: 219
Likes: 1
From: Kansas City, MO
'05 C230K SS
Bluetooth availability
Thought I'd post a somewhat disconcerting email I received from HK's customer support about the availability of the Bluetooth kit for the DP2:
Hi Ben,
Good evening and thank you for your inquiry. Unfortunately, we do not have a timeframe of when it will be developed. You may want to check back periodically on the Drive + Play website.
I hope this helps.
Best Regards,
Vu Le
Internet Support Specialist
Harman Consumer Group
Northridge, CA
PS: If replying to this email, please include all previous correspondence. It is the only way I can keep up with your situation. Thank you!
If possible, could you please take a quick survey for us? Please click on the link below to answer a few quick questions. Thank you very much for your time!
http://www.harmanaudio.com/surveys/H...me=websupport1
So, not only is there no timeframe for the Bluetooth kit, it's apparently still being "developed." This is really surprising to me because the DP2 has been out for (I believe) almost a year now. And they STILL have no idea when they're actually going to provide a key option that they sell the DP2 (at least in part) on.
Anyway, I thought that if anyone read this post and was considering the DP2 as an option, then you might want to think twice if you're counting on Bluetooth integration anytime soon.

Thread Starter
Member
Joined: Mar 2008
Posts: 219
Likes: 1
From: Kansas City, MO
'05 C230K SS
I emailed them back to see if there was at least a general estimate on the release date. E.g., are we talking 5 weeks, 5 months, or 5 years? Here was the official response:
Hi Ben,
We expect to have it released sometime in June.
I hope this helps.
Best Regards,
Vu Le
Internet Support Specialist
Harman Consumer Group
Northridge, CA
PS: If replying to this email, please include all previous correspondence. It is the only way I can keep up with your situation. Thank you!
If possible, could you please take a quick survey for us? Please click on the link below to answer a few quick questions. Thank you very much for your time!
http://www.harmanaudio.com/surveys/H...me=websupport1
So, now it sounds like they are pretty far along in their development process. It's more encouraging than the last email, but I guess we'll just have to wait and see if it's actually on the shelves by then. I'll keep my fingers crossed.

Newbie
Joined: Apr 2008
Posts: 1
Likes: 0
c 230 cupe
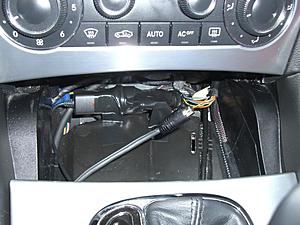
Hi, there are 3 wires (brown, black and blue) coming from lighter and i don't know which one is which. i want connect it directly to my harman/cardon.
i have +12Vdc, ACC and GND on harman/cardon.
here are some pictures
i have +12Vdc, ACC and GND on harman/cardon.
here are some pictures
Thread Starter
Member
Joined: Mar 2008
Posts: 219
Likes: 1
From: Kansas City, MO
'05 C230K SS
I'm sure if you spend a little time searching the forum you'll be able to find a post where someone has hard wired an aftermarket accessory into the lighter, with a description on which wire is which.

Newbie
Joined: Mar 2009
Posts: 1
Likes: 0
ford explorer
problem with dp2
Has anybody else had problems with dp2 cutting off twice before connecting? Then it connects to ipod but do not show ipod and will not play. I can't get it back to main menu. I have latest firmware (10/08).


