


 Jun 16, 2015, 01:38 PM
Last edit by: IB Advertising
See related guides and technical advice from our community experts:
Browse all: Steering and Suspension
- Mercedes Benz C Class How to Install Lowering Springs
Step by step instructions for do-it-yourself repairs
Browse all: Steering and Suspension

Official DIY installation of lowering springs
Thread Starter
Member
Joined: Jun 2008
Posts: 140
Likes: 1
From: Home
C200K
Official DIY installation of lowering springs
As promised, I have done my installation on the lowering springs. I chose Eibach prokit because I had nothing but good from my previous cars with prokit.
It can be done easily if you have access to a lift and some tools to go with. If done at home, it can be a lot of work, but its doable.
Tools needed: Lift(real + for cutting time), Impact gun, torx sockets(set), metric sockets(set), extensions, star sockets(don't know the name of it), flat head screw driver, needle nose, allen key small enough to fit in one piece(see below), wretchet, spring compressor etc Access to a shop should take care of all the tools you need.
If you have no knowledge on how to work on a car, it can be difficult, yet it still is doable. Do this at your own risk, suspension is something that you don't want to mess up on any car.
Directions (Rear then front)
1. Take off all wheels after its on jackstands or on a lift.

2. After you have done the step above, you will see the following (bolt for the rear lower arm, bolt that holds shock, bolt that holds stabilizer link)

I first tried to remove all bolts thats connected here in this picture

I found it easier to remove the biggest bolt out of these four, which is the located at inner most towards the center of the car. When removing, use a jack to support the arm. when done, slowly lower the jack and you will get easy access to remove the spring itself.

the far left bolt is easier to work with, do not remove other bolts like I did at first. As the spring doesn't seat well when tried to put it back into its place.
After you remove the stock spring, you will see a rubber boot where the top of the spring gets seated. Remove it with thin flathead screw driver, lube it, then seat it on top of your new spring. Lower part of the spring gets seated also, so make sure they line up as they are suppose to.
3. Do same on both sides. One thing to remember is make sure the springs seat well on their spot. Top must align which is done easily with the rubber piece when seated already on the spring before it goes back on.
4.Fronts, I found it easier to do fronts than the rear, since I started off wrong with one side by removing more bolts than I should've.

5. Three bolts needs to be removed, as well as one nut that holds the stabilizer link. Also there is plastic piece that slides into the shock assembly which needs to be taken out.

this is the biggest one, i believe 21mm and torx I forgot which size.

Above is the picture of the plastic piece that slides onto the shock body(rounded) I think i have a clearer picture.

That plastic round piece in the middle of the picture is the above mentioned plastic. It holds brake lines and some wiring.
6. The two smaller bolts are bolted below the shock body also torx bolt

You see whre they get mounted. Right above the two empty holes, you can again see the round plastic that goes into the shock body. Also there is a ziptie that's holding the plastic piece, cut it to get it free.
I found it easier to remove the stabilizer link first. you need T40 star shaped one and 18mm wrench.

impact gun did not let the nut free since those joints are ball joint.
7. Remove the top three bolts in engine bay

After you have done that, hold the shock assembly, and with one hand, use a flat head screw driver to push in the black plastic pieces on each side.


8. Now that you have the shock assembly free from the car, do the other side, this saves time changing out the springs at the same time, no need to come back to removing assembly on the other side.
9.To get access to the nut on top of the shock, you need to remove the plastic cover. slide a thin anything metal which is hard enough, into the holes on the side of the plastic cover

10. Compress the spring with spring compressor, which I believe can be rented at local auto part store, ie. advanced auto parts etc

11. Reinstall the new spring, align it on the bottom, and make sure top rubber is facing the right way. Which is factory marked with white lines. Top metal spins free, so don't worry about its location at this moment. Tighten the nut tight with impact gun. Remember to put the plastic cap back on.
12. Reinstalling the shock assembly. First I hand tighten the three bolts on top. Then I installed the plastic round piece to the shock body


use new ziptie to replace the factory ziptie which was cut earlier. Pull it with enough force, should slide right out.
13.Reinstall the stabilizer link, hand tighten for now.
(tip, use a wrench and the star socket thing and use them both to tighten them)
14.Reinstall the biggest bolt, hand tighten
15.Reinstall the smaller two bolts
16. tighten them all with whatever tool you have, make sure they are tight.
17. Put wheels back on and you are good to go for a test drive. If you hear anything abnormal, turn back and double check everything.

eye candy anyone? there were more exotic cars there but DB9 was one car that I haven't seen in person.

Doesn't seem low on the picture above, but when I got home, it seemed a bit lower than the above. I believe they will settle in within a week or two.
Get alignment done after the springs settle in
Thanks for reading this long procedure on how to change out springs. If any question, PM me or post here. Thanks
It can be done easily if you have access to a lift and some tools to go with. If done at home, it can be a lot of work, but its doable.
Tools needed: Lift(real + for cutting time), Impact gun, torx sockets(set), metric sockets(set), extensions, star sockets(don't know the name of it), flat head screw driver, needle nose, allen key small enough to fit in one piece(see below), wretchet, spring compressor etc Access to a shop should take care of all the tools you need.
If you have no knowledge on how to work on a car, it can be difficult, yet it still is doable. Do this at your own risk, suspension is something that you don't want to mess up on any car.
Directions (Rear then front)
1. Take off all wheels after its on jackstands or on a lift.
2. After you have done the step above, you will see the following (bolt for the rear lower arm, bolt that holds shock, bolt that holds stabilizer link)
I first tried to remove all bolts thats connected here in this picture
I found it easier to remove the biggest bolt out of these four, which is the located at inner most towards the center of the car. When removing, use a jack to support the arm. when done, slowly lower the jack and you will get easy access to remove the spring itself.
the far left bolt is easier to work with, do not remove other bolts like I did at first. As the spring doesn't seat well when tried to put it back into its place.
After you remove the stock spring, you will see a rubber boot where the top of the spring gets seated. Remove it with thin flathead screw driver, lube it, then seat it on top of your new spring. Lower part of the spring gets seated also, so make sure they line up as they are suppose to.
3. Do same on both sides. One thing to remember is make sure the springs seat well on their spot. Top must align which is done easily with the rubber piece when seated already on the spring before it goes back on.
4.Fronts, I found it easier to do fronts than the rear, since I started off wrong with one side by removing more bolts than I should've.
5. Three bolts needs to be removed, as well as one nut that holds the stabilizer link. Also there is plastic piece that slides into the shock assembly which needs to be taken out.
this is the biggest one, i believe 21mm and torx I forgot which size.
Above is the picture of the plastic piece that slides onto the shock body(rounded) I think i have a clearer picture.
That plastic round piece in the middle of the picture is the above mentioned plastic. It holds brake lines and some wiring.
6. The two smaller bolts are bolted below the shock body also torx bolt
You see whre they get mounted. Right above the two empty holes, you can again see the round plastic that goes into the shock body. Also there is a ziptie that's holding the plastic piece, cut it to get it free.
I found it easier to remove the stabilizer link first. you need T40 star shaped one and 18mm wrench.
impact gun did not let the nut free since those joints are ball joint.
7. Remove the top three bolts in engine bay
After you have done that, hold the shock assembly, and with one hand, use a flat head screw driver to push in the black plastic pieces on each side.
8. Now that you have the shock assembly free from the car, do the other side, this saves time changing out the springs at the same time, no need to come back to removing assembly on the other side.
9.To get access to the nut on top of the shock, you need to remove the plastic cover. slide a thin anything metal which is hard enough, into the holes on the side of the plastic cover
10. Compress the spring with spring compressor, which I believe can be rented at local auto part store, ie. advanced auto parts etc
11. Reinstall the new spring, align it on the bottom, and make sure top rubber is facing the right way. Which is factory marked with white lines. Top metal spins free, so don't worry about its location at this moment. Tighten the nut tight with impact gun. Remember to put the plastic cap back on.
12. Reinstalling the shock assembly. First I hand tighten the three bolts on top. Then I installed the plastic round piece to the shock body
use new ziptie to replace the factory ziptie which was cut earlier. Pull it with enough force, should slide right out.
13.Reinstall the stabilizer link, hand tighten for now.
(tip, use a wrench and the star socket thing and use them both to tighten them)
14.Reinstall the biggest bolt, hand tighten
15.Reinstall the smaller two bolts
16. tighten them all with whatever tool you have, make sure they are tight.
17. Put wheels back on and you are good to go for a test drive. If you hear anything abnormal, turn back and double check everything.
eye candy anyone? there were more exotic cars there but DB9 was one car that I haven't seen in person.
Doesn't seem low on the picture above, but when I got home, it seemed a bit lower than the above. I believe they will settle in within a week or two.
Get alignment done after the springs settle in
Thanks for reading this long procedure on how to change out springs. If any question, PM me or post here. Thanks

Member
Joined: Dec 2009
Posts: 117
Likes: 2
From: NJ
2010 Silver/Black C300 6-spd Manual - SOLD
$300 is an okay price, you will need to get it aligned about 2-3 weeks after the install though. Some people on here had springs done for anywhere between $100 to over $400 (alignment included). I installed the springs myself and it took about 3-4 hours, but I took my time because I wanted to get everything right. I did have to stop by Meineke so my friend could compress the front springs for me because my cheap spring compressor got stuck on one of the stock springs. Took my friend about 5 minutes to compress both Eibach springs since he had a much better spring compressor so I gave him $40 bones for bailing me out.

Super Member
Joined: Apr 2010
Posts: 705
Likes: 55
From: LA LA Land
'08 C300 MM Pano
Trending Topics

Junior Member
Joined: Dec 2012
Posts: 15
Likes: 0
2011 C 300
So let me make sure I am understanding you correctly. On the rear, you said you first unbolted 3 bolts and then ended up using only one bolt instead, the larger one on the left. Are you saying that the initial 3 you unbolted, shown loose in the pic, don't need to be touched, but the one that is shown with a bolt in it still, near the left, is the only one you actually need to remove? Pic attached for your consideration. Thanks!
MB World Stories
The Best of Mercedes & AMG

Manual Mercedes? 6 Times Sindelfingen Let Drivers Have All The Fun
Verdad Gallardo
Mercedes SLR McLaren 722 S Is Extremely Rare Example Modified by McLaren
Verdad Gallardo
8 Classic Boxy Mercedes Designs That Have Aged Like Fine Wine
Verdad Gallardo
Flawlessly Restored Mercedes 190E Evo II Heads to Auction
Verdad Gallardo
Electric Mercedes C-Class Unveiled: 11 Things You Need to Know
Verdad Gallardo
Mercedes EQS Gets A Major Update: Everything You Need to Know
Verdad Gallardo
5 Underrated Mercedes-Benz Models That Don't Get the Love They Deserve
Verdad Gallardo
Mercedes 300D Has Pushed Well Past 1 Million Miles and It Ain't Stopping
Verdad Gallardo
10 Most Reliable Mercedes-Benz Models You Can Buy Used
Verdad Gallardo
MBWorld Fanatic!
Joined: Sep 2008
Posts: 1,331
Likes: 9
From: Delaware
2004 Mazda6, 1993 RX7
Are you saying that the initial 3 you unbolted, shown loose in the pic, don't need to be touched, but the one that is shown with a bolt in it still, near the left, is the only one you actually need to remove? Pic attached for your consideration. Thanks!
If you look at all the rear suspension parts, see if you can tell what would be bolted there:
2009/MERCEDES-BENZ/C300/SPORT/REAR SUSPENSION PARTS ILLUSTRATIONS
.
Last edited by kevink2; Jan 23, 2013 at 06:39 PM.
Junior Member
Joined: Dec 2012
Posts: 15
Likes: 0
2011 C 300
He unbolted all 3 bolts, big on far left, shock bolt, and SB link bolt. That's 3 total, and by mistake he mentioned a total of 4 bolts. Also, he noted with all 3 bolts loose it was difficult to get the new spring in.
The pic shows 1 bolt at far left, and 2 bolt holes. Your arrow below "not" is not a bolt hole.
.
The pic shows 1 bolt at far left, and 2 bolt holes. Your arrow below "not" is not a bolt hole.
.
Uhh.. yeah, it is a bolt hole. That's where the rear swarbar endlink mounts. Look at the original pic up top. There are 3 bolts on the right side of the pic. One of them mounts to the shock, one of them to the swaybar endlink, the last one mounts to the part you can see above the pic I edited, it's made of aluminum and has a black bushing in it.
Last edited by sixa; Jan 23, 2013 at 06:45 PM. Reason: added pic
MBWorld Fanatic!
Joined: Sep 2008
Posts: 1,331
Likes: 9
From: Delaware
2004 Mazda6, 1993 RX7
Yes, look at the top pic. He then says:
2. After you have done the step above, you will see the following (bolt for the rear lower arm, bolt that holds shock, bolt that holds stabilizer link)
Thats 3 bolts. The shock and end link holes show the wear ring where bolt/nut was loosened.
It's just my opinion. You can verify what exactly is "there" between the 2 rubbed holes by inspection, and I'll stand corrected.
.
Junior Member
Joined: Dec 2012
Posts: 15
Likes: 0
2011 C 300
Yes, look at the top pic. He then says:
2. After you have done the step above, you will see the following (bolt for the rear lower arm, bolt that holds shock, bolt that holds stabilizer link)
Thats 3 bolts. The shock and end link holes show the wear ring where bolt/nut was loosened.
It's just my opinion. You can verify what exactly is "there" between the 2 rubbed holes by inspection, and I'll stand corrected.
.
2. After you have done the step above, you will see the following (bolt for the rear lower arm, bolt that holds shock, bolt that holds stabilizer link)
Thats 3 bolts. The shock and end link holes show the wear ring where bolt/nut was loosened.
It's just my opinion. You can verify what exactly is "there" between the 2 rubbed holes by inspection, and I'll stand corrected.
.
The bolt for the rear lower arm is the farthest bolt hole to the right, the one that I pointed out goes to the aluminum part with the bushing. If you look at my last pic you should see what I mean. When I do my spring install, i'll take some new pics to add to this. I just went out to try and get a pic but it's impossible with the wheel on the car.
MBWorld Fanatic!
Joined: Sep 2008
Posts: 1,331
Likes: 9
From: Delaware
2004 Mazda6, 1993 RX7
Uhh.. yeah, it is a bolt hole. That's where the rear swarbar endlink mounts. Look at the original pic up top. There are 3 bolts on the right side of the pic. One of them mounts to the shock, one of them to the swaybar endlink, the last one mounts to the part you can see above the pic I edited, it's made of aluminum and has a black bushing in it.
.
Senior Member
Joined: Jan 2013
Posts: 344
Likes: 2
From: Berkley, MI
'09 C350
Anybody know the sizes of the 3 strut mount bolts and the other E-Torx (star shaped) larger one on the strut body that holds it to the wheel carrier? It would help a lot in this DIY.
Junior Member
Joined: May 2013
Posts: 18
Likes: 0
C63 w/ P31
I just want to clarify this because I don't feel this was perfectly clear for the rear.
Do you remove the inner most (triple square) bolt, the shock bolt, and the sway bar bolt. YOU DO NOT remove the outer external torx bolt holding the aluminum "spindle" with bushing.
Is this correct?
Do you remove the inner most (triple square) bolt, the shock bolt, and the sway bar bolt. YOU DO NOT remove the outer external torx bolt holding the aluminum "spindle" with bushing.
Is this correct?
Junior Member
Joined: May 2013
Posts: 18
Likes: 0
C63 w/ P31
Also on the C63, the exhaust is routed right behind the bolt (triple square, 12mm) on both sides, so you have to remove the exhaust clamps middle of the car and slide the whole rear half of the exhaust back some to allow the bolt to be removed completely from the control arm. After I figured that out it was cake. Before that I was like WTF?

Junior Member
Joined: Sep 2013
Posts: 19
Likes: 0
From: Fresno, CA
2011 C300 Sedan Palladium Silver
Ok, thanks. I can confirm that this is all you need to do since I just did the rears. I did loosen the shock and sway bar bolts but I doubt that was even necessary. Much easier than what I was attempting to do first by removing that most outer bolt with the spindle. Someone needs to take that photo down because it is pretty confusing.
I know the Super sports are lower, but I was looking for 2 inches in front and back. Are they out there to avoid buying coilovers?
Member
Joined: Jan 2013
Posts: 228
Likes: 3
From: Houston, TX
2013 C63 AMG
I bought my C350 CPO and I am not sure if it has lowered springs or not but the front seems low and I scrape bumper way more than I am comfortable with. Could someone let me know the easiest way to determine if my car has lowered springs? Appearance wise it seems low.
Junior Member
Joined: Sep 2013
Posts: 19
Likes: 0
From: Fresno, CA
2011 C300 Sedan Palladium Silver
I bought my C350 CPO and I am not sure if it has lowered springs or not but the front seems low and I scrape bumper way more than I am comfortable with. Could someone let me know the easiest way to determine if my car has lowered springs? Appearance wise it seems low.
MBWorld Fanatic!


Joined: Aug 2009
Posts: 1,134
Likes: 8
From: Charlotte, NC
2015 BMW M235i 6MT
I bought my C350 CPO and I am not sure if it has lowered springs or not but the front seems low and I scrape bumper way more than I am comfortable with. Could someone let me know the easiest way to determine if my car has lowered springs? Appearance wise it seems low.
Member
Joined: Jan 2013
Posts: 228
Likes: 3
From: Houston, TX
2013 C63 AMG
Front Tire (the tires im thinking look lowered because the wheel well does not seem to be evenly spaced from top to sides)
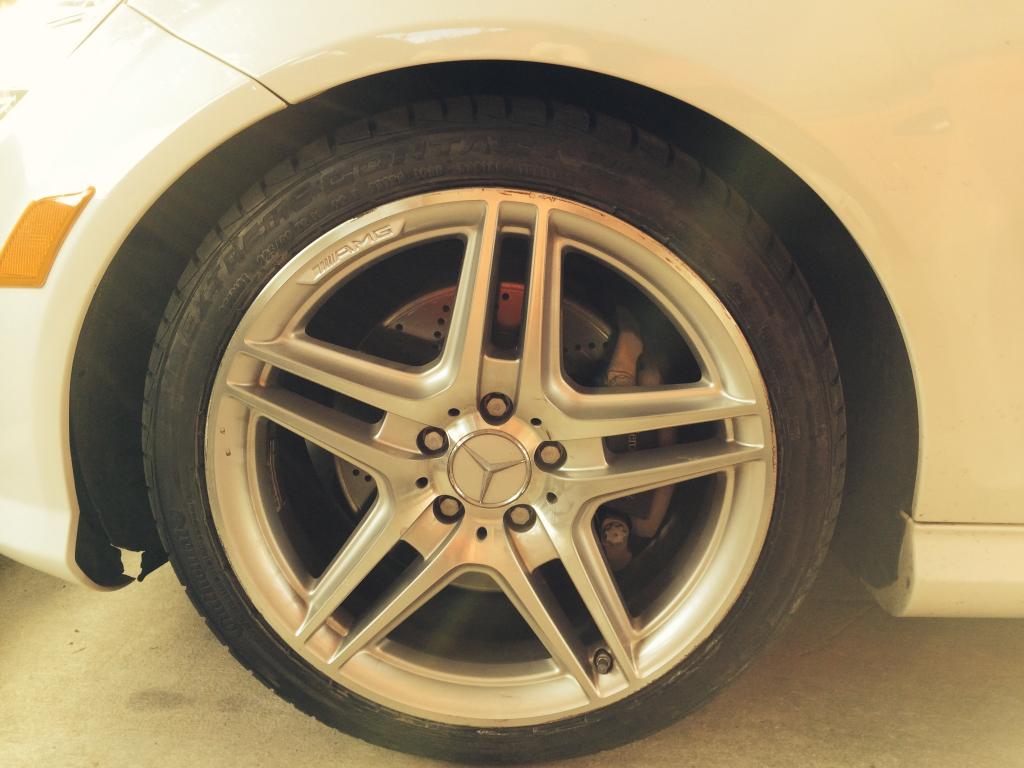
Rear Wheel
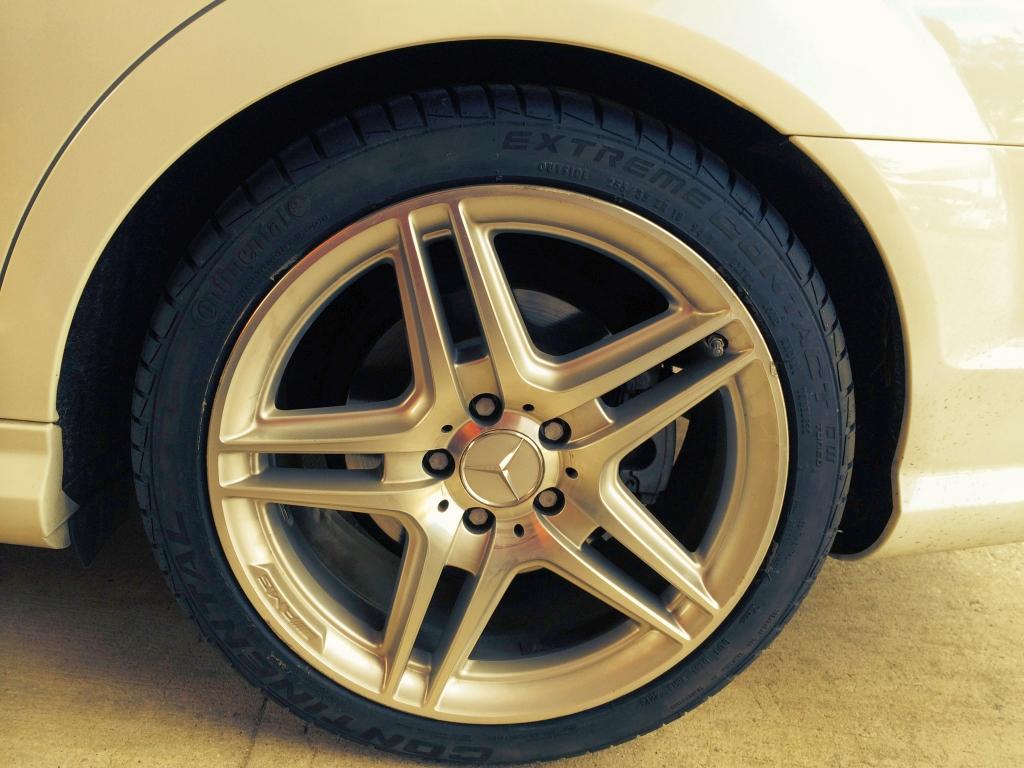
Thanks in advance for any advice!!
Member
Joined: Jan 2013
Posts: 228
Likes: 3
From: Houston, TX
2013 C63 AMG
I am not doubting you, but I want to know how you are so sure. I want to clarify that these images were taken with the camera at wheel height so there is minimal perspective involved in the top vs. sides on the front tire (I am only concerned with front tires as rear seem stock). IMO even the C63 looks more evenly spaced than my car on the front tires. Ref. this image:
http://static.cargurus.com/images/si...pic-16700.jpeg
http://static.cargurus.com/images/si...pic-16700.jpeg
MBWorld Fanatic!
Joined: Aug 2009
Posts: 1,134
Likes: 8
From: Charlotte, NC
2015 BMW M235i 6MT
Oh. I see what you're saying. If I'm not mistaken, our cars have a slight rake. I don't recall my car, which currently has stock springs, being perfectly even either.


