


DIY: Rear-View Camera under $200
Senior Member
Joined: Mar 2014
Posts: 402
Likes: 6
C350
Senior Member


Joined: Oct 2005
Posts: 301
Likes: 27
From: Norway
2015 S205 AMG
First of all i want to thank you all in this forum for the help and enthusiasm you gave me during my camera install
I not finished yet, but i only spent about 2 hours installing, first i removed the comand and then i connectet fakra and rca cable, and then i installed the RCA cable almost to the backseat.
Im gonna try to do the rest tommorrow.
Im have not figured out how to pass the seatbelts yet
https://mbworld.org/forums/e-class-c...ml#post6000095

Newbie
Joined: Nov 2009
Posts: 3
Likes: 0
2002 AMG C32
Ickdeep - I am in Seattle (Kirkland, actually) and have decided to have Car Toys do the installation for me after reading all of the threads here. I am still undecided on the camera... If the job is doing well I'll post here to let you know.
- Will
- Will

Senior Member
Joined: Aug 2008
Posts: 436
Likes: 2
From: British Columbia
2011 E350 4 Matic
Super Member
Joined: Mar 2014
Posts: 524
Likes: 4
From: Washington
'13 M5 | 08 C300 (Sold)
Thank you, hopefully it works out for you
MB World Stories
The Best of Mercedes & AMG

Manual Mercedes? 6 Times Sindelfingen Let Drivers Have All The Fun
Verdad Gallardo
Mercedes SLR McLaren 722 S Is Extremely Rare Example Modified by McLaren
Verdad Gallardo
8 Classic Boxy Mercedes Designs That Have Aged Like Fine Wine
Verdad Gallardo
Flawlessly Restored Mercedes 190E Evo II Heads to Auction
Verdad Gallardo
Electric Mercedes C-Class Unveiled: 11 Things You Need to Know
Verdad Gallardo
Mercedes EQS Gets A Major Update: Everything You Need to Know
Verdad Gallardo
5 Underrated Mercedes-Benz Models That Don't Get the Love They Deserve
Verdad Gallardo
Mercedes 300D Has Pushed Well Past 1 Million Miles and It Ain't Stopping
Verdad Gallardo
10 Most Reliable Mercedes-Benz Models You Can Buy Used
Verdad GallardoSenior Member
Joined: Oct 2005
Posts: 301
Likes: 27
From: Norway
2015 S205 AMG
Once again!! Thanks for all your help!!
Installed and works great so far!!!
I just removed the blue housing and just plugged it in the comand
FINNISHED!!!!
Installed and works great so far!!!
I just removed the blue housing and just plugged it in the comand
FINNISHED!!!!


Last edited by sentralfyr; Apr 9, 2014 at 07:52 AM.

Junior Member
Joined: Sep 2012
Posts: 33
Likes: 0
C63 AMG
Tried this on my C63
Followed your instruction however wasn't successfu,l after I got into engineering mode (Hangup 3 & #), chose 7 and sub-option 7 and was displeased that I couldnt find rear view camera s option 3. Would like your inputs.
Followed your instruction however wasn't successfu,l after I got into engineering mode (Hangup 3 & #), chose 7 and sub-option 7 and was displeased that I couldnt find rear view camera s option 3. Would like your inputs.
Senior Member
Joined: Oct 2005
Posts: 301
Likes: 27
From: Norway
2015 S205 AMG
Hummmm. And you got a comand?
I had to use SRVC camera

Senior Member
Joined: Sep 2011
Posts: 374
Likes: 1
2008 c350 sport
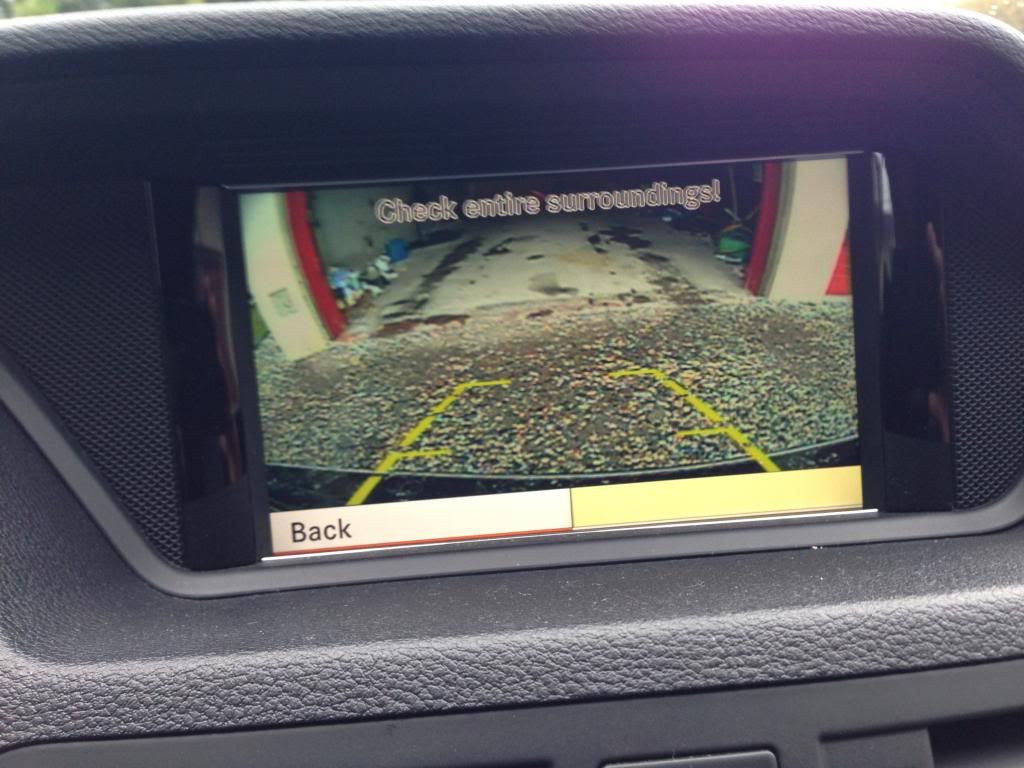
Are you getting the black screen when you put it in reverse and tells you to check your surrounding ?
Super Member
Joined: Mar 2014
Posts: 524
Likes: 4
From: Washington
'13 M5 | 08 C300 (Sold)
I called CarToys and they said they will install the camera for $150 provided I bring the camera. I can also buy one of their cameras which range from $60 to $300. I'm thinking of buying the one that is suggested on this thread and taking it to them to get in installed.

Senior Member
Joined: Apr 2014
Posts: 299
Likes: 41
From: England
W205 C200 AMG Line Premium
I don't think that you are leaving the menu correctly. On the last page of the menu make sure that you press "Reset" and If that fails then enable the camera again, remove key and lock car then return in a minute or two. Have you enabled the camera by the basic, none engineering menu?
Senior Member
Joined: Mar 2014
Posts: 402
Likes: 6
C350
Just a few notes for the 2012+ folks
This camera looks and works fantastic.
http://www.ebay.com/itm/121150021490...84.m1497.l2649
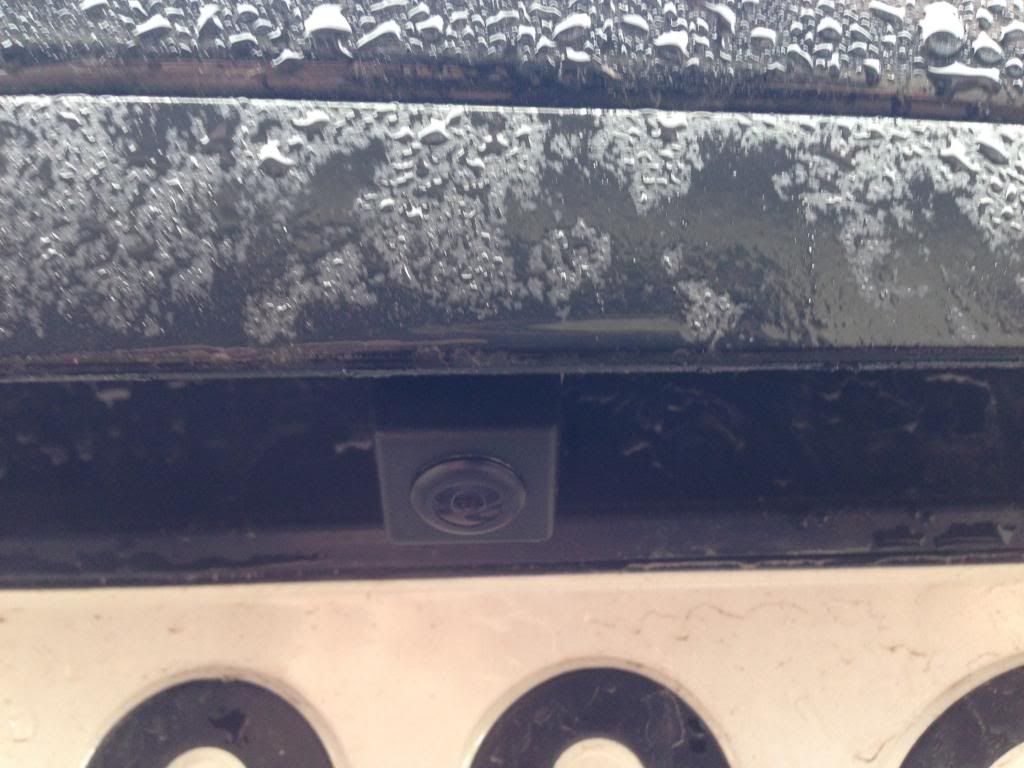
I installed it just to the left of the handle. You can see the handle cut above it in this photo
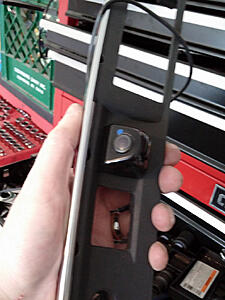
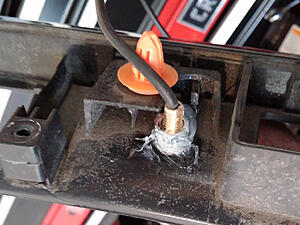
I used a 1/4" drill bit to make a hole. You can see the location relative to the orange plastic clip. I retained all clips and lights this way. The goop is RTV sealant. I had to make some minor cut to clear an area for the nut.
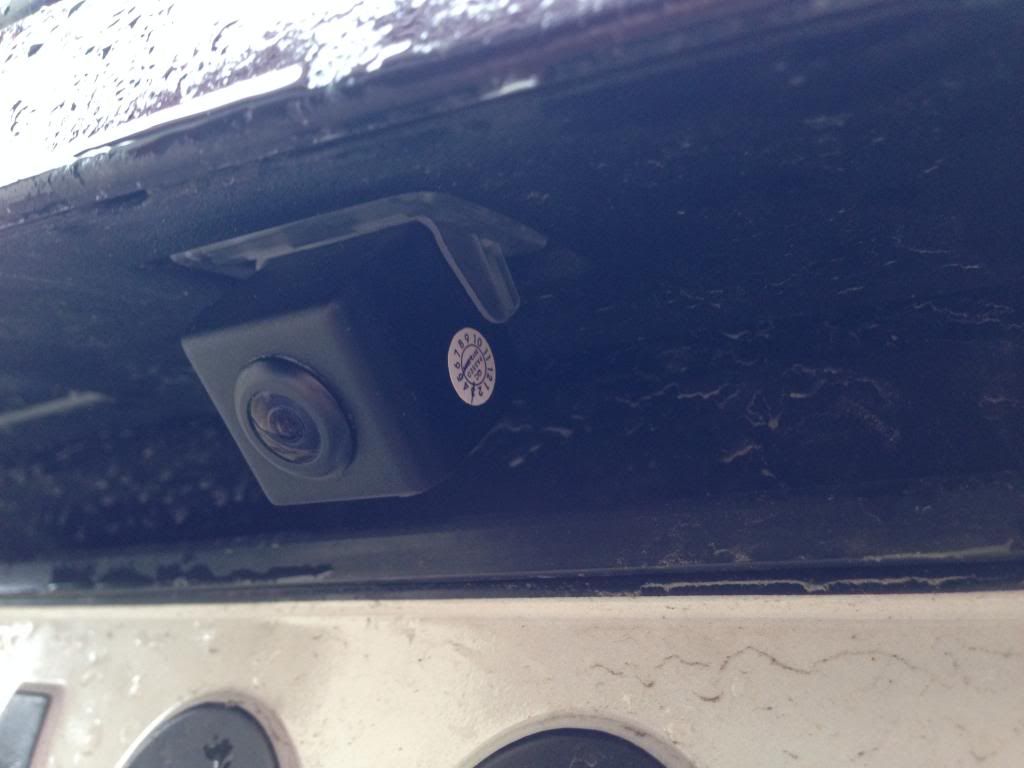
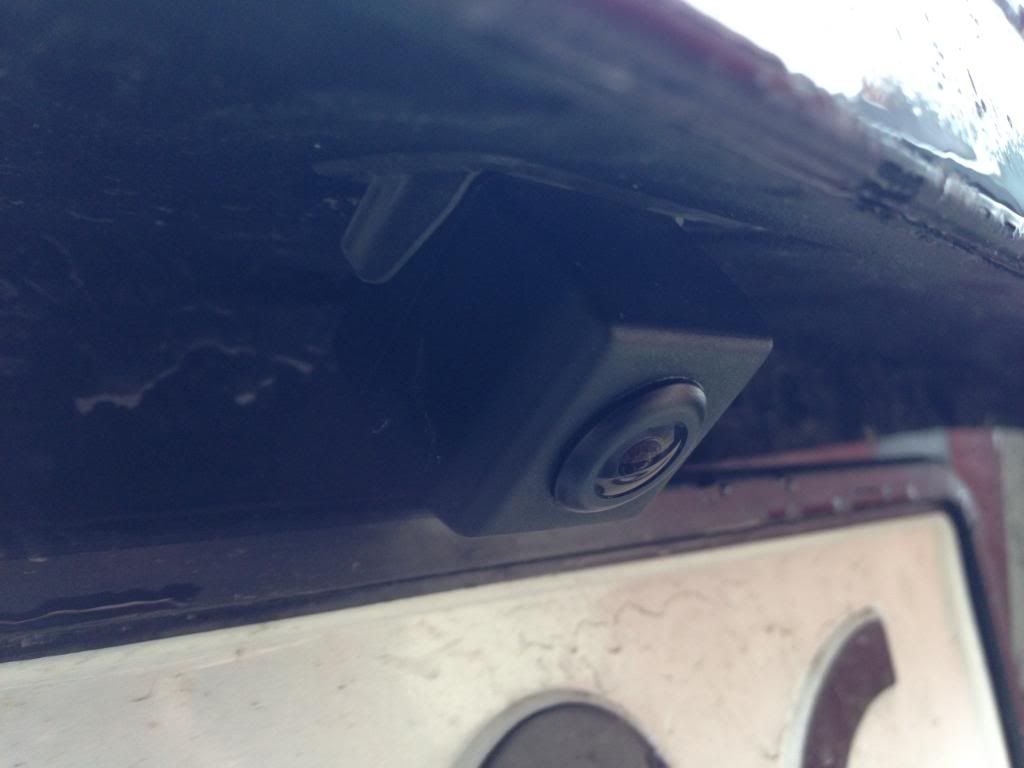
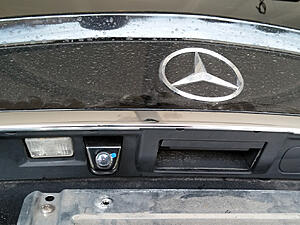
Here it is mounted. You would never know this isn't a factory camera. Wire is routed along the sheet metal and enter the trunk through the factory camera hole.
I followed the factory wire and then went behind the paneling to the rear fuse box where I use a standard (not mini) add a circuit there. I follow a link on the forum and it took me to a mini add a fuse and that didn't work. Need a standard size for fuse 71.
Inside I just tucked the wire up under the door trim. I uses a plastic bike tire remover to lever it up enough where need. From there it runs under the panel under the glove box and up to the rear of the command unit.
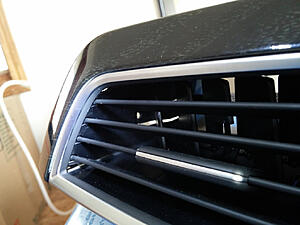
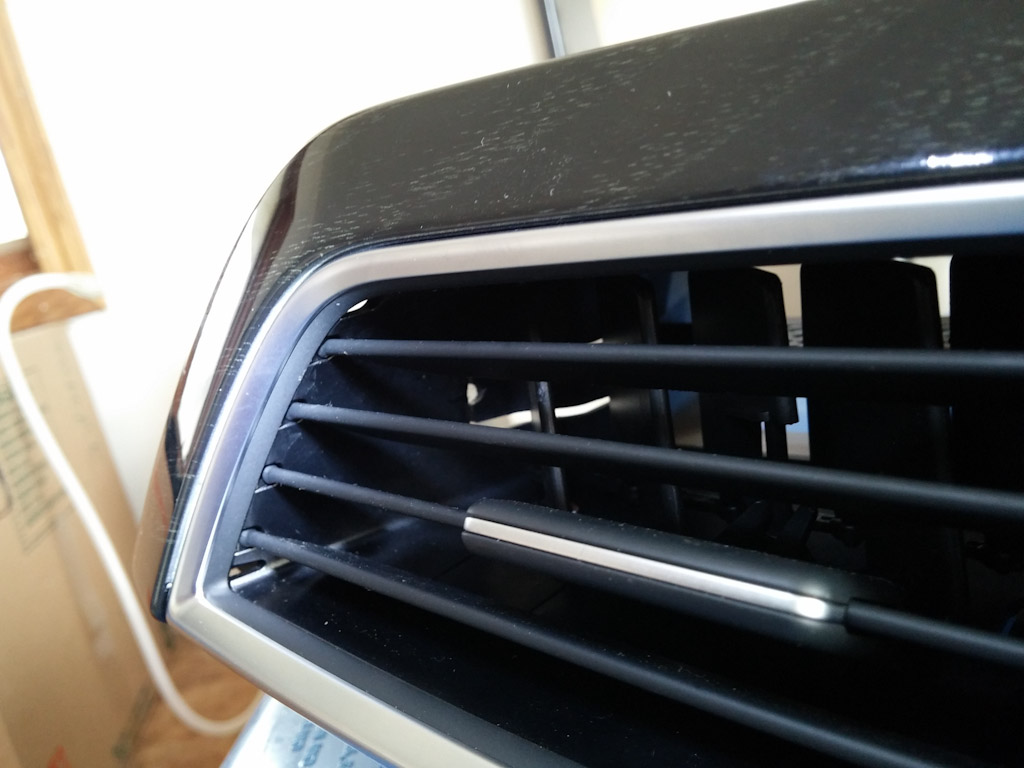
To remove the factory trim on 2012+ you open the glove box and start pulling the trim towards you. When you get to the vents there are clips inside. Here I am pointing to the clip once out with a screwdriver.
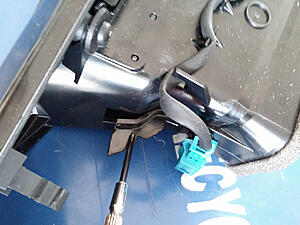
This is what it looks like in the vent. See the little hole inside? put a small screwdriver in there and level that into the vent. You need to do both vents.
The fakra plug on the 2012+ units isn't compatible with the suggested plug I see most often.
http://www.ebay.com/itm/110991103181...84.m1497.l2649
You need to modify the factory plug to accept this blue housing or modify the stock housing to accept the metal portion. I cut and filed the stock housing and glued a modified blue housing to it so both fakra plugs still snapped in.
Or and don't forget to wrap all your plug connections in tape or shrink wrap. Wouldn't want something to shake loose.
This camera looks and works fantastic.
http://www.ebay.com/itm/121150021490...84.m1497.l2649
I installed it just to the left of the handle. You can see the handle cut above it in this photo

I used a 1/4" drill bit to make a hole. You can see the location relative to the orange plastic clip. I retained all clips and lights this way. The goop is RTV sealant. I had to make some minor cut to clear an area for the nut.

Here it is mounted. You would never know this isn't a factory camera. Wire is routed along the sheet metal and enter the trunk through the factory camera hole.

I followed the factory wire and then went behind the paneling to the rear fuse box where I use a standard (not mini) add a circuit there. I follow a link on the forum and it took me to a mini add a fuse and that didn't work. Need a standard size for fuse 71.
Inside I just tucked the wire up under the door trim. I uses a plastic bike tire remover to lever it up enough where need. From there it runs under the panel under the glove box and up to the rear of the command unit.
To remove the factory trim on 2012+ you open the glove box and start pulling the trim towards you. When you get to the vents there are clips inside. Here I am pointing to the clip once out with a screwdriver.

This is what it looks like in the vent. See the little hole inside? put a small screwdriver in there and level that into the vent. You need to do both vents.
The fakra plug on the 2012+ units isn't compatible with the suggested plug I see most often.
http://www.ebay.com/itm/110991103181...84.m1497.l2649
You need to modify the factory plug to accept this blue housing or modify the stock housing to accept the metal portion. I cut and filed the stock housing and glued a modified blue housing to it so both fakra plugs still snapped in.
Or and don't forget to wrap all your plug connections in tape or shrink wrap. Wouldn't want something to shake loose.
Last edited by TheRulesLawyer; Apr 15, 2014 at 12:00 PM.
Senior Member
Joined: Mar 2014
Posts: 402
Likes: 6
C350
One last thing- When you are removing the head unit, you have to push down the metal fitting that the two torx screws were attached to. Its perfectly fine to tap them with a hammer through a screwdriver or similar. They aren't part of the radio and slide down when tapped. Its a retaining mechanism.
Senior Member
Joined: Mar 2014
Posts: 402
Likes: 6
C350
I used a torx bit in a 1/4 ratchet with appropriate socket to hold the bit. You'll want a low profile ratchet or something like a gear wrench to remove the torx screws in the command unit up front as well (at least on 2012+)
Last edited by TheRulesLawyer; Apr 15, 2014 at 12:03 PM.

Member
Joined: Jul 2010
Posts: 98
Likes: 2
2013 C300 Sport
I like your camera and install. Have the following questions -
1. Is camera lens glass or plastic?
2. Looks like you drilled a basic round hole in black trim and fed camera
cable & screw portion through hole then tighten with nut to secure
camera to black trim. Is this correct?
3. May I ask why you installed to left of handle and not right of handle
where there is a pre-cut hole trim?
4. Can it be installed to the right of handle by drilling hole through pre-cut
hole trim?
Member
Joined: Jul 2010
Posts: 98
Likes: 2
2013 C300 Sport
Based on your attached chart if I order a Green Fakra SMB E 6002 female to RCA Video TV female cable it would perfectly connect to the male plug of the HU? This is the cable I found on Ebay, would it connect perfectly?
Senior Member
Joined: Mar 2014
Posts: 402
Likes: 6
C350
1) Not sure. Auction doesn't say.
2) Yes, more or less. You need to do some minor modification to the back of the black piece as well. I'd also suggest an oval hole so you can adjust the camera a little bit. Tighten it down when you're happy.
3) The indent on that side is directly under one of the orange clips. If you could offset it a bit, but then it wouldn't be centered in that box. Figured it would look better on the other side rather than uncentered.
4) Sure, just see the above.
Senior Member
Joined: Oct 2005
Posts: 301
Likes: 27
From: Norway
2015 S205 AMG
As long you got a Comand it should fit, but if it doesent, just remove the green housing(i did) and it will work
Junior Member
Joined: May 2014
Posts: 35
Likes: 0
2012 C300 4matic
Newbie here, sorry if this is the wrong location to post this question. Does anyone know of a reputable shop to do mods in the Potomac, MD; VA/DC area? I'm looking at rear view camera and xenon projectors installed to start. Thank you.
Member
Joined: Mar 2014
Posts: 82
Likes: 0
From: Toronto
2013 C300 4matic
It seems to me the housing is pretty easy to remove. The guy took literally 2 seconds to remove it
Senior Member
Joined: Mar 2014
Posts: 402
Likes: 6
C350
Just look up car audio shops. They should have the experience to do the rear cam for sure. Yelp, etc probably can give you reviews on shops. Just avoid the big box stores.


