

 Jun 8, 2015, 08:22 PM
Last edit by: IB Advertising
See related guides and technical advice from our community experts:
Browse all: Exterior Guides
- Mercedes-Benz C-Class: How to Repair Lower Grill Mesh
Step by step instructions for do-it-yourself repairs
Browse all: Exterior Guides

DIY: Front bumper removal / Fixing the lower grill mesh

Thread Starter
Newbie
Joined: Apr 2009
Posts: 12
Likes: 1
m3
DIY: Front bumper removal / Fixing the lower grill mesh
Lots of people have the lower grille breaking / getting holes by simple daily driving. My dad eventually had large ones that couldn't be overlooked anymore. It's simply bad design by MB (or an money grab). They were quoting 300+ for the part and labour to fix it here in Canada (and it could easily happen again). We decided to do it ourselves with a spare metal mesh for free.
To remove the lower grille, you have to remove the front bumper.
You actually have to follow many of the same steps to paint the upper "star" grill, and to clear out the corner signals. It might be worth it to do those mods at the same time.
Anyways, onto the DIY.
Remove the front bumper. A simple pdf is here.
It wasn't 100% that clear, so I took some pics.
Best to have 2 people. 10 mm and 8 mm socket and a flathead required.
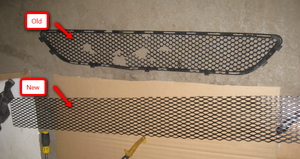
To fix the grill, we used a metal grill that we sprayed glossy black and clear coated.
"Step 2: Remove radiator trim" is better explained here:
See Official DIY Painting Grill, and Here.
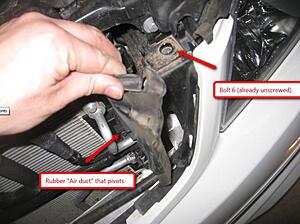
"Step 3. Pivot left and right air ducting to side and unscrew [one 10 mm] bolt [on each side]."
"Step 4. Loosen left and right fender liner in area of bumper and lift out with assembly wedge"
Basically, remove 3 plastic tabbed screws per side in the front wheel well. (similar to doing a clear signal light replacement).
"Step 5. Remove [two 10 mm] bolts [per side]"

Now it doesn't state you need to remove the front plastic cover under the car, but I found it much easier to work with once I did so I recommend it.
The front plastic cover is held on by 8 silver 8mm bolt. You have to do some shifting and slight bending of the plastic to get it loose. (Watch out for dirt falling in your eye, lol). There are also 2 smaller plastic covers in the corners held on with 1 plastic tab each. I recommend taking out that tab too.
"Step 6. Remove parktronic" I don't have this, so no pics.
"Step 7, remove connectors to lights" - you can do this now, or if you have 2 people, wait until you have bumper removed (one person still holding the bumper in the air) and disconnect any electrical wires keeping the bumper to the car.
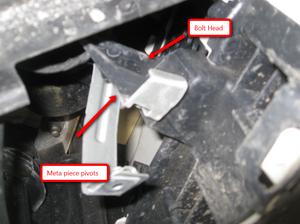
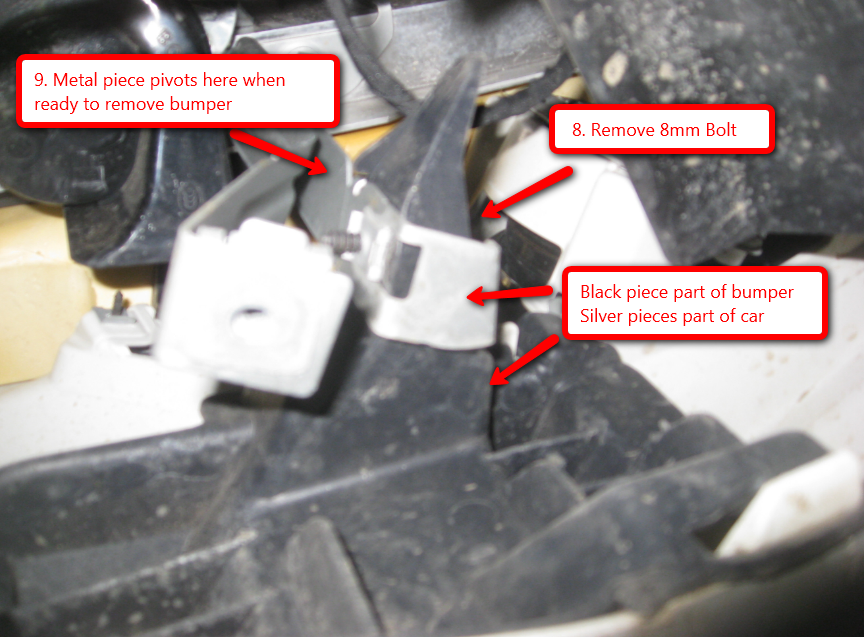
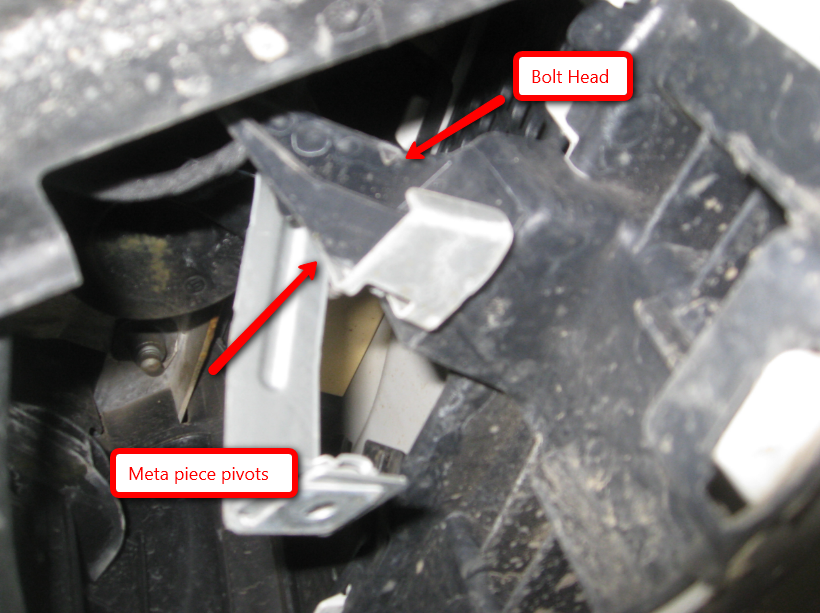
"Step 8. Unscrew 8mm bolt on left and right bracket."
"Step 9. Pivot left and right bracket toward outside and press bumper forward and remove"
Get under the car, and you'll see below.

Another angle:
Now you have the bumper removed.
Steps to fix the grill.
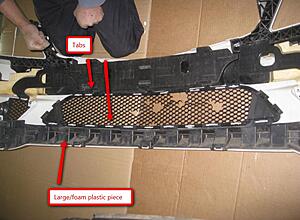
Step 10. Remove broke grille.
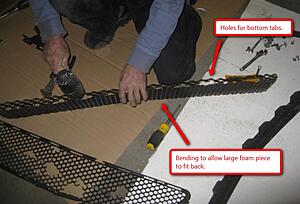
Basically there are 18 tabs holding in the grill.
There is a large foam piece at the bottom held in with tabs too.
Remove both.
Step 11.
New metal grill will lie where the old grill was.
Cut out holes for all the tabs in the mesh.
We only overlapped the lower tabs, and just pushed up against the upper tabs since they arent as visible to people
Step 12. Bend the mesh a little to allow the foam piece to fit back in.
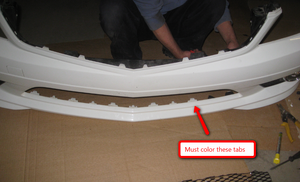
Step 13. White tabs will be visible, so make them black with paint, or even e-tape.
Step 14. Re-assemble and you're done.
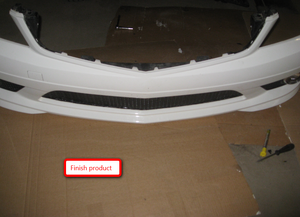
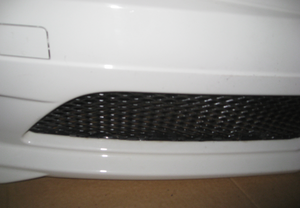
This thing is now solid and looks OEM. I'll take more pics of finished product later, came up to shower.
Hope this DIY helps someone, thanks
To remove the lower grille, you have to remove the front bumper.
You actually have to follow many of the same steps to paint the upper "star" grill, and to clear out the corner signals. It might be worth it to do those mods at the same time.
Anyways, onto the DIY.
Remove the front bumper. A simple pdf is here.
It wasn't 100% that clear, so I took some pics.
Best to have 2 people. 10 mm and 8 mm socket and a flathead required.
To fix the grill, we used a metal grill that we sprayed glossy black and clear coated.
"Step 2: Remove radiator trim" is better explained here:
See Official DIY Painting Grill, and Here.
"Step 3. Pivot left and right air ducting to side and unscrew [one 10 mm] bolt [on each side]."

"Step 4. Loosen left and right fender liner in area of bumper and lift out with assembly wedge"
Basically, remove 3 plastic tabbed screws per side in the front wheel well. (similar to doing a clear signal light replacement).
"Step 5. Remove [two 10 mm] bolts [per side]"

Now it doesn't state you need to remove the front plastic cover under the car, but I found it much easier to work with once I did so I recommend it.
The front plastic cover is held on by 8 silver 8mm bolt. You have to do some shifting and slight bending of the plastic to get it loose. (Watch out for dirt falling in your eye, lol). There are also 2 smaller plastic covers in the corners held on with 1 plastic tab each. I recommend taking out that tab too.
"Step 6. Remove parktronic" I don't have this, so no pics.
"Step 7, remove connectors to lights" - you can do this now, or if you have 2 people, wait until you have bumper removed (one person still holding the bumper in the air) and disconnect any electrical wires keeping the bumper to the car.
"Step 8. Unscrew 8mm bolt on left and right bracket."
"Step 9. Pivot left and right bracket toward outside and press bumper forward and remove"
Get under the car, and you'll see below.
Another angle:
Now you have the bumper removed.
Steps to fix the grill.
Step 10. Remove broke grille.
Basically there are 18 tabs holding in the grill.
There is a large foam piece at the bottom held in with tabs too.
Remove both.

Step 11.
New metal grill will lie where the old grill was.
Cut out holes for all the tabs in the mesh.
We only overlapped the lower tabs, and just pushed up against the upper tabs since they arent as visible to people

Step 12. Bend the mesh a little to allow the foam piece to fit back in.

Step 13. White tabs will be visible, so make them black with paint, or even e-tape.

Step 14. Re-assemble and you're done.


This thing is now solid and looks OEM. I'll take more pics of finished product later, came up to shower.
Hope this DIY helps someone, thanks

MBWorld Fanatic!


Joined: Dec 2009
Posts: 1,464
Likes: 73
From: Midwest, US
'17 GTR, '17 GLC43, '14 Panigale 899, '20 V4
Very nice.......I can believe so many people are breaking their grills though? Where are you all driving? Or is the plastic really that fragile?
Thread Starter
Newbie
Joined: Apr 2009
Posts: 12
Likes: 1
m3
Maybe because we use the car up here in Canada winter, there is more debris on the road, and chance for small rocks to hit it.
Took about 3.5 hours.. but I have basic mechanical knowledge, and a lot of trial and error.
Putting it back took <20 min once we knew which bolts / locations we needed.
MBWorld Fanatic!
Joined: Mar 2008
Posts: 3,714
Likes: 56
From: 1 hours drive north of Sydney Australia
2007 W204 220CDI Classic Sedan
Thank you for sharing. The info will be useful to me in the future.
In Australia the lower grill is of a very solid design....more slots than mesh.
In Australia the lower grill is of a very solid design....more slots than mesh.

Super Member
Joined: Nov 2009
Posts: 533
Likes: 0
From: Westchester, NY
2009 C-300 Sport
Nice work and Im pretty sure people are going to use this information. My lower grill had a big hole from a metal piece hitting it on the highway so i took the bumper out and bought a new mesh grill. The roads here is NY are horrible.
Trending Topics
MBWorld Fanatic!
Joined: Jan 2008
Posts: 2,424
Likes: 3
From: Ohio
X3 and 2012 C coming soon


Newbie
Joined: Mar 2010
Posts: 1
Likes: 0
2008 C300 Sport
I just completed replacing the lower center mesh grille on my 08 C300. I was expecting a major project after reading this post, but you don't have to take front bumper off to repair at all. All the work was done underneath car by just removing plastic shields to gain access back side of bumper. Unsnap old grille and remove, then snap on new one. Simple repair only too about an hour 1/2 to complete
MBWorld Fanatic!
Joined: Aug 2007
Posts: 1,047
Likes: 2
From: Toronto
2008 C300 Sport 4matic

Junior Member
Joined: Jan 2010
Posts: 40
Likes: 4
From: Calgary, Canada
2025 GLC300 4Matic
I would be interested in this OEM grille if you are making it. perhaps good way to start you own little business  .
.
let me know if you would make one and what would be $$ cost for me.
I rather use this one than replace with MB plastic one.
.let me know if you would make one and what would be $$ cost for me.
I rather use this one than replace with MB plastic one.


Newbie
Joined: Dec 2010
Posts: 3
Likes: 0
C 350 Sport
I just completed replacing the lower center mesh grille on my 08 C300. I was expecting a major project after reading this post, but you don't have to take front bumper off to repair at all. All the work was done underneath car by just removing plastic shields to gain access back side of bumper. Unsnap old grille and remove, then snap on new one. Simple repair only too about an hour 1/2 to complete

Member
Joined: Apr 2009
Posts: 175
Likes: 5
From: Virginia
2012 E350 - Cabrio; 2017 GLS 450
I just damaged and will have to remove my mesh and have it replaced. Dealer quoted me around 75 for the part, but the farm out their body work to a local shop. Anyway...anyone know what that "thing" is behind the mesh grate? Looks like a large Hershey's Kiss? Some sort of sensor or maybe the outside temperature sensor? Thanks for the DIY post, it looks like this may be a DIY for me.


