


 Jun 9, 2015, 04:40 PM
Last edit by: IB Advertising
See related guides and technical advice from our community experts:
Browse all: Interior Guides
- Mercedes-Benz C-Class and C-Class AMG: How to Remove Center Console
Step by step instructions for do-it-yourself repairs
Browse all: Interior Guides

DIY - Center Console Removal

Thread Starter
Junior Member
Joined: Apr 2010
Posts: 74
Likes: 2
From: Boston
2010 E550
DIY - Center Console Removal
Center Console Removal
Here is my first contribution to the forums. I hope it's helpful for someone.
Before you start, step 8 is the most important one. If you rip the cable you will have to get a new switch and it will probably cost hundreds of dollars. Be very careful with it.
Click pictures for high resolution versions.
Tools:
Torx T20 screwdriver and a plastic spatula
Instructions:
1 - Pull out the coin holder in the center console and remove the screw under it.
2 - Pull up gently starting from the front to remove the thin plastic cover that goes around the cup holders and stereo control knob. This piece just pulls up and off.
(picture of bottom of this piece)

3 - Remove the leather glove around the shift console by pushing it from right to left by hand where the leather meets the silver piece. This should be very easy to do by hand.
4 - Remove the silver outline that goes around the leather shift glove. You can do this by inserting a plastic spatula or a special panel removal tool from the sides. This piece has clips on the side but can be removed by pushing in from the outside on both sides. This can even be done by holding on from the inside and pulling towards the center then up. Once unhinged remove this completely from the shift knob to get it out of the way.

5 - Remove wood trim around shifter. Same idea - use the tool to push it apart from the black plastic outline and push up from the front. The front needs to come out first then the whole piece will slide forward and come out. Once unhinged remove this completely from the shift knob to get it out of the way. This piece will scratch your trim if you leave it on around the shift handle.
This will reveal three screws on the front of the arm rest. One holds down the switch and the other two hold down the arm rest.
6 - Remove the rear air vent. This pulls straight up. You have to yank pretty hard to get this thing off but after taking it off twice I couldn't figure out a different way. Looks like that's the right and only way even though it requires force.
This will reveal two more screws that hold down the armrest.
(picture of the top of this piece after removal)

7 - Remove the five screws that hold down the center console. Two in the back, three in the front including the one that holds the switch in place.


8 - VERY IMPORTANT. Make sure you unplug the switch and run the wire down so you can pull out the switch without ripping the thing 4 cables. I didn't do this and ended up ripping the wires and having to solder them. The white plug which is on the left side of the shifter can be seen in this picture as well as the gray cable (looks like 1 wide and thin wire) that attaches to the switch. You can unplug and then pull closer to the switch in order to eventually remove the switch.
9 - You are now ready to pull the arm rest up. Push in from each side and pull up. You can see the clips in the pictures but you don't have to insert anything that will push the clips in, just pushing in hard with your hands and pulling up will get this out. Be careful of the switch and the cable in the front that you'll have to pull through very slowly by hand. There is almost no play and this wire can rip right off.

10 - final picture with center console removed.

I did this project so I could run both an aux cable from the glove box as well as a power cable into the arm rest storage area. I might drill through one of the cup holders and have the cables come out of there.
Others might use this to swap their center console with a C63 or Euro console without the cup holders.
Whatever you use it for, I hope this guide helps.
Here is my first contribution to the forums. I hope it's helpful for someone.
Before you start, step 8 is the most important one. If you rip the cable you will have to get a new switch and it will probably cost hundreds of dollars. Be very careful with it.
Click pictures for high resolution versions.
Tools:
Torx T20 screwdriver and a plastic spatula
Instructions:
1 - Pull out the coin holder in the center console and remove the screw under it.
2 - Pull up gently starting from the front to remove the thin plastic cover that goes around the cup holders and stereo control knob. This piece just pulls up and off.
(picture of bottom of this piece)
3 - Remove the leather glove around the shift console by pushing it from right to left by hand where the leather meets the silver piece. This should be very easy to do by hand.
4 - Remove the silver outline that goes around the leather shift glove. You can do this by inserting a plastic spatula or a special panel removal tool from the sides. This piece has clips on the side but can be removed by pushing in from the outside on both sides. This can even be done by holding on from the inside and pulling towards the center then up. Once unhinged remove this completely from the shift knob to get it out of the way.
5 - Remove wood trim around shifter. Same idea - use the tool to push it apart from the black plastic outline and push up from the front. The front needs to come out first then the whole piece will slide forward and come out. Once unhinged remove this completely from the shift knob to get it out of the way. This piece will scratch your trim if you leave it on around the shift handle.
This will reveal three screws on the front of the arm rest. One holds down the switch and the other two hold down the arm rest.
6 - Remove the rear air vent. This pulls straight up. You have to yank pretty hard to get this thing off but after taking it off twice I couldn't figure out a different way. Looks like that's the right and only way even though it requires force.
This will reveal two more screws that hold down the armrest.
(picture of the top of this piece after removal)
7 - Remove the five screws that hold down the center console. Two in the back, three in the front including the one that holds the switch in place.
8 - VERY IMPORTANT. Make sure you unplug the switch and run the wire down so you can pull out the switch without ripping the thing 4 cables. I didn't do this and ended up ripping the wires and having to solder them. The white plug which is on the left side of the shifter can be seen in this picture as well as the gray cable (looks like 1 wide and thin wire) that attaches to the switch. You can unplug and then pull closer to the switch in order to eventually remove the switch.
9 - You are now ready to pull the arm rest up. Push in from each side and pull up. You can see the clips in the pictures but you don't have to insert anything that will push the clips in, just pushing in hard with your hands and pulling up will get this out. Be careful of the switch and the cable in the front that you'll have to pull through very slowly by hand. There is almost no play and this wire can rip right off.
10 - final picture with center console removed.
I did this project so I could run both an aux cable from the glove box as well as a power cable into the arm rest storage area. I might drill through one of the cup holders and have the cables come out of there.
Others might use this to swap their center console with a C63 or Euro console without the cup holders.
Whatever you use it for, I hope this guide helps.
Last edited by albertb; Feb 15, 2015 at 11:36 AM. Reason: image links broken
Trending Topics
MB World Stories
The Best of Mercedes & AMG

7 Craziest Things AMG Gas Ever Built
Verdad Gallardo
New Electric Mercedes-AMG GT 4-Door Coupe Unveiled: 10 Things You Need to Know
Verdad Gallardo
6 Mercedes Models That Did NOT Age Well (But Are Somehow Still Cool)
Verdad Gallardo
Manual Mercedes? 6 Times Sindelfingen Let Drivers Have All The Fun
Verdad Gallardo
Mercedes SLR McLaren 722 S Is Extremely Rare Example Modified by McLaren
Verdad Gallardo
8 Classic Boxy Mercedes Designs That Have Aged Like Fine Wine
Verdad Gallardo
Flawlessly Restored Mercedes 190E Evo II Heads to Auction
Verdad Gallardo
Electric Mercedes C-Class Unveiled: 11 Things You Need to Know
Verdad Gallardo
Mercedes EQS Gets A Major Update: Everything You Need to Know
Verdad GallardoMember
Joined: Oct 2008
Posts: 186
Likes: 1
From: Bay Shore, NY
2009 C300 4Matic Sport P2/MM/Steel Gray
group buy over at the C63 forums, $275 shipped.. https://mbworld.org/forums/c63-amg-w...installed.html

finished install today, thanks for the guide, that gray wire (step 8) is a royal pain to work with!
finished install today, thanks for the guide, that gray wire (step 8) is a royal pain to work with!
Member
Joined: Oct 2008
Posts: 186
Likes: 1
From: Bay Shore, NY
2009 C300 4Matic Sport P2/MM/Steel Gray
had to pull back the carpet on the side and unhook the wire from some harness holding it, it was not an easy task, after I got that done, it was smooth sailing

MBWorld Fanatic!


Joined: Feb 2010
Posts: 5,655
Likes: 484
2012 C63;1971 280SE 3.5(Sold);2023 EQS 450 SUV 4 Matic (Wife's)
Thanks albertb, very much for this DIY. It came in very handy today when I installed my Euro Console with Leather Arm Rests and sliding cover. Made it a pretty easy project. Terrific writeup detail and great supporting pics. 


Super Member
Joined: Apr 2009
Posts: 588
Likes: 0
From: NY
08 c350
yeah i had to remove this to run some wiring for my V1s concealed display and remote audio adapter and oh man i was scared i was going to rip off that wire, so i just pulled it out a little, put the tray to lay down and drilled the hole that was needed and that was that lol. thanks also albert i never seen this DIY or i woulda jumped on this project a long time ago
MBWorld Fanatic!
Joined: Jun 2007
Posts: 1,022
Likes: 44
From: Los Angeles, CA
2015 C400 Tenorite Gray
Center Console Removal
Here is my first contribution to the forums. I hope it's helpful for someone.
Before you start, step 8 is the most important one. If you rip the cable you will have to get a new switch and it will probably cost hundreds of dollars. Be very carful with it.
Tools:
Torx T20 screwdriver and a plastic spatula
Instructions:
1 - Pull out the coin holder in the center console and remove the screw under it.
2 - Pull up gently starting from the front to remove the thin plastic cover that goes around the cup holders and stereo control knob. This piece just pulls up and off.
(picture of bottom of this piece)

3 - Remove the leather glove around the shift console by pushing it from right to left by hand where the leather meets the silver piece. This should be very easy to do by hand.
4 - Remove the silver outline that goes around the leather shift glove. You can do this by inserting a plastic spatula or a special panel removal tool from the sides. This piece has clips on the side but can be removed by pushing in from the outside on both sides. This can even be done by holding on from the inside and pulling towards the center then up. Once unhinged remove this completely from the shift knob to get it out of the way.

5 - Remove wood trim around shifter. Same idea - use the tool to push it apart from the black plastic outline and push up from the front. The front needs to come out first then the whole piece will slide forward and come out. Once unhinged remove this completely from the shift knob to get it out of the way. This piece will scratch your trim if you leave it on around the shift handle.
This will reveal three screws on the front of the arm rest. One holds down the switch and the other two hold down the arm rest.
6 - Remove the rear air vent. This pulls straight up. You have to yank pretty hard to get this thing off but after taking it off twice I couldn't figure out a different way. Looks like that's the right and only way even though it requires force.
This will reveal two more screws that hold down the armrest.
(picture of the top of this piece after removal)

7 - Remove the five screws that hold down the center console. Two in the back, three in the front including the one that holds the switch in place.


8 - VERY IMPORTANT. Make sure you unplug the switch and run the wire down so you can pull out the switch without ripping the thing 4 cables. I didn't do this and ended up ripping the wires and having to solder them. The white plug which is on the left side of the shifter can be seen in this picture as well as the gray cable (looks like 1 wide and thin wire) that attaches to the switch. You can unplug and then pull closer to the switch in order to eventually remove the switch.

9 - You are now ready to pull the arm rest up. Push in from each side and pull up. You can see the clips in the pictures but you don't have to insert anything that will push the clips in, just pushing in hard with your hands and pulling up will get this out. Be careful of the switch and the cable in the front that you'll have to pull through very slowly by hand. There is almost no play and this wire can rip right off.

10 - final picture with center console removed.

I did this project so I could run both an aux cable from the glove box as well as a power cable into the arm rest storage area. I might drill through one of the cup holders and have the cables come out of there.
Others might use this to swap their center console with a C63 or Euro console without the cup holders.
Whatever you use it for, I hope this guide helps.
Do you happen to know the part number for the thin plastic cover that goes around the cup holders and stereo control knob?
Mine is pealing.
is the upholder support?
I looked at the following diagram at the link below but its tough to read
http://www.parts.com/parts/2009/MERC...gramCallOut=15
Newbie
Joined: Jul 2013
Posts: 1
Likes: 0
mercedes C320 2008
hey.i read all here,but i didn''t find something about how to remove the grey cap
hey.i read all here,but i didn''t find something about how to remove the grey cap from the switch.are you kind to tell me how to do? thanks.
Center Console Removal
Here is my first contribution to the forums. I hope it's helpful for someone.
Before you start, step 8 is the most important one. If you rip the cable you will have to get a new switch and it will probably cost hundreds of dollars. Be very carful with it.
Tools:
Torx T20 screwdriver and a plastic spatula
Instructions:
1 - Pull out the coin holder in the center console and remove the screw under it.
2 - Pull up gently starting from the front to remove the thin plastic cover that goes around the cup holders and stereo control knob. This piece just pulls up and off.
(picture of bottom of this piece)
3 - Remove the leather glove around the shift console by pushing it from right to left by hand where the leather meets the silver piece. This should be very easy to do by hand.
4 - Remove the silver outline that goes around the leather shift glove. You can do this by inserting a plastic spatula or a special panel removal tool from the sides. This piece has clips on the side but can be removed by pushing in from the outside on both sides. This can even be done by holding on from the inside and pulling towards the center then up. Once unhinged remove this completely from the shift knob to get it out of the way.
5 - Remove wood trim around shifter. Same idea - use the tool to push it apart from the black plastic outline and push up from the front. The front needs to come out first then the whole piece will slide forward and come out. Once unhinged remove this completely from the shift knob to get it out of the way. This piece will scratch your trim if you leave it on around the shift handle.
This will reveal three screws on the front of the arm rest. One holds down the switch and the other two hold down the arm rest.
6 - Remove the rear air vent. This pulls straight up. You have to yank pretty hard to get this thing off but after taking it off twice I couldn't figure out a different way. Looks like that's the right and only way even though it requires force.
This will reveal two more screws that hold down the armrest.
(picture of the top of this piece after removal)
7 - Remove the five screws that hold down the center console. Two in the back, three in the front including the one that holds the switch in place.
8 - VERY IMPORTANT. Make sure you unplug the switch and run the wire down so you can pull out the switch without ripping the thing 4 cables. I didn't do this and ended up ripping the wires and having to solder them. The white plug which is on the left side of the shifter can be seen in this picture as well as the gray cable (looks like 1 wide and thin wire) that attaches to the switch. You can unplug and then pull closer to the switch in order to eventually remove the switch.
9 - You are now ready to pull the arm rest up. Push in from each side and pull up. You can see the clips in the pictures but you don't have to insert anything that will push the clips in, just pushing in hard with your hands and pulling up will get this out. Be careful of the switch and the cable in the front that you'll have to pull through very slowly by hand. There is almost no play and this wire can rip right off.
10 - final picture with center console removed.
I did this project so I could run both an aux cable from the glove box as well as a power cable into the arm rest storage area. I might drill through one of the cup holders and have the cables come out of there.
Others might use this to swap their center console with a C63 or Euro console without the cup holders.
Whatever you use it for, I hope this guide helps.


Junior Member
Joined: Dec 2014
Posts: 56
Likes: 1
From: Melbourne, AUS
09 C63 Estate
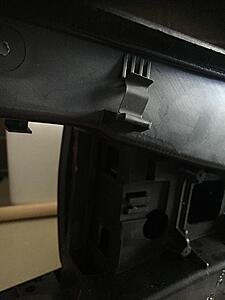
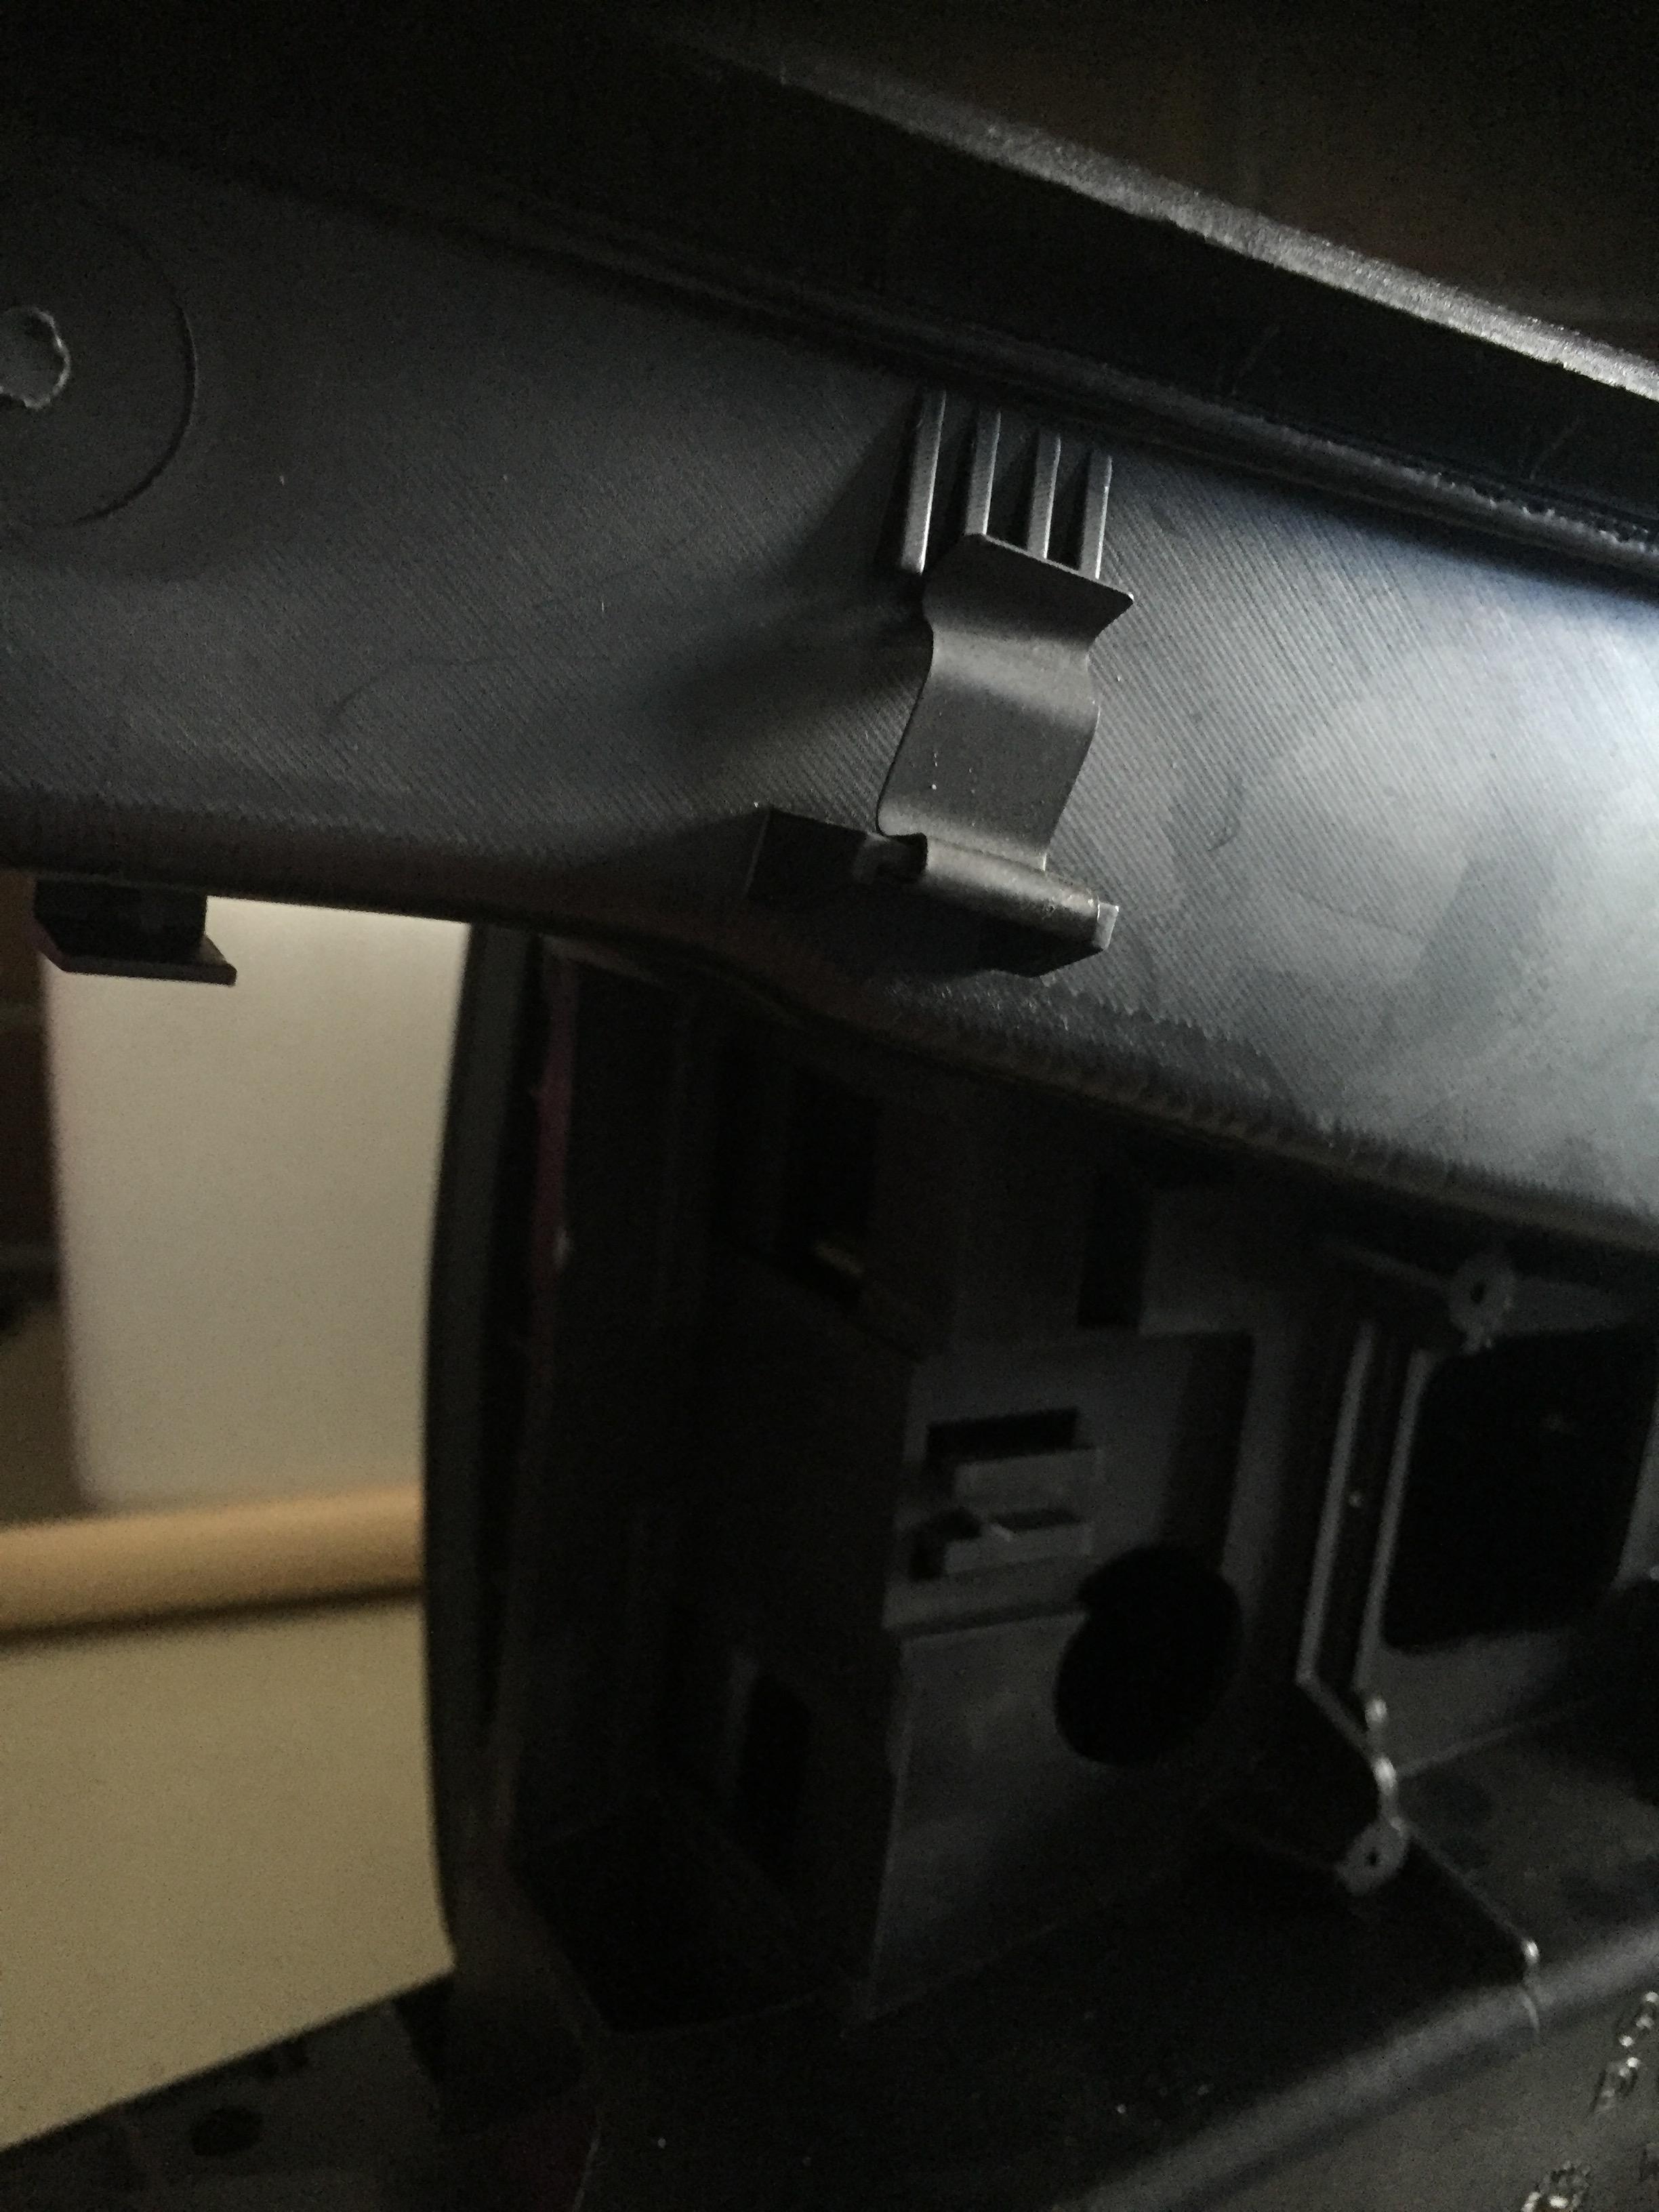
FYI - this is what you are dealing with when trying to remove the comand wire..its the clip which the cable is hooked into...
I ended up taking de-pinning the plug and was able to pull them through in the end, then just put the pins back. Didn't feel like cutting..(Almost did though out of frustration)
I ended up taking de-pinning the plug and was able to pull them through in the end, then just put the pins back. Didn't feel like cutting..(Almost did though out of frustration)

Super Member
Joined: Apr 2010
Posts: 705
Likes: 55
From: LA LA Land
'08 C300 MM Pano
FYI - this is what you are dealing with when trying to remove the comand wire..its the clip which the cable is hooked into...
I ended up taking de-pinning the plug and was able to pull them through in the end, then just put the pins back. Didn't feel like cutting..(Almost did though out of frustration)
I ended up taking de-pinning the plug and was able to pull them through in the end, then just put the pins back. Didn't feel like cutting..(Almost did though out of frustration)
Am I correct in assuming that the COMAND wire is not the only wire held up by that clip, but is there in addition to that gang of wires that runs through the gear shift cavity. Correct?
Also, as I am still working on reinstalling mine, there is still another location where the wire is looped under the COMAND switch and around another contraption that makes it difficult to pull through.
I will try to get another picture as I reassemble and will add it here for reference.


