


2011 LED DRL installed - Having issue

Member
Joined: May 2011
Posts: 139
Likes: 1
From: Jersey
2008 C300 w204

Newbie
Joined: Aug 2011
Posts: 12
Likes: 0
2008 C300 Sport
Plug Part Numbers
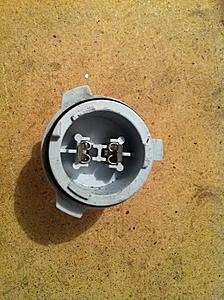
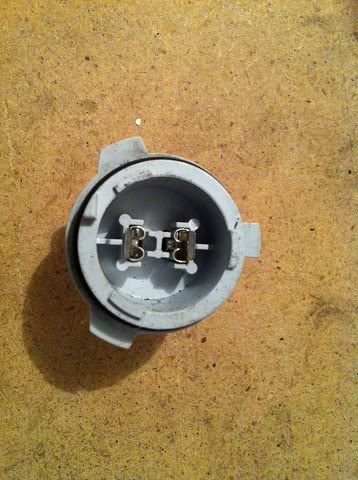
Blue00r6 .... do these in the pic appear to be what i should have been given?
I obviously didn't have a part number when i did the order and just described them to the people at the part's desk that i needed the plugs that go into the back of the DRL LEDs for a C300, and this is what they look like.
Part Number
2115451328 (it's shown upside down in the pic on the one plug side)
When i run that on Parts.com it says "Trimmer Plug", MSRP $5.25, Core $0.00, Price $3.72
Newbie
Joined: Aug 2011
Posts: 12
Likes: 0
2008 C300 Sport
Parts.com seems cheaper and also it appears they are in stock. I was able to add them to cart but didn't run thru a full checkout.
Noted that you figured they'd look like that. Sounds like i got the right stuff.
MB World Stories
The Best of Mercedes & AMG

7 Craziest Things AMG Gas Ever Built
Verdad Gallardo
New Electric Mercedes-AMG GT 4-Door Coupe Unveiled: 10 Things You Need to Know
Verdad Gallardo
6 Mercedes Models That Did NOT Age Well (But Are Somehow Still Cool)
Verdad Gallardo
Manual Mercedes? 6 Times Sindelfingen Let Drivers Have All The Fun
Verdad Gallardo
Mercedes SLR McLaren 722 S Is Extremely Rare Example Modified by McLaren
Verdad Gallardo
8 Classic Boxy Mercedes Designs That Have Aged Like Fine Wine
Verdad Gallardo
Flawlessly Restored Mercedes 190E Evo II Heads to Auction
Verdad Gallardo
Electric Mercedes C-Class Unveiled: 11 Things You Need to Know
Verdad Gallardo
Mercedes EQS Gets A Major Update: Everything You Need to Know
Verdad Gallardo
Newbie
Joined: Aug 2011
Posts: 12
Likes: 0
2008 C300 Sport
I'm having them wired to my fog switch, and pitching the round fogs (one cracked last week anyways), and he said the wires on those appear to be much larger and don't look like a good fit for that trimmer plug. He said there doesn't appear to be a pigtail or lead for the black trimmer plug, which he said appears hollow.
Do you know what advice or additional parts he might need to finish up the wire job? Have you rewired yours yet using the trimmer plugs? Even if not, do you have an idea of how he should wire the fog wires to that trimmer plug?
I have attached 4 pics the installer sent over. His email read..
"Need electrical pins/leads to solder onto.. Hard to see inside of the mercedes plug trimmer piece. Is there a way to open it up? Or is there a pigtail / wiring harness repair kit to get the wires into it?"
Thanks-
Last edited by C300SportDallas; Oct 12, 2011 at 11:43 PM.

Super Member
Joined: Mar 2011
Posts: 955
Likes: 0
From: NNJ
'11 C350 '13 F150 lariat
I am awaiting my plugs to rewire my 2011 and do the mod on dark kents ride, so this is based on the pics and my experience. All the OEM plugs Ive used in the past are repair plugs, you cut your wires blunt and fit them into the plug and theres a plastic piece that snaps down and make contact with the wire and sets the copper core into a crimp on metal connectors. If the wire to fogs is too thick have the installer solder a short 2" piece to the existing wire from fogs and insert and crimp that. I personally wouldnt do the fog jump, you then need to turn on the LEDs all the time. I would personally go straight to 12v that is switched, the leds use little power and then they would be on anytime the key is clicked forward once and when engine is running. This is basically how the 2011s are. If you really wanna get creative you could use a relay setup and take power straight from the battery and use whatever 12v source u like to just switch the relay on, utilizing 12v from battery as the real power source. Thats how I have mine setup, always bright all the time in my 2011
Newbie
Joined: Aug 2011
Posts: 12
Likes: 0
2008 C300 Sport
I am awaiting my plugs to rewire my 2011 and do the mod on dark kents ride, so this is based on the pics and my experience. All the OEM plugs Ive used in the past are repair plugs, you cut your wires blunt and fit them into the plug and theres a plastic piece that snaps down and make contact with the wire and sets the copper core into a crimp on metal connectors. If the wire to fogs is too thick have the installer solder a short 2" piece to the existing wire from fogs and insert and crimp that. I personally wouldnt do the fog jump, you then need to turn on the LEDs all the time. I would personally go straight to 12v that is switched, the leds use little power and then they would be on anytime the key is clicked forward once and when engine is running. This is basically how the 2011s are. If you really wanna get creative you could use a relay setup and take power straight from the battery and use whatever 12v source u like to just switch the relay on, utilizing 12v from battery as the real power source. Thats how I have mine setup, always bright all the time in my 2011
I actually do want mine wired to the fogs because i only want them to run (in full brightness mode) when switched via fog control, and that would be during sunrise/sunset periods when it's not quite daylight or night conditions, and will run them with my eyelids & clear sidemarkers (put AZN Optics's 5000K LEDs in those already). I'm not a fan of DRLs in general, and this will also conserve their life (even though i'm aware LEDs do last quite a long time theoretically with bulb manufacturers simulated longevity tests).
I also found this post of someone else who did this w/ username CClement...
https://mbworld.org/forums/c-class-w...-complete.html
My installer said that wire job seemed a little "ghetto", and said he wants to avoid doing it that way. However, i am a software guy and know nothing about hardware or electrical engineering, so i am just trusting his advice and can't really provide an expert opinion on that.

Thread Starter
Super Member
Joined: Apr 2010
Posts: 770
Likes: 9
2017 C43
Well I didnt wire mine to the fogs, so I can't speak on it entirely intelligibly but I imagine what i would do is hack the plug off of the fog connector, wire it into the new plug.. plug it in.. I'm not sure I understand where the problem is?
Blue00r6.... so the local tuning shop has my LEDs installed and they look awesome, however they're stuck at the wiring portion. I have those 2 little black plastic trimmer plugs that i posted a pic of above, however the guy who is doing the project is asking me about how the actual wiring works.
I'm having them wired to my fog switch, and pitching the round fogs (one cracked last week anyways), and he said the wires on those appear to be much larger and don't look like a good fit for that trimmer plug. He said there doesn't appear to be a pigtail or lead for the black trimmer plug, which he said appears hollow.
Do you know what advice or additional parts he might need to finish up the wire job? Have you rewired yours yet using the trimmer plugs? Even if not, do you have an idea of how he should wire the fog wires to that trimmer plug?
I have attached 4 pics the installer sent over. His email read..
"Need electrical pins/leads to solder onto.. Hard to see inside of the mercedes plug trimmer piece. Is there a way to open it up? Or is there a pigtail / wiring harness repair kit to get the wires into it?"
Thanks-

Super Member
Joined: Dec 2007
Posts: 580
Likes: 0
C300 Sport 6MT
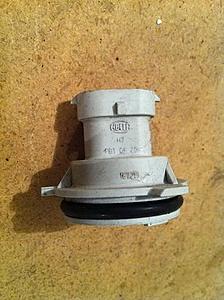
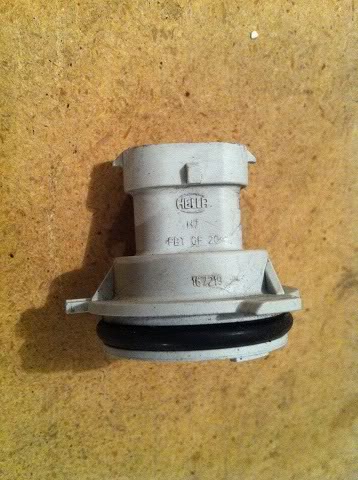
The stock foglight connector is just a mate for the Hella H7 connector. If you cracked your foglights and are going w/ this LED upgrade anyway, just take the stock pieces off. All you'd need to do is wire up spades to connect from your LEDs to the H7 connector. Pics below. Remember you're going to have to get load resistors or else you'll get errors messages since you're hooking up to the fogs. Blue hooked up to the sidemarkers, so no errors period.


Newbie
Joined: Aug 2011
Posts: 12
Likes: 0
2008 C300 Sport
http://www.frys.com/product/2875774
Or something like this... (although they didn't have MB stuff)
http://www.familycar.com/autoparts/s...connector.html
He saw the way CClement did it that i posted a link to a couple posts above, and sent me the following note....
"it looks like they did it the "ghetto" way� soldering directly on the led unit, then feeding the wires thru the trimmer plug. I guess I can do it the same way. But, I do prefer doing it like a true wired pin --> plug w/ water resistant grommet/gasket like the factory route. Another way that I could do it is by using a super small female disconnect connector and just squeeze it onto the led unit pins."
I was just trying to see if anyone had experience with trying to do it in this more polished way with the factory trimmer plugs, that he calls
"wired pin --> plug w/ water resistant grommet/gasket"
In the meantime, my car is up on the lift and i'm driving a rental which sucks lol.
Newbie
Joined: Aug 2011
Posts: 12
Likes: 0
2008 C300 Sport
The stock foglight connector is just a mate for the Hella H7 connector. If you cracked your foglights and are going w/ this LED upgrade anyway, just take the stock pieces off. All you'd need to do is wire up spades to connect from your LEDs to the H7 connector. Pics below. Remember you're going to have to get load resistors or else you'll get errors messages since you're hooking up to the fogs. Blue hooked up to the sidemarkers, so no errors period.


Super Member
Joined: Dec 2007
Posts: 580
Likes: 0
C300 Sport 6MT
Caps will not present the same load as stock halogens to the ECU so you'll still get bulb-out msgs. Haven't gotten to that point yet in my little project, though, so it's all theory at this point.

Thread Starter
Super Member
Joined: Apr 2010
Posts: 770
Likes: 9
2017 C43
1. hack off the fog plug
2. solder on some female pins that fit through those holes on the plastic connector
I don't recommend soldering anything directly to the pins coming out of the LED unit as that is pretty ghetto.
If this guy has an electrical install shop he can figure it out. I did this in a garage with spare junk from radio shack
Super Member
Joined: Mar 2011
Posts: 955
Likes: 0
From: NNJ
'11 C350 '13 F150 lariat
What u should do regardless is get a 2 pin molex connector from radio shack and use that in between ur LED and the factory wiring. If you break a LED or sumthin happens that u need to remove one it will be easy to do urself instead of paying someone. As far as fog harness goes, the info posted is correct. If you unplug your fogs all together u wont get an error in ur dash. If you jump the LEDs to them u will need a resistor before the capacitor to trick the car into thinking the fogs are still present. If you wanna avoid this all together have ur guy use a 4 plug relay, like a standard bosch automotive and use the fog + to do the switching to the relay with a continous 12+v feed from the battery or accesory. This will avoid the error message on the dash and may be easier in the end if your guy cant figure out the required voltage range to keep the error message off your dash. If you need it I can link u to a wiring schematic and relay part #
Last edited by jimmythegreek; Oct 13, 2011 at 04:03 PM.
Super Member
Joined: Dec 2007
Posts: 580
Likes: 0
C300 Sport 6MT
If you wanna avoid this all together have ur guy use a 4 plug relay, like a standard bosch automotive and use the fog + to do the switching to the relay with a continous 12+v feed from the battery or accesory. This will avoid the error message on the dash and may be easier in the end if your guy cant figure out the required voltage range to keep the error message off your dash. If you need it I can link u to a wiring schematic and relay part #
http://www.amazon.com/LED-Daytime-Ru...8563651&sr=8-1
Super Member
Joined: Mar 2011
Posts: 955
Likes: 0
From: NNJ
'11 C350 '13 F150 lariat
not worth the 30 bucks. Heres the simple way to do this and avoid error messages
U dont need the valet switch in the picture unless you want to have a hidden switch to control your LEDs. Use a standard 4 pin automotive relay available anywhere, I used a bosch that we had in stock at the shop, any parts store has them. Pic attached is the proper wiring, as follows. Just wire a fuse into your 12+v lead from battery or the main terminal on the under hood fuse block and follow the pic, this is pin 30. The lead to carputer is gonna be the leads to your LEDs, pin 87. You can use it for 2 LEDs no problem. Ground them both to the chassis or a known ground. Use a quick add a splice off of whatever 12+v positive source u want to switch the LEDs on with. Such as the fog, markers, headlights, whatever, this would be pin 86. When the wire senses 12v it will switch the relay on. The relay uses no power from the switching leg, it just closes the internal switch in relay, will not make an error message. This is how I rewired my 2011 LEDs to be on full brightness all the time. I jumped the OEM LED harness to switch on the relay so my LEDs still come on with the unlock command from key fob. Its the cats azz
U dont need the valet switch in the picture unless you want to have a hidden switch to control your LEDs. Use a standard 4 pin automotive relay available anywhere, I used a bosch that we had in stock at the shop, any parts store has them. Pic attached is the proper wiring, as follows. Just wire a fuse into your 12+v lead from battery or the main terminal on the under hood fuse block and follow the pic, this is pin 30. The lead to carputer is gonna be the leads to your LEDs, pin 87. You can use it for 2 LEDs no problem. Ground them both to the chassis or a known ground. Use a quick add a splice off of whatever 12+v positive source u want to switch the LEDs on with. Such as the fog, markers, headlights, whatever, this would be pin 86. When the wire senses 12v it will switch the relay on. The relay uses no power from the switching leg, it just closes the internal switch in relay, will not make an error message. This is how I rewired my 2011 LEDs to be on full brightness all the time. I jumped the OEM LED harness to switch on the relay so my LEDs still come on with the unlock command from key fob. Its the cats azz
Last edited by jimmythegreek; Oct 14, 2011 at 10:58 AM.
Newbie
Joined: Aug 2011
Posts: 12
Likes: 0
2008 C300 Sport
not worth the 30 bucks. Heres the simple way to do this and avoid error messages
U dont need the valet switch in the picture unless you want to have a hidden switch to control your LEDs. Use a standard 4 pin automotive relay available anywhere, I used a bosch that we had in stock at the shop, any parts store has them. Pic attached is the proper wiring, as follows. Just wire a fuse into your 12+v lead from battery or the main terminal on the under hood fuse block and follow the pic, this is pin 30. The lead to carputer is gonna be the leads to your LEDs, pin 87. You can use it for 2 LEDs no problem. Ground them both to the chassis or a known ground. Use a quick add a splice off of whatever 12+v positive source u want to switch the LEDs on with. Such as the fog, markers, headlights, whatever, this would be pin 86. When the wire senses 12v it will switch the relay on. The relay uses no power from the switching leg, it just closes the internal switch in relay, will not make an error message. This is how I rewired my 2011 LEDs to be on full brightness all the time. I jumped the OEM LED harness to switch on the relay so my LEDs still come on with the unlock command from key fob. Its the cats azz
U dont need the valet switch in the picture unless you want to have a hidden switch to control your LEDs. Use a standard 4 pin automotive relay available anywhere, I used a bosch that we had in stock at the shop, any parts store has them. Pic attached is the proper wiring, as follows. Just wire a fuse into your 12+v lead from battery or the main terminal on the under hood fuse block and follow the pic, this is pin 30. The lead to carputer is gonna be the leads to your LEDs, pin 87. You can use it for 2 LEDs no problem. Ground them both to the chassis or a known ground. Use a quick add a splice off of whatever 12+v positive source u want to switch the LEDs on with. Such as the fog, markers, headlights, whatever, this would be pin 86. When the wire senses 12v it will switch the relay on. The relay uses no power from the switching leg, it just closes the internal switch in relay, will not make an error message. This is how I rewired my 2011 LEDs to be on full brightness all the time. I jumped the OEM LED harness to switch on the relay so my LEDs still come on with the unlock command from key fob. Its the cats azz
Since i wanted to go the fog route, and the fog wires are too large to fit inside the black trimmer plugs i've posted a picture above (that snap onto the back of the LEDs perfectly), we took someone's advice (can't remember which poster or thread, there is another thread my CClement on this) and cut the fog wires and then soldered on some smaller red/black (pos/neg) ones on each side that would indeed fit into the black trimmer plugs. Then we simply fed those into the black trimmer plugs, and bent them around the end so they'd make contact, while snapping the black trimmer plugs into place. Almost like how you'd do a speaker wire type of thing.
Yes, i know this is not the most sturdy thing, although it has held up quite well over bumps and they're still running, controlled via the fog switch. We used capacitors, and i have no dash errors or problems at all (some had suggested we could only use resistors, but CClement and i both used capacitors 25v and it was sufficient it seems).
Since the above solution isn't a great long term, and was just to get my car down from the jack temporarily so i could return my rental, the installer and i are going to do something more crafty now. I ordered an extra set of black trimmer plugs today from Parts.com (since my original 2 are snapped into the LEDs obviously), and we're going to head over to Frys electronics when they arrive and match them to some parts and create a proper plug. I will post a picture if possible and at the minimum a more detailed description with part numbers once we have this done. I am thinking this second set of trimmer plugs will arrive next week and i'll have it done end of next week or early the following week.
I would suggest that those of you doing it yourselves be careful with the bumper cutting part. I wanted mine to look professional so that's why i took it to a fairly fancy shop here in Dallas (although not one of those super overpriced West Coast Customs types of places). The guy spent a lot of time smoothing out plastic and edges so there are no gaps. Other than my plugs being in a short term fix state, i love the LEDs and they look great. They are super bright, brighter than i expected. I run them with AZNOptics 5000K HIDs and his 5000K LEDs in the eyelids/clear-markers, and they all match beautifully once the HIDs are fully on after a couple second typical delay.
Pic attached.
Super Member
Joined: Mar 2011
Posts: 955
Likes: 0
From: NNJ
'11 C350 '13 F150 lariat
I got my plugs in today, picked them up from dealer. They are the proper plugs but have NO GUTS to them. There arent any spade connectors inside, just hollow. I spent a half hour on the parts guys screen and this is all thats available, so anyone buying these should expect a little customization to make them work. Im gonna spot solder the wires to the prongs and slide these over and seal them. They are kinda worthless other than a shielding and weatherproofing cover
Newbie
Joined: Aug 2011
Posts: 12
Likes: 0
2008 C300 Sport
I got my plugs in today, picked them up from dealer. They are the proper plugs but have NO GUTS to them. There arent any spade connectors inside, just hollow. I spent a half hour on the parts guys screen and this is all thats available, so anyone buying these should expect a little customization to make them work. Im gonna spot solder the wires to the prongs and slide these over and seal them. They are kinda worthless other than a shielding and weatherproofing cover


