


2011 LED DRL installed - Having issue
Senior Member
Joined: Jun 2003
Posts: 433
Likes: 2
From: Los Angeles
2008 C300 Sport Sedan: Panarama Roof, P2, Multimedia
not worth the 30 bucks. Heres the simple way to do this and avoid error messages
U dont need the valet switch in the picture unless you want to have a hidden switch to control your LEDs. Use a standard 4 pin automotive relay available anywhere, I used a bosch that we had in stock at the shop, any parts store has them. Pic attached is the proper wiring, as follows. Just wire a fuse into your 12+v lead from battery or the main terminal on the under hood fuse block and follow the pic, this is pin 30. The lead to carputer is gonna be the leads to your LEDs, pin 87. You can use it for 2 LEDs no problem. Ground them both to the chassis or a known ground. Use a quick add a splice off of whatever 12+v positive source u want to switch the LEDs on with. Such as the fog, markers, headlights, whatever, this would be pin 86. When the wire senses 12v it will switch the relay on. The relay uses no power from the switching leg, it just closes the internal switch in relay, will not make an error message. This is how I rewired my 2011 LEDs to be on full brightness all the time. I jumped the OEM LED harness to switch on the relay so my LEDs still come on with the unlock command from key fob. Its the cats azz
U dont need the valet switch in the picture unless you want to have a hidden switch to control your LEDs. Use a standard 4 pin automotive relay available anywhere, I used a bosch that we had in stock at the shop, any parts store has them. Pic attached is the proper wiring, as follows. Just wire a fuse into your 12+v lead from battery or the main terminal on the under hood fuse block and follow the pic, this is pin 30. The lead to carputer is gonna be the leads to your LEDs, pin 87. You can use it for 2 LEDs no problem. Ground them both to the chassis or a known ground. Use a quick add a splice off of whatever 12+v positive source u want to switch the LEDs on with. Such as the fog, markers, headlights, whatever, this would be pin 86. When the wire senses 12v it will switch the relay on. The relay uses no power from the switching leg, it just closes the internal switch in relay, will not make an error message. This is how I rewired my 2011 LEDs to be on full brightness all the time. I jumped the OEM LED harness to switch on the relay so my LEDs still come on with the unlock command from key fob. Its the cats azz
Does anyone have more detailed pictures on what part we have to cut when the fog is removed?
Senior Member
Joined: Jun 2003
Posts: 433
Likes: 2
From: Los Angeles
2008 C300 Sport Sedan: Panarama Roof, P2, Multimedia
All I mean here is that there are no wires coming out of the back of the LEDs. Just a socket with two pins in the recess.
The "oem plug" would be whatever connects/plugs into the LEDs in a 2011 vehicle. I haven't seen this plug, but I assume you can order a Wire/Male plug for the LEDs from the dealership.
I haven't thought about selling the fogs, but I might as well as I can't re-install them. Which pieces are you looking for? just the glass?
So with these plugs, we would just connect this plug to the LED units and wire some wires to the plug below correct? Like my sorry Paint diagram below??


Super Member
Joined: May 2010
Posts: 816
Likes: 21
2008 W204
The only thing about wiring to the fogs-
I noticed with my car that at night when I try to turn on my fogs the car automatically turns off the lowbeams/highbeams, so it seems its fog lights or nothing, so if you have the LEDs wired to the fogs you cant have them on at all at night as your headlights would turn off.
C300SportDallas-
Does this make sense?
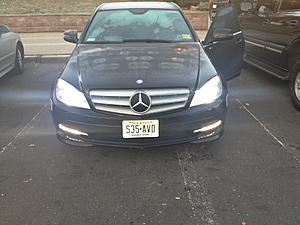
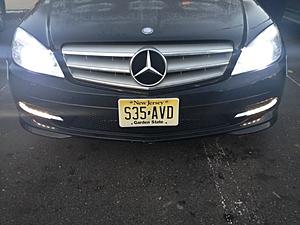
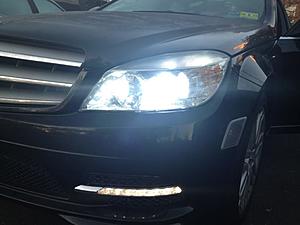
Also in your picture it seems that the LEDs are super bright, are they brighter than the OEM look or do they just look brighter in the picture but match OEM perfectly?
Did you use the capacitor method as blue did?
I want to do this mod, but I think I am going to wait to do it to the 2012 style bumper once I can get a hold of all the parts
Like this:
http://www.benzworld.org/forums/w204...8-11-w204.html
I noticed with my car that at night when I try to turn on my fogs the car automatically turns off the lowbeams/highbeams, so it seems its fog lights or nothing, so if you have the LEDs wired to the fogs you cant have them on at all at night as your headlights would turn off.
C300SportDallas-
Does this make sense?
Also in your picture it seems that the LEDs are super bright, are they brighter than the OEM look or do they just look brighter in the picture but match OEM perfectly?
Did you use the capacitor method as blue did?
I want to do this mod, but I think I am going to wait to do it to the 2012 style bumper once I can get a hold of all the parts
Like this:
http://www.benzworld.org/forums/w204...8-11-w204.html

Super Member
Joined: Mar 2011
Posts: 955
Likes: 0
From: NNJ
'11 C350 '13 F150 lariat
I had an 08 and if my fogs were on my park lights had to be on, there was no way to get around the switch. I dont understand what u mean by fogs on headlights hi or lo go off? I did the mod last week on a members car and used my relay method striaght from battery and didnt need caps. I added them to be safe but I also rewired my 2011 so Im on full brightness and I didnt need caps either. I personally wouldnt tap the foglights, they will throw an error code on ur dash if you do, if u just disconnect the fogs and ziptie them out of the way safely u wont get an error. U could tap them for a relay trigger if u wanna use the OEM HL switch, they wont error that way either. Thats what I did, I tap the +side of the OEM LED harness and that triggers my LEDs so I still have unlock flash and OEM functions, but I have full brightness all the time, Im lovin it
Senior Member
Joined: Jun 2003
Posts: 433
Likes: 2
From: Los Angeles
2008 C300 Sport Sedan: Panarama Roof, P2, Multimedia
I had an 08 and if my fogs were on my park lights had to be on, there was no way to get around the switch. I dont understand what u mean by fogs on headlights hi or lo go off? I did the mod last week on a members car and used my relay method striaght from battery and didnt need caps. I added them to be safe but I also rewired my 2011 so Im on full brightness and I didnt need caps either. I personally wouldnt tap the foglights, they will throw an error code on ur dash if you do, if u just disconnect the fogs and ziptie them out of the way safely u wont get an error. U could tap them for a relay trigger if u wanna use the OEM HL switch, they wont error that way either. Thats what I did, I tap the +side of the OEM LED harness and that triggers my LEDs so I still have unlock flash and OEM functions, but I have full brightness all the time, Im lovin it
Super Member
Joined: Mar 2011
Posts: 955
Likes: 0
From: NNJ
'11 C350 '13 F150 lariat
U can read the whole wiring schematic somewhere in this thread or maybe it was another LED thread. Anyway its a simply relay circuit. search google for how to wire relay and u will get the info u need. And just to be clear, I now have a 2011 so it was easy to use the factory + to trigger the relay. If you have a 08-10 u can do the same but u would have to use the fog switch to activate the LEDs if you want unlock flash. The only other way would be to make an isolation module (kinda tricky) that would let u use 2 triggers for the LEDs where one would be the fog to use unlock flash and the other would be constant on thru the ignition
MB World Stories
The Best of Mercedes & AMG

7 Craziest Things AMG Gas Ever Built
Verdad Gallardo
New Electric Mercedes-AMG GT 4-Door Coupe Unveiled: 10 Things You Need to Know
Verdad Gallardo
6 Mercedes Models That Did NOT Age Well (But Are Somehow Still Cool)
Verdad Gallardo
Manual Mercedes? 6 Times Sindelfingen Let Drivers Have All The Fun
Verdad Gallardo
Mercedes SLR McLaren 722 S Is Extremely Rare Example Modified by McLaren
Verdad Gallardo
8 Classic Boxy Mercedes Designs That Have Aged Like Fine Wine
Verdad Gallardo
Flawlessly Restored Mercedes 190E Evo II Heads to Auction
Verdad Gallardo
Electric Mercedes C-Class Unveiled: 11 Things You Need to Know
Verdad Gallardo
Mercedes EQS Gets A Major Update: Everything You Need to Know
Verdad Gallardo
Newbie
Joined: Aug 2011
Posts: 12
Likes: 0
2008 C300 Sport
The only thing about wiring to the fogs-
I noticed with my car that at night when I try to turn on my fogs the car automatically turns off the lowbeams/highbeams, so it seems its fog lights or nothing, so if you have the LEDs wired to the fogs you cant have them on at all at night as your headlights would turn off.
C300SportDallas-
Does this make sense?
Also in your picture it seems that the LEDs are super bright, are they brighter than the OEM look or do they just look brighter in the picture but match OEM perfectly?
Did you use the capacitor method as blue did?
I want to do this mod, but I think I am going to wait to do it to the 2012 style bumper once I can get a hold of all the parts
Like this:
http://www.benzworld.org/forums/w204...8-11-w204.html
As for my low/high beams turning off when they run, i'm equally puzzled as others as to what u mean. I can run them with my eyelids, or with eyelids/lowbeams. If i flip on my highs, they turn off, just like my old fogs did.
For those askibg about which capacitor i used, it's either posted earlier in this thread or in the one other thread like this that i've linked to earlier in this thread. I can't remember off the top of my head.
Super Member
Joined: Mar 2011
Posts: 955
Likes: 0
From: NNJ
'11 C350 '13 F150 lariat
If you wire the LEDs using a relay directly from the battery u dont need capacitors, I dont have any installed never had a flicker. If your going to feed them otherwise stop at radioshack and grab a pair of caps out of their project drawers. a 25uf or higher is fine, I think I did 40uf 35v caps on the last LED isntall I completed

Senior Member


Joined: Sep 2010
Posts: 288
Likes: 4
From: MI
2024 G63 AMG, 2022 GLE 63S AMG
If you wire the LEDs using a relay directly from the battery u dont need capacitors, I dont have any installed never had a flicker. If your going to feed them otherwise stop at radioshack and grab a pair of caps out of their project drawers. a 25uf or higher is fine, I think I did 40uf 35v caps on the last LED isntall I completed
Newbie
Joined: Aug 2011
Posts: 12
Likes: 0
2008 C300 Sport
Comprehensive LED Guide (Wiring to Fogs)
For those of you wanting to do this project, based on my experience doing this mod, here is a nice summary of this thread which will save you lots of headaches and time/money.....
1-Review the guide for self installation (or take it to the customization shop like i did) that blue00r6 posted at 07-30-2011, 12:52 AM at..
https://mbworld.org/forums/c-class-w...ing-issue.html
2-Get your parts from Parts.com rather than the dealer, which will save you hundreds upon hundreds of dollars.
i priced both ways when doing it. here are the parts.com part numbers....
LEDS (R/L)
221-820-17-56
221-820-18-56
BACKING PLASTIC MOUNT (R/L)
204-885-28-14
204-885-29-14
FRONT MESH GRILLS (R/L)
204-885-0053
204-885-0753
CHROME DECORATIVE MOLDING (R/L)
204-885-27-74
204-885-28-74
TRIMMER PLUGS (you need 2 of these. i cannot remember if Parts.com prices them as a pair or individual, but i'm guessing individual)
211-545-13-28
My total parts cost was about $400 including shipping if i remember correctly. Parts.com just partners with various dealers in each region, so mine shipped from a dealer in TX for most parts and then one part came out of Chicago because TX was out of stock on it. You are definitely getting real OEM factory MB goods. If i had just ordered them at my local MB dealer via phone, it would have run me $800+ i think.
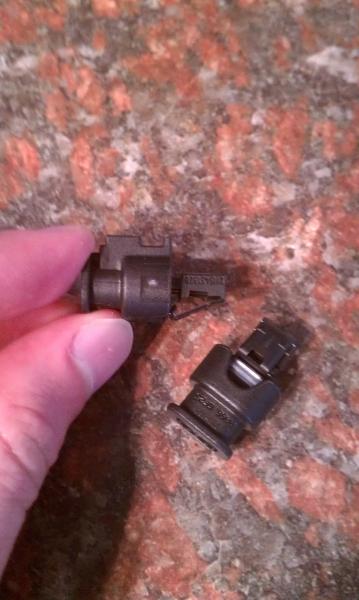
3-Since the factory trimmer plugs are hollow gutless injection molded black plastic and have nothing to wire onto, and Mercedes oddly doesn't sell a "wire repair kit" like they do on some other features/models, you have to create your own piece to wire onto to do this properly and make it as close to factory as possible. I just recently rewired mine by grabbing some crimp pins at Fry's electronics that fit perfectly into the plugs, which gave my installer something to wire to. The guy at Fry's and i opened boxes in the store which i'm sure Fry's HQ isn't thrilled about, and tried several different ones until we found a perfect fit. I have attached a photo of what these are. NOTE: they are hard to track down online for some reason, so if you have a local Fry's, just roll in there with the photo. I could not find them on the Fry's website using part number shown in the box. If you don't have a Fry's Electronics, roll into a similar type big box store in your area with that photo and they can probably track them down or another brand at least that are same specs.
4-If you're wiring to the fogs like i did, which is cool if you want to be able to control when they're on, then you'll need a capacitor...
25v and between 50 and 150 uf. This is because the LEDs require way less juice than the factory fogs. If you are doing this yourself and don't know where to put it in the chain of things, review this entire thread and somewhere there's a diagram that blue00r6 posted that will help you figure this out. If you're not fairly skilled with auto customizations, i probably wouldn't recommend this being your first project. The bumper cutting and wiring are the trickier parts if you're a novice. I probably could have figured it out if i put enough time into it, but it may not have turned out as nice as the install shop (Outperformance Shop in Grand Prairie Texas), because the owner Dan has lots of experience with tuning and took care of all the little details that make it look factory. There are no gaps in my fitment and the wiring job is rock solid and/or waterproof.
There are postings on here saying you need a resistor, but that's not true. My install guy ran a capacitor with those specs and i have zero erros in my dash. blue00r6 used the same i believe when wiring his, and his wiring was to his sidemarkers i believe.
5-if you need to fill in gaps on this project, there is another thread you can review at...
https://mbworld.org/forums/c-class-w...-complete.html
6-To see what mine looked like when done, view my posting at 10-14-2011, 12:32 PM on...
https://mbworld.org/forums/c-class-w...g-issue-4.html
My initial wire job was just a temporary one, so ignore any wiring advice from my earlier postings about how my installer did it. We only recently (yesterday) redid the wire job to be the above method with the crimp pins from Fry's.
To answer all those questions about "how do they work" and "what do they look like"... here's the scoop...
A) if you wire them to your fogs, they work with the fog switch just like your fogs. you can run them with just your eyelids/markers which looks really cool at sunrise/sunset when the lighting is "in between" daylight and dark. You can run them with your lowbeams on just like you did with your fogs. If you flip on your brights, they'll go off just like your factory fogs did.
On a side note... I actually put AZNOptics' 5000K HID kit into my brights recently, and they are awesome. I can no longer flash people (would really put wear/tear on them, and they require a couple seconds to heat up anyways), but i rarely would have to here in Dallas, as our city is like 100 miles in diameter and nobody runs their brights because it's the land of infinite sprawl. On rural TX road trips like down to Austin or South Padre Island, i've found HID brights to be incredible in terms of lighting the road (i used the same kit as i have in my lowbeams. they require the same bulb type). And no, i'm not on commission for AZN, i just mention where i got them so i don't get a bunch of people asking me.
B) as for how they look, you can check that photo of my car that i mentioned above, and if you wire to fogs they run in full brightness whenever you flip them on, which is a good thing. the 2011-beyond cars have their LEDs setup so they are DRLs, and only run in full brightness during daylight. At night, they dim to an ugly yellow that looks awful with HIDs. Because we are doing a retrofit, and there is no dimmer feature in the fogs, so if you want to be able to have them like the 2011 (full bright at day, dim at night) which i think is ugly, then you'll have to get crafty with your wiring and figure something out.
Contrary to what some might think, they do not blind people, unless you're a squirrel or lay on the ground and stare at them. drivers sit up high enough in other cars that it doesn't matter if they run full brightness at night. they don't look ridiculous and i've driven by 15 cops without an issue. the LED strip color is about 5000K if i had to guess, as they match my 5000K HID kit nearly perfect, even if the pic doesn't show it that way. my pic was taken on my Evo or iPhone, and night pics of lights just don't do justice, no way around that.
C) if you want to wire yours to your something other than your fogs, you could consult some of the postings by jimmythegreek in this thread on how to do that. i only have experience with fogs because that's how i wired mine. the above tips on trimmer plugs and the crimp pins would obviously still apply no matter what you wire them to.
D) my installer (Outperformance Shop just outside Dallas) charged me $300 for the install. Obviously pricing varies widely by shop and part of the country, so i'm only posting that as a general barometer you can use. It will take quite a while at a professional shop, so plan on dropping your car off and having someone pick u up and bring you back. I figured spending $300 was worth it to avoid screwing up a $30K car, but that's just my opinion. If you mess up and have to order a new bumper, prepare for things to get expensive.
E) do not rear end anyone. you will have to do this all over again which will be a huge pain and expense. luckily you can largely control that (rather than what hits your tail end), so keep that in mind when doing this and/or driving around later. i didn't really think about that until i had put the full $700 into this project lol.
Bonus and my favorite mod yet: if you have COMAND navigation system and the latest Telematics software running (the update is $200), and want something that will really turn heads when cruising, get the VIM204P from Mid City Engineering and have it installed so you can wire your phone or tablet to your COMAND screen and watch music videos while driving using the Vevo app on iOS or Android. i use my iPhone 4S, Vevo app and the 3G connection on Verizon here is good enough that i can cruise and play music videos and the sound is awesome. And no, i don't get commissions from them either and if you have any questions about how to do this type of setup, just call those guys and they'll give you all the details. They sell the thing and make tons of cash on it, so unlike this crazy retrofit project, there is actually a company you can contact for questions/answers. The local audio shop charged me about $180 including tax for the install, and it's literally the best customization i've done. Plus the VIM204P lets you fully use your Nav while driving (like enter addresses), which allows you to avoid that annoying pullover move you might have found yourself doing just so you could enter an address. i think the VIM204P cost me $450 or so, so about $630 was the total on this mod for me.
1-Review the guide for self installation (or take it to the customization shop like i did) that blue00r6 posted at 07-30-2011, 12:52 AM at..
https://mbworld.org/forums/c-class-w...ing-issue.html
2-Get your parts from Parts.com rather than the dealer, which will save you hundreds upon hundreds of dollars.
i priced both ways when doing it. here are the parts.com part numbers....
LEDS (R/L)
221-820-17-56
221-820-18-56
BACKING PLASTIC MOUNT (R/L)
204-885-28-14
204-885-29-14
FRONT MESH GRILLS (R/L)
204-885-0053
204-885-0753
CHROME DECORATIVE MOLDING (R/L)
204-885-27-74
204-885-28-74
TRIMMER PLUGS (you need 2 of these. i cannot remember if Parts.com prices them as a pair or individual, but i'm guessing individual)
211-545-13-28
My total parts cost was about $400 including shipping if i remember correctly. Parts.com just partners with various dealers in each region, so mine shipped from a dealer in TX for most parts and then one part came out of Chicago because TX was out of stock on it. You are definitely getting real OEM factory MB goods. If i had just ordered them at my local MB dealer via phone, it would have run me $800+ i think.
3-Since the factory trimmer plugs are hollow gutless injection molded black plastic and have nothing to wire onto, and Mercedes oddly doesn't sell a "wire repair kit" like they do on some other features/models, you have to create your own piece to wire onto to do this properly and make it as close to factory as possible. I just recently rewired mine by grabbing some crimp pins at Fry's electronics that fit perfectly into the plugs, which gave my installer something to wire to. The guy at Fry's and i opened boxes in the store which i'm sure Fry's HQ isn't thrilled about, and tried several different ones until we found a perfect fit. I have attached a photo of what these are. NOTE: they are hard to track down online for some reason, so if you have a local Fry's, just roll in there with the photo. I could not find them on the Fry's website using part number shown in the box. If you don't have a Fry's Electronics, roll into a similar type big box store in your area with that photo and they can probably track them down or another brand at least that are same specs.
4-If you're wiring to the fogs like i did, which is cool if you want to be able to control when they're on, then you'll need a capacitor...
25v and between 50 and 150 uf. This is because the LEDs require way less juice than the factory fogs. If you are doing this yourself and don't know where to put it in the chain of things, review this entire thread and somewhere there's a diagram that blue00r6 posted that will help you figure this out. If you're not fairly skilled with auto customizations, i probably wouldn't recommend this being your first project. The bumper cutting and wiring are the trickier parts if you're a novice. I probably could have figured it out if i put enough time into it, but it may not have turned out as nice as the install shop (Outperformance Shop in Grand Prairie Texas), because the owner Dan has lots of experience with tuning and took care of all the little details that make it look factory. There are no gaps in my fitment and the wiring job is rock solid and/or waterproof.
There are postings on here saying you need a resistor, but that's not true. My install guy ran a capacitor with those specs and i have zero erros in my dash. blue00r6 used the same i believe when wiring his, and his wiring was to his sidemarkers i believe.
5-if you need to fill in gaps on this project, there is another thread you can review at...
https://mbworld.org/forums/c-class-w...-complete.html
6-To see what mine looked like when done, view my posting at 10-14-2011, 12:32 PM on...
https://mbworld.org/forums/c-class-w...g-issue-4.html
My initial wire job was just a temporary one, so ignore any wiring advice from my earlier postings about how my installer did it. We only recently (yesterday) redid the wire job to be the above method with the crimp pins from Fry's.
To answer all those questions about "how do they work" and "what do they look like"... here's the scoop...
A) if you wire them to your fogs, they work with the fog switch just like your fogs. you can run them with just your eyelids/markers which looks really cool at sunrise/sunset when the lighting is "in between" daylight and dark. You can run them with your lowbeams on just like you did with your fogs. If you flip on your brights, they'll go off just like your factory fogs did.
On a side note... I actually put AZNOptics' 5000K HID kit into my brights recently, and they are awesome. I can no longer flash people (would really put wear/tear on them, and they require a couple seconds to heat up anyways), but i rarely would have to here in Dallas, as our city is like 100 miles in diameter and nobody runs their brights because it's the land of infinite sprawl. On rural TX road trips like down to Austin or South Padre Island, i've found HID brights to be incredible in terms of lighting the road (i used the same kit as i have in my lowbeams. they require the same bulb type). And no, i'm not on commission for AZN, i just mention where i got them so i don't get a bunch of people asking me.
B) as for how they look, you can check that photo of my car that i mentioned above, and if you wire to fogs they run in full brightness whenever you flip them on, which is a good thing. the 2011-beyond cars have their LEDs setup so they are DRLs, and only run in full brightness during daylight. At night, they dim to an ugly yellow that looks awful with HIDs. Because we are doing a retrofit, and there is no dimmer feature in the fogs, so if you want to be able to have them like the 2011 (full bright at day, dim at night) which i think is ugly, then you'll have to get crafty with your wiring and figure something out.
Contrary to what some might think, they do not blind people, unless you're a squirrel or lay on the ground and stare at them. drivers sit up high enough in other cars that it doesn't matter if they run full brightness at night. they don't look ridiculous and i've driven by 15 cops without an issue. the LED strip color is about 5000K if i had to guess, as they match my 5000K HID kit nearly perfect, even if the pic doesn't show it that way. my pic was taken on my Evo or iPhone, and night pics of lights just don't do justice, no way around that.
C) if you want to wire yours to your something other than your fogs, you could consult some of the postings by jimmythegreek in this thread on how to do that. i only have experience with fogs because that's how i wired mine. the above tips on trimmer plugs and the crimp pins would obviously still apply no matter what you wire them to.
D) my installer (Outperformance Shop just outside Dallas) charged me $300 for the install. Obviously pricing varies widely by shop and part of the country, so i'm only posting that as a general barometer you can use. It will take quite a while at a professional shop, so plan on dropping your car off and having someone pick u up and bring you back. I figured spending $300 was worth it to avoid screwing up a $30K car, but that's just my opinion. If you mess up and have to order a new bumper, prepare for things to get expensive.
E) do not rear end anyone. you will have to do this all over again which will be a huge pain and expense. luckily you can largely control that (rather than what hits your tail end), so keep that in mind when doing this and/or driving around later. i didn't really think about that until i had put the full $700 into this project lol.
Bonus and my favorite mod yet: if you have COMAND navigation system and the latest Telematics software running (the update is $200), and want something that will really turn heads when cruising, get the VIM204P from Mid City Engineering and have it installed so you can wire your phone or tablet to your COMAND screen and watch music videos while driving using the Vevo app on iOS or Android. i use my iPhone 4S, Vevo app and the 3G connection on Verizon here is good enough that i can cruise and play music videos and the sound is awesome. And no, i don't get commissions from them either and if you have any questions about how to do this type of setup, just call those guys and they'll give you all the details. They sell the thing and make tons of cash on it, so unlike this crazy retrofit project, there is actually a company you can contact for questions/answers. The local audio shop charged me about $180 including tax for the install, and it's literally the best customization i've done. Plus the VIM204P lets you fully use your Nav while driving (like enter addresses), which allows you to avoid that annoying pullover move you might have found yourself doing just so you could enter an address. i think the VIM204P cost me $450 or so, so about $630 was the total on this mod for me.
Last edited by C300SportDallas; Nov 15, 2011 at 01:41 PM.

Member
Joined: May 2011
Posts: 139
Likes: 1
From: Jersey
2008 C300 w204
Few iPhone pics of the install completed last week by the very talented and knowledgable Jimmythegreek!! Take heed to everything he suggests he really knows what he's talking about. The install
Is clean and very OEM looking and even when u look under the good u can't tell anything was done. No flickers, no errors, just pure FULL BRIGHT LEDs. Thanks again Greek!

It was kind of hard getting a clear shot with them on weather wasn't great and it's from a phone but u get the picture.
Is clean and very OEM looking and even when u look under the good u can't tell anything was done. No flickers, no errors, just pure FULL BRIGHT LEDs. Thanks again Greek!


It was kind of hard getting a clear shot with them on weather wasn't great and it's from a phone but u get the picture.
Super Member
Joined: Mar 2011
Posts: 955
Likes: 0
From: NNJ
'11 C350 '13 F150 lariat
thanks for the kind words bro  benz-boi I wired them w a relay straight off the battery and the trigger is from the audio systems fuse. THey are on all the time and there is an emergency switch under the dash to shut off if needed for stealth mode etc. I have to move the trigger because the LEDs were switching off w the key w a little delay like the radio does and now they are wanting to stay on. The only way to make a 08-2010 switch w the unlock is 2 have 2 triggers w an isolation module. If you have a 2011 like me its easy, use the + off the existing LED connector and u have full bright all the time w OEM functionality
benz-boi I wired them w a relay straight off the battery and the trigger is from the audio systems fuse. THey are on all the time and there is an emergency switch under the dash to shut off if needed for stealth mode etc. I have to move the trigger because the LEDs were switching off w the key w a little delay like the radio does and now they are wanting to stay on. The only way to make a 08-2010 switch w the unlock is 2 have 2 triggers w an isolation module. If you have a 2011 like me its easy, use the + off the existing LED connector and u have full bright all the time w OEM functionality
Senior Member
Joined: Sep 2010
Posts: 288
Likes: 4
From: MI
2024 G63 AMG, 2022 GLE 63S AMG
So anyway, on my 2010 GL 450, when i put the LED's in, they flickered. I put a 6ohm 50 watt resistor that Eurodok said he used and he's had no problems. Well it still flickers once or twice. I think ill just wait until the other ones that were mentioned here on this forum come in and install them.

Junior Member
Joined: Oct 2011
Posts: 19
Likes: 0
2008 C300 sport
Just finished up my install. I wired mine up to the low beam itself with a relay . I'm running a canbus adapter for the hid kit, so as long as you tap your ground and positive after the canbus you will not have a flickering issue. I also used the positive off the fog light and wired that in before the canbus. With this setup the leds work as a drl with the low beam and no other lights on. When you unlock the doors with the remote all lights including the low beam work as your surround lighting.
Last edited by PalladiumC300; Dec 14, 2011 at 12:59 PM.
 [/IMG]
Super Member
Joined: Mar 2011
Posts: 955
Likes: 0
From: NNJ
'11 C350 '13 F150 lariat
looks good bro, nice install. If I follow ur post, U used the HID power and ground to supply the relay and u used the fog light as the trigger for the relay? Or do I have that backwards? Any dash light issues? Dont forget to put a fuse on the supply side before the relay
MBWorld Fanatic!
Joined: Aug 2007
Posts: 1,914
Likes: 5
LOADED 08' C350 & 14' GLK-350 Diamond White (P1, MM, AMG Pkg, Ln Trkng, Htd Sts, Keylss Go)
no LED turn on when unlock? no DRL function? Don't know if its worth it to me to have to manually turn the fog knob on every time I want DRLs
i never use the fogs as it is because its just an extra hassle to turn on and off...
also, I assume you don't have a backup cam, right? because if u have a backup cam, then you cant have another video input with the VIM
I also have the VIM and can play music videos while driving and I have a backup Cam...
the way I can do this though is that I have to burn my Music Videos to DVD first....
For those of you wanting to do this project, based on my experience doing this mod, here is a nice summary of this thread which will save you lots of headaches and time/money.....
1-Review the guide for self installation (or take it to the customization shop like i did) that blue00r6 posted at 07-30-2011, 12:52 AM at..
https://mbworld.org/forums/c-class-w...ing-issue.html
2-Get your parts from Parts.com rather than the dealer, which will save you hundreds upon hundreds of dollars.
i priced both ways when doing it. here are the parts.com part numbers....
LEDS (R/L)
221-820-17-56
221-820-18-56
BACKING PLASTIC MOUNT (R/L)
204-885-28-14
204-885-29-14
FRONT MESH GRILLS (R/L)
204-885-0053
204-885-0753
CHROME DECORATIVE MOLDING (R/L)
204-885-27-74
204-885-28-74
TRIMMER PLUGS (you need 2 of these. i cannot remember if Parts.com prices them as a pair or individual, but i'm guessing individual)
211-545-13-28
My total parts cost was about $400 including shipping if i remember correctly. Parts.com just partners with various dealers in each region, so mine shipped from a dealer in TX for most parts and then one part came out of Chicago because TX was out of stock on it. You are definitely getting real OEM factory MB goods. If i had just ordered them at my local MB dealer via phone, it would have run me $800+ i think.
3-Since the factory trimmer plugs are hollow gutless injection molded black plastic and have nothing to wire onto, and Mercedes oddly doesn't sell a "wire repair kit" like they do on some other features/models, you have to create your own piece to wire onto to do this properly and make it as close to factory as possible. I just recently rewired mine by grabbing some crimp pins at Fry's electronics that fit perfectly into the plugs, which gave my installer something to wire to. The guy at Fry's and i opened boxes in the store which i'm sure Fry's HQ isn't thrilled about, and tried several different ones until we found a perfect fit. I have attached a photo of what these are. NOTE: they are hard to track down online for some reason, so if you have a local Fry's, just roll in there with the photo. I could not find them on the Fry's website using part number shown in the box. If you don't have a Fry's Electronics, roll into a similar type big box store in your area with that photo and they can probably track them down or another brand at least that are same specs.
4-If you're wiring to the fogs like i did, which is cool if you want to be able to control when they're on, then you'll need a capacitor...
25v and between 50 and 150 uf. This is because the LEDs require way less juice than the factory fogs. If you are doing this yourself and don't know where to put it in the chain of things, review this entire thread and somewhere there's a diagram that blue00r6 posted that will help you figure this out. If you're not fairly skilled with auto customizations, i probably wouldn't recommend this being your first project. The bumper cutting and wiring are the trickier parts if you're a novice. I probably could have figured it out if i put enough time into it, but it may not have turned out as nice as the install shop (Outperformance Shop in Grand Prairie Texas), because the owner Dan has lots of experience with tuning and took care of all the little details that make it look factory. There are no gaps in my fitment and the wiring job is rock solid and/or waterproof.
There are postings on here saying you need a resistor, but that's not true. My install guy ran a capacitor with those specs and i have zero erros in my dash. blue00r6 used the same i believe when wiring his, and his wiring was to his sidemarkers i believe.
5-if you need to fill in gaps on this project, there is another thread you can review at...
https://mbworld.org/forums/c-class-w...-complete.html
6-To see what mine looked like when done, view my posting at 10-14-2011, 12:32 PM on...
https://mbworld.org/forums/c-class-w...g-issue-4.html
My initial wire job was just a temporary one, so ignore any wiring advice from my earlier postings about how my installer did it. We only recently (yesterday) redid the wire job to be the above method with the crimp pins from Fry's.
To answer all those questions about "how do they work" and "what do they look like"... here's the scoop...
A) if you wire them to your fogs, they work with the fog switch just like your fogs. you can run them with just your eyelids/markers which looks really cool at sunrise/sunset when the lighting is "in between" daylight and dark. You can run them with your lowbeams on just like you did with your fogs. If you flip on your brights, they'll go off just like your factory fogs did.
On a side note... I actually put AZNOptics' 5000K HID kit into my brights recently, and they are awesome. I can no longer flash people (would really put wear/tear on them, and they require a couple seconds to heat up anyways), but i rarely would have to here in Dallas, as our city is like 100 miles in diameter and nobody runs their brights because it's the land of infinite sprawl. On rural TX road trips like down to Austin or South Padre Island, i've found HID brights to be incredible in terms of lighting the road (i used the same kit as i have in my lowbeams. they require the same bulb type). And no, i'm not on commission for AZN, i just mention where i got them so i don't get a bunch of people asking me.
B) as for how they look, you can check that photo of my car that i mentioned above, and if you wire to fogs they run in full brightness whenever you flip them on, which is a good thing. the 2011-beyond cars have their LEDs setup so they are DRLs, and only run in full brightness during daylight. At night, they dim to an ugly yellow that looks awful with HIDs. Because we are doing a retrofit, and there is no dimmer feature in the fogs, so if you want to be able to have them like the 2011 (full bright at day, dim at night) which i think is ugly, then you'll have to get crafty with your wiring and figure something out.
Contrary to what some might think, they do not blind people, unless you're a squirrel or lay on the ground and stare at them. drivers sit up high enough in other cars that it doesn't matter if they run full brightness at night. they don't look ridiculous and i've driven by 15 cops without an issue. the LED strip color is about 5000K if i had to guess, as they match my 5000K HID kit nearly perfect, even if the pic doesn't show it that way. my pic was taken on my Evo or iPhone, and night pics of lights just don't do justice, no way around that.
C) if you want to wire yours to your something other than your fogs, you could consult some of the postings by jimmythegreek in this thread on how to do that. i only have experience with fogs because that's how i wired mine. the above tips on trimmer plugs and the crimp pins would obviously still apply no matter what you wire them to.
D) my installer (Outperformance Shop just outside Dallas) charged me $300 for the install. Obviously pricing varies widely by shop and part of the country, so i'm only posting that as a general barometer you can use. It will take quite a while at a professional shop, so plan on dropping your car off and having someone pick u up and bring you back. I figured spending $300 was worth it to avoid screwing up a $30K car, but that's just my opinion. If you mess up and have to order a new bumper, prepare for things to get expensive.
E) do not rear end anyone. you will have to do this all over again which will be a huge pain and expense. luckily you can largely control that (rather than what hits your tail end), so keep that in mind when doing this and/or driving around later. i didn't really think about that until i had put the full $700 into this project lol.
Bonus and my favorite mod yet: if you have COMAND navigation system and the latest Telematics software running (the update is $200), and want something that will really turn heads when cruising, get the VIM204P from Mid City Engineering and have it installed so you can wire your phone or tablet to your COMAND screen and watch music videos while driving using the Vevo app on iOS or Android. i use my iPhone 4S, Vevo app and the 3G connection on Verizon here is good enough that i can cruise and play music videos and the sound is awesome. And no, i don't get commissions from them either and if you have any questions about how to do this type of setup, just call those guys and they'll give you all the details. They sell the thing and make tons of cash on it, so unlike this crazy retrofit project, there is actually a company you can contact for questions/answers. The local audio shop charged me about $180 including tax for the install, and it's literally the best customization i've done. Plus the VIM204P lets you fully use your Nav while driving (like enter addresses), which allows you to avoid that annoying pullover move you might have found yourself doing just so you could enter an address. i think the VIM204P cost me $450 or so, so about $630 was the total on this mod for me.
Junior Member
Joined: Oct 2011
Posts: 19
Likes: 0
2008 C300 sport
looks good bro, nice install. If I follow ur post, U used the HID power and ground to supply the relay and u used the fog light as the trigger for the relay? Or do I have that backwards? Any dash light issues? Dont forget to put a fuse on the supply side before the relay
Junior Member
Joined: Oct 2011
Posts: 19
Likes: 0
2008 C300 sport
Ok so I ended up removing the relay and it still works fine. I'm running the power and ground to my LEDs between the can bus canceller and ballast. The fog light power is wired in before the can bus canceller. I have no flicker and no errors.
Last edited by PalladiumC300; Dec 15, 2011 at 05:28 PM.

Newbie
Joined: Dec 2011
Posts: 7
Likes: 0
2008 C350 AMG
Ok so reading through this entire thread. I have decided that I am going to do this mod in the near future. I am up in the air about connecting to the fog lights though. On my car, 2008 C350. When I turn left/right with the fog lights off and headlights on, the fog light on that side illuminates as I turn and then fades off when I straighten up the wheels. I guess it wouldn't be any different than the way they light up now only there will not be a fading effect. I didn't see any other suggestions to wire the lights up to anything other than the corner lights or fog lights. I really would rather not have all the other lights on with the DRLs as it kind of defeats the concept. I was considering wiring them to an ignition wire and through a relay and putting an on/off switch in so if I wanted to black out while sitting in a parking lot I could flip the switch. Anyone have a suggestion for a ignition wire that I could use that wouldn't cause any issues?
Drew
Drew
Super Member
Joined: Mar 2011
Posts: 955
Likes: 0
From: NNJ
'11 C350 '13 F150 lariat
What you need to do in this situation is wire them with a relay. If you unhook your stock pre 2011 fogs u will get no errors just leaving the wire harness in tact. Just zip tie them out of the way. Search google for how to wire a relay there are many pics/schematics out there. U need a 4 pole basic relay, power in, power out, ground, 12v trigger. Use battery for in power and out to relays, no caps needed. Use any close ground for the ground, there are two, one on each side of hood lock I like those myself. Then run the trigger back to the drivers side fuse block under the hood, jump off of the windshield wiper fuse, its switched ignition and works perfect, they will be full bright whenever power is to the first click on your key. Very simple wiring job.......


