
DIY 722.9 - 2008 c300 - with pics
 02-23-2013, 03:25 PM
#1
Member
Thread Starter
Join Date: Nov 2011
Location: Ann Arbor, MI
Posts: 99
Likes: 0
Received 4 Likes
on
4 Posts
2008 c300 sport 4matic
DIY 722.9 - 2008 c300 - with pics
After much thought and deliberation I decided to tackle this project on my own. One main reason being, both dealerships I called tried explaining to me on the 722.9 the torque converter didn't have a drain. After I explained through my research I found otherwise, I still didn't feel confident they would drain the torque converter. If I was paying +$500 for a service I should feel confident in it will be done properly.
I want to thank Johnand and his fantastic DIY thread over at the w203 sub forum: https://mbworld.org/forums/c-class-w...ce-thread.html If it weren't for this very informative thread, I wouldn't have attempted this!
This DIY is simply following all of Johnand's suggestions/directions. There were a few small variations, and I wanted to share my experience because there was a few hiccups along the way. I hope someone else can learn from my mistakes. I recommend reading Johand's directions and looking at my photographs if you get stuck.
Before we begin, let me again say, this is NOT my DIY, I am not taking credit for the information and directions, I was following Johnand's DIY 722.9, this is simply adapted specifically for the w204 with pictures. The parts numbers I ordered are found directly on Johnand's thread. Be forewarned, images are crapy iphone pics - and it was difficult to photograph this project because I was by myself, half the time my hands had ATF on them, and lastly taking pictures while on my back under the car isn't exactly easy.
**This is for entertainment purposes only - any damage done to your vehicle is your own fault**
I actually researched quite a while on how/where to jack the w204. I ended jacking the vehicle using the front jacking point, between the front wheels. There is a semi circle, directly in front of this is a rubber jacking mount. The jacking mount is located directly between the top two middle to screws indicated in image 4.
I jacked the rear of the car using a strong frame component, directly in the center, between the two rear wheels. Looking under the car - it should be fairly obvious - there isn't much else you you can use.
I used standard 3 ton jackstand on the jacking points of the car. I've read other have purchased Reverselogic adapters, but I decided to do it this way. (Please refer to Image 3)
After the vehicle is on stands (Image 1) I placed plenty of cardboard down to work on (Image 2). Finally you must remove two engine splash plates/covers to access the transmission (Image 4 and 5). Please note - engine cover in Image 4 must be removed first, two of the screws removed from this cover are shared with engine cover 2 (image 5) and those screws are circled twice. In both engine cover pictures the front of the car is oriented as the to the top of the image.
...more to come.
Last edited by tpdietz; 02-24-2013 at 11:26 AM.
 02-23-2013, 03:45 PM
#2
Member
Thread Starter
Join Date: Nov 2011
Location: Ann Arbor, MI
Posts: 99
Likes: 0
Received 4 Likes
on
4 Posts
2008 c300 sport 4matic
After removing the engine covers, I unscrewed the drain bolt from the transmission pan. There is only one bolt on the bottom of the transmission pan, it's impossible to mistake. I used an allen wrench to open this guy up. Upon opening the the drain, a little bit of ATF will be released - be prepared, use an appropriately sized container to catch the fluid. Once the fluid has stopped, I tried to pop the overflow tube off its seat with a drift/pin to no avail. I was afraid of messing up the threads for the drain plug, so I tried my best. If you hold the pin on an angle it will help release more ATF, but not as much as if you could unseat the overflow tube. This isn't a problem, just an inconvenience.
I then began tackling the sprags and bolts that hold the transmission pan in place. From what I've read, all w204 appear to have the new revised pan found in earlier applications of the 722.9, so we can just reuse what we have. the middle two and rear two bolts are straight forward.
The two front bolts/sprags weren't as readily accessible. I have indicated in Image 1, the drivers side sprag. Notice there is another screw (torx 30 I believe) holding the sprag in place. Once you unscrew the pan bolt, unscrew the torx, and the sprag should be freed.
The passenger sprag/bolt was blocked by a stubborn piece of metal, only apparent purpose was hold a guide for a wire, which almost seemed unnecessary and was just another inconvenience. As indicated in blue on image 2, I simply bent the metal piece forward (toward the front of the car) to access the sprag. The piece of metal does have a circular cut out indicating it could have at one point been combined with the sprag bolt, similar to the drivers side. My car is at 80,000 miles so during the 39k miles service the mech. could have unscrewed the piece of metal and left it as i found it, (when I didnt own the car) I'm not sure if this is the case or not.
After removing the pan, catch remaining liquid. Remove pan and clean - thoroughly - and swap out the overflow with a new one as indicated in Johnand's thread. Clean the two magnets found in the pan and reinstall. Remove the transmission filter by simply pulling down, be sure the o-ring is still attached as the replacement will have a new one already installed.
The torque converter is found just forward of the transmission pan. Remove the rubber cover found in image 4. (note torque converter plug in blue, trans filter hole in red) According to Johnand's thread, a breaker bar and a 36mm socket is required to turn the crankshaft bolt. My crankshaft bolt was much smaller, but still large enough that I didnt have a socket large enough to turn this. The only option I had to turn the engine over was to "start" the engine. I simply turned the key and once I heard the engine turning over I turned the key CCW so the engine wouldn't start. This is trial and error. You must turn the engine over until the torque converter drain plug is visible. Please see image 5. Red points to torque converter drain plug, blue points to transmission filter hole. Remove the torque converter drain plug and let contents drain into oil pan. During this time I cleaned my transmission pan. Mine wasn't so bad, the gasket came off easily and so did the grime.
Image 6 displays hardware removed. The larger bolt is the transmission drain plug, the smaller is the torque converter drain plug, and of course the 6 bolts for the transmission.
more to come..
Last edited by tpdietz; 02-24-2013 at 11:29 AM.
02-23-2013, 03:54 PM
#3
Member
Thread Starter
Join Date: Nov 2011
Location: Ann Arbor, MI
Posts: 99
Likes: 0
Received 4 Likes
on
4 Posts
2008 c300 sport 4matic
Once the torque converter is drained, install a new plug. Install new gasket on transmission pan, and reinstall in reverse. Do not install drain plug. Do NOT over tighten the aluminum bolts (which are one time use). I broke one by being too insensitive (i.e. cranked too hard).
As shown in image 1, I managed to drain almost 9 quarts of ATF.
I used the mityvac mv7201 plus to dispense my ATF. You can use whatever tool you'd like. The mityvac is about 90 bucks on amazon, the ATF kit and 722.9 adapter are $40 together. I like this combo a lot. The Mityvac is obviously a multi purpose tool (oil changes, power steering, brake fluid, etc.) and worth the investment. The ATF kit has quick connects which is very convenient. I do recommend not filling the Mityvac more than half way. I found it performs better under half. I filled the transmission in three stages - about 3 quarts each time.
Image 2 shows me filling the mityvac, Image 3 shows the dispensing. Once all ATF is in the transmission, leave the pump attached. Start the vehicle. Shift through all gears. Wait until transmission pan reaches 113 Fahrenheit. It was cold outside (36 degrees Fahrenheit) and took about 20 minutes or so for me. At this point remove the quick connect, let fluid drain (see image 5). After fluid drains slows from a steady stream to a much slower stream remove ATF adapter and reinstall drain plug.
Button up the engine covers.
Your Done!
Please fee free to ask any questions.
Last edited by tpdietz; 02-24-2013 at 11:35 AM.
02-24-2013, 08:13 AM
#4
Junior Member

Join Date: Feb 2012
Posts: 29
Likes: 0
Received 0 Likes
on
0 Posts
Mercedes GLK 220CDI (Diesel)
Great post, thank you! You are helping all of us DIY guys to take confidence and do what we all know what to do, but don't dare just because it's an MB!
To be sure, I'm keeping copies of this thread (and the previous marvellous one you refer to) in my glove box for future use!
To be sure, I'm keeping copies of this thread (and the previous marvellous one you refer to) in my glove box for future use!

 02-24-2013, 11:34 AM
#7
Member
Thread Starter
Join Date: Nov 2011
Location: Ann Arbor, MI
Posts: 99
Likes: 0
Received 4 Likes
on
4 Posts
2008 c300 sport 4matic
Thanks guys for the positive feedback! I really cannot believe how much great information I have read on this website and I hope my contribution helps!
If any of you guys are thinking of trying this, go for it, it's not too difficult. I would say the toughest part of the job is simply getting up and back under the car to grab different sockets, tools, etc.
If any of you guys are thinking of trying this, go for it, it's not too difficult. I would say the toughest part of the job is simply getting up and back under the car to grab different sockets, tools, etc.
The following users liked this post:
Peta (08-02-2021)
Trending Topics
02-24-2013, 10:39 PM
#8
MBWorld Fanatic!

Join Date: Jan 2008
Posts: 1,321
Likes: 0
Received 0 Likes
on
0 Posts
C300 Sport/Palladium Silver on Black/P2
I always worry if my dealer did the full change on my C Class. At least you can now.
My dealer's manager did tell me immediately that they do torque converter with no hesitation, but who knows?
I was billed for 9 quarts, which sounds like the amount you replaced.
You must feel really satisfied at accomplishing this yourself at a great price!
My dealer's manager did tell me immediately that they do torque converter with no hesitation, but who knows?
I was billed for 9 quarts, which sounds like the amount you replaced.
You must feel really satisfied at accomplishing this yourself at a great price!
03-12-2013, 05:32 PM
#9
MBWorld Fanatic!

Join Date: Sep 2008
Location: Delaware
Posts: 1,331
Likes: 0
Received 9 Likes
on
8 Posts
2004 Mazda6, 1993 RX7
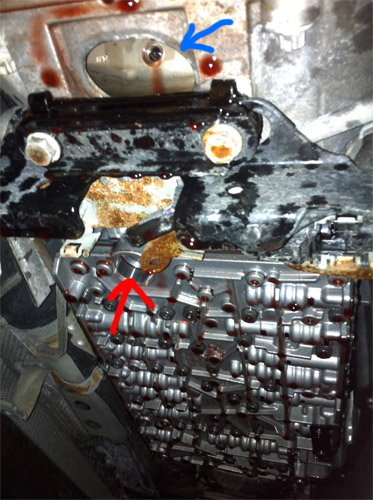
Nice record of a 2008 with a drain plug for the Torque Converter. See blue arrow to the threaded hole, plug removed.
.
.
Last edited by kevink2; 03-12-2013 at 05:36 PM.
04-10-2013, 05:54 PM
#10
Newbie

Join Date: Nov 2009
Location: minneapolis, mn
Posts: 11
Likes: 0
Received 0 Likes
on
0 Posts
89 325ix and 91 325i
Very nice thread indeed! I stumbled across this as I'm considering a c300 or a c250. Even with this really nice writeup, I'm kind of gun shy of the 4M now after reading some other's experiences.
Do you guys feel that with regular AT maitenance, with attention paid to the Torque Converter, that a C300W4 or C350W4 should be a solid performer above 150,000 miles?
Do you guys feel that with regular AT maitenance, with attention paid to the Torque Converter, that a C300W4 or C350W4 should be a solid performer above 150,000 miles?
 08-06-2013, 12:36 AM
#12
 08-21-2013, 11:26 PM
#14
Take the used ATF oil and pour it into an empty quart of oil. Then take the quart of oil and dump it into a 2nd container. Repeat this process until you empty the container holding all the used ATF.
08-23-2013, 11:44 AM
#15
Super Member
This is phenomenal...
Sticky/add to DIY sticky??
It would be great for a lot of people to be able to find this fairly quickly.
Very informative.
Although I am not going to do this at the moment, it will come in very handy in the near future.
Thank you!
Sticky/add to DIY sticky??
It would be great for a lot of people to be able to find this fairly quickly.
Very informative.
Although I am not going to do this at the moment, it will come in very handy in the near future.
Thank you!
12-22-2013, 09:59 PM
#16
MBWorld Fanatic!

Join Date: Apr 2010
Posts: 1,955
Likes: 0
Received 7 Likes
on
7 Posts
2017 Mini Cooper S Clubman ALL4 - British Racing Green
I actually found this thread while looking up the mityvac tool (random google search linked to this thread).
Congrats, DIY is the best option, learn to work on your car, save a crap ton of money, and enjoy yourself (I know I find DIY relaxing and enjoying, some people complain that there time is worth more than paying someone else to do the job, I disagree).
That being said, I do not recommend following your instructions word for word. Please follow the following instructions (Mostly for anyone else finding this thread)
https://mbworld.org/wiki/index.php?t...ission_Service
I'm not trying to be an ***, but you missed a couple of extremely important steps.
First off, you need a torque wrench. That is why you busted one of the bolts, they are torque to yield, you tighten them to 4nm, then using an angle gauge you tighten them another 180 degrees. This is a critical step. If you want to make sure there are no leaks, pickup a couple of non TTY bolts, tighten to 15 or so nm, fill transmission, if no leaks, replace the regular bolts 1 at a time with the TTY ones and bolt them on to spec.
Secondly, the reason that you your crankshaft bolt size differed, as the original DIY thread was for an M156 engine (AMG 63 engines). Do not keep turning the engine over till the bolt is available to remove in the Torque converter, not healthy for the battery, and probably not good for overall engine wear since you have no oil flowing and internals moving.
Again, not trying to be an ***, but if you are going to DIY it, especially the transmission, you want to do it right, too many things can go wrong, especially if you are in motion, you are now a danger to others.
02-01-2014, 11:45 PM
#17
Super Member

Join Date: Dec 2005
Location: Rochester, NY
Posts: 806
Likes: 0
Received 18 Likes
on
18 Posts
2009 S550 AMG sport pckg. 2014 Ford F-150 Lariat Supercrewcab
Awesome write up!! I did the same thing on my 07 ml350. Just one thing to add though. If you live in the northeast region or anywhere where they salt the roads alot make sure you use brand new bolts every time. My buddy works at the dealership and has told me horror stories about the heads shearing and rounding off from corrosion because the last guy never changed them. They are made of aluminum and are very soft. Very expensive repair!!!!!!
08-04-2015, 07:27 PM
#19
Member
Join Date: Mar 2011
Location: Alaska
Posts: 80
Likes: 0
Received 0 Likes
on
0 Posts
2010 C300 4MATIC Sport
Noob question: After filling about 9 quarts of ATF and letting it drain until you got a steady stream of fluid, you don't add more before you plug her up? I'm confused on the volume of atf required to fill.
09-15-2015, 10:06 AM
#20
Junior Member

Once transmission has reached optimal temperature there's 2 different temps to reach this is key,,, once reached that's when transmission will then open up solenoids and "allow "the remaining couple quarts,,, and then remove filler nipple,and when fluid comes out from a pencil thickness stream to a steady trickle,, cap it! Your done with confidence! I've done mine several times and I kno 1st hand,,,,,make sure you use either "laser temp gun"or something easy to monitor temp increase can't stress enough how this is the key to performing the proper fill up procedure,,,,,,
Last edited by sdenney89; 09-15-2015 at 10:14 AM.
The following users liked this post:
PNW_E63_AMG (01-07-2023)
04-03-2019, 01:03 PM
#22
Newbie

Join Date: Apr 2019
Posts: 1
Likes: 0
Received 0 Likes
on
0 Posts
2012 MB c300
Great write up thanks!! Just took my 2012 C300 w204 with 722.9 7 speed trans to dealer for trans service and before hand told them "make sure they drained the Torque converter". Checking over the work order they only 6 qts charged out. Called dealer and they give me some bull crap about its just how they billed it out and they said TC was drained. Them not knowing the day before the service I marked the TC drain plug with neon green paint, so I said ask the tech what color the paint was on the TC drain plug!!! They will call me back .... called me back 15 minutes later and said there going to get my car back to do the correctly, they admitted they did not drain the TC.
I called about 6 other MB dealer's they knew nothing about changing the fluid in TC, why is going on at MB? Will do it my self next time!!
I called about 6 other MB dealer's they knew nothing about changing the fluid in TC, why is going on at MB? Will do it my self next time!!


