When you click on links to various merchants on this site and make a purchase, this can result in this site earning a commission. Affiliate programs and affiliations include, but are not limited to, the eBay Partner Network.
Hey benzdude! Nice build and thanks for the info about the tweeters. Just wondering how they've kept up after having them in for over two years? I'm about to go ahead with purchasing some but given they're from China i'd hate to have them in for a year before having to replace them again.
Also when you replaced it with the Audiotech tweeters, were you essentially removing the 3D rotating tweeter?
The chinese tweeters sounded ok, worked fine.
As i mentioned before i accidentally destroyed one by squeezing the wires together and bypassing the crossover.
Since the Match tweeters are the same sizes i took the opportunity to replace both. They sound incredible.
My 3D rotating tweeters work the same as before.
The body rotates and the tweeter sits inside. You just need to make sure you put it back together properly and enough loose wire is available to allow it to spin.
Last edited by benzdude; Jan 12, 2021 at 11:06 AM.
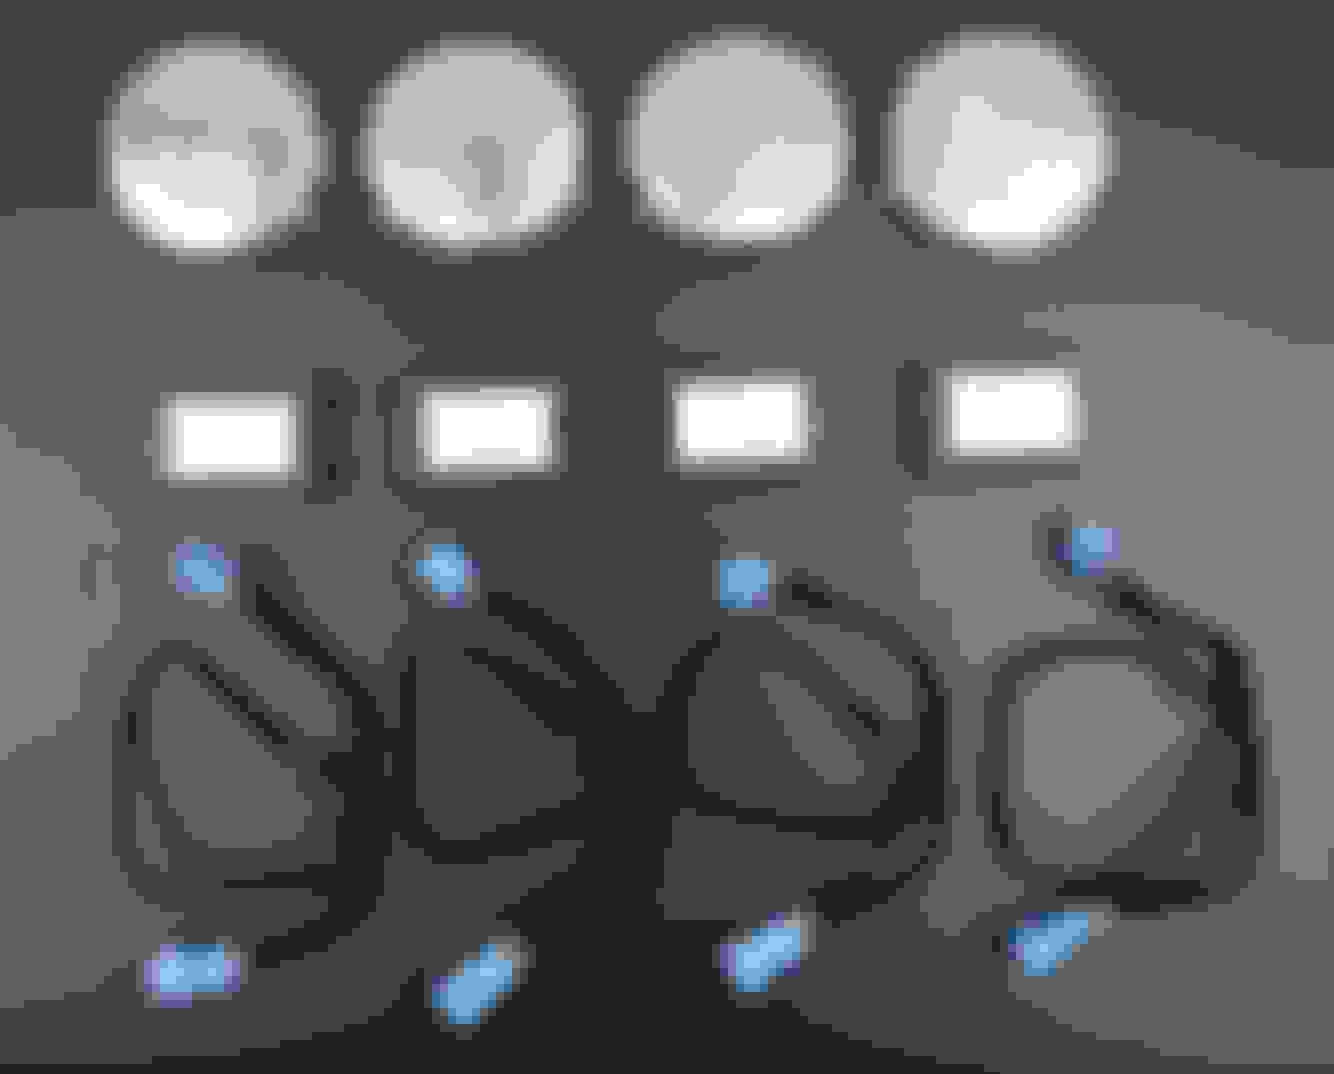
Upgraded my rotating led tweeters to Audiotec Fischer Match tweeters
I am getting ready to install all of the ambient lighting retrofit this weekend. I haven't looked at it in great detail yet, but how did the included tweeter become removed so that you can install the Match tweeter? I am guessing the 3 main screws holding it down need to come out.
Upgraded my rotating led tweeters to Audiotec Fischer Match tweeters
Hey @benzdude , sorry to be a pain and revive an old thread but I just got those and trying to get my Match tweeters in there but I seem to have trouble getting the original one out, do you remember how you got yours out by any chance?
Hey @benzdude , sorry to be a pain and revive an old thread but I just got those and trying to get my Match tweeters in there but I seem to have trouble getting the original one out, do you remember how you got yours out by any chance?
For the best results, you need a set of these. They are handy in various DIY situations.
The tweeter mount all have lock notches and may have a bit of loose glue to keep tweeter in place. (I guess it depends on your rotating tweeter manufacturer)
See pics below.
Just gently pry apart with tools and they should pop out easy.
Reuse the tweeter mounts.
Last edited by benzdude; Mar 31, 2021 at 10:45 AM.
I just ordered these and communicated with the seller prior to purchasing with the exact version that I need. I think I may have still received the wrong version, but would appreciate if anyone who has done this swap could help.
I have a 2016 c63 with stock 3-color ambient light.
What I received looks like this:
From reading a few of these threads and watching this video installing on a 2016 w205 (
), I think the 3-color version that I need has the extra cable as seen in the pic below and that video points to at 1 min 37 sec. He identifies that as the cable for ambient light on that 2016 (like mine) and I don't have it.
So was I sent the wrong version (64-color) or am I missing something?
I just ordered these and communicated with the seller prior to purchasing with the exact version that I need. I think I may have still received the wrong version, but would appreciate if anyone who has done this swap could help.
I have a 2016 c63 with stock 3-color ambient light.
What I received looks like this:
From reading a few of these threads and watching this video installing on a 2016 w205 (https://m.youtube.com/watch?v=qZrXvFrxFfA), I think the 3-color version that I need has the extra cable as seen in the pic below and that video points to at 1 min 37 sec. He identifies that as the cable for ambient light on that 2016 (like mine) and I don't have it.
So was I sent the wrong version (64-color) or am I missing something?
If you received the same as in video that'd be wrong, in that video he's installing a complete aftermarket kit, I'm not sure what you've received as the pic resolution isn't that great but it looks similar to mine which is completely aftermarket ambient light system and iirc would be a different connector than for original one.
If you received the same as in video that'd be wrong, in that video he's installing a complete aftermarket kit, I'm not sure what you've received as the pic resolution isn't that great but it looks similar to mine which is completely aftermarket ambient light system and iirc would be a different connector than for original one.
Yes, in that video he's installing the kit also including the door speakers which I don't have. Was just using the video because he clearly describes each of the tweeter cable functions. And that was a 2016 like mine. Between that video and reading a few threads on the topic, my understanding was that the version with the extra cable is for stock 3-color ambient lighting and the version without the extra cable is the 64-color. But each thread was a bit confusing so I could be mistaken.
Also, I think you confused which picture I said I have. It's not the lower resolution one. What I received looks like the first picture that is higher resolution.
No I didn't misunderstand, both pictures are very low resolution, the second just more so. In any case, have a look at that white plug, if there are 4 pins there then you have received the 64 colour version.
No I didn't misunderstand, both pictures are very low resolution, the second just more so. In any case, have a look at that white plug, if there are 4 pins there then you have received the 64 colour version.
Ok, below is my actual harness. There isn't an open white plug. There are two white parts already connected to each other...?
Ok, below is my actual harness. There isn't an open white plug. There are two white parts already connected to each other...?
The small cable is for audio.
The large cable is for power, etc. It needs to be a T harness because you will be unplugging a large connector from the door controller and plugging it into your harness. Then take the other end of your harness and plug it into the door controller. Simple. They should all fit each other.
The large cable is for power, etc. It needs to be a T harness because you will be unplugging a large connector from the door controller and plugging it into your harness. Then take the other end of your harness and plug it into the door controller. Simple. They should all fit each other.
Hope he sent you the correct 3 color version.
.
So does that picture look like the setup I need for 3-color? It has the small audio cable. And then 2 larger cables coming out of the speaker that feed into the top and bottom of the white connector. And there is another white part inserted into that connector. That white part has two cables with one going to the black box and the other to the larger blue connectors. Which then is wired to the black box as well. It's like a loop except for the two larger blue connectors.
So the only open connections I have (that can be plugged into car) are the 2 small blue connectors for audio and then the 2 larger blue connectors. Is that right for 3-color? In the video there is an additional cable that he shows also plugging into the car and said that is the ambient light cable.
Ignore the video, you should have a completely different harness if you're plugging it in to the original ambient light and you do.
I'm not sure where the MCU sends the original ambient light info over but it very well might be through plug #6 in the door control module.
Simplest thing would be to plug it in and try to see if it works, undoing the door card is honestly a 5-10 minute job.
He is making this way too complicated when every connector is sized, shaped and notched to only fit correct sockets.
So does that picture look like the setup I need for 3-color? It has the small audio cable. And then 2 larger cables coming out of the speaker that feed into the top and bottom of the white connector. And there is another white part inserted into that connector. That white part has two cables with one going to the black box and the other to the larger blue connectors. Which then is wired to the black box as well. It's like a loop except for the two larger blue connectors.
So the only open connections I have (that can be plugged into car) are the 2 small blue connectors for audio and then the 2 larger blue connectors. Is that right for 3-color? In the video there is an additional cable that he shows also plugging into the car and said that is the ambient light cable.
Nobody can tell you if you bought or recieved the correct product for your car from a picture.
Not all kits have the same wires or requirements. Yours appears plug and play. Many require soldering to existing wires.
Hey everyone,
In early 2015 models, port 6 does not have all pins, causing it not to rotate, everything besides that works, anyone know a way to fix this?
Hey everyone,
In early 2015 models, port 6 does not have all pins, causing it not to rotate, everything besides that works, anyone know a way to fix this?
You may have to use a ACC wire to trigger rotation?
You may have to use a ACC wire to trigger rotation?
thanks for the reply, i was thinking of soldering my own pins on the door module but that probably wont be of any use since no power would be going to them pins?
weird thing is I�ve heard someone say it worked for them
Mercedes SLR McLaren 722 S Is Extremely Rare Example Modified by McLaren
Slideshow: A one-of-one U.S.-spec Mercedes-Benz SLR McLaren Roadster became even rarer after a factory-backed transformation at McLaren's headquarters.