


started tear down for paint
Thread Starter
MBWorld Fanatic!


Joined: May 2009
Posts: 1,846
Likes: 29
From: Canada
eclectic assortment of cars
Finally managed to get the oil filter housing off last night. The torque on the nut isn't huge, but I couldn't torque it off without someone holding onto the engine and stand. I only have a three-wheeled stand, and I was afraid I would topple it over if I didn't have someone helping me out. Couldn't ask my wife to do it, so I had my uncle help out while he was over.
The engine is low-ish mileage - about 110,000km - but the three oil filter/oil cooler seals were pretty hardened. Replacing them with the engine out is cake, so it's a no brainer to do them now.
Plan is to get the engine out the weekend of 12-14 August, take the week to clean up and transfer any bits over from the 4.3, then put the 55 in the weekend of 19-21 August. Just need to finish putting the intake manifold back together and I will be good to go, and ready for the swap!
And it seems I'm not the only one doing a swap...a couple buddies are coming by tonight to borrow my engine hoist. They've both bought Civics and are doing swaps on those. One has a B16 swap already, but the owner of that car wants a K20 swap. The other friend just bought a standard Civic hatchback which will get the B16. Honda alphabet soup!!
When my wife and I bought our Land Rover last year, we gave my wife's old '96 Civic hatch to her brother on the condition that he give it back when he got something else. So maybe I'll do a K swap or Integra Type R swap one day on that car...it's soooo light, like 2200 lbs. That said, it can be a lot of work to put a K series engine into an old Civic...and at the end of the day you still have a Civic. More appealing is an LS swap into an S13. Or, dare I say it, an LS swap into my S2000 one day...
The engine is low-ish mileage - about 110,000km - but the three oil filter/oil cooler seals were pretty hardened. Replacing them with the engine out is cake, so it's a no brainer to do them now.
Plan is to get the engine out the weekend of 12-14 August, take the week to clean up and transfer any bits over from the 4.3, then put the 55 in the weekend of 19-21 August. Just need to finish putting the intake manifold back together and I will be good to go, and ready for the swap!
And it seems I'm not the only one doing a swap...a couple buddies are coming by tonight to borrow my engine hoist. They've both bought Civics and are doing swaps on those. One has a B16 swap already, but the owner of that car wants a K20 swap. The other friend just bought a standard Civic hatchback which will get the B16. Honda alphabet soup!!
When my wife and I bought our Land Rover last year, we gave my wife's old '96 Civic hatch to her brother on the condition that he give it back when he got something else. So maybe I'll do a K swap or Integra Type R swap one day on that car...it's soooo light, like 2200 lbs. That said, it can be a lot of work to put a K series engine into an old Civic...and at the end of the day you still have a Civic.
More appealing is an LS swap into an S13. Or, dare I say it, an LS swap into my S2000 one day...
Last edited by Saaboteur; Jul 25, 2011 at 05:57 PM.
Member
Joined: Jul 2009
Posts: 159
Likes: 0
From: Stafford, VA
1998 Mercedes-Benz C43 AMG
Finally managed to get the oil filter housing off last night. The torque on the nut isn't huge, but I couldn't torque it off without someone holding onto the engine and stand. I only have a three-wheeled stand, and I was afraid I would topple it over if I didn't have someone helping me out. Couldn't ask my wife to do it, so I had my uncle help out while he was over.
The engine is low-ish mileage - about 110,000km - but the three oil filter/oil cooler seals were pretty hardened. Replacing them with the engine out is cake, so it's a no brainer to do them now.
Plan is to get the engine out the weekend of 12-14 August, take the week to clean up and transfer any bits over from the 4.3, then put the 55 in the weekend of 19-21 August. Just need to finish putting the intake manifold back together and I will be good to go, and ready for the swap!
And it seems I'm not the only one doing a swap...a couple buddies are coming by tonight to borrow my engine hoist. They've both bought Civics and are doing swaps on those. One has a B16 swap already, but the owner of that car wants a K20 swap. The other friend just bought a standard Civic hatchback which will get the B16. Honda alphabet soup!!
When my wife and I bought our Land Rover last year, we gave my wife's old '96 Civic hatch to her brother on the condition that he give it back when he got something else. So maybe I'll do a K swap or Integra Type R swap one day on that car...it's soooo light, like 2200 lbs. That said, it can be a lot of work to put a K series engine into an old Civic...and at the end of the day you still have a Civic. More appealing is an LS swap into an S13. Or, dare I say it, an LS swap into my S2000 one day...
The engine is low-ish mileage - about 110,000km - but the three oil filter/oil cooler seals were pretty hardened. Replacing them with the engine out is cake, so it's a no brainer to do them now.
Plan is to get the engine out the weekend of 12-14 August, take the week to clean up and transfer any bits over from the 4.3, then put the 55 in the weekend of 19-21 August. Just need to finish putting the intake manifold back together and I will be good to go, and ready for the swap!
And it seems I'm not the only one doing a swap...a couple buddies are coming by tonight to borrow my engine hoist. They've both bought Civics and are doing swaps on those. One has a B16 swap already, but the owner of that car wants a K20 swap. The other friend just bought a standard Civic hatchback which will get the B16. Honda alphabet soup!!
When my wife and I bought our Land Rover last year, we gave my wife's old '96 Civic hatch to her brother on the condition that he give it back when he got something else. So maybe I'll do a K swap or Integra Type R swap one day on that car...it's soooo light, like 2200 lbs. That said, it can be a lot of work to put a K series engine into an old Civic...and at the end of the day you still have a Civic.
More appealing is an LS swap into an S13. Or, dare I say it, an LS swap into my S2000 one day...
Thread Starter
MBWorld Fanatic!
Joined: May 2009
Posts: 1,846
Likes: 29
From: Canada
eclectic assortment of cars
Nah, I really doubt it. Here's the situation, my buddy Josh has bought a Civic with a B16 swap in it already. He's the one that wants the K20 swap, and has already bought a whole setup for that. My other buddy Jimmy picked up the normal Civic (although it has had suspension work done) and will ditch that motor and put the B16 in it from Josh's Civic. Convoluted, no?
I'm excited for my 55 swap. The car should make substantially more power, but notably, probably twice the torque of my S2000 (even supercharged) at much lower revs. The S2000 makes all the power and torque near 9000rpm. The cars are different beasts entirely, and the 'go-fast' stuff done on both will just serve to emphasize their differences. Even with the 6-700 weight difference between the two cars, I'm thinking my 202 C55 would tear my S2000 a new one if comparing hole shots. Completely different story on the road course or twisty roads though.
I'm excited for my 55 swap. The car should make substantially more power, but notably, probably twice the torque of my S2000 (even supercharged) at much lower revs. The S2000 makes all the power and torque near 9000rpm. The cars are different beasts entirely, and the 'go-fast' stuff done on both will just serve to emphasize their differences. Even with the 6-700 weight difference between the two cars, I'm thinking my 202 C55 would tear my S2000 a new one if comparing hole shots. Completely different story on the road course or twisty roads though.
Last edited by Saaboteur; Jul 25, 2011 at 06:18 PM.
Thread Starter
MBWorld Fanatic!
Joined: May 2009
Posts: 1,846
Likes: 29
From: Canada
eclectic assortment of cars
Some more pix of the little work I did on the car last night:
New oil cooler seals:
These are disgustingly expensive to buy separately from the dealer, like C$50-60 each. The best deal I could find from a Canadian online source was like C$25 each. Fortunately, AutohausAZ has the three pack (both of the oil cooler seals, plus the oil filter housing gasket) for $15!
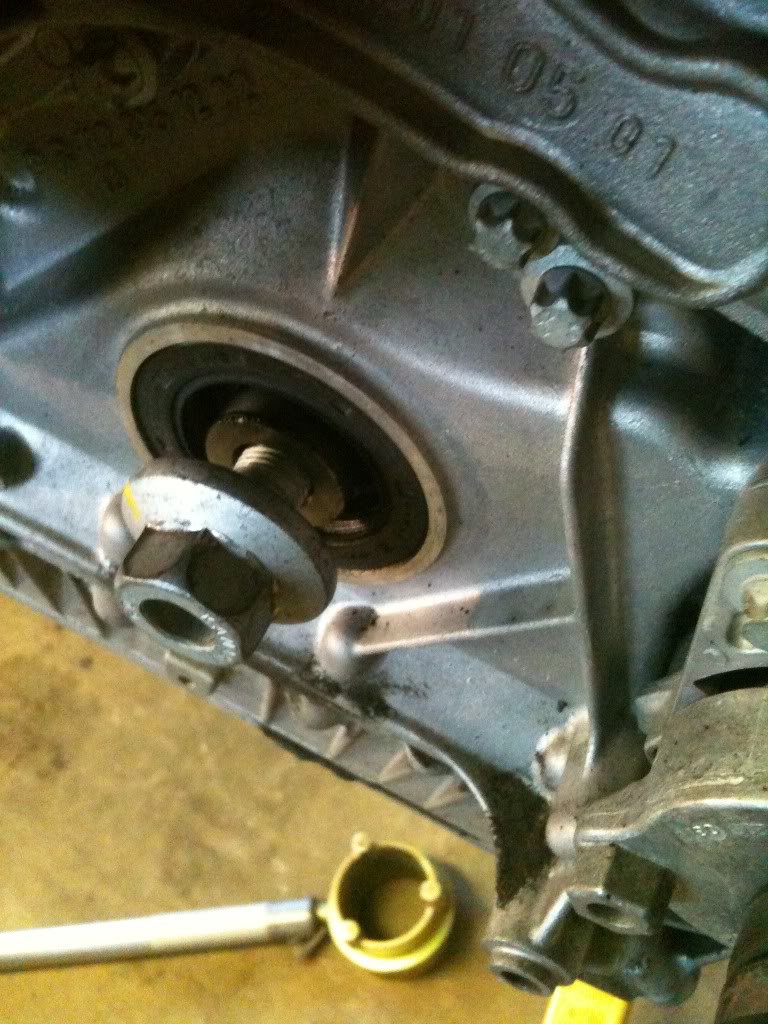
Forgot to take a photo with the oil filter housing off, but I did replace that gasket too. The photo just shows the massive 'pass through' fastener that holds the filter housing onto the timing cover. 46mm socket! I had the 46mm socket, but it was 3/4" drive, and I don't have any 3/4" drive ratchets or breaker bar even. I think I bought it a long while ago to use with some borrowed tools. I had to pick up a 1/2" to 3/4" drive adaptor to use it again.

Next - finish putting the intake manifold together, then rope another friend or relative into holding the engine steady whilst I remove the crank pulley - which of course I neglected to do the other day when others were around to help!
I also need to take a good look at the WIS again. The two knock sensors are located inside the V of the engine, and basically impossible to get at with the intake manifold in place. I'm going to have to reuse the existing engine wiring harness, as the one that came with the 55 was a bit melted, and I threw it all away already. So that is going to add a step or two, but not a huge deal. I figure I'm going to have to remove the 43 motor, remove its intake manifold, remove the engine wiring harness, plus the harness into the 55, put the manifold on, and then put it into the car. I'm guessing the engine wiring harness disconnects somewhere - so the injector harness, ignition stuff, emissions crap, variable intake wiring, etc all stays on the engine when it's pulled from the car. That would make the most sense.
I wish there was a way to get rid of the EGR and secondary air pump. In the S2000 world, one of the shops has developed a small black box which gets rid of the check engine light when the secondary air pump is removed. That'd be cool. But there are over 113,000 S2000s produced, and less than 3500 C43s, so I'm guessing that type of electronic magic isn't coming my way soon for my old AMG...
Just another note about engine components inside the V of V configuration engines. I know the GM based Saab V6s had oil coolers nestled in there - they leaked, which was bad news. Many manufacturers and aftermarket setups put superchargers inside the V too. I'm really curious to see detailed cutaways of BMW's twin turbo V8, as I understand they have both turbos inside the V. Nuts. Must be 'great' for heat and packaging!
New oil cooler seals:
These are disgustingly expensive to buy separately from the dealer, like C$50-60 each. The best deal I could find from a Canadian online source was like C$25 each. Fortunately, AutohausAZ has the three pack (both of the oil cooler seals, plus the oil filter housing gasket) for $15!
Forgot to take a photo with the oil filter housing off, but I did replace that gasket too. The photo just shows the massive 'pass through' fastener that holds the filter housing onto the timing cover. 46mm socket! I had the 46mm socket, but it was 3/4" drive, and I don't have any 3/4" drive ratchets or breaker bar even. I think I bought it a long while ago to use with some borrowed tools. I had to pick up a 1/2" to 3/4" drive adaptor to use it again.
Next - finish putting the intake manifold together, then rope another friend or relative into holding the engine steady whilst I remove the crank pulley - which of course I neglected to do the other day when others were around to help!
I also need to take a good look at the WIS again. The two knock sensors are located inside the V of the engine, and basically impossible to get at with the intake manifold in place. I'm going to have to reuse the existing engine wiring harness, as the one that came with the 55 was a bit melted, and I threw it all away already. So that is going to add a step or two, but not a huge deal. I figure I'm going to have to remove the 43 motor, remove its intake manifold, remove the engine wiring harness, plus the harness into the 55, put the manifold on, and then put it into the car. I'm guessing the engine wiring harness disconnects somewhere - so the injector harness, ignition stuff, emissions crap, variable intake wiring, etc all stays on the engine when it's pulled from the car. That would make the most sense.
I wish there was a way to get rid of the EGR and secondary air pump. In the S2000 world, one of the shops has developed a small black box which gets rid of the check engine light when the secondary air pump is removed. That'd be cool. But there are over 113,000 S2000s produced, and less than 3500 C43s, so I'm guessing that type of electronic magic isn't coming my way soon for my old AMG...
Just another note about engine components inside the V of V configuration engines. I know the GM based Saab V6s had oil coolers nestled in there - they leaked, which was bad news. Many manufacturers and aftermarket setups put superchargers inside the V too. I'm really curious to see detailed cutaways of BMW's twin turbo V8, as I understand they have both turbos inside the V. Nuts. Must be 'great' for heat and packaging!
Last edited by Saaboteur; Jul 26, 2011 at 10:57 AM.
MBWorld Fanatic!


Joined: Mar 2010
Posts: 5,890
Likes: 323
From: Land of mountains, cheese, chocolate and watches
12' W204 C63 AMG coupe "T-Rex", 12' W451 Smart Fortwo Pulse (99' W202 C43 AMG + Ultima Can-Am sold)
Great reading Saab  I would personally change the knock sensors in the V before installing your intake. Have you considered getting phenolic spacers on the intake? Good luck removing the pulley nut
  and get ALL the help (heavyweights) you can to hold down the engine and mount
I would personally change the knock sensors in the V before installing your intake. Have you considered getting phenolic spacers on the intake? Good luck removing the pulley nut and get ALL the help (heavyweights) you can to hold down the engine and mount
Thread Starter
MBWorld Fanatic!
Joined: May 2009
Posts: 1,846
Likes: 29
From: Canada
eclectic assortment of cars
No more budget for fancy schmancy stuff at the moment! Just need to get it into the car. Only the essentials for now.
I have a reproduction crank pulley holder tool to help remove the pulley, but even with my electric impact I couldn't get the bolt to budge. I'm gonna hafta 'strong arm' it. Boo!
Just need to get it into the car. Only the essentials for now.I have a reproduction crank pulley holder tool to help remove the pulley, but even with my electric impact I couldn't get the bolt to budge. I'm gonna hafta 'strong arm' it. Boo!
MBWorld Fanatic!
Joined: Mar 2010
Posts: 5,890
Likes: 323
From: Land of mountains, cheese, chocolate and watches
12' W204 C63 AMG coupe "T-Rex", 12' W451 Smart Fortwo Pulse (99' W202 C43 AMG + Ultima Can-Am sold)
No more budget for fancy schmancy stuff at the moment! Just need to get it into the car. Only the essentials for now.
I have a reproduction crank pulley holder tool to help remove the pulley, but even with my electric impact I couldn't get the bolt to budge. I'm gonna hafta 'strong arm' it. Boo!
Just need to get it into the car. Only the essentials for now.I have a reproduction crank pulley holder tool to help remove the pulley, but even with my electric impact I couldn't get the bolt to budge. I'm gonna hafta 'strong arm' it. Boo!
as I have heard it happens sometime with tough and VERY tight crank nuts 
MB World Stories
The Best of Mercedes & AMG

Manual Mercedes? 6 Times Sindelfingen Let Drivers Have All The Fun
Verdad Gallardo
Mercedes SLR McLaren 722 S Is Extremely Rare Example Modified by McLaren
Verdad Gallardo
8 Classic Boxy Mercedes Designs That Have Aged Like Fine Wine
Verdad Gallardo
Flawlessly Restored Mercedes 190E Evo II Heads to Auction
Verdad Gallardo
Electric Mercedes C-Class Unveiled: 11 Things You Need to Know
Verdad Gallardo
Mercedes EQS Gets A Major Update: Everything You Need to Know
Verdad Gallardo
5 Underrated Mercedes-Benz Models That Don't Get the Love They Deserve
Verdad Gallardo
Mercedes 300D Has Pushed Well Past 1 Million Miles and It Ain't Stopping
Verdad Gallardo
10 Most Reliable Mercedes-Benz Models You Can Buy Used
Verdad Gallardo
Thread Starter
MBWorld Fanatic!
Joined: May 2009
Posts: 1,846
Likes: 29
From: Canada
eclectic assortment of cars
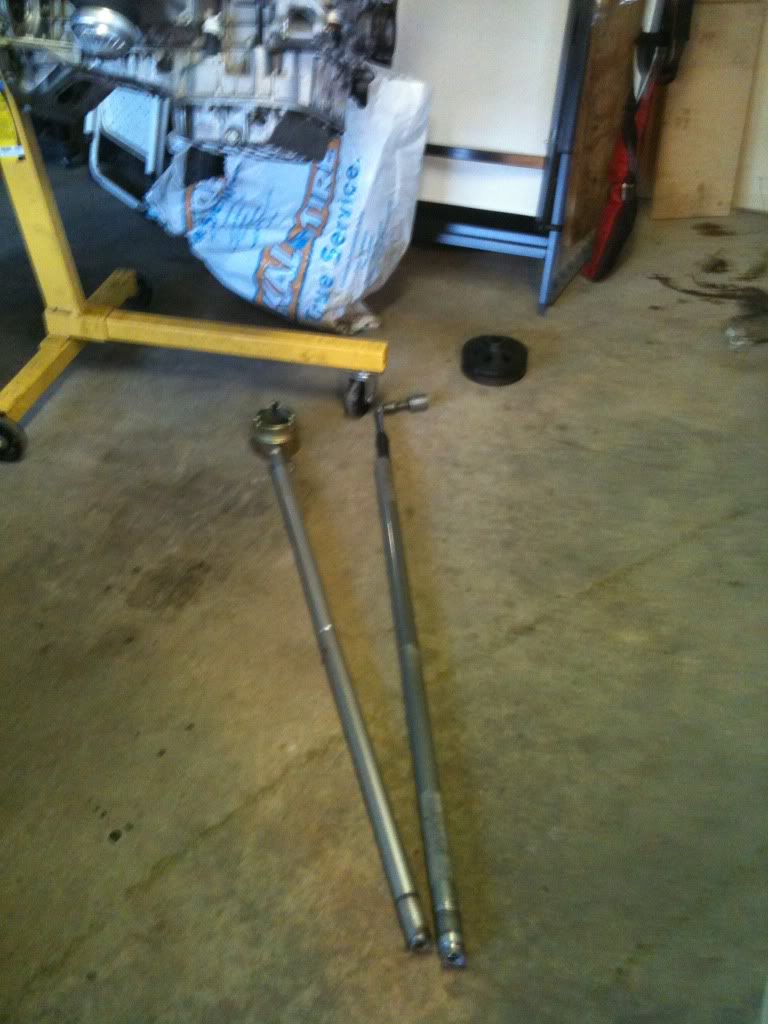
With my uncle's help, managed to remove the crank pulley bolt last night. I held the crank pulley tool in place with a jack lever and braced against the garage floor, and also put another jack lever onto the breaker bar. The only thing that bent was the pulley tool handle!
Pix, along with some attempts at moody, art shots of my S2000's rear in the rain yesterday:

Pix, along with some attempts at moody, art shots of my S2000's rear in the rain yesterday:


Thread Starter
MBWorld Fanatic!
Joined: May 2009
Posts: 1,846
Likes: 29
From: Canada
eclectic assortment of cars
Went through the WIS again last night with a view to printing off as many torque specs for the engine's fasteners as possible. Ended up with a stack of 30-40 pages!
Wishing I had a better look at the timing cover before I cleaned the whole motor, and now wondering whether I should take it off to re-seal it. Kind of a big job, but then again, it's even bigger with the engine in the car, so....
I have already acquired new front and rear main seals, so those should go on for sure. Question is - are the special tools really required for their installation? Might have to chat with the local indy Mercedes techs about that one.
Manage to accidentally destroy the little vacuum hose nipple on the inside of the intake manifold, so I will have to cannibalize the C43's original manifold for that part. Ah well.

MBWorld Fanatic!
Joined: Apr 2010
Posts: 4,437
Likes: 43
From: PDX
1999 C43, 2008 P30 E63, 2014 SQ5, 2024 Model Y Performance
Went through the WIS again last night with a view to printing off as many torque specs for the engine's fasteners as possible. Ended up with a stack of 30-40 pages!
Wishing I had a better look at the timing cover before I cleaned the whole motor, and now wondering whether I should take it off to re-seal it. Kind of a big job, but then again, it's even bigger with the engine in the car, so....
I have already acquired new front and rear main seals, so those should go on for sure. Question is - are the special tools really required for their installation? Might have to chat with the local indy Mercedes techs about that one.
Manage to accidentally destroy the little vacuum hose nipple on the inside of the intake manifold, so I will have to cannibalize the C43's original manifold for that part. Ah well.
Wishing I had a better look at the timing cover before I cleaned the whole motor, and now wondering whether I should take it off to re-seal it. Kind of a big job, but then again, it's even bigger with the engine in the car, so....
I have already acquired new front and rear main seals, so those should go on for sure. Question is - are the special tools really required for their installation? Might have to chat with the local indy Mercedes techs about that one.
Manage to accidentally destroy the little vacuum hose nipple on the inside of the intake manifold, so I will have to cannibalize the C43's original manifold for that part. Ah well.
 You should definitely do as much as you can with the motor outside of the vehicle and save yourself a headache in the future.
I can't wait to see the finished product
Thread Starter
MBWorld Fanatic!
Joined: May 2009
Posts: 1,846
Likes: 29
From: Canada
eclectic assortment of cars
Gettin' antsy with anticipation of the swap. Got a new water pump gasket the other day. If I had enough budget, I would have gotten new pulleys, new water pump, new or rebuilt starter, power steering pump, alternator, AC compressor, drag link etc etc, but all of that adds up really quickly - and all of my stuff still works. Probably would have put in another $2k right there. I've already replaced just about all the coolant, trans cooler and heater hoses, and actually have a couple more that need to go on.
Decided to redo the C32/55 front calipers though - but by that I just mean swapping them from left to right to get the correct piston orientation, but with the bleeder valve pointed downwards - just will have to bleed with them off the car I guess.
To that end, tomorrow I'm going to pick up a few brake adaptors, to being the metric fittings on the car (variously 10mm x 1 male and female) out to -3 AN. Those will likely be Aeroquip or Earl's pieces, depending on availability and price.
Then I intend to pick up Russell or Earl's pre-fabricated brakelines with -3 fittings on both sides. The only variation there is that a 45* fitting would be ideal on the caliper end, to deal with the line orifice which will be pointed downwards once the calipers are fitted on the opposite side of the car to get the correct piston orientation. Most of the readily available pre-fab'd brakelines are -3 to -3 straight, or -3 to -3 90*. I suppose a 90* would work but the bend might be a bit more than required. The only problem may be availability - my engine builder and another local shop may take some time to get the Russell lines in, but the Earl's are readily available I understand. But only the Russell lines come with the 45* fitting on one end, and only Russell are DOT approved. Not that I think there would be anything wrong with an Earl's line that's made for racing (and indeed, their literature indicates their lines exceed DOT requirements) but it's nice to have the DOT approval.
I'm going to get a wheel off tonight to have a look and to hopefully measure the required brakeline length. I may attempt to mount the S500 calipers I have onto the car too, as these are from the same caliper family and are basically the same as the C32/55 calipers, except spec'd for 330mm rotors.
Rest assured, once it's all done, I will post up all the part numbers.
After that, I want to grab a deck with Bluetooth and iPhone charging and playback capability and would like to grab a set of 18" BBS LMs. Not easy to find those wheels in 5x112, but vrwheels.com has a ready supply of them in 5x114.3, and will charge another $150 to redrill them with steel inserts. I'm told the redrilling does not affect the wheel aesthetically. But that will have to wait for more money - that's $2k plus another $900 for tires (plus mounting and shipping) so call that $3k total - best to probably just stick with my 18" Monoblocks for the time being, and just grab tires for them!
The other thing I need to do is figure out why my side bolsters inflate, but don't stay inflated. I did try nosing around with the fittings, and they seem to be connected, but perhaps I need to look closer. I shudder to think how much one of those bladders will cost, new.
Lately I have been intrigued by the "Honda alphabet soup", for lack of a better term. I posted earlier about my two friends picking up EK body Civic hatchbacks (a '99 and an '00 respectively). These cars are so bloody lightweight, as it appears they are basically tin cans with wheels and engines. I'm talking Elise light - like 2200-2400 lbs depending on year and level of trim. The one friend has acquired a modern complete K20 engine and 6 speed trans with LSD from an Acura CSX (Canadian market only car, I understand - basically a Civic sedan - ~200hp if I remember right). The other friend will be transplanting in a B16 engine from the Civic SiR coupe, so 1.6L with 160hp or something like that - quite a jump from the basic hatchback's 110hp or whatever it was.
So that has got me all intrigued because my brother-in-law's 'arrangement' with me and my wife is that once he buys another car, he'll give us back (or we'll buy it back from him) the '96 Civic hatchback we gave him. I've been looking at torontojdm.com, and it appears I can grab a complete Integra Type-R B18 engine and trans (so nearly 200hp) for $4200. I figure I can get the car back for basically free, and have quite a quick little track car for maybe $7-8000 (with new suspension, wheels, some interior bits, engine mounts, exhaust). Anyway, it's all about power to weight, right? And 2300lbs compares favourably with the Integra Type-R's 2600+lbs. How else can you lose 300lbs?!?
The beauty is that all of these swaps have been engineered by other people who have done such things. Hasport.com makes all the mounts, and help with the wiring and other required accessories.
I figure an S13 with an LSx V8 swap will run at least $15k, maybe closer to $20k to do it right, so to keep my tinkering spirit alive, and to keep things cheap, the Civic with the B18 Type-R engine swap seems like the right path.
So that's the next project, but I digress and don't want to turn this into a Honda thread. I should probably finish the AMG engine swap before I start another swap project!!
Last edited by Saaboteur; Aug 5, 2011 at 06:35 PM.

Thread Starter
MBWorld Fanatic!
Joined: May 2009
Posts: 1,846
Likes: 29
From: Canada
eclectic assortment of cars
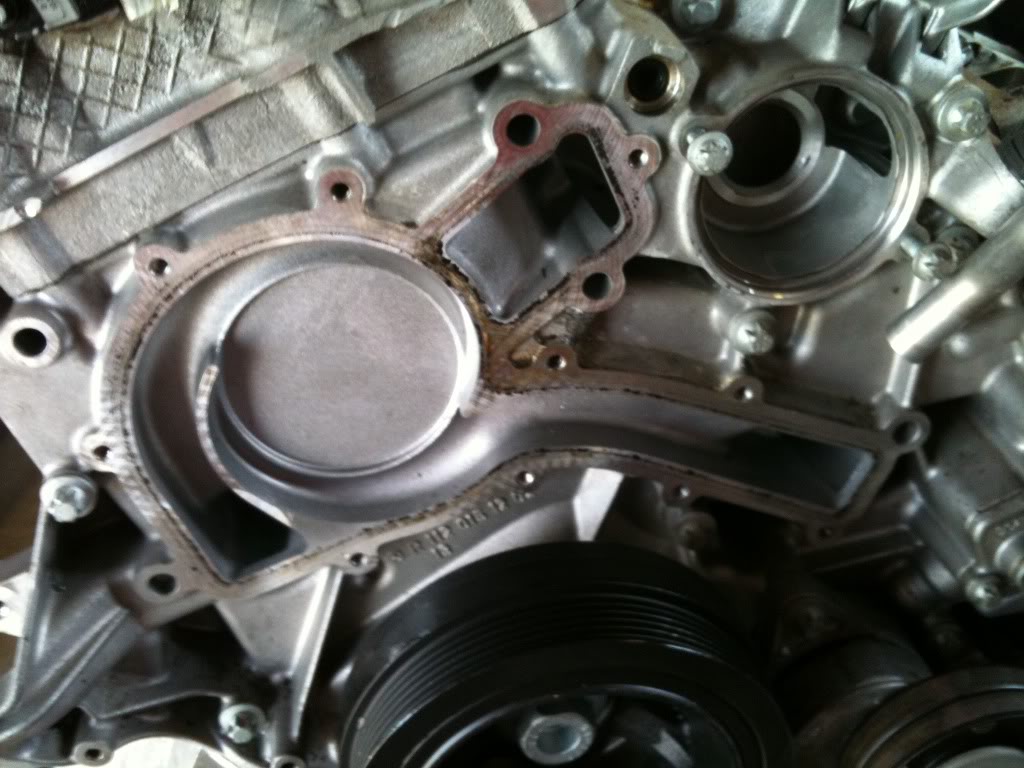
Found some time Sunday afternoon to put some more work into the 55. Started with torquing down all the fasteners on items which I had removed, but had not yet torqued back down - valve covers, engine mounts, oil filter housing. Then I removed the viscous fan clutch and water pump to put in a new water pump gasket. The water pump itself spins nice and freely, so no worries there, but I figured I'd do the gasket anyway.
Also put in the new front main seal, and also a new crank pulley and crank pulley bolt. Just need to torque that down, but I'll need some help or need to have the motor in the car to do that. Two phase torque spec, 200Nm and then another 45* if I remember right from the WIS!
Interestingly, and I wonder if this is on later M113s or what, but the water pump pulley was secured by four regular hex cap bolts to the water pump shaft, ie. with six sides on them, the type you'd put a wrench or socket onto. Consequently, the holder tool I have wouldn't fit over those bolts (to hold the water pump still while the fan clutch was removed). On my C43, the bolts are socket head allen cap bolts, ie. with a round head into which an allen key is used.
So I had to round up a couple of the appropriate bolts to thread into the pulley/water pump before I could get the fan clutch off. Bit of a pain, as that type of fastener is relatively specialized, and not carried by the local PartSource auto parts chain stores. They used to, but no longer. Boo.
Got the water pump off and cleaned up the surfaces, then re-installed. Figured that I would get mixed up with the time between torquing down the fasteners (as I'll be at this for a little while yet), so I applied a bit of paint to each fastener which I torqued today.
All in all, pretty basic stuff today, but ah well - I'll post up the pix anyway! No good 'build' thread is complete without lots of pictures!

The other thing I did was acquire the 10mm x 1 male and female to -3 adaptor fittings for the brakes. The hardline on the chassis side is male, while the fitting on the caliper is female. My plan, as I alluded to earlier, is to use the adaptors to get me to -3 male, and then use off the shelf brakelines by Russell to get the proper length. Fingers crossed I can get the 45* fitting I need on one end, as that will be perfect for the calipers once they are fitted for the correct piston orientation.
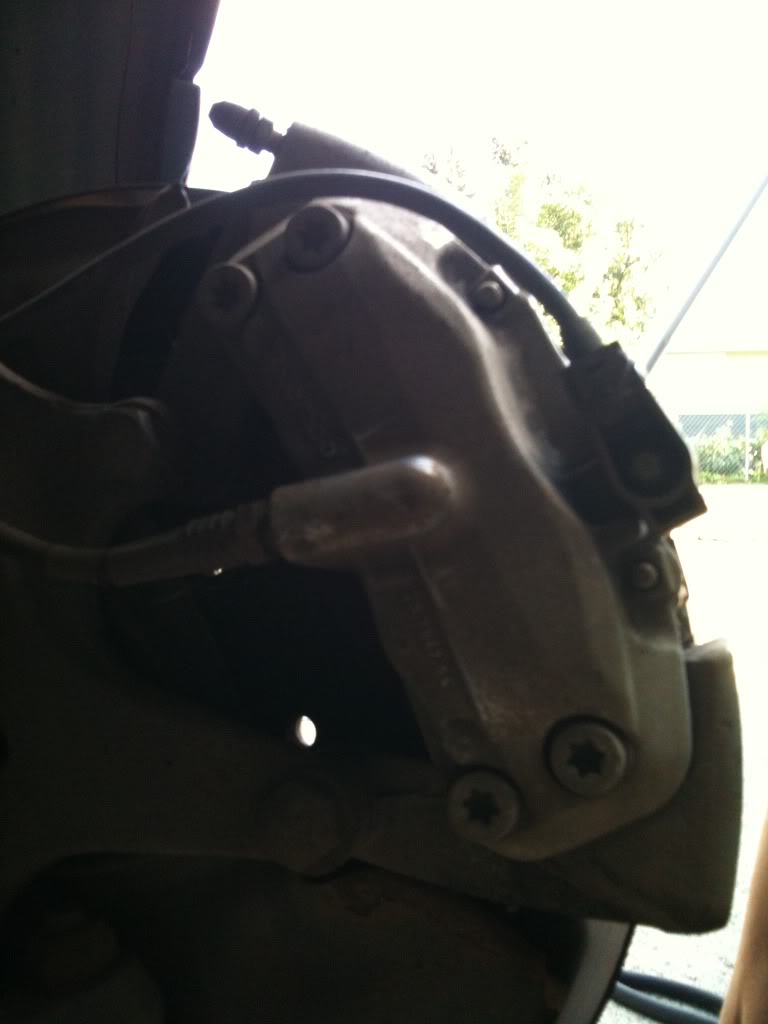
Here's a pic of the reverse side of the caliper, and you can see the female end on the caliper and why, once the caliper is fitted onto the other side of the car, the fitting will need a little bend so that it will point in the right direction for the line to feed nicely to the chassis side.

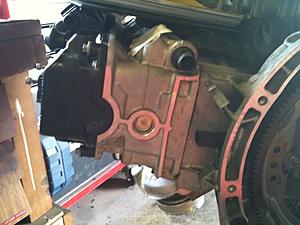
Another thing I noticed was the water line off the left head. Mine and ProjectC55's posts on the stickied 55 swap thread discuss the need to remove the water fitting off the C43 to put on the the 55 motor. But unless I'm mistaken, my 55 motor has this fitting already! Here's a pic:
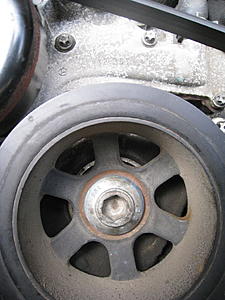
I dunno why I never noticed before when I first got the motor, but it now seems like the tensioner pulley isn't as nice as I'd like it to be. Doesn't rotate as smoothly as I'd like. I think I'll be ordering a new assembly tomorrow (as it doesn't appear to be possible to just acquire the pulley by itself). Oh well.
Also put in the new front main seal, and also a new crank pulley and crank pulley bolt. Just need to torque that down, but I'll need some help or need to have the motor in the car to do that. Two phase torque spec, 200Nm and then another 45* if I remember right from the WIS!
Interestingly, and I wonder if this is on later M113s or what, but the water pump pulley was secured by four regular hex cap bolts to the water pump shaft, ie. with six sides on them, the type you'd put a wrench or socket onto. Consequently, the holder tool I have wouldn't fit over those bolts (to hold the water pump still while the fan clutch was removed). On my C43, the bolts are socket head allen cap bolts, ie. with a round head into which an allen key is used.
So I had to round up a couple of the appropriate bolts to thread into the pulley/water pump before I could get the fan clutch off. Bit of a pain, as that type of fastener is relatively specialized, and not carried by the local PartSource auto parts chain stores. They used to, but no longer. Boo.
Got the water pump off and cleaned up the surfaces, then re-installed. Figured that I would get mixed up with the time between torquing down the fasteners (as I'll be at this for a little while yet), so I applied a bit of paint to each fastener which I torqued today.
All in all, pretty basic stuff today, but ah well - I'll post up the pix anyway! No good 'build' thread is complete without lots of pictures!


The other thing I did was acquire the 10mm x 1 male and female to -3 adaptor fittings for the brakes. The hardline on the chassis side is male, while the fitting on the caliper is female. My plan, as I alluded to earlier, is to use the adaptors to get me to -3 male, and then use off the shelf brakelines by Russell to get the proper length. Fingers crossed I can get the 45* fitting I need on one end, as that will be perfect for the calipers once they are fitted for the correct piston orientation.
Here's a pic of the reverse side of the caliper, and you can see the female end on the caliper and why, once the caliper is fitted onto the other side of the car, the fitting will need a little bend so that it will point in the right direction for the line to feed nicely to the chassis side.
Another thing I noticed was the water line off the left head. Mine and ProjectC55's posts on the stickied 55 swap thread discuss the need to remove the water fitting off the C43 to put on the the 55 motor. But unless I'm mistaken, my 55 motor has this fitting already! Here's a pic:

I dunno why I never noticed before when I first got the motor, but it now seems like the tensioner pulley isn't as nice as I'd like it to be. Doesn't rotate as smoothly as I'd like. I think I'll be ordering a new assembly tomorrow (as it doesn't appear to be possible to just acquire the pulley by itself). Oh well.
Last edited by Saaboteur; Aug 8, 2011 at 02:04 AM.
Thread Starter
MBWorld Fanatic!
Joined: May 2009
Posts: 1,846
Likes: 29
From: Canada
eclectic assortment of cars
Woot! Best online price I could find (from a Canadian distributor) for the tensioner assembly was about $140, plus shipping of course. Best local price I could find from an import parts shop I deal with was $165. Buddy of mine who works at a shop is getting me the same part for $95. Pays to know people in the industry!
Same goes for the thermostat gasket - about $6.50 local, $2.50 online, $2.00 from my buddy.
I'm going to re-use my low mileage thermostat which I put into the car a couple years ago, plus all of the 16 plugs and wires (which I put in last winter). Going to re-use the injectors that came with the 55 though, those are less than half the mileage of the originals on my C43.
Also ordered the Russell pre-fabricated brakelines, hopefully they'll get here in a week or two. FYI, here are all the part numbers for my brake set up, fingers crossed it will work nicely:
-3 straight to 10mm x 1 male - Aeroquip FCM2941, two in one package
-3 straight to 10mm x 1 female - 2x required, Earl's 989534ERL, one per package, 2x required
45* to -3 straight, 16" pre-fabricated brakeline - 2x required, Russell 654243
Finally, tomorrow evening I'm going to rent a hoist at a local shop (this shop just rents out space and provides help, the use of the hoist is $17/hour) and I'm going to loosen up the exhaust bolts (for the downpipes off the exhaust manifolds) and the torque converter to flywheel bolts. Then I'll tighten them up again to drive back home, but it'll make it easier when we actually get down to removing the engine to have those out of the way and broken free at least once. If I have enough time, I'm also going to install the new rear engine/trans mount, as that is much easier with a hoist too.
Last edited by Saaboteur; Aug 8, 2011 at 12:35 PM.
Thread Starter
MBWorld Fanatic!
Joined: May 2009
Posts: 1,846
Likes: 29
From: Canada
eclectic assortment of cars
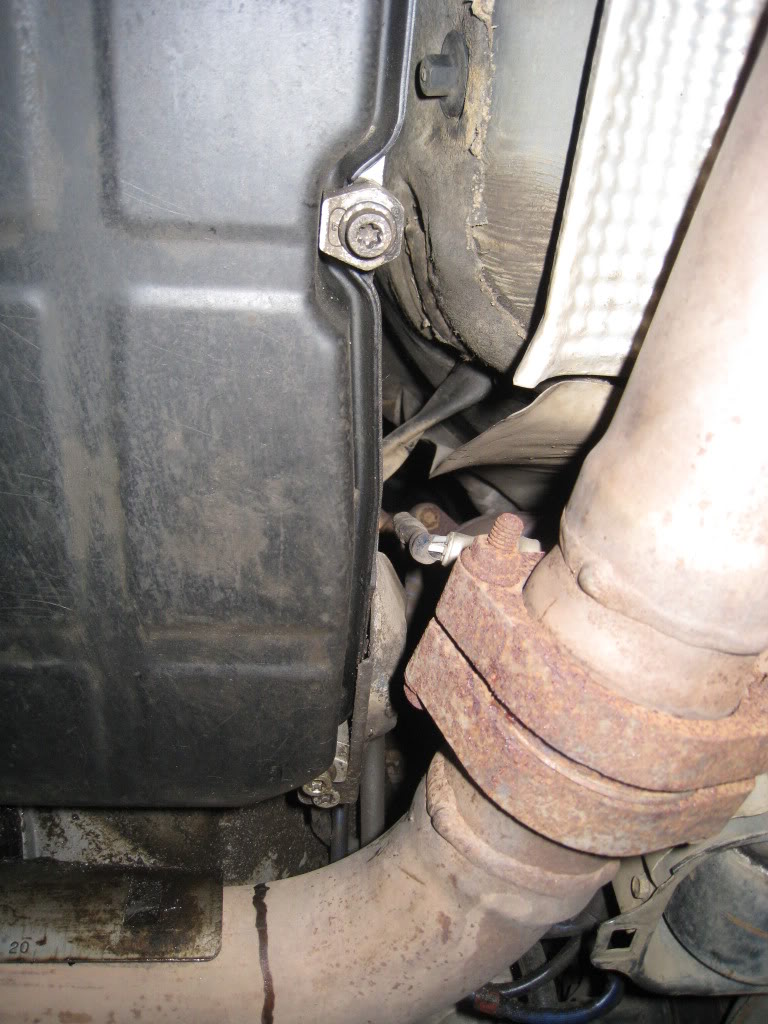
Got the car up on a hoist yesterday evening for the princely sum of $17/hour. Spent an hour there and loosened (then tightened) the torque converter to flywheel bolts and loosened the exhaust manifold to downpipe bolts.
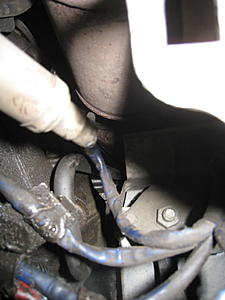
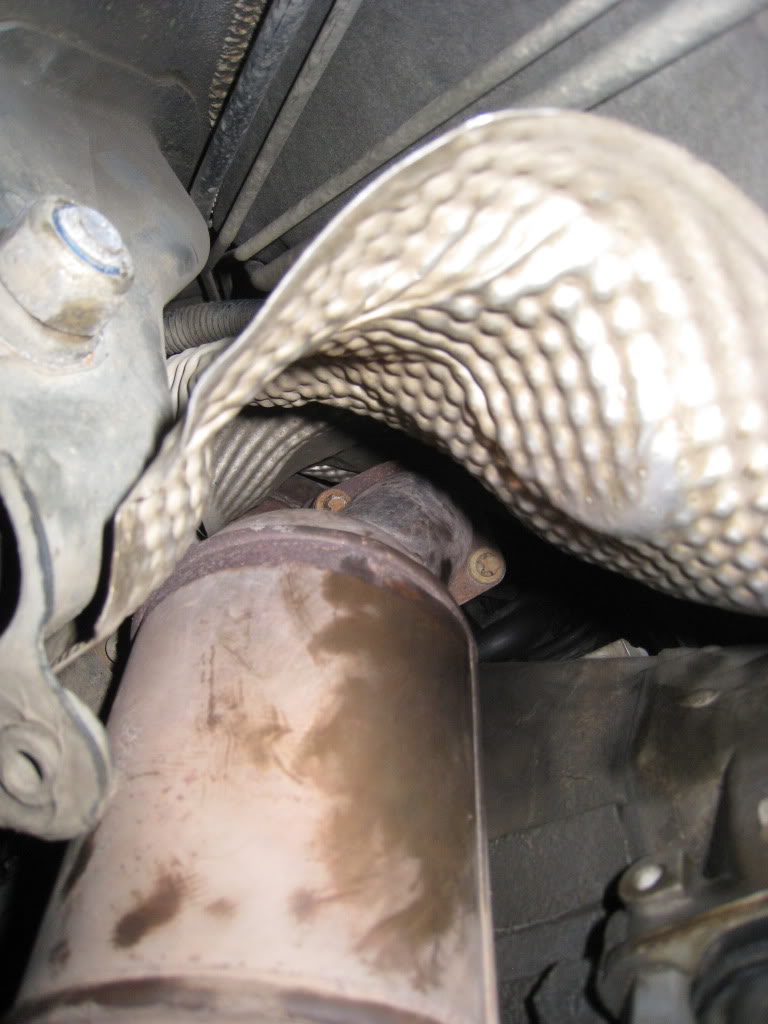
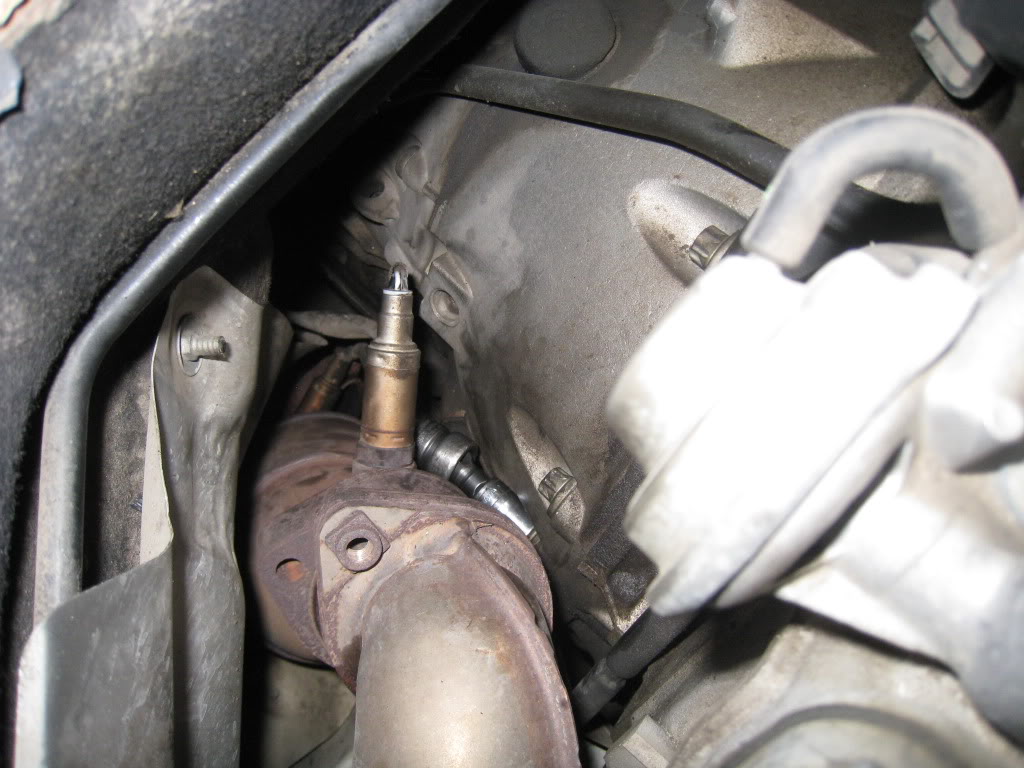
The former were quite easy, no more than a twist of the wrist on the 3/8" ratchet to break them free. The exhaust manifold to downpipe bolts were a bit harder. I had to use a lengthy 3/8" extension and a u-joint to reach them. And of course they were torx fasteners. The hardest one was actually one of the two on the left side, with a heatshield having to be loosened off to allow a 'straight shot' at the fastener. Still gonna hafta crawl underneath the car to finish the job, but at least they are loose now.
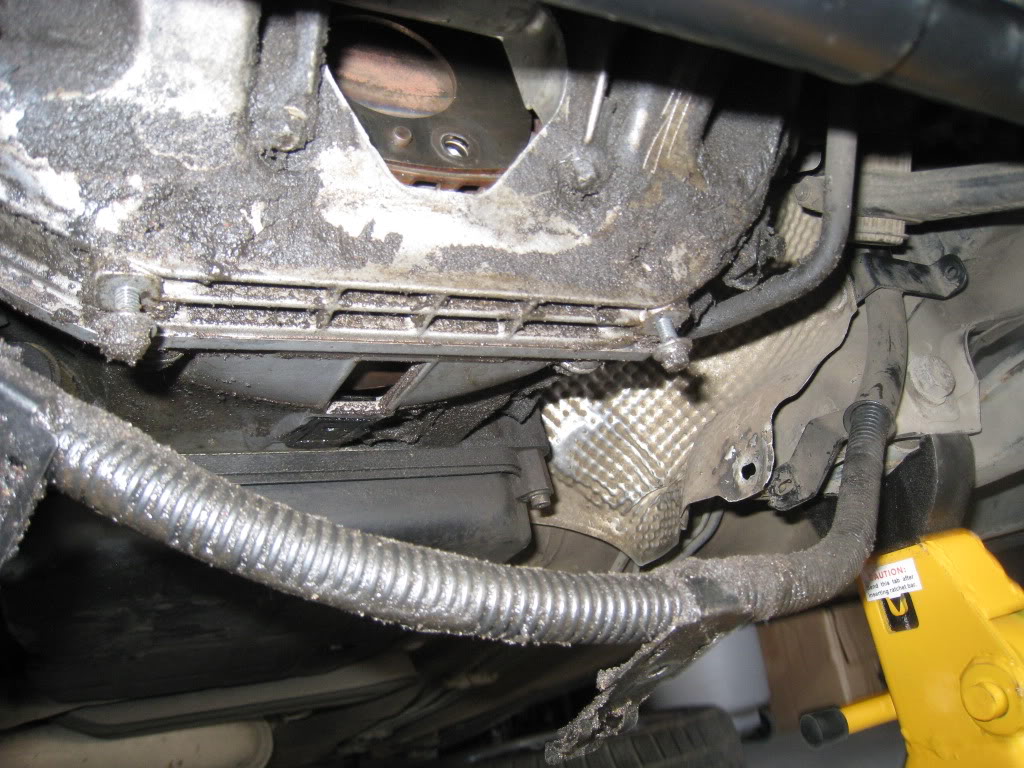
That heatshield, the lower one, is only held on by three nuts. Two of them are easy to get at. The third one is up higher, beside the cat and trans oil pan. That made it very difficult to get a wrench on there! I scalded my arm a couple times. In the end I just left that third one and managed to move the heatshield out of the way enough to let me get at the exhaust bolt.
Didn't want to spend more time doing the rear engine/trans mount, as I wanted to get home, but that one shouldn't be too bad.
This is the heatshield and a view of the left side exhaust manifold:


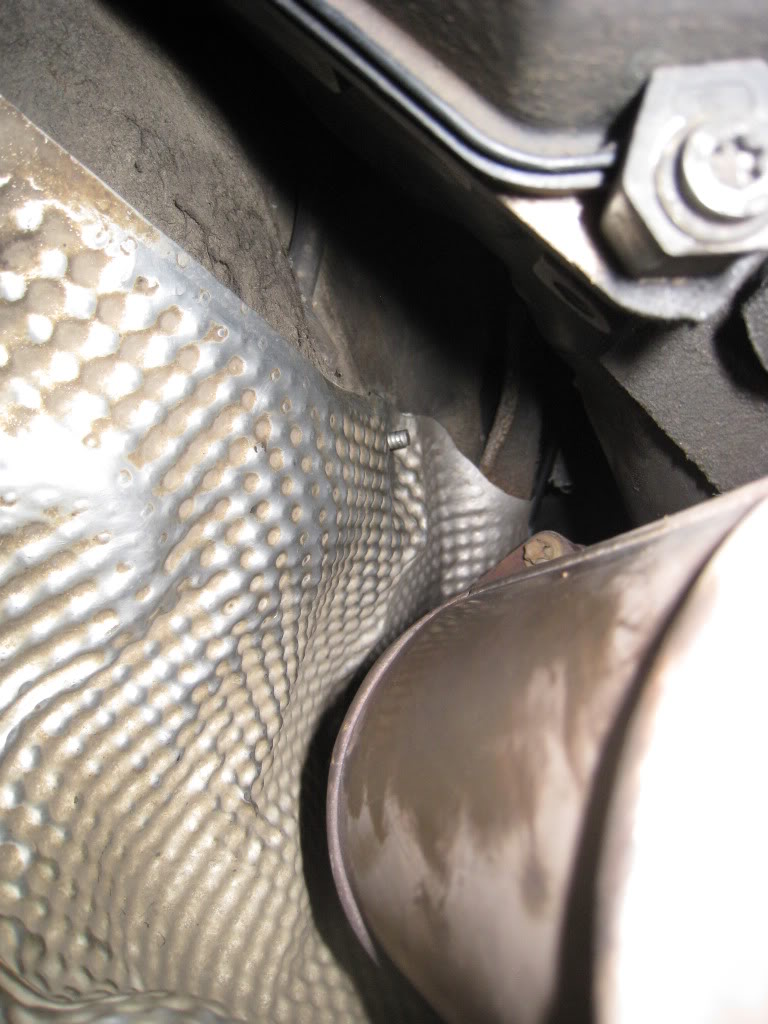
The right side:
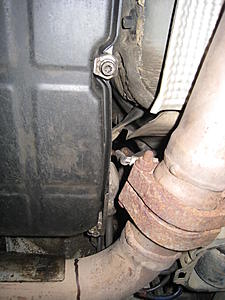
The underside and the trans need a lot of cleaning, plenty of crap and gunk on there. Once the motor is out, I'll have at it with degreaser and a hose. The previous owner's service records mentioned the need to fix the front seal on the trans, so I will be getting at that one when the motor is out too. Plan is to leave the trans in the car when the engine comes out, a slight variation on the WIS directions, came from Money-One's suggestion. Might pull the rad, rad support and bumper right out too, so instead of lifting the engine up and over, we won't have to lift it up as high, just enough to clear, and then out the front. We'll see.
Also bought new socket head allen cap bolts for the water pump pulley so my fan holder tool will fit over them in the future.
And someone with more Mercedes knowledge can probably answer definitively, but I think now I know the difference between the old crank pulley bolt and the new style one. The old one is an 'innie' (sockety head allen cap bolt), and requires a 17mm allen socket to remove. The new one is an 'outtie' (a regular hex cap bolt), and uses a 27mm socket to remove. I'm not sure if my car ever had that recall done. But the 55 motor (from an '02 E55) has the regular hex cap bolt, as does the new crank pulley bolt I bought when I got the new crank pulley.
When I win the lottery I will definitely have a large hoist in my huge garage, makes things so much easier!
Can't wait to get stuck into the engine R&R job. Doing what I do in my day job (at times very stressful; an endless stream of documents, letters, emails, voicemails, phone calls, etc etc), working on my cars is so different. While without a doubt working on the cars can also be stressful and sweaty and dirty, I enjoy it immensely, almost all the time. Well, not when having to fix something that's busted, but when it's just wrenching for the sake of modifying, I love it. Not that I would give up my day job. It's the contrasts in work and and the main hobby that keep life interesting (just like the contrast between my S2000 and the AMG). The boss has apparently also tried something similar - all this week he is helping his son-in-law do renos on his investment property. He's learning how to chill out too!
The former were quite easy, no more than a twist of the wrist on the 3/8" ratchet to break them free. The exhaust manifold to downpipe bolts were a bit harder. I had to use a lengthy 3/8" extension and a u-joint to reach them. And of course they were torx fasteners. The hardest one was actually one of the two on the left side, with a heatshield having to be loosened off to allow a 'straight shot' at the fastener. Still gonna hafta crawl underneath the car to finish the job, but at least they are loose now.
That heatshield, the lower one, is only held on by three nuts. Two of them are easy to get at. The third one is up higher, beside the cat and trans oil pan. That made it very difficult to get a wrench on there! I scalded my arm a couple times. In the end I just left that third one and managed to move the heatshield out of the way enough to let me get at the exhaust bolt.
Didn't want to spend more time doing the rear engine/trans mount, as I wanted to get home, but that one shouldn't be too bad.
This is the heatshield and a view of the left side exhaust manifold:
The right side:

The underside and the trans need a lot of cleaning, plenty of crap and gunk on there. Once the motor is out, I'll have at it with degreaser and a hose. The previous owner's service records mentioned the need to fix the front seal on the trans, so I will be getting at that one when the motor is out too. Plan is to leave the trans in the car when the engine comes out, a slight variation on the WIS directions, came from Money-One's suggestion. Might pull the rad, rad support and bumper right out too, so instead of lifting the engine up and over, we won't have to lift it up as high, just enough to clear, and then out the front. We'll see.
Also bought new socket head allen cap bolts for the water pump pulley so my fan holder tool will fit over them in the future.
And someone with more Mercedes knowledge can probably answer definitively, but I think now I know the difference between the old crank pulley bolt and the new style one. The old one is an 'innie' (sockety head allen cap bolt), and requires a 17mm allen socket to remove. The new one is an 'outtie' (a regular hex cap bolt), and uses a 27mm socket to remove. I'm not sure if my car ever had that recall done. But the 55 motor (from an '02 E55) has the regular hex cap bolt, as does the new crank pulley bolt I bought when I got the new crank pulley.
When I win the lottery I will definitely have a large hoist in my huge garage, makes things so much easier!
Can't wait to get stuck into the engine R&R job. Doing what I do in my day job (at times very stressful; an endless stream of documents, letters, emails, voicemails, phone calls, etc etc), working on my cars is so different. While without a doubt working on the cars can also be stressful and sweaty and dirty, I enjoy it immensely, almost all the time. Well, not when having to fix something that's busted, but when it's just wrenching for the sake of modifying, I love it. Not that I would give up my day job. It's the contrasts in work and and the main hobby that keep life interesting (just like the contrast between my S2000 and the AMG). The boss has apparently also tried something similar - all this week he is helping his son-in-law do renos on his investment property. He's learning how to chill out too!
Last edited by Saaboteur; Aug 10, 2011 at 03:21 PM.

Senior Member
Joined: Feb 2009
Posts: 317
Likes: 1
From: Germany
C43 AMG 5.5 - 396.4HP
I don't know the english word for it... I have a short extension (2'') you can tilt the head a little. This one and some other long extension is good to reach the screws of the exhaust manifold. But I don't like to mount/dismount them too.
Even harder is to reach some screws between engine and transmission. Especially to mount the starter is difficult, because you need to hold the starter in position (but you can hardly reach it with your hand) and drive the screws from other side.
Even harder is to reach some screws between engine and transmission. Especially to mount the starter is difficult, because you need to hold the starter in position (but you can hardly reach it with your hand) and drive the screws from other side.
Thread Starter
MBWorld Fanatic!
Joined: May 2009
Posts: 1,846
Likes: 29
From: Canada
eclectic assortment of cars
Probably what you are referring to is a u-joint, like this:
http://www.keywordpicture.com/keywor...oint%20socket/
Any tips on getting at the engine to transmission bolts? I thought there was enough room to get at them from both up top and underneath the car?
http://www.keywordpicture.com/keywor...oint%20socket/
Any tips on getting at the engine to transmission bolts? I thought there was enough room to get at them from both up top and underneath the car?
MBWorld Fanatic!

Joined: Apr 2005
Posts: 3,784
Likes: 84
From: SCV SoCal
2002 CLK430
Probably what you are referring to is a u-joint, like this:
http://www.keywordpicture.com/keywor...oint%20socket/
Any tips on getting at the engine to transmission bolts? I thought there was enough room to get at them from both up top and underneath the car?
http://www.keywordpicture.com/keywor...oint%20socket/
Any tips on getting at the engine to transmission bolts? I thought there was enough room to get at them from both up top and underneath the car?
Senior Member
Joined: Feb 2009
Posts: 317
Likes: 1
From: Germany
C43 AMG 5.5 - 396.4HP
With the link version you have problems wiht stability when driving. A trick is to wrap some tape around.
I ment those: http://www.rs-werkzeuge.de/images/pr...e/mi77/777.jpg
Some other 'nice to have' tools:
http://images.izideal.com/img/produc...he-packpg.jpeg
http://www.ace-technik.de/dokumente/...oss/365966.jpg
In general you should have smart hands!
Another tipp: Don't rempve the torque converter if not necessary. It can be difficult to insert it again. Sometimes you are lucky to have it in correct position in just some minutes, sometimes it can take an hour. Sometimes you think it is in position, but when you mount the engine you find it is not fully inserted and you need to remove the engine again.
Also take care, that the screw holes of tourque converter and flywheel is in down position, so you can link when engine is mounted.
Bye,
Stephan
Thread Starter
MBWorld Fanatic!
Joined: May 2009
Posts: 1,846
Likes: 29
From: Canada
eclectic assortment of cars
Popeye, I see what you mean now - the first photo is a wobble socket. Unfortunately, I don't have any of those, but my mechanic buddy (who is going to help me with the swap) likely does. I actually had to use the tape trick when I was underneath the car the other night, to stop the u-joint from moving around too much. The second one just looks like a normal socket and ratchet set though? Or am I seeing that it is used by twisting the handle? The last one would be a swivel head ratchet. I think I have one of those.
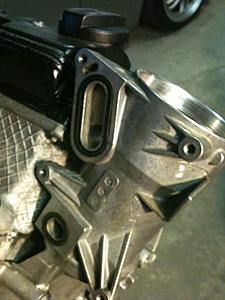
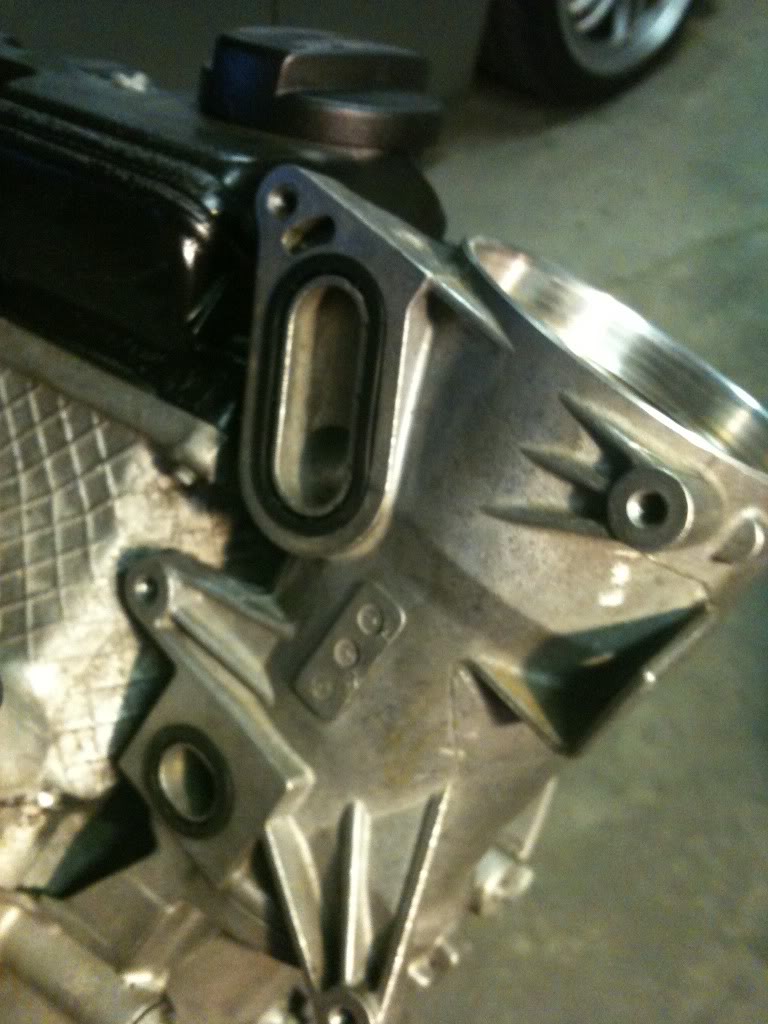
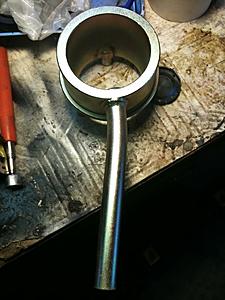
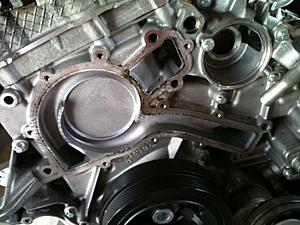
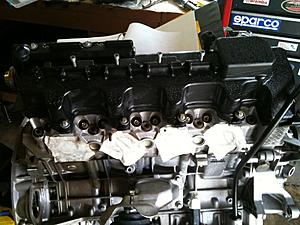
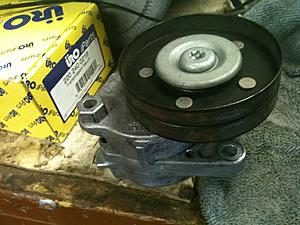
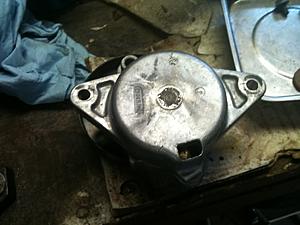
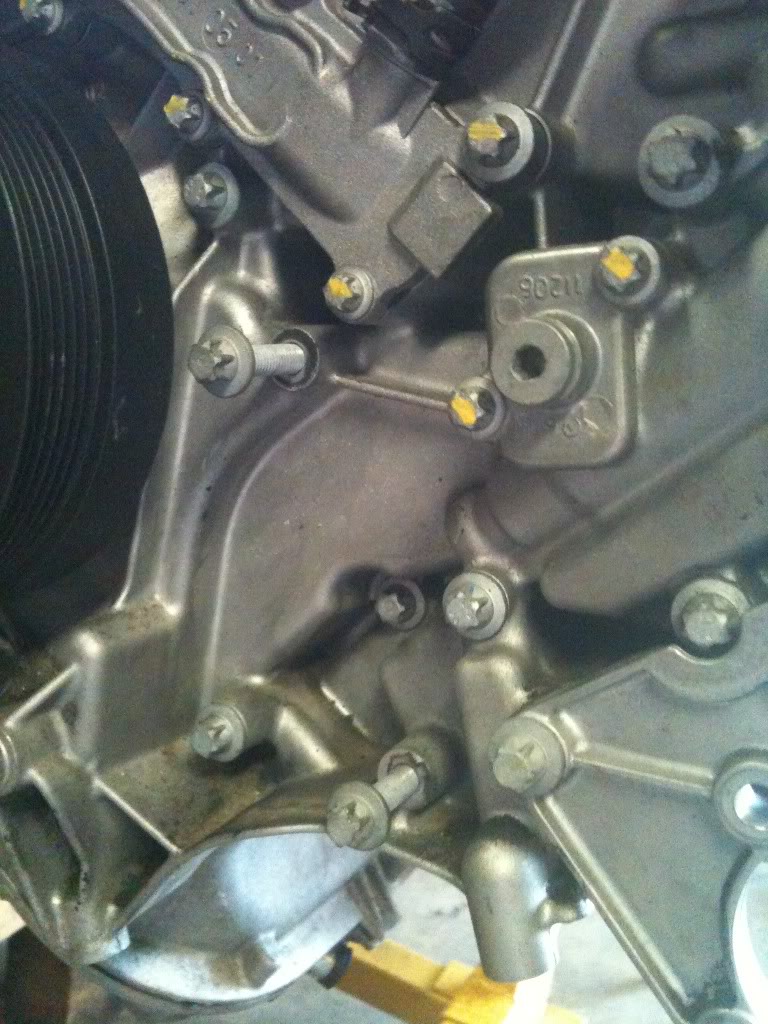
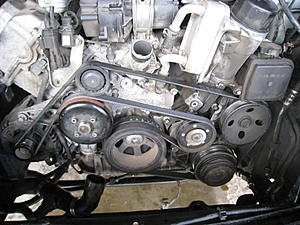
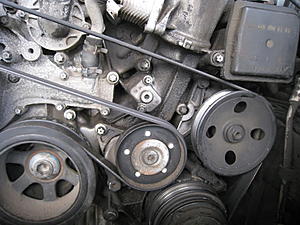
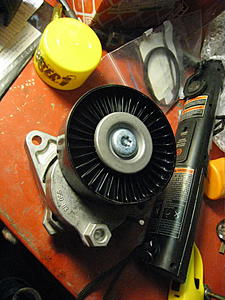
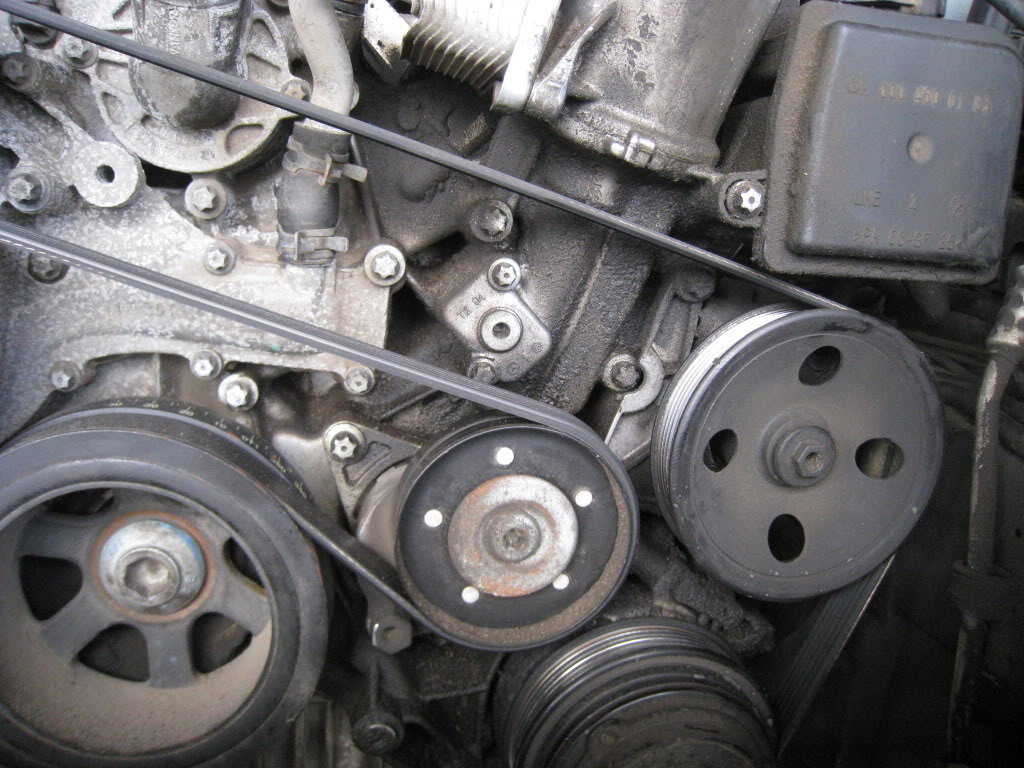
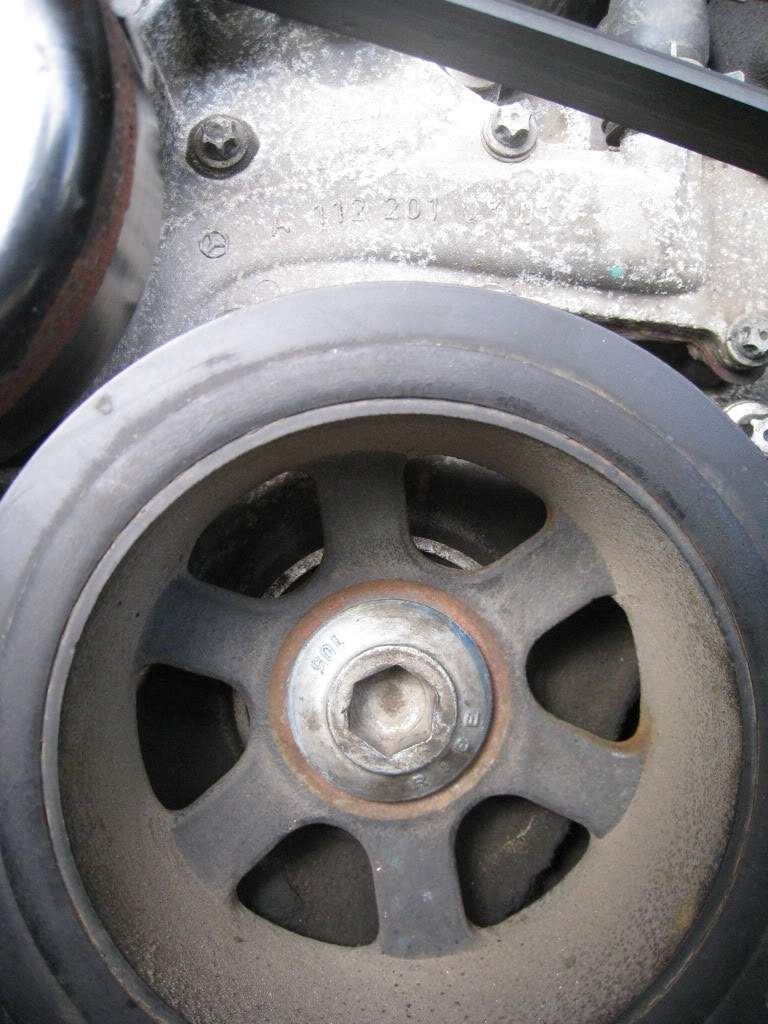
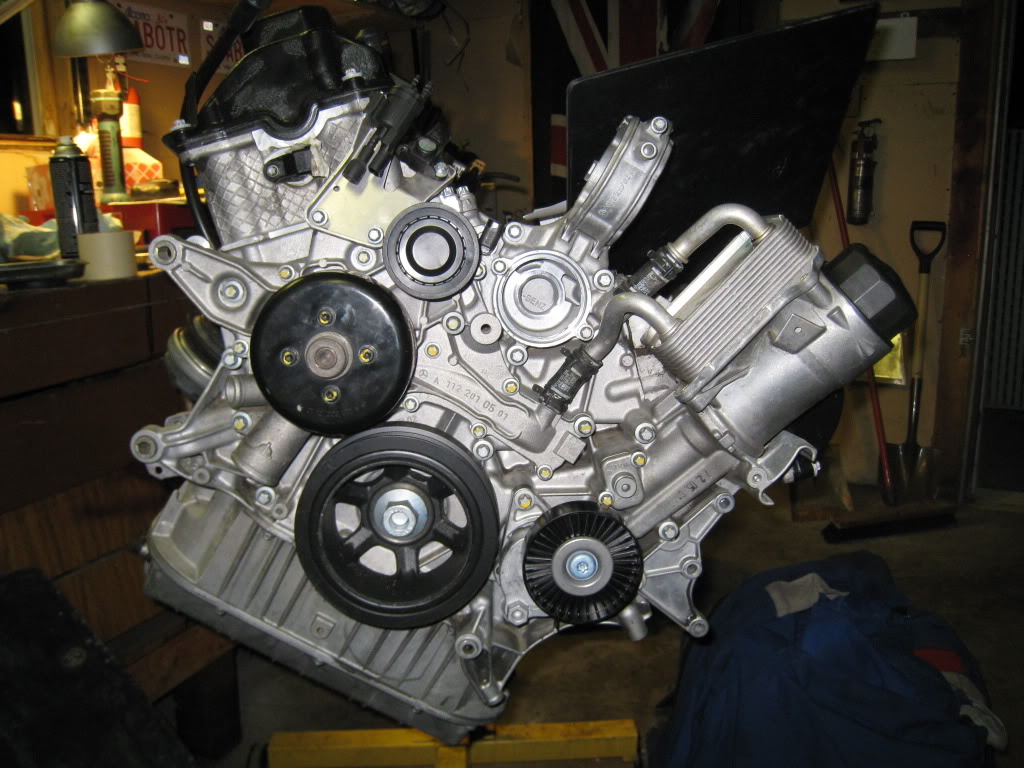
Per Marcus' request, some more photos. Last night I didn't have a chance to do much other than 5 minutes to remove the belt tensioner. Only two M8 bolts hold it in place. The first image is of the area on the timing cover where the tensioner sits, the two bolts that are sticking out are the ones that secure the tensioner to the timing cover. Then just a shot of the front and back side of the tensioner.
In the first pic you can also clearly see the oil pressure test port on the timing cover (the rectangular thing with an allen head plug in the middle). I measured the thread on that plug as M12x1.5 (or sh*t, was it M10? should have written it down!!) with the intention of one day fitting an oil pressure sender there. Not sure it will work that nicely though - the belt is very close to that area, and so is the rad, might not be able to get it all in there. Especially considering that if I ever get aftermarket gauges, they will likely be Autometer, and being 'mercan, their senders will likely use NPT threads, not metric, so I'd need an adaptor too.
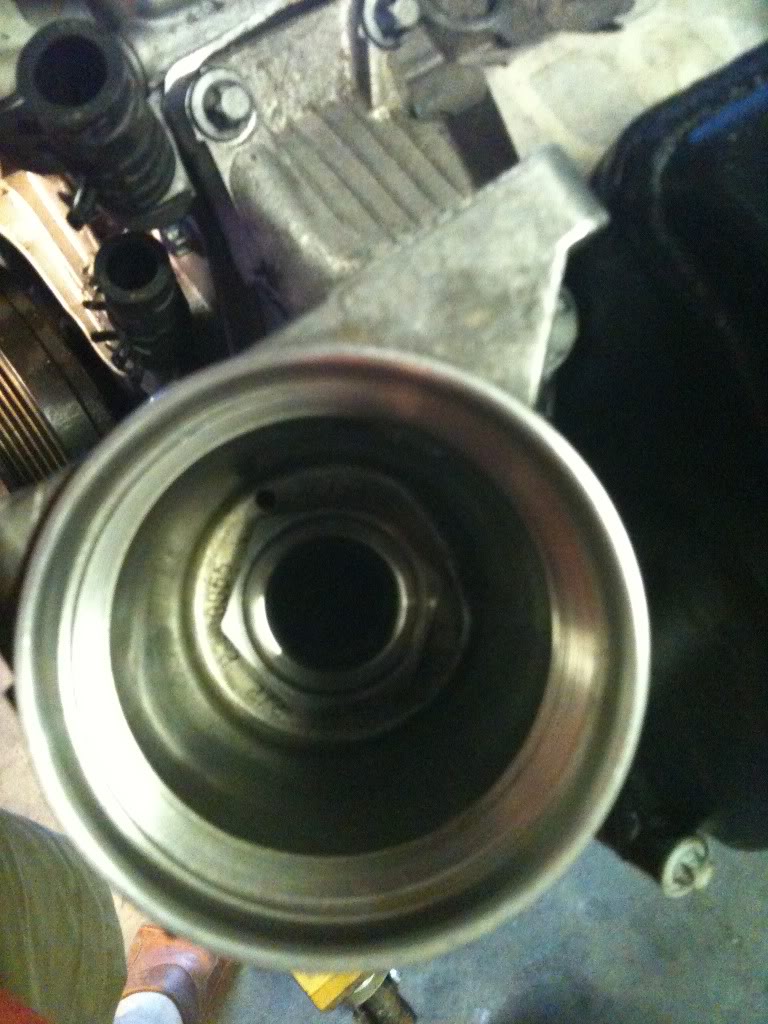
Until a few days ago, boy did I feel stupid - on releasing the belt tension. The WIS talks about just attaching a socket to the tensioner and moving it counterclockwise to release the tension. So when I did the oil cooler seals quite some time ago, I went out and bought a set of security torx bits. You can see that the pulley is secured with a security torx bolt (ie, a normal torx fastener but with the protrusion in the middle, requiring special torx bits).
But, applying CCW force to that security torx bolt just loosens it, it doesn't relieve the tension on the tensioner. Duh. It wasn't until I had a good look at the tensioner on the 55 motor on the stand that I saw the large hexagonal protrusion on the tensioner (on the left of the tensioner). You put a wrench or socket on there, apply CCW force and the tension is relieved. Then you can put a pin into the small hole (just to the left of the right bolt hole) and it is held in place by the little arm on the casting of the tensioner body. Doing so locks the tensioner in a slack position, allowing the belt to be applied with ease, or to allow the bolts holding the tensioner in place to be removed from the timing cover. Damn did I feel stupid! But in my defence, all of these bits are quite hard to see with the engine in the car from up top, with the rad in place.
I think the WIS only mentions using the hexagonal protrusion for W211s. Maybe the later or updated tensioners are all like this? Dunno.
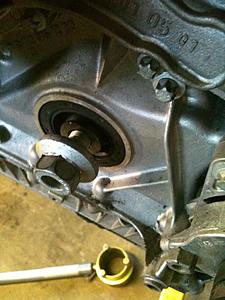
Anyway, final photo is of the back side of the tensioner - as you can see, it's a self contained unit, automatically adjustable.

Per Marcus' request, some more photos. Last night I didn't have a chance to do much other than 5 minutes to remove the belt tensioner. Only two M8 bolts hold it in place. The first image is of the area on the timing cover where the tensioner sits, the two bolts that are sticking out are the ones that secure the tensioner to the timing cover. Then just a shot of the front and back side of the tensioner.
In the first pic you can also clearly see the oil pressure test port on the timing cover (the rectangular thing with an allen head plug in the middle). I measured the thread on that plug as M12x1.5 (or sh*t, was it M10? should have written it down!!) with the intention of one day fitting an oil pressure sender there. Not sure it will work that nicely though - the belt is very close to that area, and so is the rad, might not be able to get it all in there. Especially considering that if I ever get aftermarket gauges, they will likely be Autometer, and being 'mercan, their senders will likely use NPT threads, not metric, so I'd need an adaptor too.
Until a few days ago, boy did I feel stupid - on releasing the belt tension. The WIS talks about just attaching a socket to the tensioner and moving it counterclockwise to release the tension. So when I did the oil cooler seals quite some time ago, I went out and bought a set of security torx bits. You can see that the pulley is secured with a security torx bolt (ie, a normal torx fastener but with the protrusion in the middle, requiring special torx bits).
But, applying CCW force to that security torx bolt just loosens it, it doesn't relieve the tension on the tensioner. Duh. It wasn't until I had a good look at the tensioner on the 55 motor on the stand that I saw the large hexagonal protrusion on the tensioner (on the left of the tensioner). You put a wrench or socket on there, apply CCW force and the tension is relieved. Then you can put a pin into the small hole (just to the left of the right bolt hole) and it is held in place by the little arm on the casting of the tensioner body. Doing so locks the tensioner in a slack position, allowing the belt to be applied with ease, or to allow the bolts holding the tensioner in place to be removed from the timing cover. Damn did I feel stupid! But in my defence, all of these bits are quite hard to see with the engine in the car from up top, with the rad in place.
I think the WIS only mentions using the hexagonal protrusion for W211s. Maybe the later or updated tensioners are all like this? Dunno.
Anyway, final photo is of the back side of the tensioner - as you can see, it's a self contained unit, automatically adjustable.


Last edited by Saaboteur; Aug 11, 2011 at 10:45 AM.
Senior Member
Joined: Feb 2009
Posts: 317
Likes: 1
From: Germany
C43 AMG 5.5 - 396.4HP
The Facom is very nice if you don't have space to rotate the lever. You turn like a screw driver. You turn right - the screw turns forward, you turn left the screw turns forward too. Or you can swap and turn backwards for sure. But you can also turn the lever.
Thread Starter
MBWorld Fanatic!
Joined: May 2009
Posts: 1,846
Likes: 29
From: Canada
eclectic assortment of cars
Productive day today, although it might not look it. Started by draining fluids, removed the fan and fan shroud, disconnected the wiring harness, then removed the rad support, rad and AC condenser. After that, detached the exhaust manifolds from the downpipes (that was a bit of a pain) and removed the torque converter to flywheel bolts. Amazing - there are only six torque converter to flywheel bolts, they are all just M8x25mm or so, and barely torqued on - all to hold 300hp/300ft lbs (or more in other applications). But my buddy pointed out that it's not really the bolts that hold the torque, it's the friction between the components.
We then started on removing the engine to trans bolts (also a bit of a pain at times). Removing the left side down/cross pipe allowed a lot more room to access the engine to trans bolts. We had to stop before we got all of those done, but we are also going to remove the right side downpipe too. Expecting to need some new bolts for those - one of them was destroyed upon removal already.
My buddy also brought over the new thermostat gasket and belt tensioner. Interestingly, the belt tensioner came in a Febi/Bilstein box, but the castings on the unit itself show Litens. Neat, because one online source (bimmerspecialist.com) had the Litens at $140 and the Febi/Bilstein at $105 or so. BUT - the new tensioner has a plastic pulley, whilst the original has a metal pulley. The price of progress?
Pix:
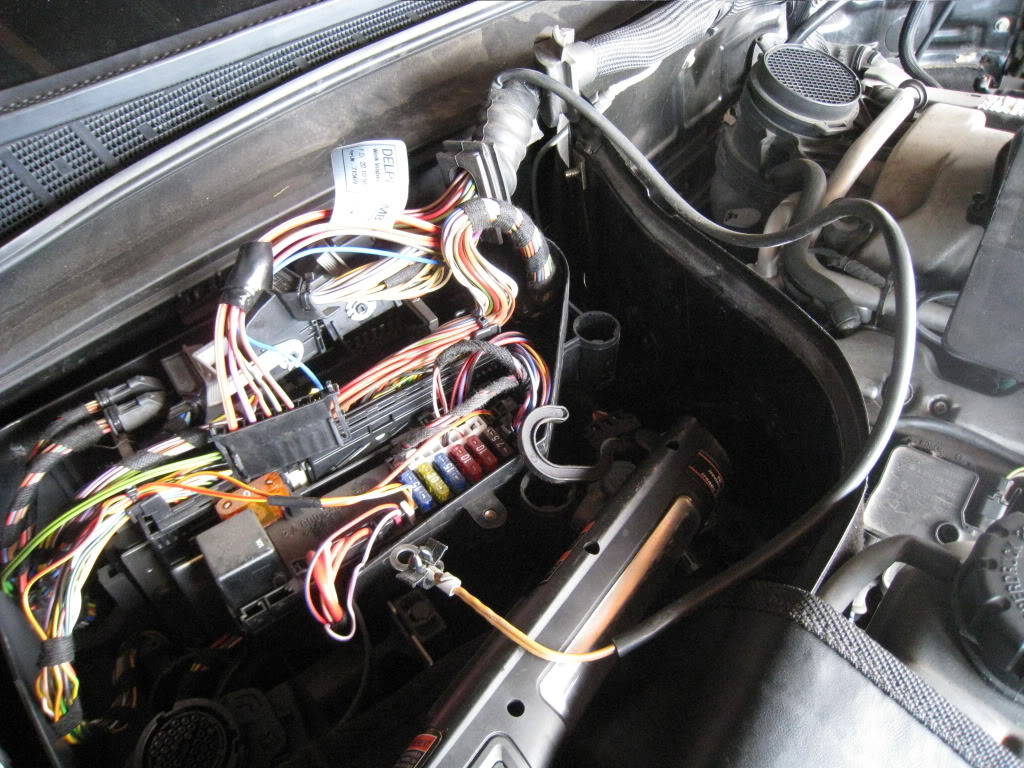
Disconnecting the wire harness:

the beginnings:

after a bit of work:

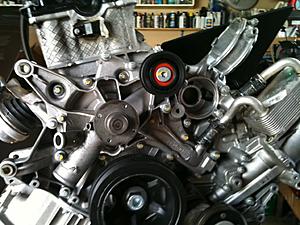
some detail shots of the engine:
here's a shot of (what I believe to be) the old style crank pulley bolt:
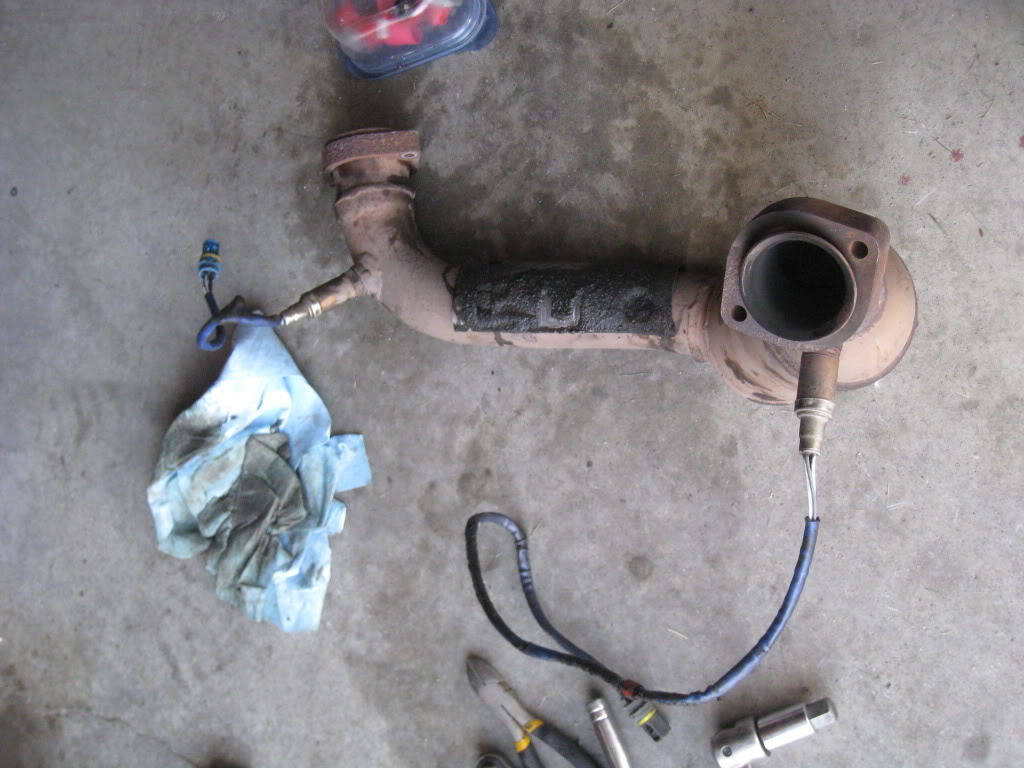
downpipe removed:

the busted bolt on the mid section pipe:
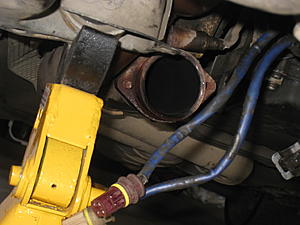
photo of the port to allow access to the torque converter to flywheel bolts:

rad and AC condenser (with fan assembly) removed:
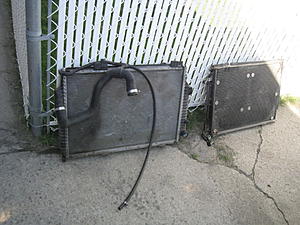
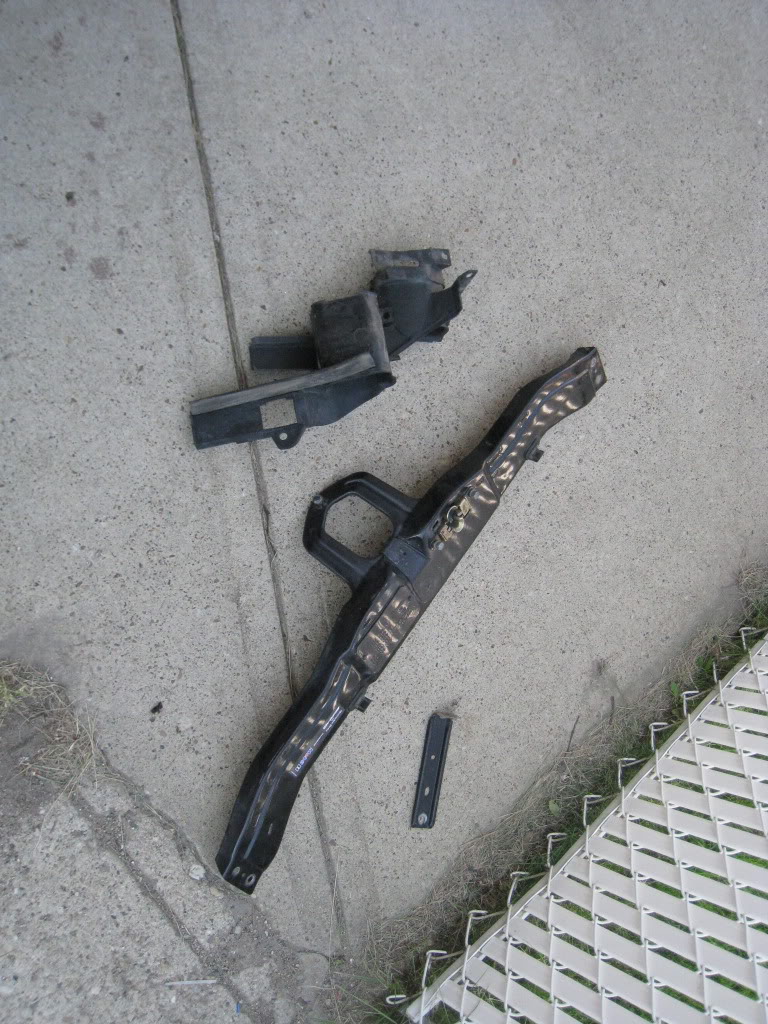
rad support and the intake ports off the car:

new tensioner:

one of the harder to get to engine to trans bolts - U-joint with E14 torx bit attached, just need a long extension from the other side - this would be a lot easier with the car on a hoist:

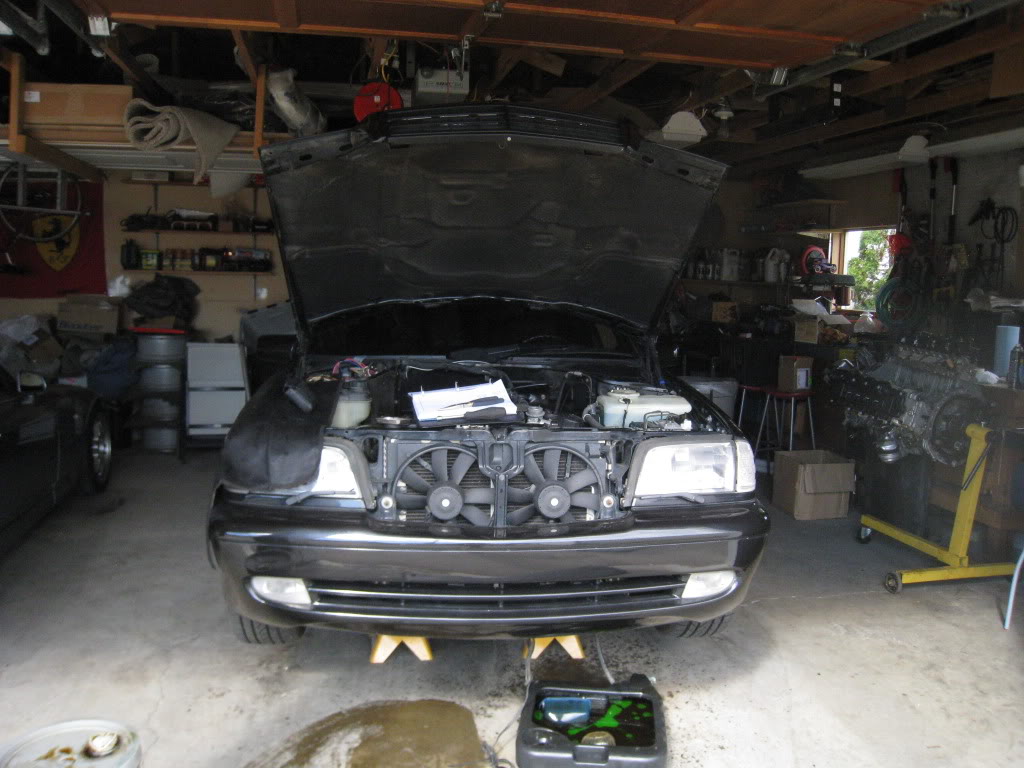
artsy shot of the car when I came home tonight:

Should be finished getting the engine out tomorrow. Fuel lines, auto trans to cooler lines, engine mounts and the rest of the engine to trans bolts need to be disconnected/removed. Then it will be down to swapping the accessories onto the 55 and cleaning up the engine bay.
We then started on removing the engine to trans bolts (also a bit of a pain at times). Removing the left side down/cross pipe allowed a lot more room to access the engine to trans bolts. We had to stop before we got all of those done, but we are also going to remove the right side downpipe too. Expecting to need some new bolts for those - one of them was destroyed upon removal already.
My buddy also brought over the new thermostat gasket and belt tensioner. Interestingly, the belt tensioner came in a Febi/Bilstein box, but the castings on the unit itself show Litens. Neat, because one online source (bimmerspecialist.com) had the Litens at $140 and the Febi/Bilstein at $105 or so. BUT - the new tensioner has a plastic pulley, whilst the original has a metal pulley. The price of progress?
Pix:
Disconnecting the wire harness:
the beginnings:
after a bit of work:

some detail shots of the engine:

here's a shot of (what I believe to be) the old style crank pulley bolt:
downpipe removed:
the busted bolt on the mid section pipe:

photo of the port to allow access to the torque converter to flywheel bolts:
rad and AC condenser (with fan assembly) removed:
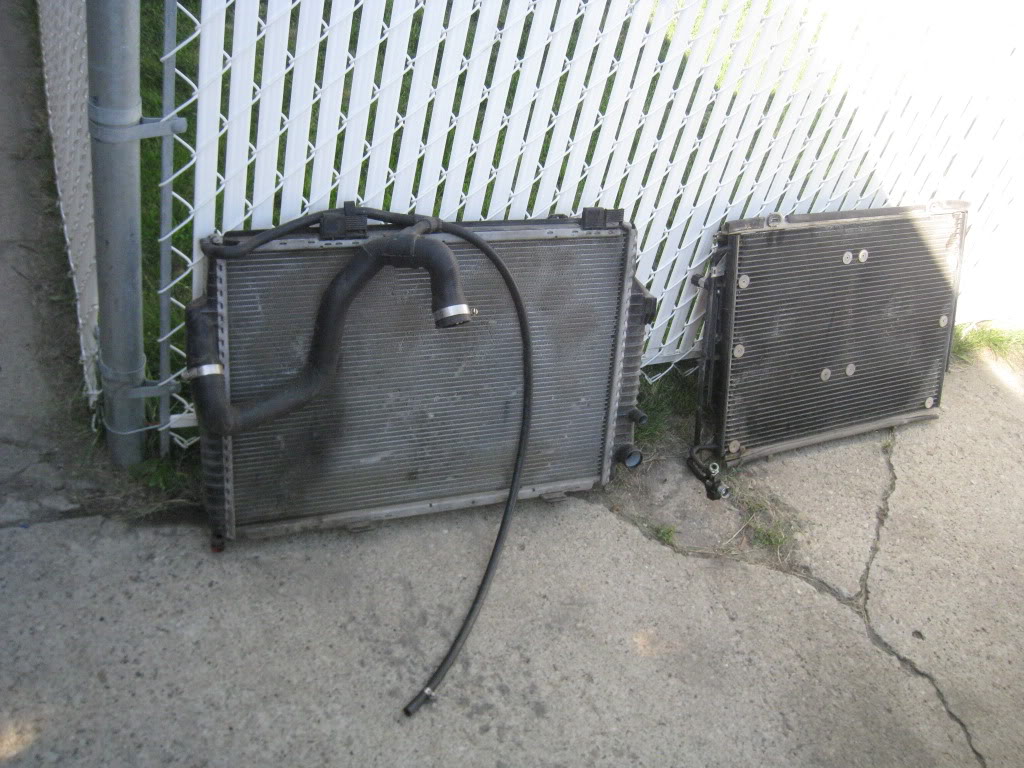
rad support and the intake ports off the car:
new tensioner:

one of the harder to get to engine to trans bolts - U-joint with E14 torx bit attached, just need a long extension from the other side - this would be a lot easier with the car on a hoist:
artsy shot of the car when I came home tonight:
Should be finished getting the engine out tomorrow. Fuel lines, auto trans to cooler lines, engine mounts and the rest of the engine to trans bolts need to be disconnected/removed. Then it will be down to swapping the accessories onto the 55 and cleaning up the engine bay.
Last edited by Saaboteur; Aug 14, 2011 at 01:17 AM.


