

Quick DIY: easy install of aftermarket C63 / W204 front and rear AMG door pins
 06-17-2012, 11:04 PM
#1
Junior Member
Thread Starter
Join Date: May 2012
Location: Austin, TX
Posts: 29
Likes: 0
Received 0 Likes
on
0 Posts
Iridium Silver 2009 C63
Hi all -
After reading several posts discussing the difficulty installing aftermarket rear pins and the subsequent need to take apart the door panel to repair the damage, I set out today to install my father's day gift, a set of aftermarket AMG door pins from N Speedway (eBay link)
While some/most of this is rehash from older posts, I wanted to post my own experience as it was very smooth and I want to encourage others who might hesitate to do this because of the other posts on the topic in the past that make the process sound quite difficult.
Front Pins:
The front pins go on easily. The only thing required is a pliers and a thin towel to wrap the original pin to protect it from the pliers.
Rear Pins:
These are a bit trickier, but in my case, not as tricky as I expected them to be. Below are the steps I followed.
Other thoughts:
Doing it this way, the front pins drop below flush with the door, and the rear pins protrude ~1/16" or less from the rear door. Other threads I read talked about drilling out the new pins or Dremeling the original inner post to make the rear installation as flush as the front, but I'd strongly consider you to just do the standard 10-minute install and consider whether the rear pins being off by < 1/16" is worth all that extra work and risk. Considering the original pins protrude by 1-2" when locked (and my complete lack of trust in my ability to safely Dremel my car), I didn't even consider this, but to each his own and if you have the skills, more power to you.
Pictures:
Front/Rear Installed Pins - Doors Unlocked
You can see below that the rear pins are ever so slightly taller than the fronts. IMHO, unless you know you're looking for it, you'd never notice the difference.

Front Pins - Doors Unlocked

Rear Pins - Doors Unlocked
Slightly taller than the fronts - close-up

Front Pins - Doors Locked
Front pins sink to slightly below flush when locked
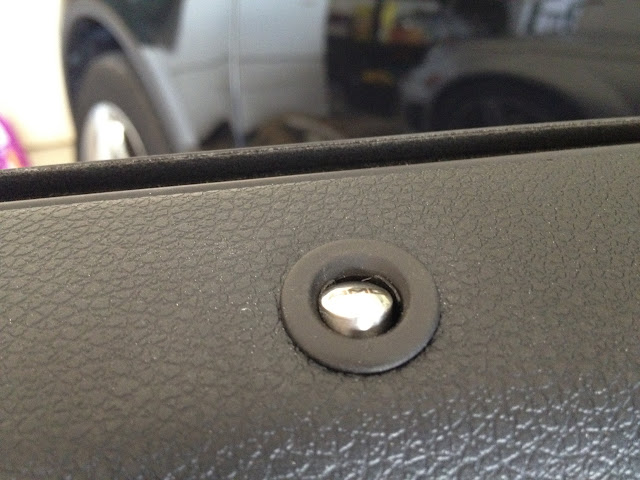
Rear Pins - Doors Locked
Rear pins protrude < 1/16" above flush when locked

I'd encourage anyone considering this upgrade to forge ahead. It's a cheap upgrade that makes a very noticeable change inside your car. Using the pins above from N Speedway, the process was very straight-forward. Just be gentle on the step marked above when installing the rear pins. If I can be of help or answer questions, please let me know.
After reading several posts discussing the difficulty installing aftermarket rear pins and the subsequent need to take apart the door panel to repair the damage, I set out today to install my father's day gift, a set of aftermarket AMG door pins from N Speedway (eBay link)
While some/most of this is rehash from older posts, I wanted to post my own experience as it was very smooth and I want to encourage others who might hesitate to do this because of the other posts on the topic in the past that make the process sound quite difficult.
Front Pins:
The front pins go on easily. The only thing required is a pliers and a thin towel to wrap the original pin to protect it from the pliers.
- Unlock the doors and roll down the windows - it's easier to unscrew the pins if you're not bumping the window.
- Lay your thin cloth over the door pin. Double it up if you're not sure it's thick enought to protect the pin.
- Grasp the pin with the pliers from the side and twist counter-clockwise (lefty loosey). It will take 4-5 'hard' turns before you can finish with your fingers.
- Continue turning until the pin turns off the top of the inner screw.
- Drop the replacement pins onto the top of the original screw post now exposed in the door frame. You can reattach it by hand and tighten until it no longer turns.
- Finish the tightening with ~1 more complete rotation with the pliers (again using the towel to protect the door pin). Finish when the "AMG" text on top of the pin is lined up the way you want it.
Rear Pins:
These are a bit trickier, but in my case, not as tricky as I expected them to be. Below are the steps I followed.
- Unlock the doors and roll down the windows - it's easier to unscrew the pins if you're not bumping the window.
- Lay your thin cloth over the door pin. Double it up if you're not sure it's thick enought to protect the pin.
- Grasp the pin with the pliers from the TOP and pull directly up. It will require a fair amount of force, but nothing herculean. The pin should pop off quickly if you are pulling straight up.
- You now have exposed the inner door pin, which looks different from the front screw pins.
- This is the only tricky step in the entire process. Read carefully. Drop the replacement rear pin onto the top of the original post now exposed in the door frame. Press down **gently** until you meet resistance. This takes very little force. This is the most risky step of the process as too much force here will push the inner rod into the door frame and potentially break it as well. Be gentle here!
- Turn the pin to the right and stop when the "AMG" text on top of the pin is lined up the way you want it.
- Test the installation by locking the door with your remote. The pin should drop mostly into the door, but will protrude slightly from the door when locked (see pictures).
- Lock/unlock a few times to make sure the pin isn't going to fly off. In my case, both rear pins went on easily and nothing further was required. If you're not convinced these are firmly attached, I suppose you could also put superglue/epoxy inside the replacement pin, but they really felt secure after my installation, so I'm not sure this is always necessary.
Other thoughts:
Doing it this way, the front pins drop below flush with the door, and the rear pins protrude ~1/16" or less from the rear door. Other threads I read talked about drilling out the new pins or Dremeling the original inner post to make the rear installation as flush as the front, but I'd strongly consider you to just do the standard 10-minute install and consider whether the rear pins being off by < 1/16" is worth all that extra work and risk. Considering the original pins protrude by 1-2" when locked (and my complete lack of trust in my ability to safely Dremel my car), I didn't even consider this, but to each his own and if you have the skills, more power to you.
Pictures:
Front/Rear Installed Pins - Doors Unlocked
You can see below that the rear pins are ever so slightly taller than the fronts. IMHO, unless you know you're looking for it, you'd never notice the difference.
Front Pins - Doors Unlocked
Rear Pins - Doors Unlocked
Slightly taller than the fronts - close-up
Front Pins - Doors Locked
Front pins sink to slightly below flush when locked
Rear Pins - Doors Locked
Rear pins protrude < 1/16" above flush when locked
I'd encourage anyone considering this upgrade to forge ahead. It's a cheap upgrade that makes a very noticeable change inside your car. Using the pins above from N Speedway, the process was very straight-forward. Just be gentle on the step marked above when installing the rear pins. If I can be of help or answer questions, please let me know.

 06-17-2012, 11:31 PM
#3
MBWorld Fanatic!

Nice write up, I had to crazy glue my rear cuz it felt off after a while. It's now on tight.
Fung, it should take you less than 15 minutes for all 4. Super easy... lol
Fung, it should take you less than 15 minutes for all 4. Super easy... lol
06-18-2012, 08:24 AM
#5
Senior Member
+1 thanks!
I'm going to order a set, my friend just commented the other day that the stock pin sticks up a lot & gets in the way when resting your arm on top when the windows are down.
I'm going to order a set, my friend just commented the other day that the stock pin sticks up a lot & gets in the way when resting your arm on top when the windows are down.
06-18-2012, 11:24 AM
#6
MBWorld Fanatic!
And in case the rear pin drops due to force of a failed insertion, there is a DIY in the W204 section on how to remove the door trim panel and reattach the rear pin mechanism. Very easy to do.
06-18-2012, 11:51 AM
#7
Super Member
Join Date: Mar 2012
Posts: 851
Likes: 0
Received 0 Likes
on
0 Posts
c63

crazy glue is a good idea. think something like rubber cement might be better so its removable?
Trending Topics
 07-01-2012, 11:25 AM
#10
Super Member
Join Date: Mar 2012
Posts: 851
Likes: 0
Received 0 Likes
on
0 Posts
c63
i have those exact door pins and mine do not sit nearly as flush in the rear. i got mine from ebay for like $50. is there second pop to get them seated? they feel secure as they are..
 07-02-2012, 07:39 PM
#12
MBWorld Fanatic!

Join Date: Feb 2010
Posts: 5,517
Received 434 Likes
on
357 Posts
2012 C63;1971 280SE 3.5(Sold);2023 EQS 450 SUV 4 Matic (Wife's)
Since you only have front doors to worry about installing pins in I would think they are threaded and that you should try turning them to get them off and back on.


 07-04-2012, 09:32 AM
#15
Junior Member
Thread Starter
Join Date: May 2012
Location: Austin, TX
Posts: 29
Likes: 0
Received 0 Likes
on
0 Posts
Iridium Silver 2009 C63
It could also be that the ones you bought are different than mine (did you buy the "n speedway" pins I linked to or something different?). If they're not the same pins, my guess would be that it's a difference of hardware and there's not much that can easily be done.
07-12-2012, 12:11 AM
#18
Super Member

Join Date: Aug 2008
Location: Metro Detroit
Posts: 975
Received 50 Likes
on
39 Posts
2014 C63 AMG 507 sedan
^Likewise! Installed mine yesterday. A good trick for the rear is to push it in lightly, then lock the doors, then you'll be able to put more pressure downward.
 07-17-2012, 12:05 AM
#21
Member

Join Date: Jun 2012
Posts: 76
Likes: 0
Received 0 Likes
on
0 Posts
.
Just ordered these for $34.99 USD They look identical to the AMG ones, perhaps without the AMG logo don't know. Will keep you posted. They guarantee 100% fitment so we shall see.. http://www.ebay.com/itm/170856951095...84.m1439.l2649
07-26-2012, 03:01 AM
#22
Super Member
Join Date: Feb 2008
Location: Los Angeles
Posts: 627
Likes: 0
Received 0 Likes
on
0 Posts
2011 C63 AMG
Just did this earlier today, great diy. it went really smooth but the rear passenger side is on but seems a little loose like someone could just pull it off. Is that normal? Any input?
07-26-2012, 07:01 AM
#23
Senior Member
Put mine on the other day, bought them from N Speedway off of eBay. Like others mentioned, the rears don't snap on quite like the oem's, I'll probably try a dab of rtv as well.
07-26-2012, 10:31 AM
#24
Junior Member
Thread Starter
Join Date: May 2012
Location: Austin, TX
Posts: 29
Likes: 0
Received 0 Likes
on
0 Posts
Iridium Silver 2009 C63
LAMB09 - they don't fit quite as well as the fronts, but mine feel fairly solid. In reality, someone could pull them off, but they shouldn't come off on their own. For me, they're in the backseat where I rarely have anyone sitting, so as long as they don't come off on their own, they're tight enough for me. If they feel so loose that they might fly off during a lock/unlock, then you might want to add a dab of adhesive inside like the last post recommended.
08-02-2012, 09:45 PM
#25
Member

Join Date: Jan 2009
Location: Westchester County, NY
Posts: 178
Likes: 0
Received 0 Likes
on
0 Posts
'11 E550 4MATIC, '07 Suzuki SV1000S
Door Pins
Did this on my W212 - the rears do come off - not always, but on 2 separate occasions over the course of the past 3-4 days the pin has wound up on the floor. I am in the process of getting the instructions from the dealer on it...I almost feel like there is a special tool that is needed also.


