


DIY: Remove and replace valve cover gaskets and spark plugs
Newbie
Joined: May 2013
Posts: 8
Likes: 0
From: Atlanta, GA
CLK55 AMG, Past; CLS550 SL500
Yes, pulling those plug wire off can be a real PITA. I have a set of pliers like this:
http://www.thetoolwarehouse.net/astr...15-P43803.aspx
The hose pliers on the left work great for pulling plug wires.
http://www.thetoolwarehouse.net/astr...15-P43803.aspx
The hose pliers on the left work great for pulling plug wires.
i went with Bosch Iridium to replace MB originals. Although, I have not experienced any issues with the engine or malfunctions. I just wanted to do a little preventative maintenance.
thanks to original OP, tw2, wodeshed, and Rodney for sharing your insight.
question:
does $29.15 *per *side from RBM sound right on valve cover gaskets?

Junior Member

Joined: Sep 2010
Posts: 54
Likes: 4
W209
Valve cover breather
This photo shows the incorrect way to apply the sealant. Sealant should not be applied on the groove of the cover only. This is a male-female joint. The sealant is to fill the gap between these two parts and that's it. MB recommends to fill the groove 2 mm tick. I didn't measure, but the groove depth of groove is about a little more than that. This would fill the groove enough when joining the parts. If you overfill, chances are that the excess inside the cover may fall and be carried by the oil to the oil sump. With time it may obstruct the oil orifices of the engine lubrication system. Use a small spatula or putty knife to assure the sealant is totally inside the groove and remove any excess around before joining the parts. I would not guess about the RTV. I used original MB. It didn't cost me more than most sealants.

Newbie

Joined: Feb 2015
Posts: 3
Likes: 0
2005 clk500
Well,DO NOT use aftermarket valve cover gaskets for your 2005 CLK500 v8 
Use only the gasket from the dealer,it's about $35.
No more leaky!!!!!!!!!!
I tried the Victor Reinze from Autozone,no amount of RTV would help........it just dosen't fit the groove in the cover at all,would keep dropping out as I inverted the cover to set it.And with a tiny bit of RTV to secure it place,& on the face,it still leaked after installation...........")
It took about 1 hour to remove,clean & reinstall the valve cover (didn't need RTV to secure to cover groove just used a little black RTV on the gasket face,very small bead from the pressurized can RTV).
Use only the gasket from the dealer,it's about $35.
No more leaky!!!!!!!!!!
I tried the Victor Reinze from Autozone,no amount of RTV would help........it just dosen't fit the groove in the cover at all,would keep dropping out as I inverted the cover to set it.And with a tiny bit of RTV to secure it place,& on the face,it still leaked after installation...........
It took about 1 hour to remove,clean & reinstall the valve cover (didn't need RTV to secure to cover groove just used a little black RTV on the gasket face,very small bead from the pressurized can RTV).
Last edited by Unacceptable; Feb 3, 2015 at 12:13 AM.

Senior Member
Joined: Dec 2014
Posts: 391
Likes: 14
From: Orlando, FL
05 CLK55 AMG (1 of 247) Cubanitsilber designo series
This photo shows the incorrect way to apply the sealant. Sealant should not be applied on the groove of the cover only. This is a male-female joint. The sealant is to fill the gap between these two parts and that's it. MB recommends to fill the groove 2 mm tick. I didn't measure, but the groove depth of groove is about a little more than that. This would fill the groove enough when joining the parts. If you overfill, chances are that the excess inside the cover may fall and be carried by the oil to the oil sump. With time it may obstruct the oil orifices of the engine lubrication system. Use a small spatula or putty knife to assure the sealant is totally inside the groove and remove any excess around before joining the parts. I would not guess about the RTV. I used original MB. It didn't cost me more than most sealants.
MB World Stories
The Best of Mercedes & AMG

Manual Mercedes? 6 Times Sindelfingen Let Drivers Have All The Fun
Verdad Gallardo
Mercedes SLR McLaren 722 S Is Extremely Rare Example Modified by McLaren
Verdad Gallardo
8 Classic Boxy Mercedes Designs That Have Aged Like Fine Wine
Verdad Gallardo
Flawlessly Restored Mercedes 190E Evo II Heads to Auction
Verdad Gallardo
Electric Mercedes C-Class Unveiled: 11 Things You Need to Know
Verdad Gallardo
Mercedes EQS Gets A Major Update: Everything You Need to Know
Verdad Gallardo
5 Underrated Mercedes-Benz Models That Don't Get the Love They Deserve
Verdad Gallardo
Mercedes 300D Has Pushed Well Past 1 Million Miles and It Ain't Stopping
Verdad Gallardo
10 Most Reliable Mercedes-Benz Models You Can Buy Used
Verdad Gallardo

MBworld Guru
Joined: Dec 2009
Posts: 10,782
Likes: 1,011
NO LONGER ACTIVE

Newbie
Joined: Dec 2010
Posts: 1
Likes: 0
2005 CLK 320
Changing 2005 CLK320 spark plugs
Thanks to all contributors on changing out clk320 plugs. Did it myself today. About 3 hours, but most of that was cleaning everything. I found that an 18mm open end wrench worked like a charm prying off the connectors. The 17mm just didn't seem as easy. Didn't want to buy the special 45 degree wrench. It absolutely was not needed. The open end wrench worked fine. There was a little oil at edges of valve covers. Tightened the bolts, they were all a little loose. (just "tweaked" them a little)! Car has 105K. Runs great.
MBWorld Fanatic!


Joined: Aug 2011
Posts: 3,428
Likes: 288
From: New Zealand
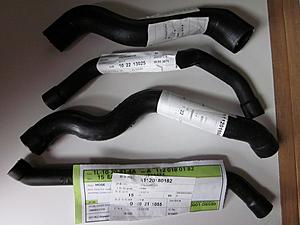
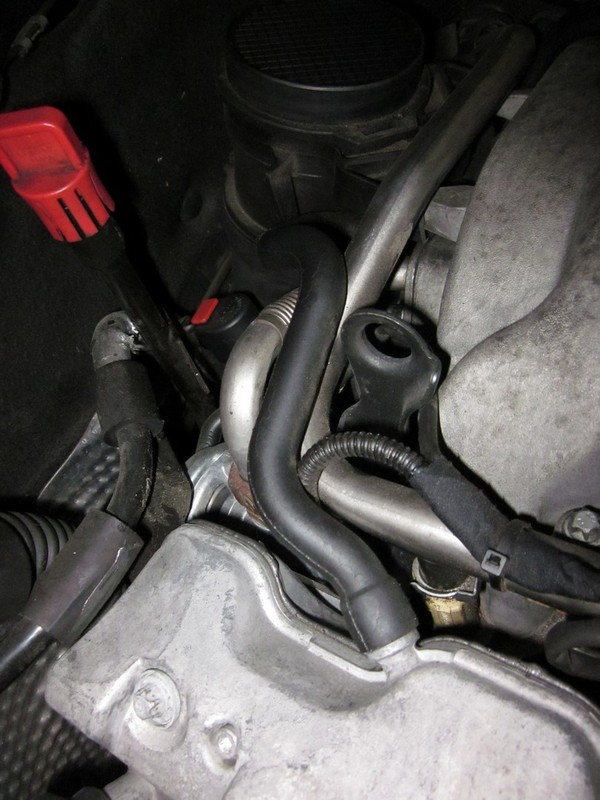
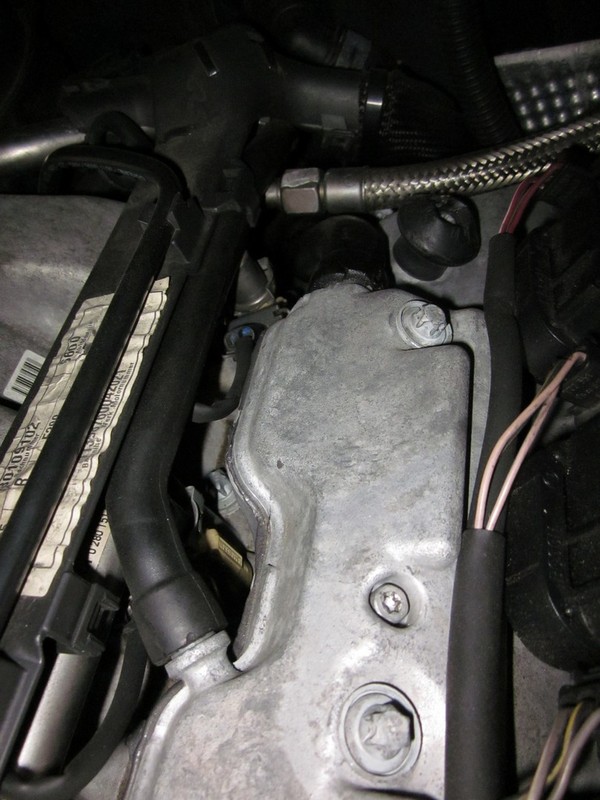
Just came back from the dealer. Hopefully this helps someone. There are four common hoses with the M113 which go hard, dry and brittle. Three of which are disconnected with the valve cover job. At this age definitely not a bad idea to replace them.
From top to bottom
A6462030282
A1120180382
A1120180482
A1120180182
From top to bottom
A6462030282
A1120180382
A1120180482
A1120180182

MBWorld Fanatic!
Joined: Aug 2011
Posts: 3,428
Likes: 288
From: New Zealand
The top one looked like a heater hose to me. Mine was supple and did not look like it needed replacing so I left it. I might return it or keep it until I one day change the coolant.
This is the one from the right bank.

Left bank. This one loops under the wiring loom where it joins another hose in a very difficult place to access almost inside the wiring harness.
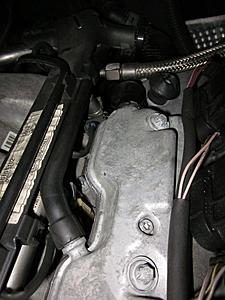
Healthy looking hose also from the left bank.
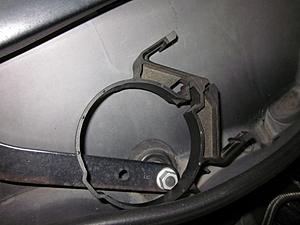
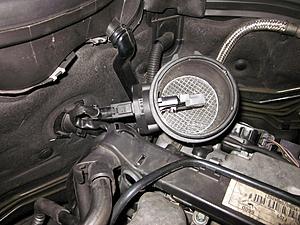
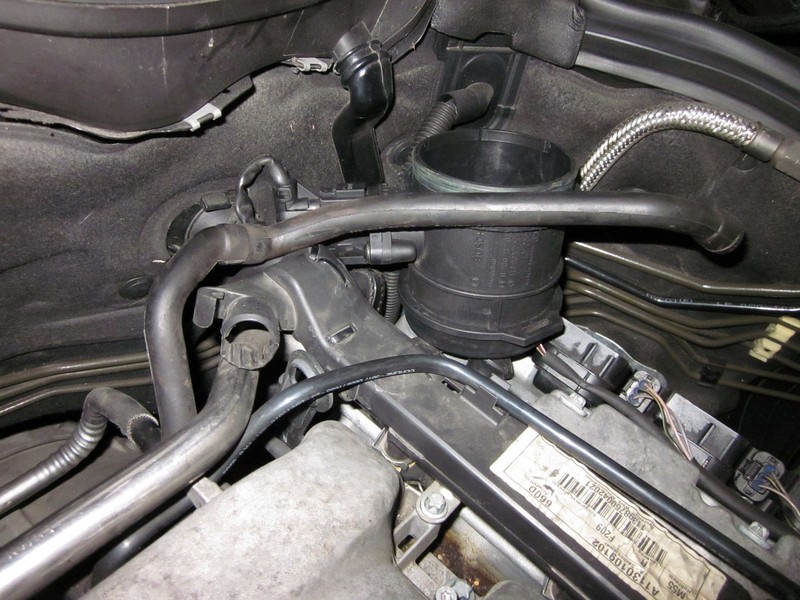
Unclip this mount that sits around the MAF housing.
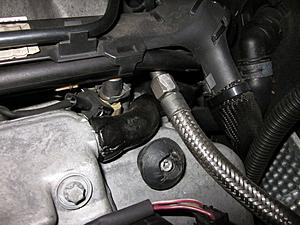
Now you can see the hose from the right bank. Remove the MAF housing. I didn't undo the electrical connector.
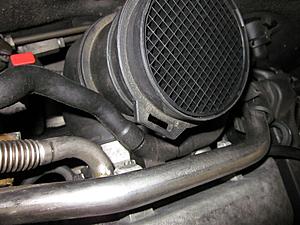
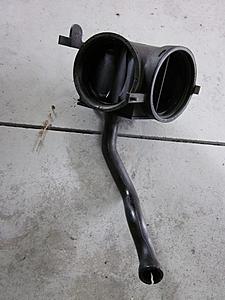
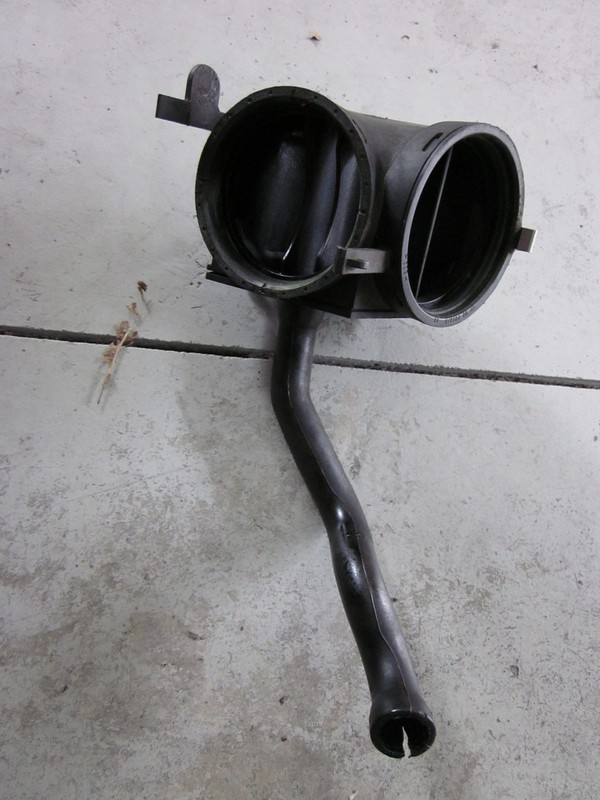
Now you can get the 90 degree bend out from beneath which has the hose attached. There are two clips holding it to the thottle body.
Thread the hose out from the left bank so you can remove the old one and replace it. Then thread it back in and connect it back into the wiring harness again.

Replace the hose with this out of the car. Then thread the hose back up to the valve cover and reconnect the 90 degree bend.
This is the one from the right bank.
Left bank. This one loops under the wiring loom where it joins another hose in a very difficult place to access almost inside the wiring harness.
Healthy looking hose also from the left bank.

Unclip this mount that sits around the MAF housing.

Now you can see the hose from the right bank. Remove the MAF housing. I didn't undo the electrical connector.

Now you can get the 90 degree bend out from beneath which has the hose attached. There are two clips holding it to the thottle body.

Thread the hose out from the left bank so you can remove the old one and replace it. Then thread it back in and connect it back into the wiring harness again.
Replace the hose with this out of the car. Then thread the hose back up to the valve cover and reconnect the 90 degree bend.

Newbie
Joined: Jul 2015
Posts: 1
Likes: 0
2003 E320
I am a new member to the forum and want to thank all contributors as your knowledge and expertise have saved this guy allot of time and money! Found similar success with the valve cover replacement writeup ONCE I PURCHASED OEM gaskets. First purchased the Victor Reinze brand as noted in an earlier post, and had nothing but leaks all over the valve covers. Wish I would have made it to the 6th pg of the post!! Also replaced the 3 hoses noted in above posts as my vehicle has original material and was dried out. Car has no oil leaks now and runs like new. Thanks again all!

Member
Joined: Mar 2008
Posts: 198
Likes: 0
04 CLK 500
Hi Guys, I noticed excessive oil/grease on outside the valve cover, what kind of chemicals can I use to remove it safely? warm water with cloth? or there is OEM benz cleaning product? And for the breather cover can I soak it in water and clean the inside and outside? Thanks.
One last thing do you have the part # spark plug and spark plug wire? I know some say get ngk and mang wires but prefer OEM.
One last thing do you have the part # spark plug and spark plug wire? I know some say get ngk and mang wires but prefer OEM.
Last edited by EMC; Dec 17, 2015 at 01:16 AM.
Junior Member
Joined: Sep 2010
Posts: 54
Likes: 4
W209
Cleaning engine compartment
You can pin-point with a sprayer and Purple Power (bought at Walmart) and a shrub (different lengths to reach). Spray the degreaser just where it is needed.
Make sure to not spray any electrical parts, sensors, etc.
Wait about 5 minutes, scrub if possible, and wash it out with a sprayer. If not satisfied, repeat again. Concerning cleaning the breather cover in and out, yes you can. Make sure there is not residue left in particular watch out that tinny orifice inside the cover.
My final five cents tip is ONLY use Mercedes sealing compound in the breather cover. Worth the price.
Last edited by fernmc; Dec 17, 2015 at 08:57 AM.

Senior Member
Joined: Oct 2010
Posts: 341
Likes: 4
From: Columbia, MO
E320 & X166
Hi Guys, I noticed excessive oil/grease on outside the valve cover, what kind of chemicals can I use to remove it safely? warm water with cloth? or there is OEM benz cleaning product? And for the breather cover can I soak it in water and clean the inside and outside? Thanks.
One last thing do you have the part # spark plug and spark plug wire? I know some say get ngk and mang wires but prefer OEM.
One last thing do you have the part # spark plug and spark plug wire? I know some say get ngk and mang wires but prefer OEM.
I cleaned the valve covers and breathers with that blue stuff mentioned today and also used gun cleaner.
Spark plugs will be about $10 each if you can get them discounted for you. I did use original MB. Went this route because devide 100k between changes and it works out pretty inexpensive. I did not replace coils or cables. If you don't see a problem with them, don't replace it. Just yesterday I asked a 40 year plus Mercedes technitian about this, he said to just leave well enough alone. Once you start noticing rough idle or a miss fire code(s) then you can begin replacing them. They should run MSRP about $360 or as low as $130 for the set at Autohausaz
Good luck and have fun. This was one of my favorite projects

Member
Joined: Mar 2008
Posts: 198
Likes: 0
04 CLK 500
Thanks for the for all the help and advices guys. BTW, should I wait till summer/spring to this do? If pretty chilly from where I am from. And is there a specific brand for the anti-seize when coating the spark plug?
Senior Member
Joined: Oct 2010
Posts: 341
Likes: 4
From: Columbia, MO
E320 & X166
Weather won't matter to the project. I personally don't like to work on anything other than oil changes when its cold.
As far as anti-seize, some people it some don't. I personally did not. It is about a 50 50 here at our shop as well.
Have fun
As far as anti-seize, some people it some don't. I personally did not. It is about a 50 50 here at our shop as well.
Have fun
Senior Member
Joined: Dec 2014
Posts: 391
Likes: 14
From: Orlando, FL
05 CLK55 AMG (1 of 247) Cubanitsilber designo series
You don't need anti-seize on modern plugs. I don't use it, but if you do, make sure it is copper based. The threads are the path to ground for the plugs and if you raise the resistance of that path with anti-seize the plugs won't fire completely.
Senior Member
Joined: Oct 2010
Posts: 341
Likes: 4
From: Columbia, MO
E320 & X166
That was the best darn answer I've read about this issue!! Awesome

Junior Member
Joined: Mar 2015
Posts: 38
Likes: 0
CLK 500
With the weather getting nice out again my next project will be replacing spark plug, wires and valve cover gaskets at same time. I have slight oil leak and with almost 88k miles figured I do plugs and wires at same time. I ordered Bosch 09850 wire set and Bosch 9652 spark plug. First question, just want make sure they compatible. I was reading something about resister vs non-resister plugs and need the correct one depending on the wires. Second question, I know the breather cover has aluminum bolts and need replacement, does anyone know if the valve cover bolts are aluminum too or can they be re-used. Also, is it really necessary to use gasket sealant when replacing the valve cover gasket and I'm not talking about the breather covers? I bought gaskets from Mercedes dealer so they're not aftermarket. Lastly any part #s for the aluminum bolts?


