


 . This is exactly what I need
  .
.
DIY: Remove and replace valve cover gaskets and spark plugs

Thread Starter
Senior Member
Joined: Jul 2007
Posts: 421
Likes: 14
From: Bay Area
2004 E500 CLK320
DIY: Remove and replace valve cover gaskets and spark plugs
I just replaced the valve cover gaskets on the 2004 CLK320 w/ 90k mi. The leak started at about 80k mi, and the leak was getting worse, so it was about time to R&R the gaskets. Since the spark plugs were original, it was also a good time to R&R the spark plugs as well. It�s a fairly easy job; total time was ~3.5 hrs for the two valve cover gaskets and replacing 12 spark plugs (2 per cylinder). I bought parts from autohausaz.com. The dealer typically charges $800 for replacing the 2 valve cover gaskets and an additional $500 for the spark plugs. If the leak becomes really bad, the oil could drip down to the hot exhaust manifold, causing smoke and possibly catching a fire. Oil leak down to the tips of the spark plugs could also cause engine misfire.
Here�s the procedure:
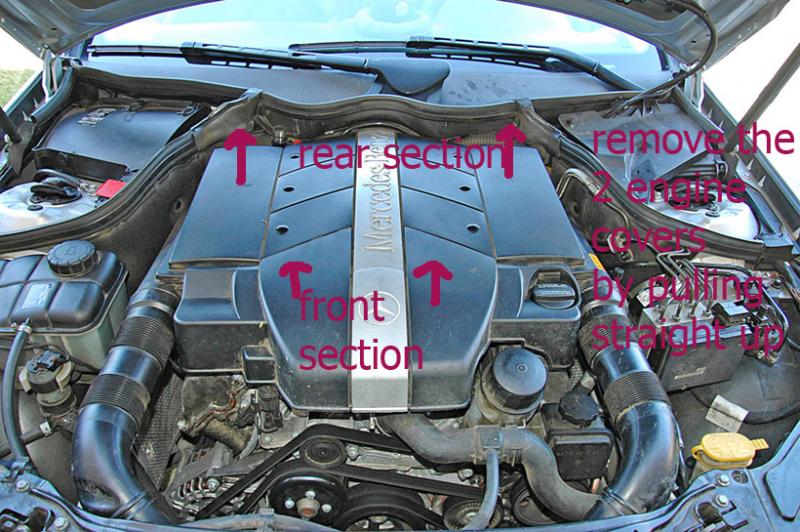
1. Remove the two engine covers by pulling straight up, as indicated below.
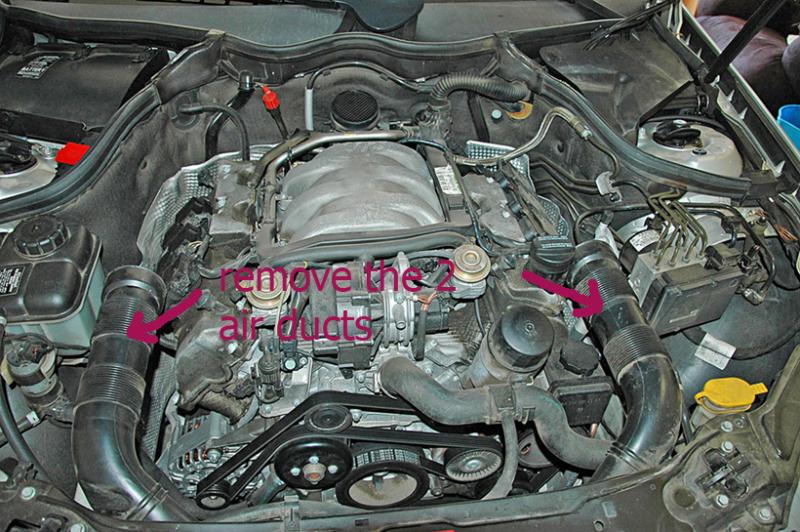
2. Remove the two air ducts. Just pull them straight out.
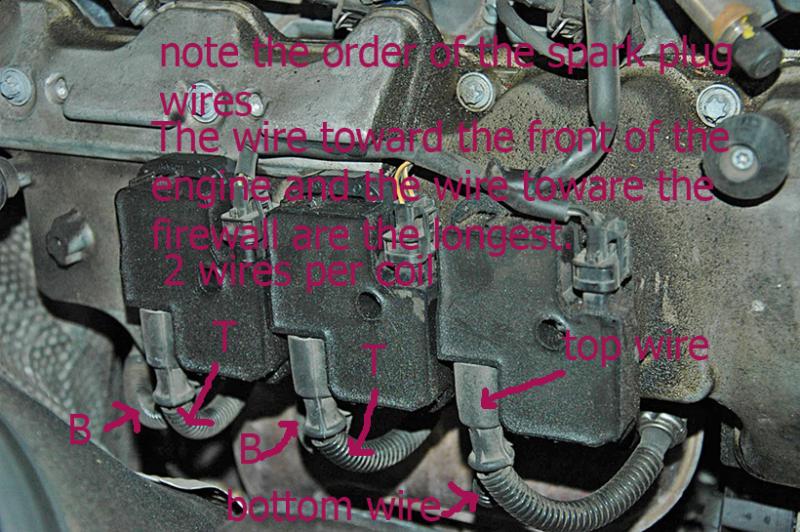
3. Shown below is the right valve cover. Note the 3 ignition coils casings are covered in oil from the oil leak. Note the order of the spark plug wires before removing them.
4. Detach the electrical connector from each ignition coil. Remove the bolt holding the ignition coil.
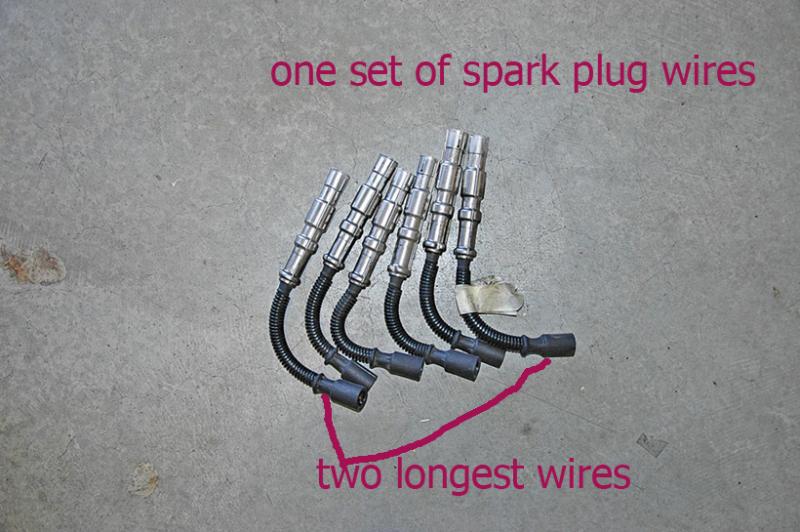
5. Use the open end of the 17mm wrench to pry off the spark plug. Note that the first and the last spark plug wires are the longest -- label them so you won�t mix them up.

6. Shown below is a set of spark plug wires (to be reused) from the right engine.
Here�s the procedure:
1. Remove the two engine covers by pulling straight up, as indicated below.
2. Remove the two air ducts. Just pull them straight out.
3. Shown below is the right valve cover. Note the 3 ignition coils casings are covered in oil from the oil leak. Note the order of the spark plug wires before removing them.
4. Detach the electrical connector from each ignition coil. Remove the bolt holding the ignition coil.
5. Use the open end of the 17mm wrench to pry off the spark plug. Note that the first and the last spark plug wires are the longest -- label them so you won�t mix them up.
6. Shown below is a set of spark plug wires (to be reused) from the right engine.
Thread Starter
Senior Member
Joined: Jul 2007
Posts: 421
Likes: 14
From: Bay Area
2004 E500 CLK320
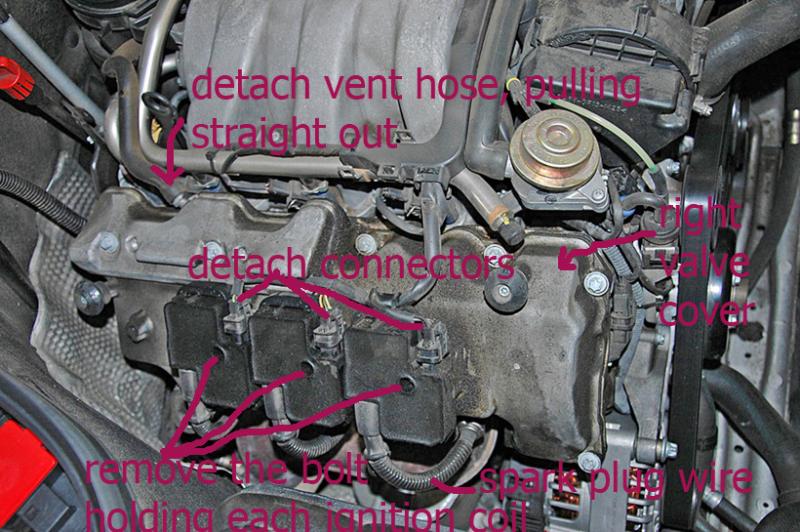
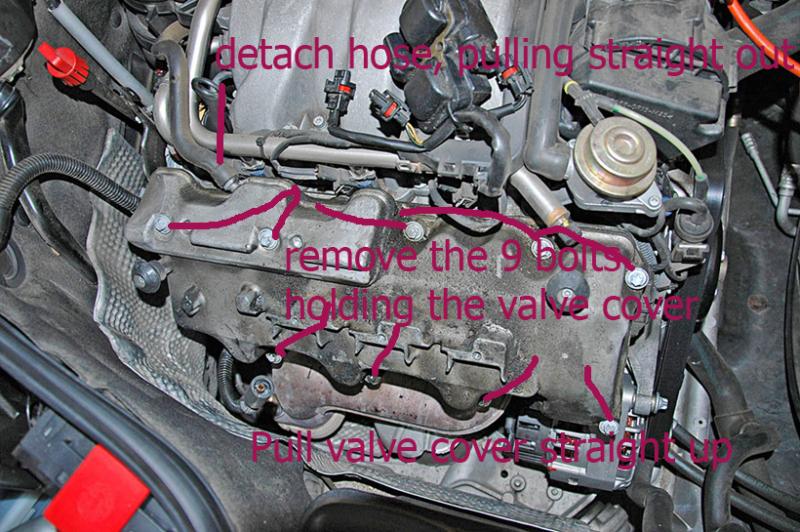
7. Remove the 9 bolts holding the valve cover. Detach the vent hose from the valve cover by pulling it straight outward � may require some twist and pull motion.
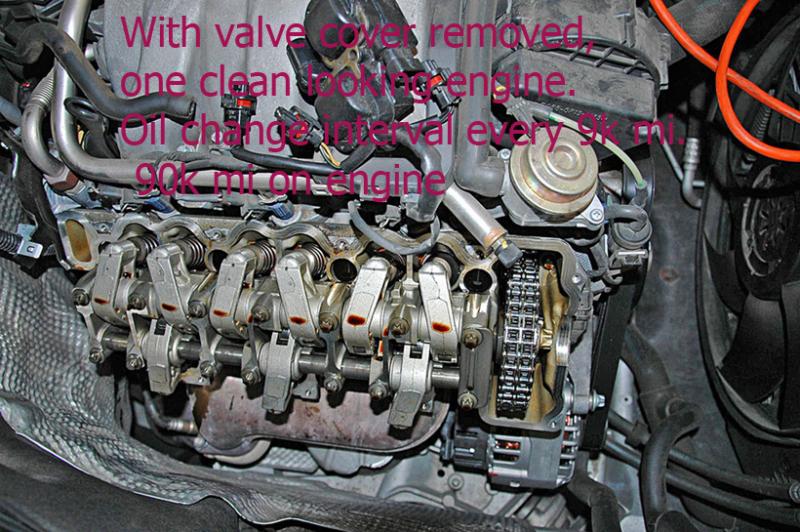
8. The engine parts look very clean for an engine w/ 90k mi. Oil change interval was every 9k mi w/ Mobil-1.
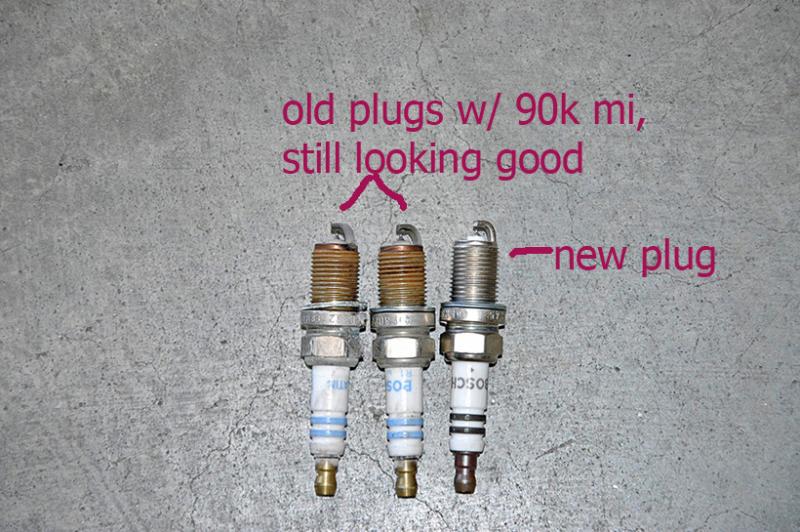
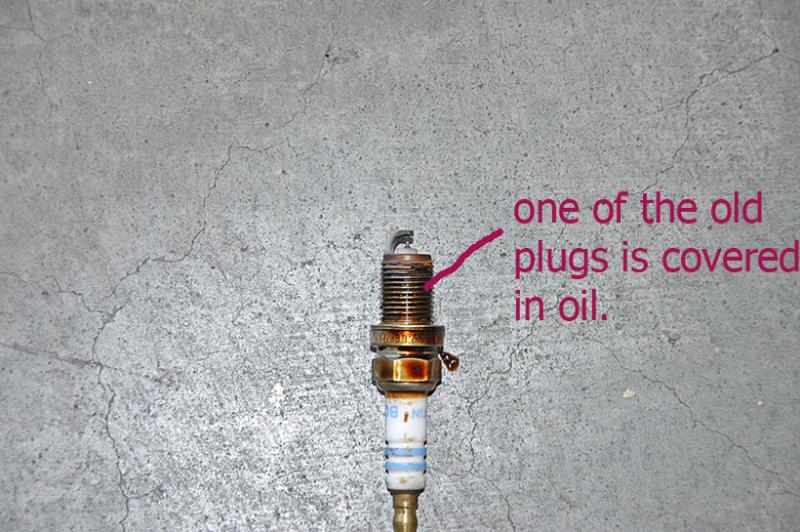
9. Now it�s a good time to remove and replace the spark plugs. Old and new spark plugs side by side. The old news are still looking good at 90k mi. (
10. One of the old plugs is covered w/ oil. If the oil leaks to the tip of the spark plug, it could cause misfire.
11. Coat the thread of the new spark plug w/ anti-seize.
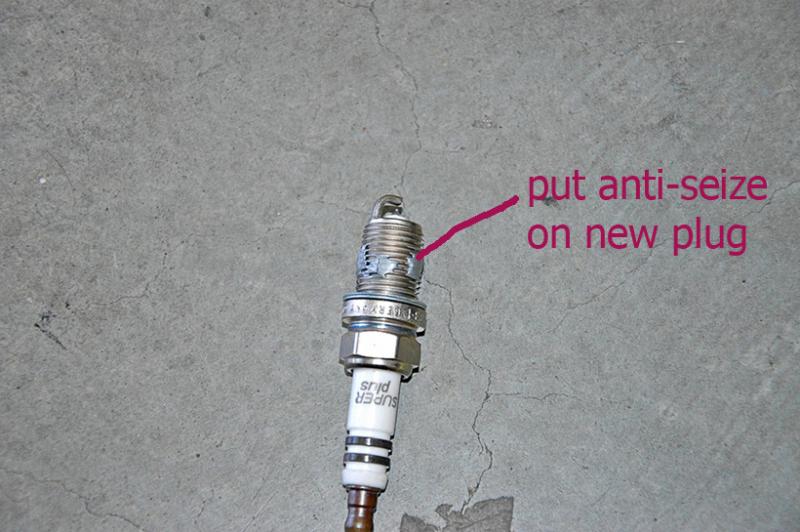
12. Install the new spark plugs. Tighten by hand and then with wrench by feel.
13. Clean the valve cover w/ a clean rag. Remove the old gasket. Apply gasket sealant along the rims of the valve cover.

8. The engine parts look very clean for an engine w/ 90k mi. Oil change interval was every 9k mi w/ Mobil-1.
9. Now it�s a good time to remove and replace the spark plugs. Old and new spark plugs side by side. The old news are still looking good at 90k mi. (
10. One of the old plugs is covered w/ oil. If the oil leaks to the tip of the spark plug, it could cause misfire.
11. Coat the thread of the new spark plug w/ anti-seize.
12. Install the new spark plugs. Tighten by hand and then with wrench by feel.
13. Clean the valve cover w/ a clean rag. Remove the old gasket. Apply gasket sealant along the rims of the valve cover.
Thread Starter
Senior Member
Joined: Jul 2007
Posts: 421
Likes: 14
From: Bay Area
2004 E500 CLK320
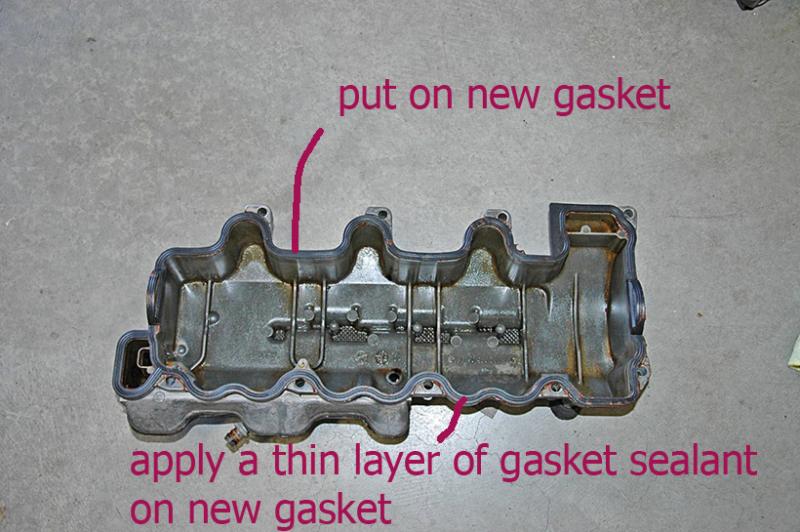
14. Put on the new gasket. Apply a thin layer of gasket sealant on the new gasket.
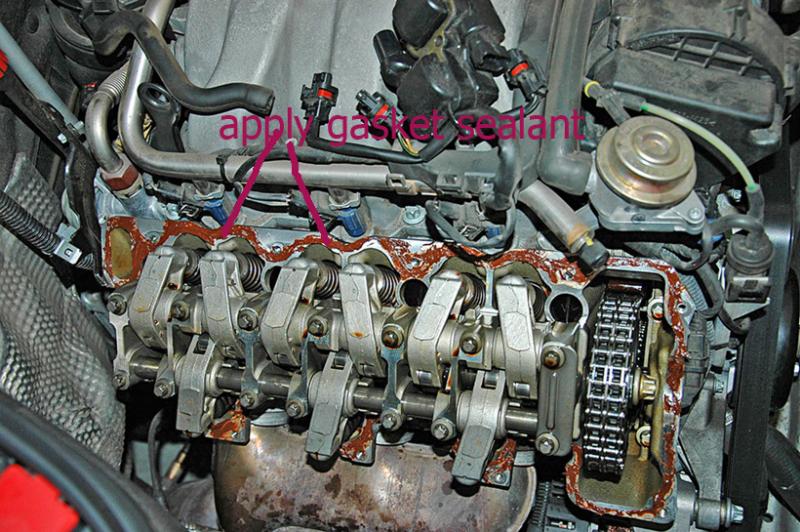
15. Apply gasket sealant on the rims of the engine block.
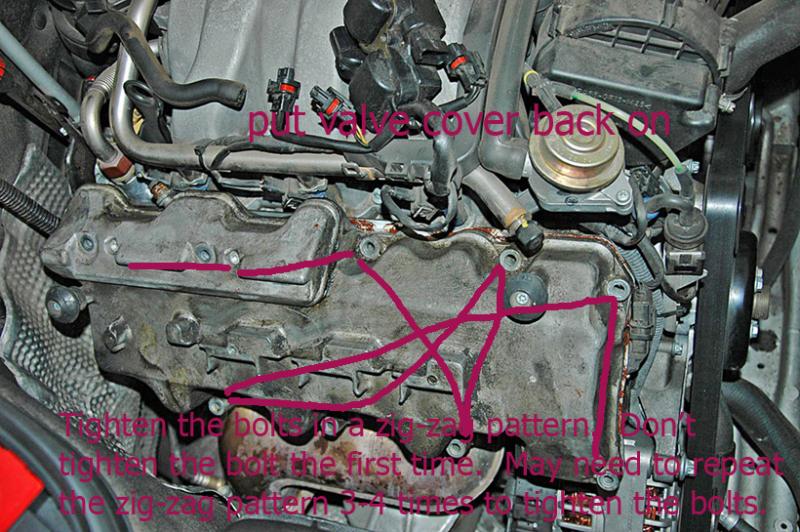
16. Put valve cover back on. Tighten the bolts in a zig-zag pattern. Do not tighten the bolts on the first attempt. Repeat the zig-zag patter a few times before having all the bolts completely tightened down.
17. Attach the vent hose.
18. Snap the spark plug wires back on.
19. Put the ignition coils back on.
20. Attached spark plug wires to the ignition coils. Make sure you have the wires in the right order.
21. You�re done for the right valve cover.
22. Moving on to the left valve cover.
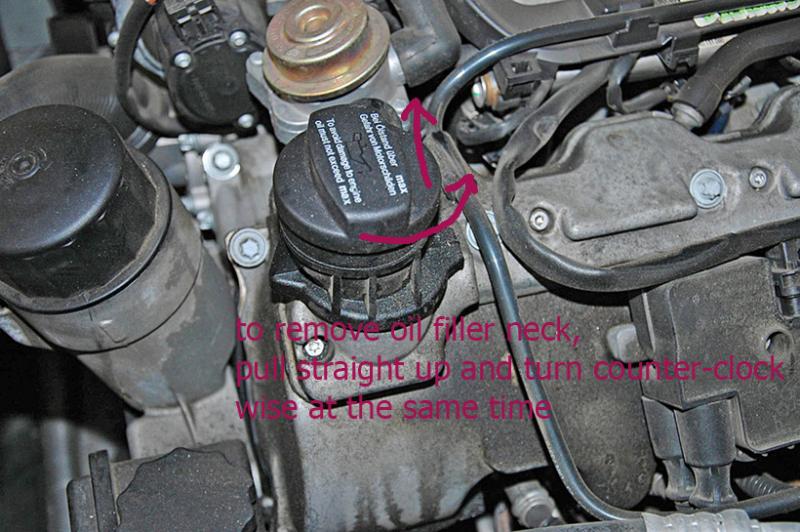
23. Remove the oil filler neck by pulling it straight up and rotate counter-clockwise at the same time.
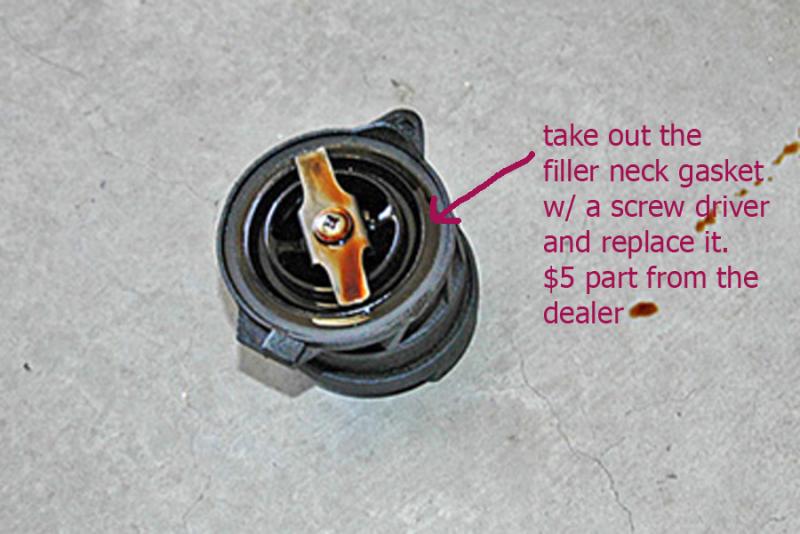
24. Use a flat head screw driver to remove the gasket on the filler neck and replace it w/ a new gasket. A new one costs $5 from the dealer.
15. Apply gasket sealant on the rims of the engine block.
16. Put valve cover back on. Tighten the bolts in a zig-zag pattern. Do not tighten the bolts on the first attempt. Repeat the zig-zag patter a few times before having all the bolts completely tightened down.
17. Attach the vent hose.
18. Snap the spark plug wires back on.
19. Put the ignition coils back on.
20. Attached spark plug wires to the ignition coils. Make sure you have the wires in the right order.
21. You�re done for the right valve cover.
22. Moving on to the left valve cover.
23. Remove the oil filler neck by pulling it straight up and rotate counter-clockwise at the same time.
24. Use a flat head screw driver to remove the gasket on the filler neck and replace it w/ a new gasket. A new one costs $5 from the dealer.
Thread Starter
Senior Member
Joined: Jul 2007
Posts: 421
Likes: 14
From: Bay Area
2004 E500 CLK320
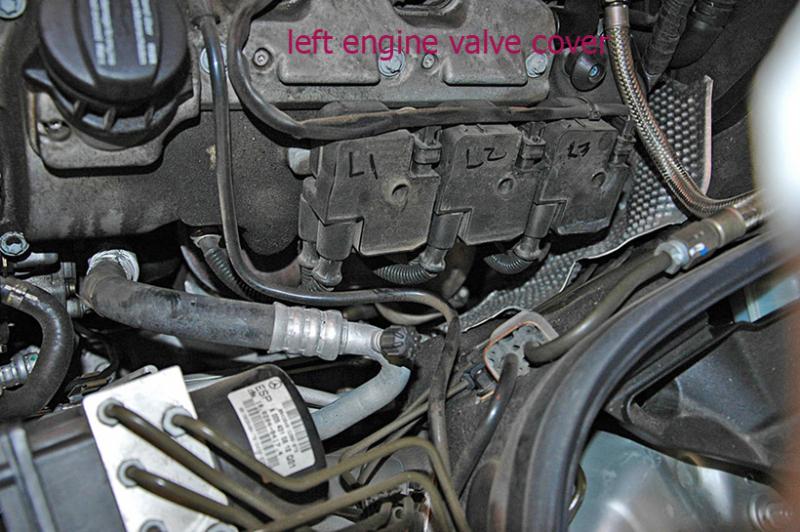
25. The rest of the procedure in R&R the left valve cover and spark plugs is the same as the right cover. There are two vent hoses attached to the left cover vs. only one hose on the right cover.

26. Put everything back in the reverse order and you�re done. You�ve just saved at least $1200 in labor for just 3.5-4hrs of easy work.
27. The picture below shows the oil leak from the rear main seal. Well, that�s a job to be left for the professional since the transmission needs to be removed in order to R&R the rear main seal.
MBWorld Fanatic!
Joined: Mar 2008
Posts: 3,632
Likes: 150
C63s Cabriolet, BMW M4, Civic
I just replaced the valve cover gaskets on the 2004 CLK320 w/ 90k mi. The leak started at about 80k mi, and the leak was getting worse, so it was about time to R&R the gaskets. Since the spark plugs were original, it was also a good time to R&R the spark plugs as well. It�s a fairly easy job; total time was ~3.5 hrs for the two valve cover gaskets and replacing 12 spark plugs (2 per cylinder). I bought parts from autohausaz.com. The dealer typically charges $800 for replacing the 2 valve cover gaskets and an additional $500 for the spark plugs. If the leak becomes really bad, the oil could drip down to the hot exhaust manifold, causing smoke and possibly catching a fire. Oil leak down to the tips of the spark plugs could also cause engine misfire.
Here�s the procedure:
1. Remove the two engine covers by pulling straight up, as indicated below.
2. Remove the two air ducts. Just pull them straight out.
3. Shown below is the right valve cover. Note the 3 ignition coils casings are covered in oil from the oil leak. Note the order of the spark plug wires before removing them.
4. Detach the electrical connector from each ignition coil. Remove the bolt holding the ignition coil.
5. Use the open end of the 17mm wrench to pry off the spark plug. Note that the first and the last spark plug wires are the longest -- label them so you won�t mix them up.
6. Shown below is a set of spark plug wires (to be reused) from the right engine.
I also did the same on my Clk 430 and CL 55. The Left side (driver side) valves cover is a little bit harder to do then the right side because of the fuel line in the way. I couldn't remove the valve cover without remove the fuel line first due to the valve cover has a 3 inches guide pin that required the valve cover to pull straight out.
Trending Topics
MB World Stories
The Best of Mercedes & AMG

7 Craziest Things AMG Gas Ever Built
Verdad Gallardo
New Electric Mercedes-AMG GT 4-Door Coupe Unveiled: 10 Things You Need to Know
Verdad Gallardo
6 Mercedes Models That Did NOT Age Well (But Are Somehow Still Cool)
Verdad Gallardo
Manual Mercedes? 6 Times Sindelfingen Let Drivers Have All The Fun
Verdad Gallardo
Mercedes SLR McLaren 722 S Is Extremely Rare Example Modified by McLaren
Verdad Gallardo
8 Classic Boxy Mercedes Designs That Have Aged Like Fine Wine
Verdad Gallardo
Flawlessly Restored Mercedes 190E Evo II Heads to Auction
Verdad Gallardo
Electric Mercedes C-Class Unveiled: 11 Things You Need to Know
Verdad Gallardo
Mercedes EQS Gets A Major Update: Everything You Need to Know
Verdad GallardoMBWorld Fanatic!
Joined: Jul 2010
Posts: 4,748
Likes: 0
From: A Canadian in Dubai, United Arab Emirates
'05 C200K SS, '05 Kleemann CLK500K, '08 Hummer H3 & '92 Z34 5sp (track car in Canada)
Great write up, I'm going to be doing my plugs and wires in the comming months. Thanks!

MBWorld Fanatic!
Joined: Jul 2010
Posts: 4,748
Likes: 0
From: A Canadian in Dubai, United Arab Emirates
'05 C200K SS, '05 Kleemann CLK500K, '08 Hummer H3 & '92 Z34 5sp (track car in Canada)
What should be done is to start a generic DIY thread, sticky it and put links to all these various DIY threads in it, most are fantastic. That way everything is under one thread.
My $0.02
My $0.02

Thread Starter
Senior Member
Joined: Jul 2007
Posts: 421
Likes: 14
From: Bay Area
2004 E500 CLK320
I also did the same on my Clk 430 and CL 55. The Left side (driver side) valves cover is a little bit harder to do then the right side because of the fuel line in the way. I couldn't remove the valve cover without remove the fuel line first due to the valve cover has a 3 inches guide pin that required the valve cover to pull straight out.
Thread Starter
Senior Member
Joined: Jul 2007
Posts: 421
Likes: 14
From: Bay Area
2004 E500 CLK320
However, changing spark plugs on BMWs is super easy -- almost effort less.
Thread Starter
Senior Member
Joined: Jul 2007
Posts: 421
Likes: 14
From: Bay Area
2004 E500 CLK320
Apply a thin layer of sealant and then smooth out the sealant with your finger tip. Press in the new gasket with hands, and wipe off any excess sealant on the inside of the valve cover. Once the valve cover is tightened, there will be some excess sealant on the inside cover; there's nothing you can do about that and it won't harm the engine. The sealant does not get hardened or become brittle. I used the non-silicon base type, and don't recommend using the silicon based gasket maker, which hardens after sometime.
Thread Starter
Senior Member
Joined: Jul 2007
Posts: 421
Likes: 14
From: Bay Area
2004 E500 CLK320


Member
Joined: Dec 2007
Posts: 121
Likes: 0
From: USA
2005 E320
Nice write-up but I can't find any mention of your replacing the seals on the breather covers.
Based upon my personal experience and from talking with several MB techs, the breather covers are just as likely (if not more likely) as the valve covers to leak.
Based upon my personal experience and from talking with several MB techs, the breather covers are just as likely (if not more likely) as the valve covers to leak.
Thread Starter
Senior Member
Joined: Jul 2007
Posts: 421
Likes: 14
From: Bay Area
2004 E500 CLK320
I didn't find any leaks in these valves, connectors or hoses. They were clean. If they were clogged, they could be looking dirty. This is a California car, never been thru a cold winter, and I don't expect this car will have any problem w/ the breather valve. Maybe cars in the East Coast would experience clogged valves due to condensation from short trips during the winter months.


Junior Member
Joined: Mar 2008
Posts: 18
Likes: 0
From: Austin, TX USA
04 E320
Great DIY instructions... thanks for posting them. But I have a couple of questions.
1) Now that it's been close to 6 months since you made the fix.... are you leak free? Or have any leaks developed?
2) It doesn't look like any kind of sealant was used at the factory. My 04 e320 is sorely in need of me doing this fix.... but it also has 102K miles. Probably could have actually done this at 85K.... but it was just seeping at that point. Anyway... if you have to go in and do this again you're going to have a really fun cleanup job with the sealant you added. Did you ever find any instructions on how this is spec.'d on something like a WIS? Or has anyone found torque specs for the valve covers?
I'd just rather not cover everything in sealant if I don't have to. It never worked well long term on cars I've had in the past.
Thanks for posting the instructions.


