


DIY: OEM Alloy Pedals

Junior Member
Joined: Nov 2011
Posts: 15
Likes: 1
From: CT, USA
2006 E350 4Matic
Adding to the comments below about stretching really hard, warming the new pedal cover up can help. Use a hair dryer to get it hot to the touch and then stretch it over the brake pedal.
Junior Member
Joined: Nov 2011
Posts: 15
Likes: 1
From: CT, USA
2006 E350 4Matic
The part spec'ed out in this thread has a tail (the part that wraps up under & then slides into the base of the pedal assembly) that's about 3/8" shorter than the stock pedal. The top of the pedal has a pivot point where it attaches to the upper end of the pedal support with a pin. This point is about 1/2" lower than the stock's so you can't attach it to the pedal assembly base.
However, the aluminum & rubber dots are actually part of a rubber sleeve that slides over the plastic of the pedal. You can slip it off and do the same with the plain rubber pad covering the stock pedal. Then slip the new one on the stock pedal and you've got the update.
You can probably do that without removing the pedal from the pedal assembly base by removing the pin at the top, bending it down towards the floor and then working it off the pedal. Otherwise after removing the pin, remove the nut holding the pedal base assembly to the floor (there's a round plastic cap covering it about midway up the base - it's a 10mm nut) and then pulling the base assembly downward to get it free of where it slides up in the dashboard area. Underneath this is a trapezoidal plastic piece that has two pins in it to fit into the corresponding holes in the tail of the pedal. Pry that off and then slip the rounded plastic housing off the pedal base assembly & backward toward the pedal and the pedal will come free of the base & you can work on removing the rubber pad without having to be crouched under the car.
I have pictures if anyone wants to see some on how to do this.
Jim
Senior Member
Joined: Nov 2009
Posts: 398
Likes: 7
From: Queens NY/ Ft Lauderdale FL
W211 E63
Senior Member
Joined: Nov 2009
Posts: 398
Likes: 7
From: Queens NY/ Ft Lauderdale FL
W211 E63
i just installed the hand brake. somewhat simple. accelerator im gonna leave for tomorrow.
BUT DAMN was the brake painful to do. I keep feeling like the right side of the brake isn't in the holder.
But on the other hand interior looks fresshhhh. These pedals along with the all season floor mats #success. Ill upload a pic when i finish tomorrow
PS thanks a lot DiggerJim for the heads up
BUT DAMN was the brake painful to do. I keep feeling like the right side of the brake isn't in the holder.
But on the other hand interior looks fresshhhh. These pedals along with the all season floor mats #success. Ill upload a pic when i finish tomorrow
PS thanks a lot DiggerJim for the heads up
Member
Joined: Jul 2011
Posts: 187
Likes: 1
From: Baltimore, MD
2012 Jeep Grand Cherokee Overland
DiggerJim is 100% correct.
I purchased the items for my 2009 e350 and the accelerator pedal wouldn't work. Besides being to short the pin hole wouldn't line up, it was located lower on the back side of the pedal than stock (ring vs. pinky finger). I've attached a few pictures showing the difference in the pedals, left is stock, right is the OEM Sport Replacement.
Fortunately, I was able to slide the new aluminum pedal cover off and place it onto the old. It was a pain to try to stretch the rubber on back of the new aluminum pedal over the hump because the aluminum doesn't move (obviously). So I used a small flathead screwdriver like a ramp to help guide the aluminum cover off (pic). The "strap" at the end of the pedal is held in place by a "plug" with two studs/posts that easily pops out and back in.
To soften the rubber I soaked my pedals in hot water.
While I was under there I cleaned everything really well.
I spent $58 in parts at the dealership (had a 15% off coupon). The online price was slightly better at $48 but I wasn't sure what the S&H portion would be because it didn't show up in the shopping cart.
The is a simple change with great visual impact that you can do in 30min.
Tools used: small flathead screwdriver, pump style pliers, 10mm socket
MB World Stories
The Best of Mercedes & AMG

Manual Mercedes? 6 Times Sindelfingen Let Drivers Have All The Fun
Verdad Gallardo
Mercedes SLR McLaren 722 S Is Extremely Rare Example Modified by McLaren
Verdad Gallardo
8 Classic Boxy Mercedes Designs That Have Aged Like Fine Wine
Verdad Gallardo
Flawlessly Restored Mercedes 190E Evo II Heads to Auction
Verdad Gallardo
Electric Mercedes C-Class Unveiled: 11 Things You Need to Know
Verdad Gallardo
Mercedes EQS Gets A Major Update: Everything You Need to Know
Verdad Gallardo
5 Underrated Mercedes-Benz Models That Don't Get the Love They Deserve
Verdad Gallardo
Mercedes 300D Has Pushed Well Past 1 Million Miles and It Ain't Stopping
Verdad Gallardo
10 Most Reliable Mercedes-Benz Models You Can Buy Used
Verdad GallardoSuper Member


Joined: Sep 2014
Posts: 916
Likes: 134
From: NOVA/DC
20' RCF, 18' NX, 09' E350, 07' Solara, 05' STi, 01' Ranger
Thanks to all who provided advice throughout this thread, I just updated mine. What a difference! They look great with the sports package interior and against the black carpet.
I ordered the OEM pedals from the dealer and I ordered the ones that all have the same round (not oval) rubber dots. Here are the part numbers I used (from this post):
170 300 00 04 - Accelerator (round rubber nubs)
170 290 01 82 - Brake pedal (round rubber nubs)
203 430 00 84 - E-brake pedal (round rubber nubs)
The difference for the e-brake pedals is that the 203 430 00 84 part number has the round tabs and the 230 430 00 84 part number has the oval tabs.
EnzoSLK did a great job explaining the process in the preceeding thread, so I won't do so again other than to echo his comments. Brake pedal being the toughest physically (stretching the rubber lip over the metal pedal), and the gas pedal taking the longest.
The parts cost me, with tax, over $140 here in Canada. You guys are getting a serious discount, especially with our dollar now worth more!

Anyway, love the upgrade and here are some before and after pics (excuse my messy garage) -
I ordered the OEM pedals from the dealer and I ordered the ones that all have the same round (not oval) rubber dots. Here are the part numbers I used (from this post):
170 300 00 04 - Accelerator (round rubber nubs)
170 290 01 82 - Brake pedal (round rubber nubs)
203 430 00 84 - E-brake pedal (round rubber nubs)
The difference for the e-brake pedals is that the 203 430 00 84 part number has the round tabs and the 230 430 00 84 part number has the oval tabs.
EnzoSLK did a great job explaining the process in the preceeding thread, so I won't do so again other than to echo his comments. Brake pedal being the toughest physically (stretching the rubber lip over the metal pedal), and the gas pedal taking the longest.
The parts cost me, with tax, over $140 here in Canada. You guys are getting a serious discount, especially with our dollar now worth more!
Anyway, love the upgrade and here are some before and after pics (excuse my messy garage) -
Glad I searched and found this thread, even though it's a couple years old.
It looks like you have the same part number for both the circle and oval rubber...
Can anyone confirm the all round rubber pads vs the oval pads?
Definitely something I'm going to do next week!
Thanks,
-Nigel
Super Member
Joined: Sep 2014
Posts: 916
Likes: 134
From: NOVA/DC
20' RCF, 18' NX, 09' E350, 07' Solara, 05' STi, 01' Ranger
Welp answered my own questions..lol
Pulled the pedals right off of our CLK. Took all of 10 minutes, 7 of those being the gas pedal and that silly pin at the top.
w00t w00t for free nicer looking pedals.
Swapped over the black cheap plastic looking ones from the 211 to the 209!
These are the oval looking rubber nubs compared to the circles. Attached are part numbers for reference.
Will update when they are done drying (had to wash them they were filthy being 10 years old, but surprisingly they look brand new now!)
Parking Brake: A 230 430 00 84
Brake Pedal: A 230 290 0089
Gas pedal: A 230 300 00 82
-Nigel
Last edited by NewShockerGuy; Nov 4, 2016 at 03:08 PM.
Super Member
Joined: Sep 2014
Posts: 916
Likes: 134
From: NOVA/DC
20' RCF, 18' NX, 09' E350, 07' Solara, 05' STi, 01' Ranger
I forgot to add that I actually have a matching dead pedal from formymercedes in case someone wanted it to go with their round rubber pedals. I had it on our CLK even though the pedals were the oval rubber and it didn't look bad, but I am choosing not to install it in the w211 now so it's up for grabs if anyone is looking for one... Had I not been able to get the clk pedals off and ordered the round rubber pedals then I would definitely be installing this. Attached below. Comes with 4 s/s screws not pictured. PM me if there is any interest.
Thanks,
-Nigel
Thanks,
-Nigel
MBWorld Fanatic!

Joined: Oct 2004
Posts: 1,358
Likes: 297
From: South Florida
2010 E63 AMG, 2003 E500
Picked up these covers from AliExpress for less than $11 - they fit perfectly and look great.
Just need to finish installing the gas pedal cover and I'll post pics.
https://www.aliexpress.com/item/New-...607021228.html
Done - that was easy.
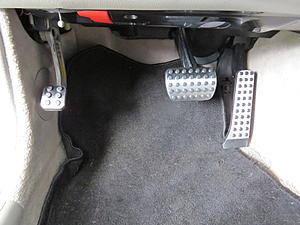
Floormats are temporary until I get new OEM ones from eBay.
Just need to finish installing the gas pedal cover and I'll post pics.
https://www.aliexpress.com/item/New-...607021228.html
Done - that was easy.

Floormats are temporary until I get new OEM ones from eBay.
Last edited by Bahnstormer; Dec 28, 2016 at 01:43 PM.


