


 Jun 5, 2015, 12:57 PM
Last edit by: IB Advertising
See related guides and technical advice from our community experts:
- Mercedes-Benz: How to Repair foggy headlights
Step by step instructions for do-it-yourself repairs

3M Headlight Restoration: Before and After
Thread Starter
Senior Member
Joined: Aug 2009
Posts: 320
Likes: 7
From: North NJ
06 E55(SOLD), 03 E500(SOLD)
3M Headlight Restoration: Before and After
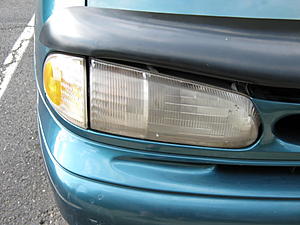
When I bought my E500 this past August the only cosmetic flaw I could find was the headlights. They were yellow and hazy looking. I was planning on replacing both headlight units with new ones when I remembered the 3M headlight restoration kit. After reading up on them I purchased three kits. I used one kit to practice on my Ford Windstar's headlights, which were in really bad shape.
Before:
After:
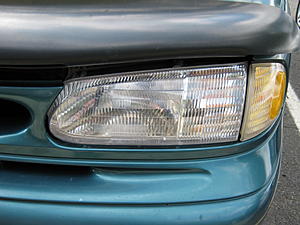
I was very pleased with the results. I'm glad I had two more kits left. With the size of the W211 headlights and the amount of material that needed to be removed, I used one kit for each side of the vehicle.
Before:

After:
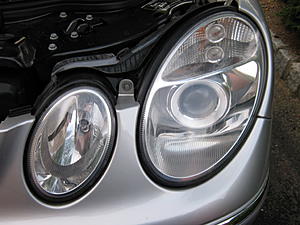
Again, I was very pleased with the results. I spent an hour on each headlight including preparation. I put two layers of masking tape around each lens in case the drill got away from me.
Before:

After:

I was very pleased with the results. I'm glad I had two more kits left. With the size of the W211 headlights and the amount of material that needed to be removed, I used one kit for each side of the vehicle.
Before:

After:

Again, I was very pleased with the results. I spent an hour on each headlight including preparation. I put two layers of masking tape around each lens in case the drill got away from me.

Senior Member
Joined: Apr 2008
Posts: 303
Likes: 15
2011 E550 (RIP), 2014 CLS 550C4
I just did the same with mine, but didn't use the 3M kit.
I used wet/dry auto body sand paper. Wetted the lens and the paper. Started with 400 grit, then 600, 1000, 1500, then 2000. Went over each lens twice with each grit; 400 twice, then 600 twice, etc-etc, wiping the lens after each time. Followed up with a clear coat body scrub compound and then finally with "Scratch-X".
A world of difference. I'm pretty sure there is some kind of anti-reflection or anti-scratch coating on the lens and it's that coating that gets cloudy.
Dan
MBWorld Fanatic!
Joined: Nov 2004
Posts: 1,281
Likes: 8
From: Longmont, CO
04 E320 4 Matic, 95 Audi S6, 99 Carrera 4 Cabrio, 12 Fiat 500 Sport, 00 BMW R1200C 10, BMW R1200R
I bought my car new and I seem to have avoided this problem by putting the thick shielding layer with extra UV protection on them lenses. My car sits in the garage most of the time, but these thick protecting layers have actually gotten beat up by rocks and gravel more than anything. You can buy them custom cut at www.performanceproducts.com. I recommend them, especially if you just buffed and restored your lenses! I would post the link, but the site seems to be down right now.
I might be wrong, but even though you did the right thing by sanding the plastic and polishing it, they might tarnished and get cataracts quicker now that the original harder finish is gone.
When my lens covers get too beat up, I will peel them off and put new ones on.
Steve
I might be wrong, but even though you did the right thing by sanding the plastic and polishing it, they might tarnished and get cataracts quicker now that the original harder finish is gone.
When my lens covers get too beat up, I will peel them off and put new ones on.
Steve
Thread Starter
Senior Member
Joined: Aug 2009
Posts: 320
Likes: 7
From: North NJ
06 E55(SOLD), 03 E500(SOLD)
I also see a lot of W210's headlights that are horrible looking.
ss3964spd, I used the wet/dry sand paper years ago on other headlights with good results. Figured I'd give the 3M kit a try this time. There's definitely a coating on the lens. I had to sand it completely off to get a uniform surface to polish.
SAguirre, you're right. They will get "cataracts" quicker now that I sanded away the coating. I've been thinking I should apply a clear film to them sooner rather than later. Thanks for the link to www.performanceproducts.com.
Thanks for the comments.
MBWorld Fanatic!


Joined: Aug 2005
Posts: 3,085
Likes: 59
From: Los Angeles
2009 SL550 Roadster Diamond White, 2008 CLK550 Coupe Obsidian Black
Trending Topics

Newbie
Joined: Sep 2009
Posts: 2
Likes: 0
From: Florida
2003 E320 Mercedes Benz
Hi, I’m Djbory… This is my first post in this forum and I’m afraid it may be a little off topic, but since I’m not very familiar with this forum yet, I will post it here.
This is the thing, I own a 2003 E320… First the left turn signal stop working (just the front one) I took it to several shops, but not to MB special mechanic since in the place I live there’s not MB Certified shop…
Nobody has been able to locate the problem, and just a couple of days ago, the other side stopped working too… of course we already tried changing the light bulbs, but that’s not the problem…
The instrumental cluster display is showing that the lights are out as well… I appreciate any advice…
Djbory
P.S. I’ve been trying to buy a front license plate bracket like the one on gaazmon picture, I haven’t been able to locate one on the internet… Any leads?
MB World Stories
The Best of Mercedes & AMG

Manual Mercedes? 6 Times Sindelfingen Let Drivers Have All The Fun
Verdad Gallardo
Mercedes SLR McLaren 722 S Is Extremely Rare Example Modified by McLaren
Verdad Gallardo
8 Classic Boxy Mercedes Designs That Have Aged Like Fine Wine
Verdad Gallardo
Flawlessly Restored Mercedes 190E Evo II Heads to Auction
Verdad Gallardo
Electric Mercedes C-Class Unveiled: 11 Things You Need to Know
Verdad Gallardo
Mercedes EQS Gets A Major Update: Everything You Need to Know
Verdad Gallardo
5 Underrated Mercedes-Benz Models That Don't Get the Love They Deserve
Verdad Gallardo
Mercedes 300D Has Pushed Well Past 1 Million Miles and It Ain't Stopping
Verdad Gallardo
10 Most Reliable Mercedes-Benz Models You Can Buy Used
Verdad GallardoOut Of Control!!
Joined: Jul 2003
Posts: 15,901
Likes: 4,630
From: North Scottsdale, AZ
'71 Pinto
Malfunction may be due to inadequate electrical contact between the turn signal bulb socket and headlamp housing. A repair kit was released for MY03 & 04, part # 2038260282 (for comparison shopping, parts.com $22.43) PM your email address and I will forward bulletin containing repair instructions.
Newbie
Joined: Sep 2009
Posts: 2
Likes: 0
From: Florida
2003 E320 Mercedes Benz
Malfunction may be due to inadequate electrical contact between the turn signal bulb socket and headlamp housing. A repair kit was released for MY03 & 04, part # 2038260282 (for comparison shopping, parts.com $22.43) PM your email address and I will forward bulletin containing repair instructions.

Djbory

Super Member


Joined: Aug 2009
Posts: 685
Likes: 121
From: Palm Coast, Florida
2019 E-450 Wagon
Had same problem.
Use wet-sanding with 1000/1500 grit and fianl polishing with Flitz.
Spent an hour on each side, but not too happy with the end result.
Should have gone with a package product like the one described above, or Maquires head-lamp restorer.
The Flitz thing was recommended by a lady in the hardware store as I was shopping for a kit..As usual I can't say no to a femme..")
Use wet-sanding with 1000/1500 grit and fianl polishing with Flitz.
Spent an hour on each side, but not too happy with the end result.
Should have gone with a package product like the one described above, or Maquires head-lamp restorer.
The Flitz thing was recommended by a lady in the hardware store as I was shopping for a kit..As usual I can't say no to a femme..

Member
Joined: Jan 2008
Posts: 100
Likes: 0
From: Chicago IL
S550, E320 Sport Wagon and A170CDI :)
3M kit
4 steps:
300 then 800 then 3000 w/ water and the final step was the kind of orange spunge with a polish cleaner on it - standard kit
Had a lot of work cause Chicago's weather killed my headlights but it was worth it.....
don't be afraid about sending the surface of the lamp...
hubi
4 steps:
300 then 800 then 3000 w/ water and the final step was the kind of orange spunge with a polish cleaner on it - standard kit
Had a lot of work cause Chicago's weather killed my headlights but it was worth it.....
don't be afraid about sending the surface of the lamp...
hubi

Junior Member
Joined: Jan 2010
Posts: 66
Likes: 0
e320
So at first i used turtle wax product and it ended up looking like ****... i had been looking for something to fix it for a while now about 6 months and even thought about getting new headlights.. But... thanks to this forum and 3m it looks amazing.. the pictures i will post dont do it justice maybe tomorrow during the day i can retake them with a normal camera. First pic is after turtle restore then the second is 3m ,, 3m take about an hour if that even, but my cordless drill kept on dyeing so i had to recharge and wait.. lol..


Senior Member
Joined: Jan 2006
Posts: 424
Likes: 1
From: Space Coast, FL
'14 E350, '03 H-D FXDL
Cause for Headlight Hazing?
I'm a new owner of an 08 E350.
What is causing this hazing of the front headlights?
Is this hazing covered under the factory warranty or is it considered wear and tear?
What is causing this hazing of the front headlights?
Is this hazing covered under the factory warranty or is it considered wear and tear?
Member
Joined: Jan 2008
Posts: 100
Likes: 0
From: Chicago IL
S550, E320 Sport Wagon and A170CDI :)
just my guessing......
Out Of Control!!
Joined: Jun 2008
Posts: 10,557
Likes: 24
From: Earth
Porsche Macan S SportDesign / Ex M-B's: 11 & 10 & 06 E350's, 02 S500
I think it usually has to do with being exposed to direct sunlight (parked outdoors for extended periods of time) for the most part. Harsh weather doesn't help either.
Senior Member

Joined: Mar 2010
Posts: 451
Likes: 44
2007 E350; 2018 GLE350
You did a great job cleaning up your light covers. Well done.
There's another way of performing that work: Novus plastic cleaner. I've attached a link to Novus info at the end of this note. You can get it at any motocycle store ... bikers use the stuff to clean their Lexan or acrylic windshields and goggles. I've seen it at WalMart, also. We used the same stuff (less the name brand markings) in Naval Aviation to clean aircraft canopies. I use it for my bike's windshield, my goggles, my Kubota RTV acrylic windshield, and my vehicles' headlight covers.
Squirt a dab of Novus on a clean, soft towel, spread it on the headlight cover and rub it around the cover, then polish off with a clean, dry towel. Simple as that.
http://www.novuspolish.com/

Member
Joined: May 2010
Posts: 218
Likes: 0
03 E320, 03 Lexus RX300
I did this with my 2003 E320, I did not use a kit though. I bought a $25 buffer from Autozone, Meguire's Polish/Wax and 3M rubbing compound.
Step 1) Compound on
Step 2) Buff Out
-Wipe with cloth towel-
Step 3) Wax on
Step 4) Buff out
-Wipe with cloth towel-
Came out flawless, took me 3-4 minutes each cover.
Step 1) Compound on
Step 2) Buff Out
-Wipe with cloth towel-
Step 3) Wax on
Step 4) Buff out
-Wipe with cloth towel-
Came out flawless, took me 3-4 minutes each cover.


