
 06-10-2015, 12:13 PM
Last edit by: IB Advertising
See related guides and technical advice from our community experts:
- Mercedes Benz E Class How to Replace Brake pads/calipers/rotors
Step by step instructions for do-it-yourself repairs

W211 DIY Brake Job
01-10-2008, 03:50 AM
#101
MBWorld Fanatic!
Join Date: Nov 2001
Location: Berkshire, UK
Posts: 1,148
Likes: 0
Received 16 Likes
on
13 Posts
2004 SL55, 2015 A250d, 2016 GLC250d
Just a quick additional point for the list of steps to complete this task.
If you're replacing all pads then put a cloth around the brake fluid reservoir - if it had been filled whislt you had low pads then it may overflow when all the pads get pushed outward and thicker newer pads are put in.
R
If you're replacing all pads then put a cloth around the brake fluid reservoir - if it had been filled whislt you had low pads then it may overflow when all the pads get pushed outward and thicker newer pads are put in.
R
 01-10-2008, 07:11 AM
#102
MBWorld Fanatic!
Join Date: Mar 2006
Location: Louisiana
Posts: 3,254
Likes: 0
Received 12 Likes
on
12 Posts
03 E500 and Corvette
Just a quick additional point for the list of steps to complete this task.
If you're replacing all pads then put a cloth around the brake fluid reservoir - if it had been filled whislt you had low pads then it may overflow when all the pads get pushed outward and thicker newer pads are put in.
R
If you're replacing all pads then put a cloth around the brake fluid reservoir - if it had been filled whislt you had low pads then it may overflow when all the pads get pushed outward and thicker newer pads are put in.
R
01-28-2008, 01:52 PM
#103

Jack procedures
Last Saturday,I changed oil and rear pads on our 2003 E320. The question/ problem I bring up is relevant to all 211 " do it your selfers". The car has only 4 jacking points. I have a survival instinct that prevents me from putting my body in a pinch point while the car is supported by anything less than a sturdy jack stand. The only "hard points" I can find in the rear are the end of the aluminum sub frame that appears to support the trunk. I imagine that is not an approved support but it will do in an emergency. The front is completely void of any place to put a stand. Apparently some of you have solved the riddle. Any advice? P.S. Here is something NOT to do. I placed a bottle jack (approx 1" dia) right in the center of a jack point. It was so centered that it punched through what I thought was 1/8" plate (NOT) and bullseyed a round hole in the body that accepts the round hollow pipe molded into the jack pad. I was VERY lucky in that it failed when I lowered the car at about 2" off the pavement. I could have been seriously injured. The factory jack spreads that shear force over a larger area. I have seen the machined puck that some have bought off e- bay. etc. Not a bad idea but a piece of 5/4 " oak cut to fit will do as well. In closing, my brakes had 27,300 miles when the warning light appeared on the FSS. The fronts had 8.5 mm left out of a possible 14.5 when new so I left them. The rears had 2-4mm left out of a
possible 10mm. The side with the sensor failed at 2mm. That is pretty thin.
Both front and rear rotors were heavily scored but only 1mm of material was missing from the rotor width. I decided to get to about 50,000 miles before replacing them. It appears that the sensor is not re-usable once it shorts out, as I could not get the code to clear until I substituted a new one.
As mentioned previously some set-ups (rear) require a #40 Torx to get the caliper off (mine). The fronts are 13mm bolts and are no problem. It took me the better part of the day and I was too fatigued to bleed the brakes. I disabled the SBC by pulling up the latch on the top and pivoting the caplug from the top. It has so much wire protruding from the bottom rear that I found it impossible to completely disengage it as it is strapped very close to the plug. I stuffed a piece of styrofoam between the connections to make sure it stayed disabled. No codes, no problems.
01-28-2008, 02:30 PM
#104
MBWorld Fanatic!
Last Saturday,I changed oil and rear pads on our 2003 E320. The question/ problem I bring up is relevant to all 211 " do it your selfers". The car has only 4 jacking points. I have a survival instinct that prevents me from putting my body in a pinch point while the car is supported by anything less than a sturdy jack stand. The only "hard points" I can find in the rear are the end of the aluminum sub frame that appears to support the trunk. I imagine that is not an approved support but it will do in an emergency. The front is completely void of any place to put a stand. Apparently some of you have solved the riddle. Any advice? P.S. Here is something NOT to do. I placed a bottle jack (approx 1" dia) right in the center of a jack point. It was so centered that it punched through what I thought was 1/8" plate (NOT) and bullseyed a round hole in the body that accepts the round hollow pipe molded into the jack pad. I was VERY lucky in that it failed when I lowered the car at about 2" off the pavement. I could have been seriously injured. The factory jack spreads that shear force over a larger area. I have seen the machined puck that some have bought off e- bay. etc. Not a bad idea but a piece of 5/4 " oak cut to fit will do as well. In closing, my brakes had 27,300 miles when the warning light appeared on the FSS. The fronts had 8.5 mm left out of a possible 14.5 when new so I left them. The rears had 2-4mm left out of a
possible 10mm. The side with the sensor failed at 2mm. That is pretty thin.
Both front and rear rotors were heavily scored but only 1mm of material was missing from the rotor width. I decided to get to about 50,000 miles before replacing them. It appears that the sensor is not re-usable once it shorts out, as I could not get the code to clear until I substituted a new one.
As mentioned previously some set-ups (rear) require a #40 Torx to get the caliper off (mine). The fronts are 13mm bolts and are no problem. It took me the better part of the day and I was too fatigued to bleed the brakes. I disabled the SBC by pulling up the latch on the top and pivoting the caplug from the top. It has so much wire protruding from the bottom rear that I found it impossible to completely disengage it as it is strapped very close to the plug. I stuffed a piece of styrofoam between the connections to make sure it stayed disabled. No codes, no problems.
possible 10mm. The side with the sensor failed at 2mm. That is pretty thin.
Both front and rear rotors were heavily scored but only 1mm of material was missing from the rotor width. I decided to get to about 50,000 miles before replacing them. It appears that the sensor is not re-usable once it shorts out, as I could not get the code to clear until I substituted a new one.
As mentioned previously some set-ups (rear) require a #40 Torx to get the caliper off (mine). The fronts are 13mm bolts and are no problem. It took me the better part of the day and I was too fatigued to bleed the brakes. I disabled the SBC by pulling up the latch on the top and pivoting the caplug from the top. It has so much wire protruding from the bottom rear that I found it impossible to completely disengage it as it is strapped very close to the plug. I stuffed a piece of styrofoam between the connections to make sure it stayed disabled. No codes, no problems.
01-28-2008, 03:03 PM
#105
I would only ever use any factory jack in a roadside tire change emergency. I keep a couple of decent (3 1/2 ton) floor jacks since I rotate tires every 5000 miles. For the front I can slide the jack under the engine block center and there is a nice square piece that is not covered by the underbody plastic."[/B][/B]
It would appear that you are jacking the motor to lift the front end off the ground? Are motor mounts designed to be stressed in that direction? Is there a spot on the block to support a jack? I will certainly look for the a- frame spot. I have used that successfully in other vehicles.
It would appear that you are jacking the motor to lift the front end off the ground? Are motor mounts designed to be stressed in that direction? Is there a spot on the block to support a jack? I will certainly look for the a- frame spot. I have used that successfully in other vehicles.
01-28-2008, 03:36 PM
#106
MBWorld Fanatic!
I would only ever use any factory jack in a roadside tire change emergency. I keep a couple of decent (3 1/2 ton) floor jacks since I rotate tires every 5000 miles. For the front I can slide the jack under the engine block center and there is a nice square piece that is not covered by the underbody plastic."[/B][/B]
It would appear that you are jacking the motor to lift the front end off the ground? Are motor mounts designed to be stressed in that direction? Is there a spot on the block to support a jack? I will certainly look for the a- frame spot. I have used that successfully in other vehicles.
It would appear that you are jacking the motor to lift the front end off the ground? Are motor mounts designed to be stressed in that direction? Is there a spot on the block to support a jack? I will certainly look for the a- frame spot. I have used that successfully in other vehicles.
 01-31-2008, 10:06 AM
#108
MBWorld Fanatic!
Join Date: Mar 2006
Location: Louisiana
Posts: 3,254
Likes: 0
Received 12 Likes
on
12 Posts
03 E500 and Corvette
On the front I have used a block and jacked directly on the bottom of the shock tower :. Using caution to not cause a stress concentration point and going slowly. This was only so I could put a stand under the door hard points. Ok,, I know that is a not.. but it does work if you are really careful.
Besides the shock point takes all the road impact loading from the weight of the suspension but will not take a small concentrated pressure point well.
:. Using caution to not cause a stress concentration point and going slowly. This was only so I could put a stand under the door hard points. Ok,, I know that is a not.. but it does work if you are really careful.Besides the shock point takes all the road impact loading from the weight of the suspension but will not take a small concentrated pressure point well.
02-09-2008, 12:31 AM
#110
Newbie

Join Date: Dec 2007
Posts: 1
Likes: 0
Received 0 Likes
on
0 Posts
e320 2003
lift point
you guys think i can put a floor jack on the rear differential and lift it up that way so i can change brake pads on the rear ? i have done it on others cars and it no problem and was wondering if it's ok on my e320 2003 
02-09-2008, 06:49 AM
#111
MBWorld Fanatic!
Join Date: Mar 2006
Location: Louisiana
Posts: 3,254
Likes: 0
Received 12 Likes
on
12 Posts
03 E500 and Corvette
Otherwise I also use to jack on the diff but I have never jacked on the E500 diff. So others who might have could be more specific.
03-22-2008, 01:10 PM
#113
Newbie
Join Date: Mar 2008
Posts: 5
Likes: 0
Received 0 Likes
on
0 Posts
2003 E320
This was the easiest brake job I have EVER done (less than 20 minutes)...and I've done quite a few on different autos. And the cost to do this yourself is astounding ($102 vs $530 dealership quote). Here is a series of photos that may help others in their attempt.
1. Apply the parking brake, pull the hood lever, exit the car and set the key aside.
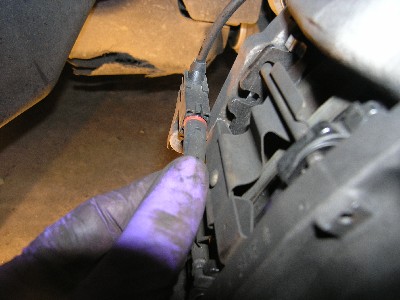
2. Open the hood a locate the SBC connector
3. Pull up the SBC Clip to unlock the connector

4. Pivot the connector backward to disengage and set aside

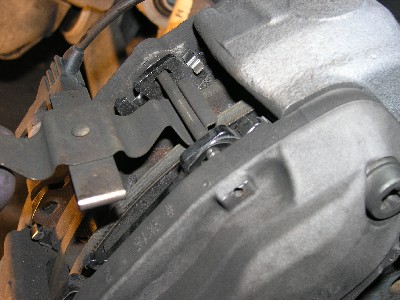
5. Lift car and remove tire. This is the before shot

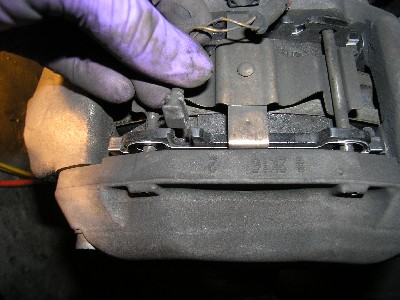
6. Unplug Brake Pad connector and sensor


7. Tap out holding pins (I used a thin drill bit and a hammer to do this)

8. Remove pad holder

9. Compress piston using c-clamp or carefully with pliers (Not much force needed). DO THIS WHILE OLD PADS ARE STILL IN THE ASSEMBLY

10. Remove pads

11. Insert new pads

12. Re-insert pins

13. Hook pad holder under first pin then press down and insert second pin
14. Replug sensor and connector. I had to used the old one since Mercedesshop did not send that sensor for this side...even though this one is still unbroken I will replace tomorrow after purchase locally
15. All Done

Hope this helps someone!
1. Apply the parking brake, pull the hood lever, exit the car and set the key aside.
2. Open the hood a locate the SBC connector
3. Pull up the SBC Clip to unlock the connector
4. Pivot the connector backward to disengage and set aside
5. Lift car and remove tire. This is the before shot
6. Unplug Brake Pad connector and sensor
7. Tap out holding pins (I used a thin drill bit and a hammer to do this)
8. Remove pad holder
9. Compress piston using c-clamp or carefully with pliers (Not much force needed). DO THIS WHILE OLD PADS ARE STILL IN THE ASSEMBLY
10. Remove pads
11. Insert new pads
12. Re-insert pins
13. Hook pad holder under first pin then press down and insert second pin
14. Replug sensor and connector. I had to used the old one since Mercedesshop did not send that sensor for this side...even though this one is still unbroken I will replace tomorrow after purchase locally
15. All Done
Hope this helps someone!
OK just one question what if you have to change out the rotor and the bracket that holds the break pads on has two stuck bolts and can not be removed. This is were I am right now I can not get the bolts to move a fraction of a millimeter they are stuck tight.
03-22-2008, 02:09 PM
#114
Super Member
Join Date: Nov 2007
Location: NY
Posts: 612
Likes: 0
Received 2 Likes
on
2 Posts
'12 Mustang 5.0, '89 Supra Turbo, C55,
I once remember a master tech. said "if you're having to struggle and apply brute force, something's wrong, and is about to break." I thought about it, and he's right. Anytime I encounter a rusted/stubborn bolt, I opt for a larger wrench/pipe/breaker bar and apply smooth, concentrated power - always works. Working in a tight area does become challenging though....
Good luck!
03-22-2008, 02:19 PM
#115
Member

Join Date: Jun 2003
Posts: 117
Likes: 0
Received 0 Likes
on
0 Posts
U can try Liquid Wrench, or PB Blaster. Be careful NOT to strip the bolt. Then go slow and if you can, put a larger pipe over the wrench/breaker bar for extra leverage.
I once remember a master tech. said "if you're having to struggle and apply brute force, something's wrong, and is about to break." I thought about it, and he's right. Anytime I encounter a rusted/stubborn bolt, I opt for a larger wrench/pipe/breaker bar and apply smooth, concentrated power - always works. Working in a tight area does become challenging though....
Good luck!
Good Luck!
 03-22-2008, 05:58 PM
#116
MBWorld Fanatic!
Join Date: Mar 2006
Location: Louisiana
Posts: 3,254
Likes: 0
Received 12 Likes
on
12 Posts
03 E500 and Corvette
One final point,, measure the rotor thickness. My guess is you don't need new rotors. If you have a small lip on the edge but are within spec just install the pads and give a easy first few braking stops to seat them. You probably don't need the rotors.
Last edited by vettdvr; 03-22-2008 at 06:02 PM.
03-23-2008, 02:29 PM
#117
Member

I think the factory always uses some type of Loctite on these bolts. Nothing wrong with the methods suggested to get the bolts out but another way I have used sometimes is an impact wrench. The pulses from the wrench are sometimes helpful in loosening a bolt. Of course, you do not want it on a full torque setting that might snap the bolt before loosening it.
06-10-2008, 01:35 PM
#118
Newbie

Join Date: Jun 2008
Posts: 18
Likes: 0
Received 0 Likes
on
0 Posts
2004 E320
I have had the "brake visit workshop" warning coming on lately. I checked all 4 corners and all of the pads have about 50% left on them. So I decided to check the sensors. The rear sensor was bad, so I replaced it. To me, it looked like a previous brake job failed to replace the sensor because there is still about 2mm before it should be tripping. Took the car for a test drive and the light came on again.
Is there something that I need to reset to get rid of the light? Any other suggestions?
2004 e 320 rwd
Is there something that I need to reset to get rid of the light? Any other suggestions?
2004 e 320 rwd
06-10-2008, 02:26 PM
#119
MBWorld Fanatic!
Join Date: Mar 2006
Location: Louisiana
Posts: 3,254
Likes: 0
Received 12 Likes
on
12 Posts
03 E500 and Corvette
It will probably reset after you drive it a while or you change oil and reset the FSS.
If it states Warning Stop Now Total SBC failure this is a different failure and a major malfunction. Don't drive if this is what you are showing.
If it states Warning Stop Now Total SBC failure this is a different failure and a major malfunction. Don't drive if this is what you are showing.
06-17-2008, 07:01 AM
#120
Super Member
I just replaced mine too.. (front and rear pads /sensors...2 front.. 1 back)
I too am still having visit stealer message......
though... I also had a problem with keyless go not working hours before I changed the pads...
am taking to the stealer tomorrow .. will update.
also... my brakes look nothing like the ones described in the pics!!! you MUST HAVE a T40 torx socket to remove the 2 pins on the back side of the calipers all the way around! (not fun having to go and run around looking for a socket set as a torx screwdriver will not remove the screws without buggering up the screw itself)
07-06-2008, 04:29 PM
#121
Newbie
Join Date: Jun 2008
Posts: 18
Likes: 0
Received 0 Likes
on
0 Posts
2004 E320
brakes
I checked the sensors again to be sure they where not causing the "brake vists workshop!" on the console. I also reset the FSS controls, and I'm still getting the warning.
One thing that may be worth mentioning; when the ignition is on but not started there is no malfunction alert. But as soon as I start the car the malfunction alert comes on.
Any other suggestions?
What did you find out at the dealer cyclrder?
One thing that may be worth mentioning; when the ignition is on but not started there is no malfunction alert. But as soon as I start the car the malfunction alert comes on.
Any other suggestions?
What did you find out at the dealer cyclrder?
07-06-2008, 04:36 PM
#122
MBWorld Fanatic!
Join Date: Mar 2006
Location: Louisiana
Posts: 3,254
Likes: 0
Received 12 Likes
on
12 Posts
03 E500 and Corvette
If you have installed the brakes correctly and sensors and still have the warning. It must be something else. Given you disabled the SBC following the SBC procedure then unplugged it prior to the work. After the work connected the sbc and reactivated the system using the door lock key.
I have not done rear pads yet but followed the procedure to the letter. I got the warning on turn on. I turned the key off, depressed the brake pedal turned the key on and the spc system ran to pressurize which moved the pads out. Turn off again then on and the alarms cleared. So if you followed the steps and still have the alarm,, take it to have the codes read then make corrections as necessary. I suppose it is possible that the brake stop light switch might have failed but lets not guess,, take it for a code read session. Best of luck.
I have not done rear pads yet but followed the procedure to the letter. I got the warning on turn on. I turned the key off, depressed the brake pedal turned the key on and the spc system ran to pressurize which moved the pads out. Turn off again then on and the alarms cleared. So if you followed the steps and still have the alarm,, take it to have the codes read then make corrections as necessary. I suppose it is possible that the brake stop light switch might have failed but lets not guess,, take it for a code read session. Best of luck.
07-06-2008, 08:24 PM
#123
Newbie
Join Date: Jun 2008
Posts: 18
Likes: 0
Received 0 Likes
on
0 Posts
2004 E320
brakes
To be clear, I did not actually install new pads as the current pads still have pleanty left. All that I did was to replace two of the three sensors which were bad.
I did however disable SBC by removing the plug on the back as described throughout this thread. And to enable it (SBC) I simply plugged it back in as described throught the thread. That is all that I did.
If there is something special that I should be doing to "reactivate the system with the door key lock" please further descibe that process. I have not read anything about reactivating other than what I described above.
Thank you in advance for any further thoughts/ideas.
07-07-2008, 04:56 AM
#124
Member

Join Date: Dec 2003
Location: CHESTERFIELD U.K.
Posts: 78
Likes: 0
Received 1 Like
on
1 Post
E320 CDI W211
Brake warning
Ok here goes.>>>>>
I had this problem the car went in times to resolve this problem.
new sensors new wireing harness all to no avail resolving the problem.
Finealy it was the brake light switch that operates the rear brake warning lights that was not working
Check the threads on this site.
Les Chesterfield U.K.
I had this problem the car went in times to resolve this problem.
new sensors new wireing harness all to no avail resolving the problem.
Finealy it was the brake light switch that operates the rear brake warning lights that was not working
Check the threads on this site.
Les Chesterfield U.K.
07-07-2008, 08:16 AM
#125
MBWorld Fanatic!
Join Date: Mar 2006
Location: Louisiana
Posts: 3,254
Likes: 0
Received 12 Likes
on
12 Posts
03 E500 and Corvette
To be clear, I did not actually install new pads as the current pads still have pleanty left. All that I did was to replace two of the three sensors which were bad.
I did however disable SBC by removing the plug on the back as described throughout this thread. And to enable it (SBC) I simply plugged it back in as described throught the thread. That is all that I did.
If there is something special that I should be doing to "reactivate the system with the door key lock" please further descibe that process. I have not read anything about reactivating other than what I described above.
Thank you in advance for any further thoughts/ideas.
I did however disable SBC by removing the plug on the back as described throughout this thread. And to enable it (SBC) I simply plugged it back in as described throught the thread. That is all that I did.
If there is something special that I should be doing to "reactivate the system with the door key lock" please further descibe that process. I have not read anything about reactivating other than what I described above.
Thank you in advance for any further thoughts/ideas.
I am confused. Why were 2 of 3 sensors bad and only sensors replaced?
What caused these sensors to fail?


