
My W212 subwoofer install
 01-05-2016, 04:53 PM
#1
MBWorld Fanatic!
Thread Starter

My W212 subwoofer install
I installed this Rockford Fosgate 10 inch pre-loaded / amplified subwoofer in the trunk of my E550. The model is P300-10.
Props to RNBRAD who originally posted and figured out the way to tap the signals from the factory amp.
https://mbworld.org/forums/e-class-w...-complete.html
I would love a custom box like his, but time is limited, and this seems like a pretty clean and easy solution. He also left out a few detail tips that I will show here.
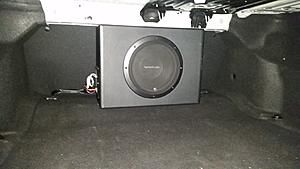
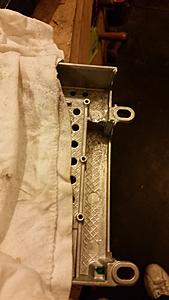
I was worried that the box would not fit behind the back seat, as my measurements showed about 1/4" too little space between the floor and the metal frame. I decided to try it anyway. I was able to overcome this obstacle by cutting the plastic legs on the plastic floor panel below the area of installation. I marked the legs and cut off about 1/2 inch in the end. Here you can see:
After putting the plastic panel back for a test fit, the chosen sub fit nice and snug up against the back seat. The angle is slightly different, so the top touches, and the bottom has a couple inches of space behind it.
On my model, the battery is in the front, so I had to run a power cable all the way back, along with the remote wire for the remote gain control which I put in the glove box. I ran these down the right side door sill area.
I removed the trunk threshold plate (tip: the piece surround the latch comes out by sliding flat toward the front of the car) and the left side trunk liner panel, then removed the stereo amplifier.
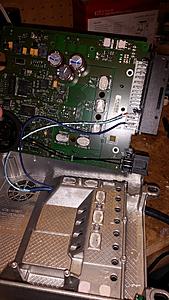
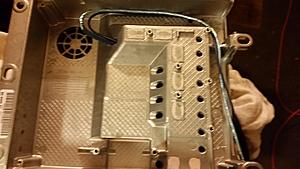
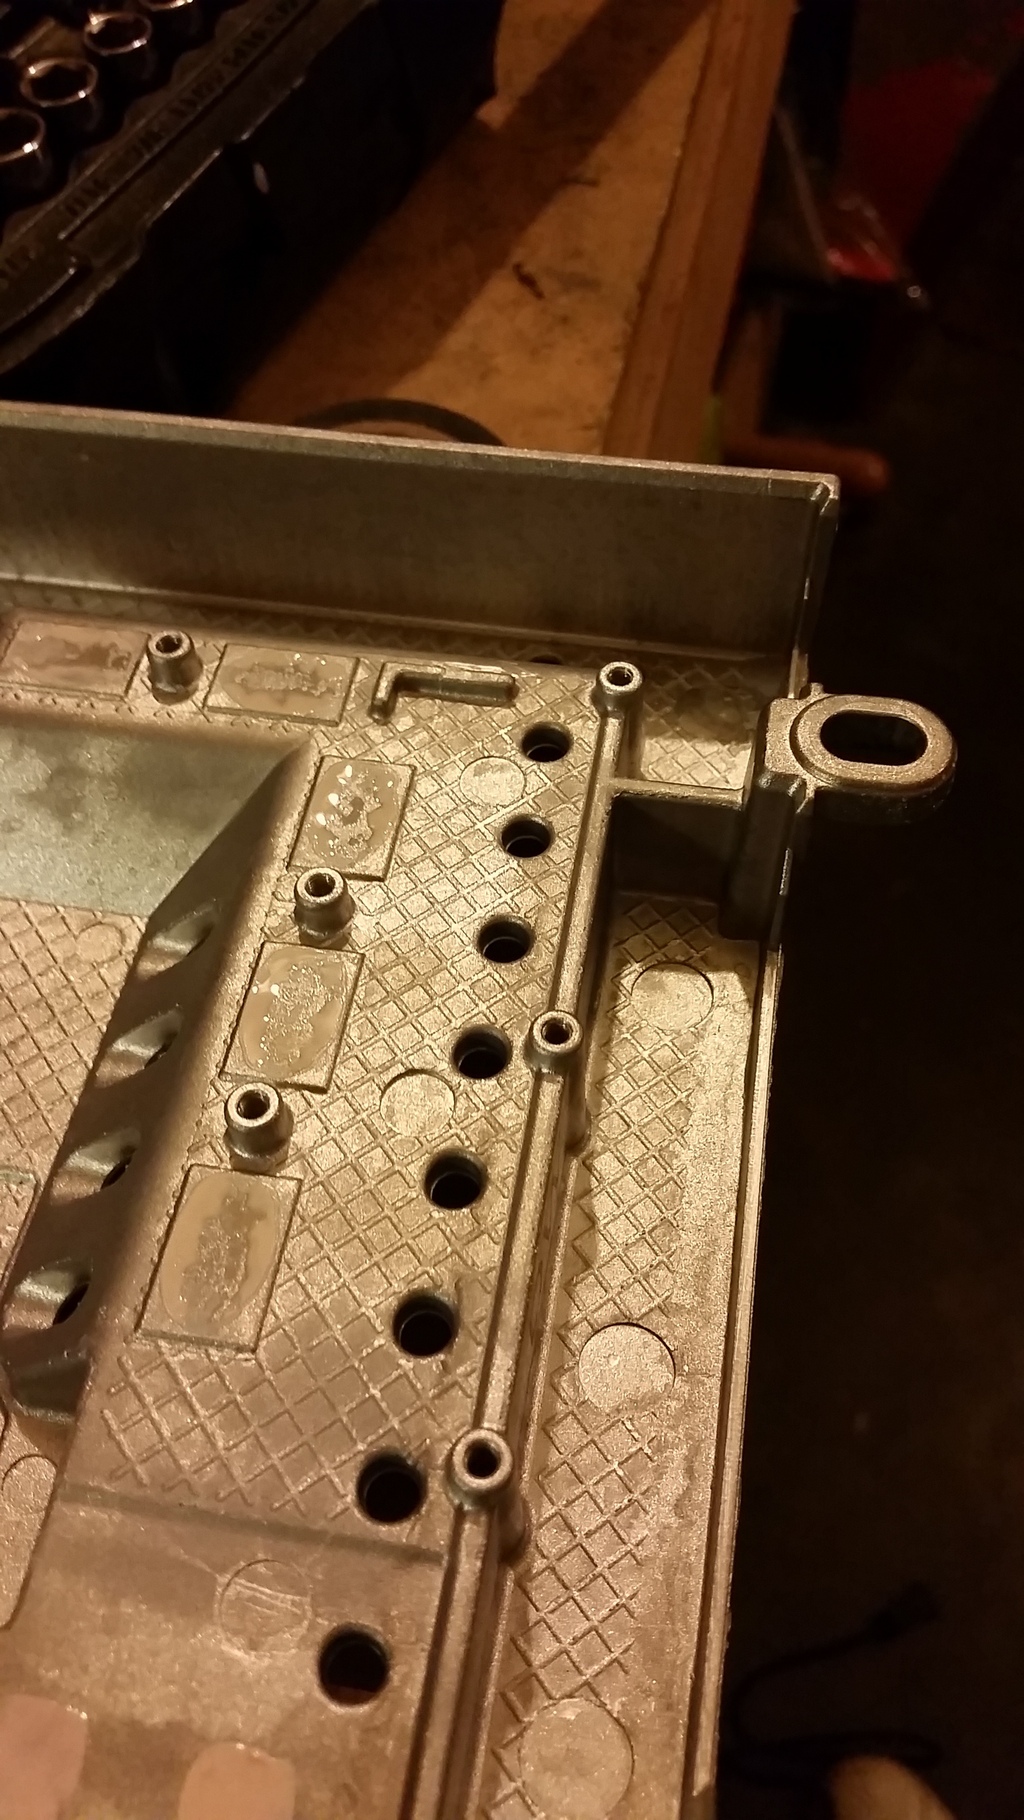
I used the same signal pins as RNBRAD posted, and it worked flawlessly. The details that were left out is exactly how to get the wires to exit the amp. As you will see in the next pics, the amp board comes out of the metal housing, which is actually a heat sink. There are multiple chips that stick to the housing with thermal paste for proper cooling. This close contact leaves little room for the wires to pass, and they have to be run properly within the amp to allow this cooling contact, and not to interfere with the fan or anything else.
I used a 6ft single RCA (split the pair) and peeled back the rubber jacket about 6 inches. I left the shielding in place. I ran this slim wire, plus the blue 18ga turn-on signal wire through a hole in the face of the amp. I pulled about 1" of rubber jacket through the hole to protect from the metal where the wire passes through.
Here you can see the wires coming through, and soldered to the back connector pins.
The most important point here is the routing of those wires. I had to dremel out a notch in the metal that separates the two connector areas to allow the wires to follow this path. Before and after pics:
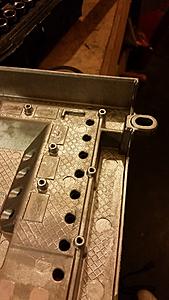
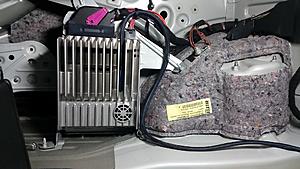
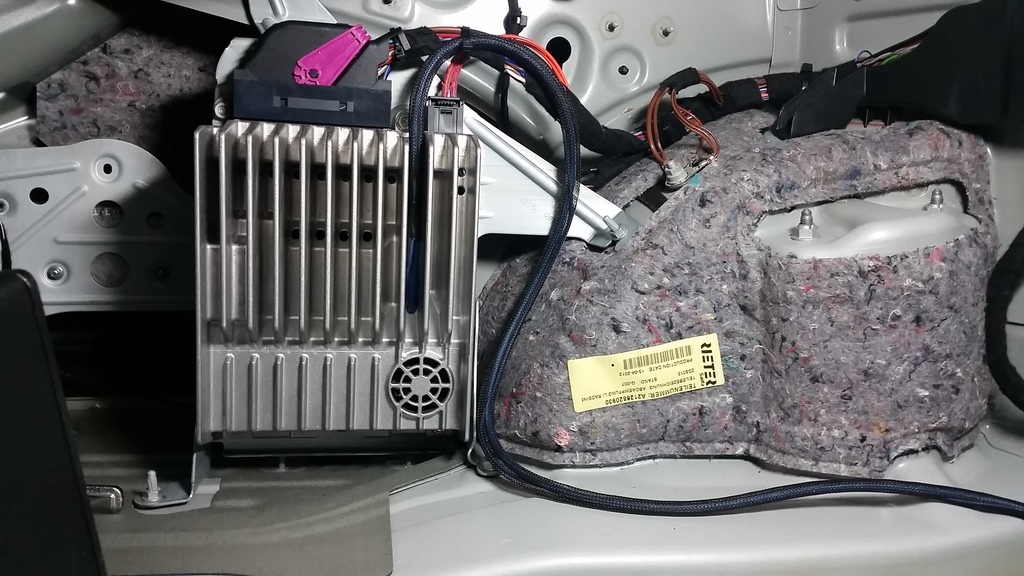
While dropping the board back into the heat sink casing, it's very important to guide the wires into this path, or the chips will not contact the heat sink side and could over-heat, and the whole thing just won't fit together with the wires in the wrong place.
Now you see the amp back together, and secured with the new wires coming out. I wrapped them in some braided jacket material and guided them along the original wiring trays toward the seat back.

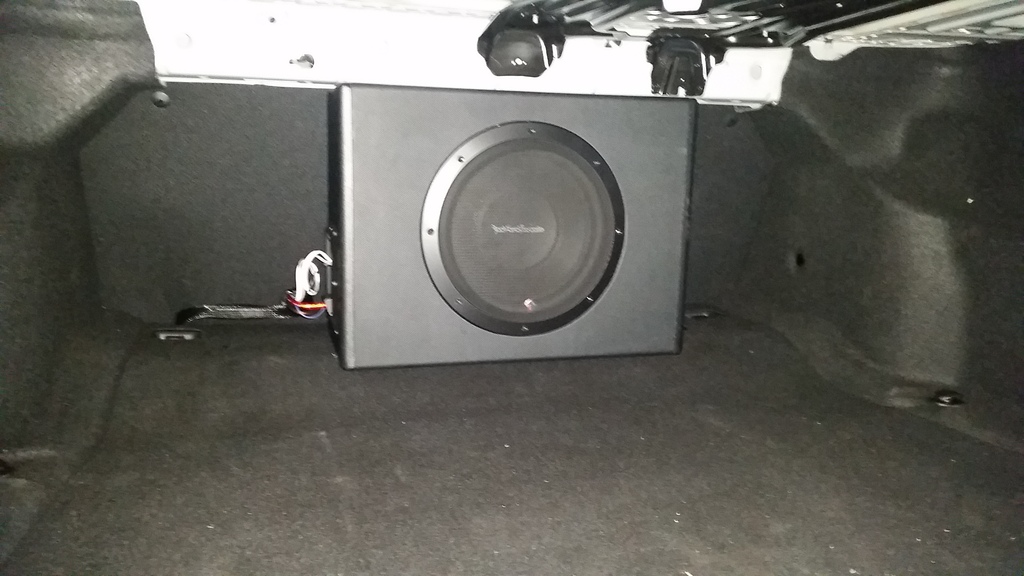
after putting everything back together nicely, it looks like the first pic. I'll try to get a better overall pic, but it was late and dark.
The subwoofer fired up without a hitch. I drove around a bit today and tweaked the gain and crossover levels. I'm currently running it just below 1/2 gain, and it complements the original HK system pretty nicely. So far, I found that I like it better with the original sub disconnected. The original just pumps in little bass with bad sound quality.
For under $200 I think this is a must for anyone who owns this car and enjoys music.
Props to RNBRAD who originally posted and figured out the way to tap the signals from the factory amp.
https://mbworld.org/forums/e-class-w...-complete.html
I would love a custom box like his, but time is limited, and this seems like a pretty clean and easy solution. He also left out a few detail tips that I will show here.
I was worried that the box would not fit behind the back seat, as my measurements showed about 1/4" too little space between the floor and the metal frame. I decided to try it anyway. I was able to overcome this obstacle by cutting the plastic legs on the plastic floor panel below the area of installation. I marked the legs and cut off about 1/2 inch in the end. Here you can see:

After putting the plastic panel back for a test fit, the chosen sub fit nice and snug up against the back seat. The angle is slightly different, so the top touches, and the bottom has a couple inches of space behind it.
On my model, the battery is in the front, so I had to run a power cable all the way back, along with the remote wire for the remote gain control which I put in the glove box. I ran these down the right side door sill area.
I removed the trunk threshold plate (tip: the piece surround the latch comes out by sliding flat toward the front of the car) and the left side trunk liner panel, then removed the stereo amplifier.
I used the same signal pins as RNBRAD posted, and it worked flawlessly. The details that were left out is exactly how to get the wires to exit the amp. As you will see in the next pics, the amp board comes out of the metal housing, which is actually a heat sink. There are multiple chips that stick to the housing with thermal paste for proper cooling. This close contact leaves little room for the wires to pass, and they have to be run properly within the amp to allow this cooling contact, and not to interfere with the fan or anything else.
I used a 6ft single RCA (split the pair) and peeled back the rubber jacket about 6 inches. I left the shielding in place. I ran this slim wire, plus the blue 18ga turn-on signal wire through a hole in the face of the amp. I pulled about 1" of rubber jacket through the hole to protect from the metal where the wire passes through.
Here you can see the wires coming through, and soldered to the back connector pins.

The most important point here is the routing of those wires. I had to dremel out a notch in the metal that separates the two connector areas to allow the wires to follow this path. Before and after pics:


While dropping the board back into the heat sink casing, it's very important to guide the wires into this path, or the chips will not contact the heat sink side and could over-heat, and the whole thing just won't fit together with the wires in the wrong place.
Now you see the amp back together, and secured with the new wires coming out. I wrapped them in some braided jacket material and guided them along the original wiring trays toward the seat back.

after putting everything back together nicely, it looks like the first pic. I'll try to get a better overall pic, but it was late and dark.
The subwoofer fired up without a hitch. I drove around a bit today and tweaked the gain and crossover levels. I'm currently running it just below 1/2 gain, and it complements the original HK system pretty nicely. So far, I found that I like it better with the original sub disconnected. The original just pumps in little bass with bad sound quality.
For under $200 I think this is a must for anyone who owns this car and enjoys music.
 01-05-2016, 08:56 PM
#3
Senior Member
Looks like a nice neat install, but begs a question. Instead of opening up the assembly and splicing internally, why didn't you access the signal off the harness that goes in from the outside? Wouldn't that have been easier to splice into?
01-06-2016, 07:27 PM
#4
Member

^^ I'd also like to know the answer to this...is there no way to tap into the harness from outside the case?
Thanks for posting this - and the link to the other install. For a couple hundred dollars I'm going to roll the dice on this.
Thanks for posting this - and the link to the other install. For a couple hundred dollars I'm going to roll the dice on this.
01-06-2016, 08:20 PM
#5
MBWorld Fanatic!
Thread Starter
I'm sure you could split the loom and tap the wires, but I've found the taps to be unreliable, and I don't want to cut the wires. Solder is always the best contact option.
01-06-2016, 08:37 PM
#6
Member
Thanks, I am going to try to cut outside of the unit then...I'll still keep the factory connections, just splicing in my new wiring, will be soldered and then I'll use heat shrink tubing to wrap them. Then to uninstall later I can just de-solder and re-shrink wrap.
01-12-2016, 07:30 PM
#7
Super Member
Good idea on shortening the floor legs, most people would of scrapped the idea right there. As for tapping the signal internally, you must really despise a splice due to the extra effort but kudo's regardless, I dig it and you did a really good job!!!
On a side note, you can use the blue crimp splicers that won't cut your wires and they are reliable. I've never had a splice go bad from one, been using them for 20 yrs. I just wouldn't use them in a nominal power situation where resistance could be a problem.
On a side note, you can use the blue crimp splicers that won't cut your wires and they are reliable. I've never had a splice go bad from one, been using them for 20 yrs. I just wouldn't use them in a nominal power situation where resistance could be a problem.
Trending Topics
01-12-2016, 08:55 PM
#8
MBWorld Fanatic!
Thread Starter
The blue crimp over splices are only somewhat reliable when you have 16ga or very close wire. I've never found them for smaller wire. The RCA wires are very thin, and the turn on wire I used was more like 20ga. Scraping off a little insulation and soldering is a better idea, but a pain to do inside the trunk.
I disconnected the original sub, so maybe you could tap those wires at the sub end connector, stick some little connector into the plug.
I disconnected the original sub, so maybe you could tap those wires at the sub end connector, stick some little connector into the plug.
01-23-2016, 10:47 PM
#9
Member
Just got mine today! Any good starting points for the switches?
Gain (assuming start low and work my way up depending on sound/distortion)?
X-Over (assuming lower is more bass)?
Bass Boost?
Phase 0-180 (guessing use 0)?
Input level lo/hi?
Gain (assuming start low and work my way up depending on sound/distortion)?
X-Over (assuming lower is more bass)?
Bass Boost?
Phase 0-180 (guessing use 0)?
Input level lo/hi?
01-23-2016, 11:03 PM
#10
MBWorld Fanatic!
Thread Starter
Phase 0
Input low if you wire this way
Bass boost off, all the way down
Gain about 1/4 - 1/3 to taste
X-over about 100-120, near center of dial.
The remote controls the gain if connected; the actual gain dial is disabled.
I have the bass on the stereo about 3/4 up, like +4 or 5, and the treble neutral. Logic 7 off for music. Sounds great. If you use the bass boost on the sub it just causes distortion. Also disconnected the original sub because it make distorted sound.
01-30-2016, 05:16 PM
#12
Member
Well I've had mine in for almost a week now. Extremely easy install...I tapped into the small brown & white wires for signal (outside of factory amp), and the medium sized black wire for signal turn-on. I spliced them, soldered all connections, and shrink wrapped them with my heat gun and some shrink tubing.
Amp power was taken from the ECO battery junction adjacent to my spare tire, and factory grounding point near spare tire was used to ground the amp. The only wire I've routed into the cabin is the adjustable remote so I can turn the bass off (or up and down).
I also unplugged factory sub.
Thanks for the ideas and help - very useful for those who want to add a bit of punch on occasion, for very little money. Since I listen to mostly talk radio, but enjoy a good sound when I actually listen to music, this was the perfect solution.
 10-18-2016, 08:06 AM
#14
MBWorld Fanatic!
Thread Starter
The 12 inch box is much larger it definitely won't fit in the same space. I'm only using about 1/3 gain on the 10 inch the 12 inch wood far overpower the rest of the factory system.
10-18-2016, 08:44 AM
#15
Super Member
10-18-2016, 08:52 AM
#16
MBWorld Fanatic!
Thread Starter
10-28-2016, 01:59 PM
#17
I got the 10" and am paying $80 to have it installed. I guess I forgot to get the gain control knob/remote as well.
Is that, right? Where are yall buying the remote gain control knob?
Is that, right? Where are yall buying the remote gain control knob?
10-28-2016, 06:35 PM
#18
MBWorld Fanatic!
Thread Starter
the remote gain control comes with the sub. I have it in the glove box, but I never touch it. if I want to turn down the bass, I do it through the radio settings.
10-28-2016, 09:55 PM
#19
I'll take pics of it tomorrow
At first I had a problem with the woofer muting the entire system for about 3-4 seconds and it'd come back on.
So I took it back to the shop, they installed a RCA line converter and that seemed to fix the problem but when the owner wanted to charge $100 for that I balked, had him uninstall the part and I drove off. Never had a muting problem since.
Go figure.
I didn't disconnect the stock woofer. Will this pose problems?
Can this be done?
Install guy didn't think I could disconnect the stock woofer and still have the external one work.
10-30-2016, 09:38 AM
#20
MBWorld Fanatic!
Thread Starter
well I'm curious how they tapped the audio signal for your install. Did you show them this thread for instructions? hard to say, since you just gave them money and don't really know how it was done. Only $80 to install it sounds cheap, I would expect more based on my time and skill to do this properly.
I disconnected the plug to the bottom of the stock sub in the deck area, easy to get from the trunk.
I disconnected the plug to the bottom of the stock sub in the deck area, easy to get from the trunk.
10-30-2016, 11:22 AM
#21
Member
It would be interesting to see where they are getting signal...and I'd unplug the stock sub (takes 3 seconds or less) to test if new sub shuts off (you can also look at the stock wiring to the sub to see if they mistakenly tapped it from there). If they tapped in the wrong spot, you may be missing out on a better-sounding sub.
Strange they wanted $80 for your entire install...and then $100 for an RCA adapter.
Strange they wanted $80 for your entire install...and then $100 for an RCA adapter.
11-19-2016, 03:46 PM
#22
It would be interesting to see where they are getting signal...and I'd unplug the stock sub (takes 3 seconds or less) to test if new sub shuts off (you can also look at the stock wiring to the sub to see if they mistakenly tapped it from there). If they tapped in the wrong spot, you may be missing out on a better-sounding sub.
Strange they wanted $80 for your entire install...and then $100 for an RCA adapter.
Strange they wanted $80 for your entire install...and then $100 for an RCA adapter.
Mine barely squeezes below the rear deck and actually the rear deck keeps it snugly in place because it sandwiches the box in there.
I don't have a Dremel so it took maybe 25 seconds on each leg with a two dollar hacksaw to do the job. I cut half an inch off of each leg.
11-21-2016, 09:08 AM
#23
Super Member

Join Date: Feb 2013
Location: Maryland
Posts: 580
Likes: 0
Received 62 Likes
on
61 Posts
2013 E550 4Matic
Has anyone tried getting a harness to fit the wiring going to the stock sub to get the signal through an actual plug, rather than T-tapping or soldering the signal wire? I would be interested in that... 100% reversible if the car ever goes up for sale, and wouldn't involve splicing into the stock sub cable.
12-10-2016, 12:36 PM
#24
Super Member
Has anyone tried getting a harness to fit the wiring going to the stock sub to get the signal through an actual plug, rather than T-tapping or soldering the signal wire? I would be interested in that... 100% reversible if the car ever goes up for sale, and wouldn't involve splicing into the stock sub cable.
12-11-2016, 01:17 AM
#25
Super Member
For those of you that have cut down the legs, How much do you think is the maximum we could remove and still have it sit back in place? I'd go check but would need to remove my enclosure and it's snowing/below zero right now 


