When you click on links to various merchants on this site and make a purchase, this can result in this site earning a commission. Affiliate programs and affiliations include, but are not limited to, the eBay Partner Network.
Help after water pump install oil mixing with coolant
Hey all, I�m hoping to get some help here. I recently changed the leaking water pump in my x166 with the 4.7 motor. I got everything done and put back together started it up and everything seemed good. Then I noticed my coolant tank filling up with oil I immediately shut my engine off and took the water pump back off to inspect. My question is this: is there an oil passage on this water pump? I looked at my old one and the small passage on the very bottom farthest from the propeller had oil in it. I�m hoping it is an oil passage and maybe I just didn�t tighten the water pump down properly and the oil leaked through the gasket into the coolant. It was not like this before I did the water pump. Thank you
There is an oil cooler on front cover. It is one easy way of oil going to coolant. Try to take it off, check it, and change gasket. If won't help there is a two seal between front cover and block but you will have to pull engine out to change it.
The oil cooler to front cover gasket is another known issue; changed out 2 so far. The material used ablates in your hand when removed, kinda similar to the crappy water pipe (plasticky cardboard ****e) material used. Confirmed when I asked dealer how many of these were in stock.
Be meticulous and take your time in removing oil cooler using direct visualization throughout entire process preferably with LED flashlight. Protect internals from material chunks falling into internal both passages.
Of course antifreeze needs to be drained, would suggest removing most, verify diagnosis of only the gasket is the problem, then remove all of remaining antifreeze. Flush.
While you�re in there and if time permits suggest back flushing heater core to rid of the �pearls� MB used (search heater blows hot then cold thread). Same for turbo cooling circuit as the fluid color will surprise you.
Keeping this fluid clean/changed is a vastly understated item imho.
Take your time with it & hopefully the gasket only is the issue.
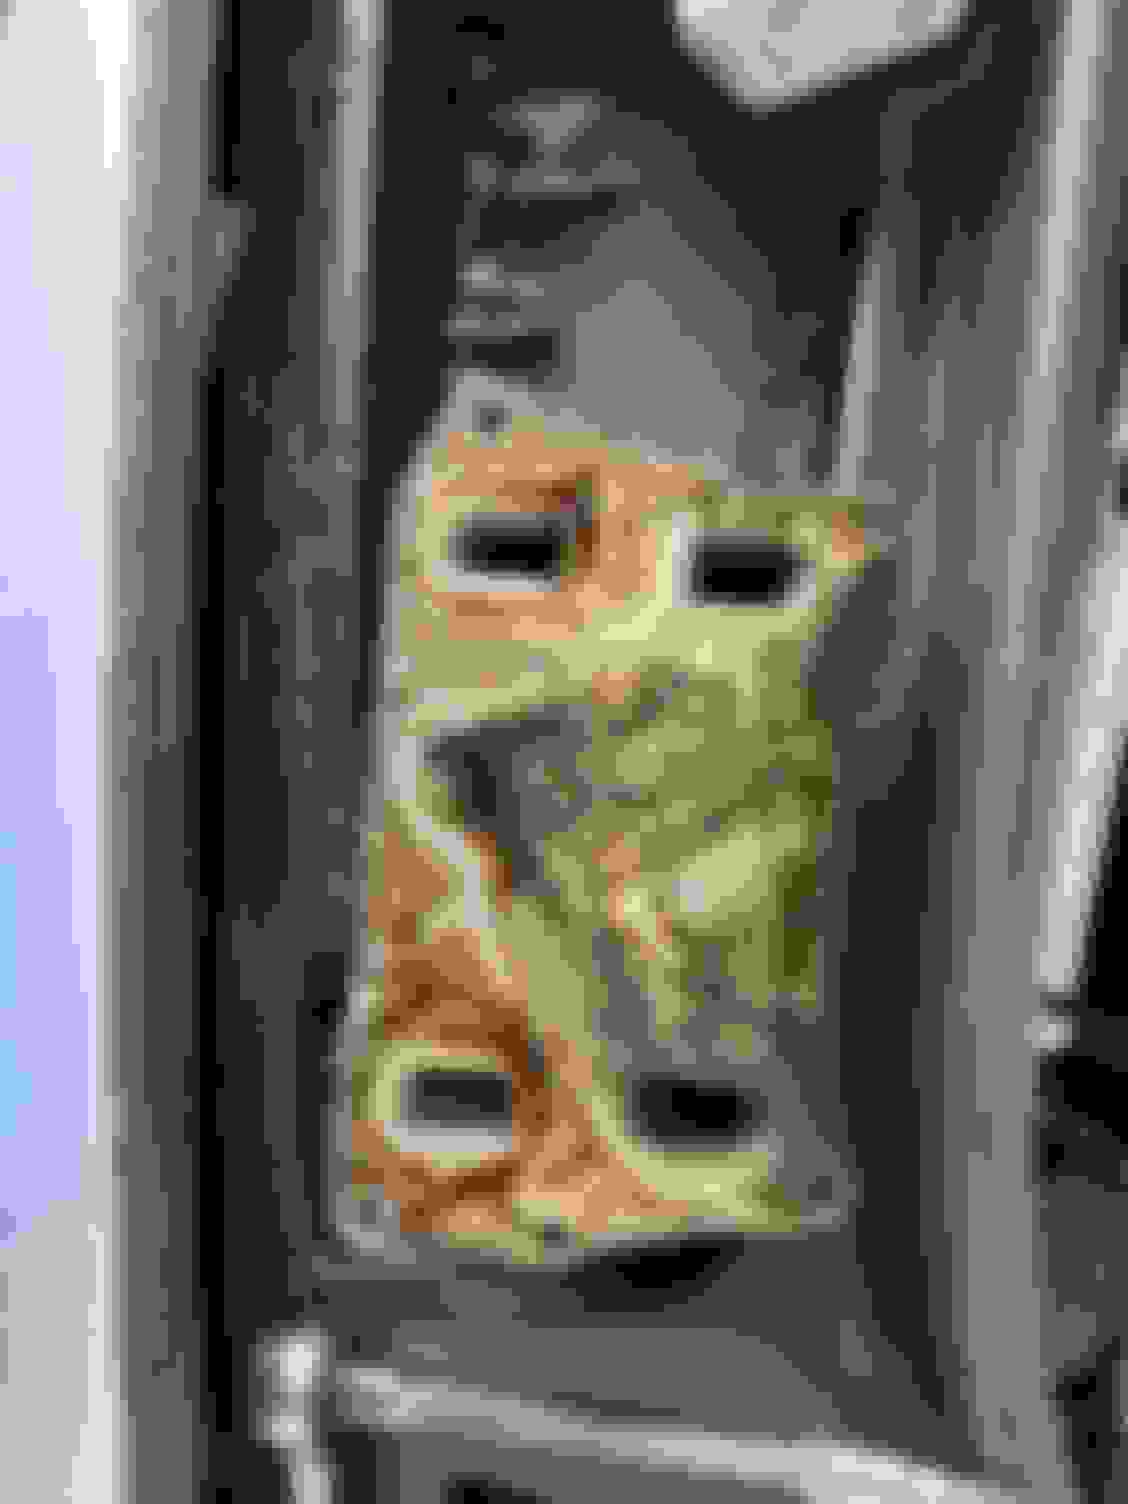
So I did what you all suggested and removed the oil cooler. I�m really not sure what I�m looking at here so I included some pictures. The gaskets do not appear to be cracked. But it looks like oil has gotten around them.
I�m sorry about my ignorance to this but it�s my first time. Thank you all for the help
It is difficult to discern anything from these 2 photos.
What you�re looking for is evidence of an interaction b/w oil & coolant. This occurs usually at the gasket interfaces. Closely inspect part to look for witness lines of any kind, indicating one fluid breaking free from its intended passages. Do NOT wipe the surface with a rag as this will remove a light witness line, until you�ve learned what�s going on. Perform same on engine side surface. Use a bright & small LED light, move the part through different angles to see a different perspective. A lot of this will be judgement - are you seeing what you think you�re seeing? Try to come to a judgement as to whether this is a good part or needs replacing.
Another tack�.
What�s the color of the coolant? Remove caps from both main coolant reservoir on drivers side and turbo reservoir under the center plastic engine cover. Look for signs of oil in either. Keep in mind these reservoirs tend to discolor & look blackish from coolant hose wear being deposited on the sides & bottom.
Conversely, remove oil cap & view underside - see anything milky white or old-bubbly-milk-looking-stuff?
Big picture here is fluids are mixing most likely and you have to determine where this is coming from; oil cooler, head gasket, cracked block, etc.
Anyone else want to chime in here regarding most likely scenario?
Note: when installing the oil cooler, pay meticulous attention to the cleanliness of the sealing surfaces. Remove any gasket lumps & bumps from sealing surfaces by using a razor blade in a backwards scraping motion, NOT a forward motion as sometimes a divot can be made with a sharp edge from the blade. Clean with acetone on a microfiber towel. No flat blade screwdrivers.
Note: when you lean on car to work on it sometimes more antifreeze will drip out of passages - plan so as to not have to clean sealing surfaces twice.
If you pay attention in your picture you will see two clear channels - those are for coolant, and two oily channels - those are for oil. One of the oil channels looks oily clean where another one look milky - where oil already got mixed with coolant. I would suggest to clean everything with brake cleaner as a beginning, then figure out what holes in oil cooler for coolant close one and apply pressure in another to check if your oil cooler is not busted inside. If it is not busted change gasket and put back
I only see four bolt holes and two dowel pin holes. To me I would check your cover for flatness with a straight edge. It doesn't take much of a gap for stuff under pressure to start leaking. A lot of gasket there to squish, to me a possible design flaw, as a machinist I would have put a fifth bolt somewhere in the centre just to make sure the cover stayed down against the block. With only 4 bolts around the perimeter the pressure to seal the ports is going to diminish towards the centre, it is going to lift in the centre slightly when trying to squish the seals. My .02 cent opinion.
Bob
Mercedes SLR McLaren 722 S Is Extremely Rare Example Modified by McLaren
Slideshow: A one-of-one U.S.-spec Mercedes-Benz SLR McLaren Roadster became even rarer after a factory-backed transformation at McLaren's headquarters.