When you click on links to various merchants on this site and make a purchase, this can result in this site earning a commission. Affiliate programs and affiliations include, but are not limited to, the eBay Partner Network.
..... ... Maybe tape it up there with some blue tape to see if it might bug you like it does to me. Anyway, when I get the time to rewire mine, I plan to move it to the blue box (just make sure it clears the wiper in the video footage. Rear 1ch viofo
For the front, I have a similar issue. I placed it in an area where I can see it and it bothers me. I also mounted it without looking at the recording/footage so part of my image is actually blocked by the rearview mirror/stereo camera housing (very little but enough to bug me). Anyway I plan to move my front camera to the blue box location (behind the mirror) so it's more hidden from the driver's perspective. Front 1ch viofo
If I recall, I don't think I have any GPS issues with either cameras (acoustic package as well). I'll try to double check tomorrow.
I used your suggestion and use some gaffers tape to check the locations before starting hardwiring.
I drove a mile in all directions into a setting Sun and was impressed.
However, when I reviewed the video and checked the data, I saw that the speed was off quite a bit. When I'd come to a stop it would gradually slow down to about 9 mph but never zero.
So I'll try it again with the receiver in the designated IR open spot, to see if the speed is more accurate before I stick everything together.
I've also decided to use those static cling stickers instead of direct tape to the windshield, because I will probably get a new windshield in a few months.
Now to get courage to remove a panel or two. Think I'll start at the upper rear.
I was delayed twice for 2 hours in the past two months, for wrecks involving distracted and impaired drivers.
This ended my personal debate, and I bought two two-channel Viofo 4k's for two cars (That's a lot of 2's!)
All the photos and procedures on this thread are invaluable, and I'm about to start installing.
However, I haven't removed a panel in 15 years, and it always seemed like I broke one clip before I got the hang of it.
Where should I start to get confidence with my panel removal?
For the front, start with the panels next to the glove box (with the door open). That would be the easiest (at least to me) and allow you to route the cables at the bottom.
Originally Posted by mikapen
Also - I have IR Acoustic glass, and can never really see the grid up by the mirror. How sensitive are the GPS monitors that are in the base of those cameras? If I straddle a grid line will it confuse the GPS? (I had difficulty with my toll pass and ended up with it in the sunroof.)
GPS will works, but it might affect the signal quality. Use a flashlight to shine the light at the spot, try different angles to find the location.
One Issue (on my latest dashcam replacement) I notice is that you want to position the camera lens so that it is facing just below the box, otherwise it the "opening grip" does affect the video quality. (I already installed mine with lens facing the grip and notice "noise" on the video)
Originally Posted by mikapen
Edit- what do you do about the rear camera, vs. the Diversity Antenna?
Either by interfering with the signal strength or the view?
Diversity antenna V167 SUV
I always have my rear camera right under the antenna location and I don't notice any issue related to signal strength. The "problem" i have is that no matter which line you position the camera, there is always one or two lines that are in the field of view of the camera. Just try to position the rear camera so that the line is not directly in the middle of the video view.
One other thing I just thought of, make sure the cameras are within the swipe of your wiper blades so that you maintain a clear image when the car is dirty or it's raining.
For the front, start with the panels next to the glove box (with the door open). That would be the easiest (at least to me) and allow you to route the cables at the bottom.
GPS will works, but it might affect the signal quality. Use a flashlight to shine the light at the spot, try different angles to find the location.
One Issue (on my latest dashcam replacement) I notice is that you want to position the camera lens so that it is facing just below the box, otherwise it the "opening grip" does affect the video quality. (I already installed mine with lens facing the grip and notice "noise" on the video)
I always have my rear camera right under the antenna location and I don't notice any issue related to signal strength. The "problem" i have is that no matter which line you position the camera, there is always one or two lines that are in the field of view of the camera. Just try to position the rear camera so that the line is not directly in the middle of the video view.
Thanks.
Can you be more specific about the "opening grip?"
Or the bolded text above, in general?
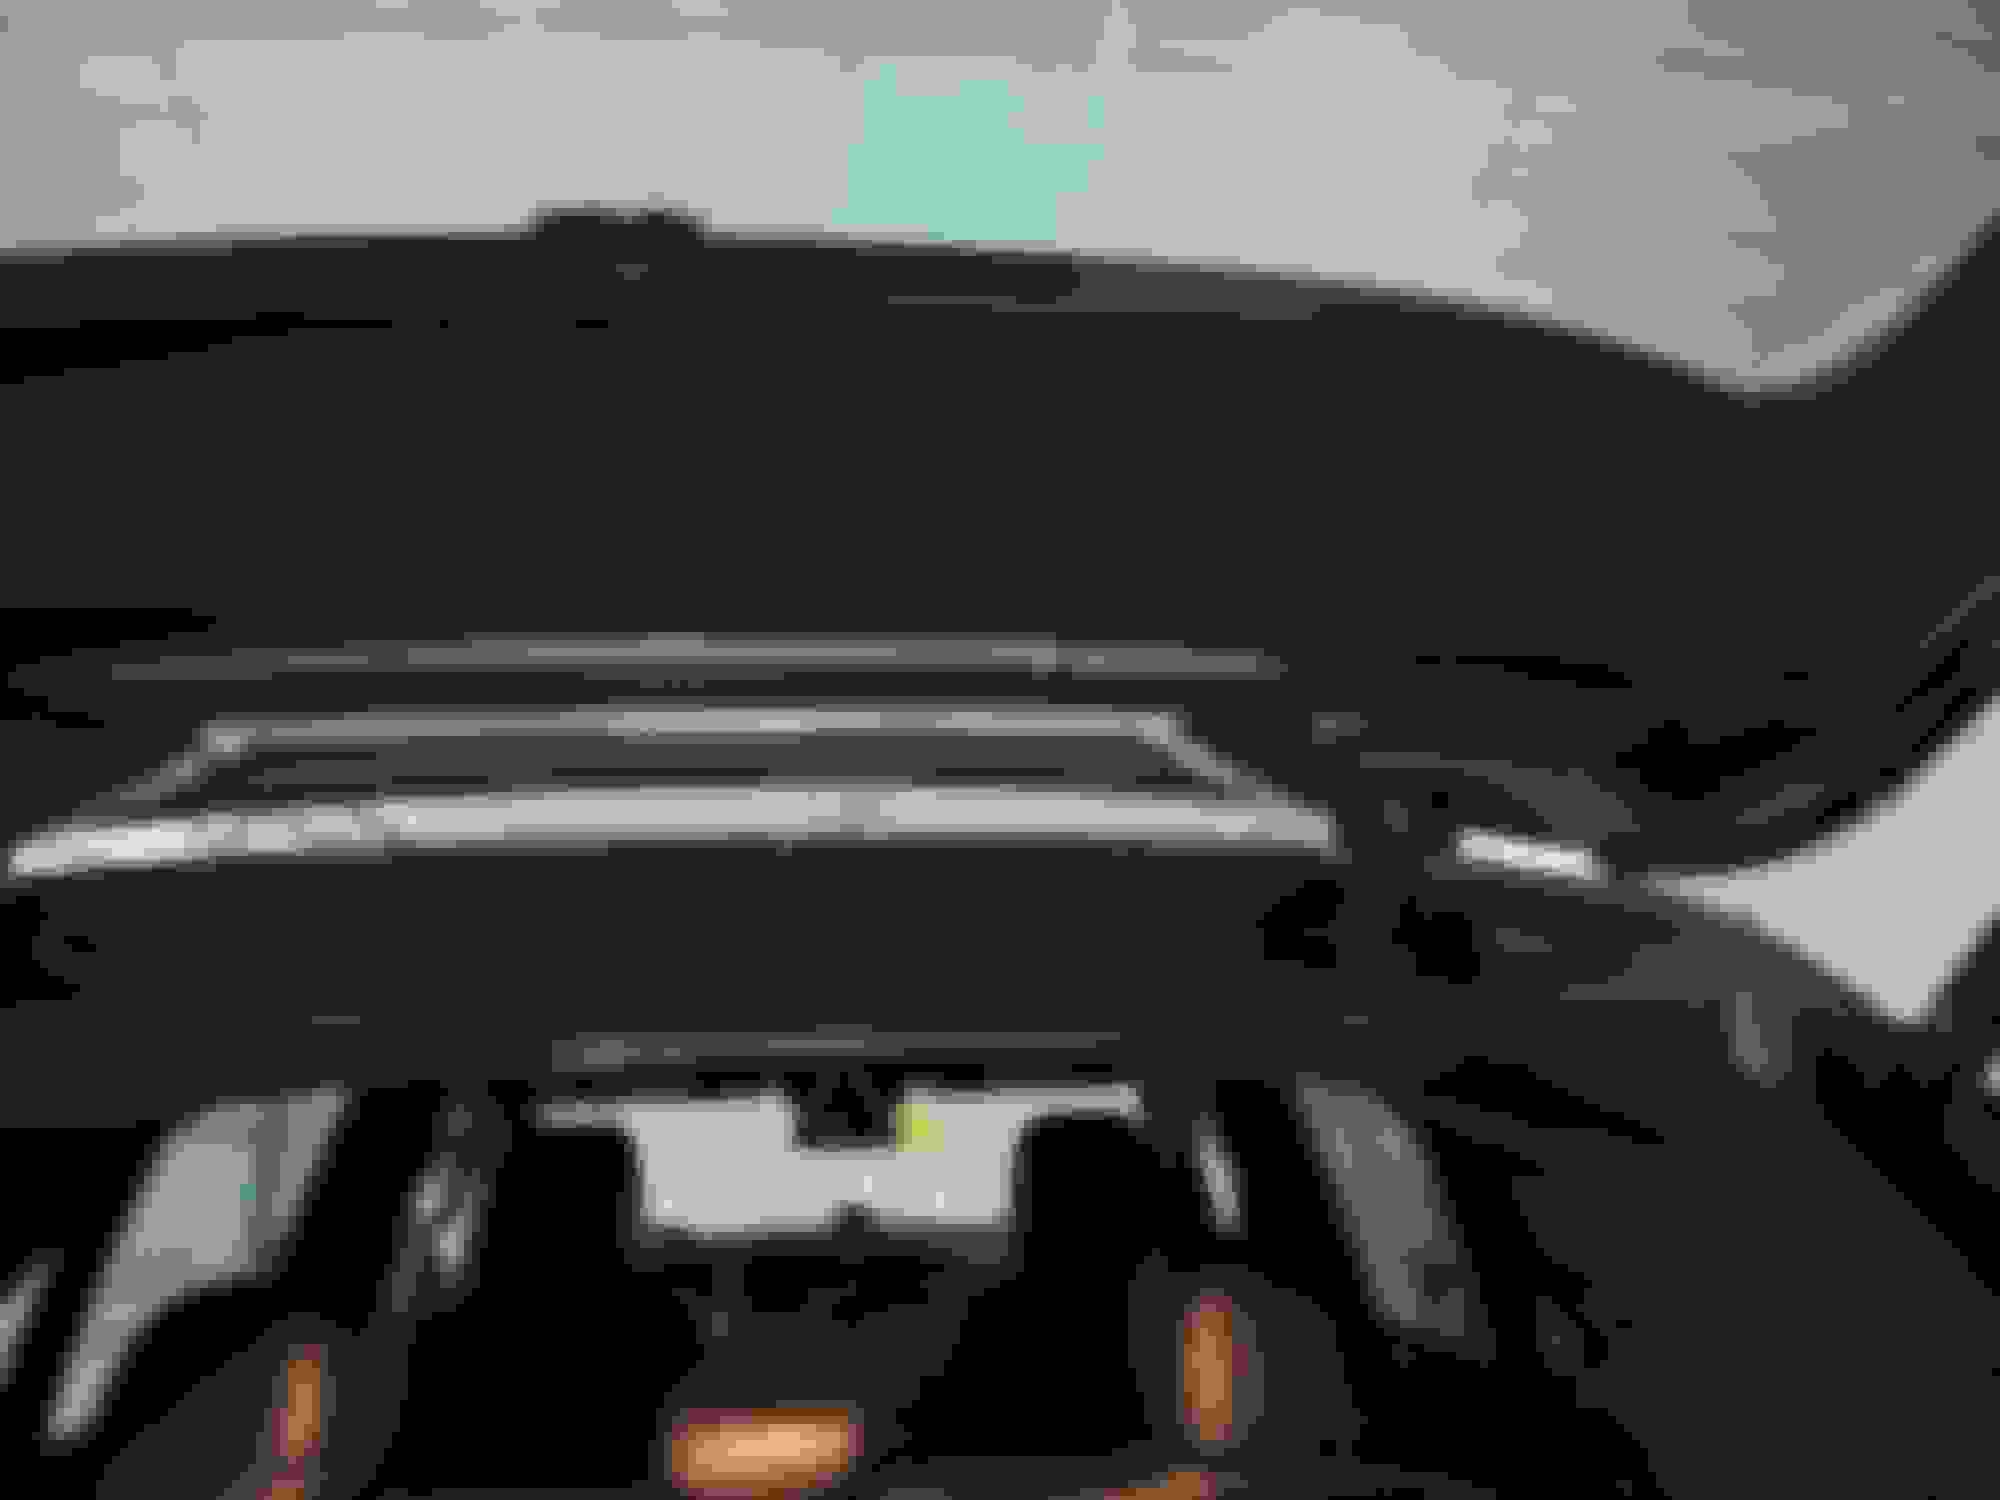
I was surprised when I went out to continue my dash cam installation, that the lighting was just right for me to see the outlines of the acoustic windshield grid that allows radio waves.
Distinct and clear!
So I taped it off so I could measure and photograph the area for future reference.
So here is my picture with measurements. And somehow the flash got the grid even more distinctly.
Thanks.
Can you be more specific about the "opening grip?"
Or the bolded text above, in general?
I haven't move the camera yet so I wasn't sure if it is the location issue or if it is the camera issue.
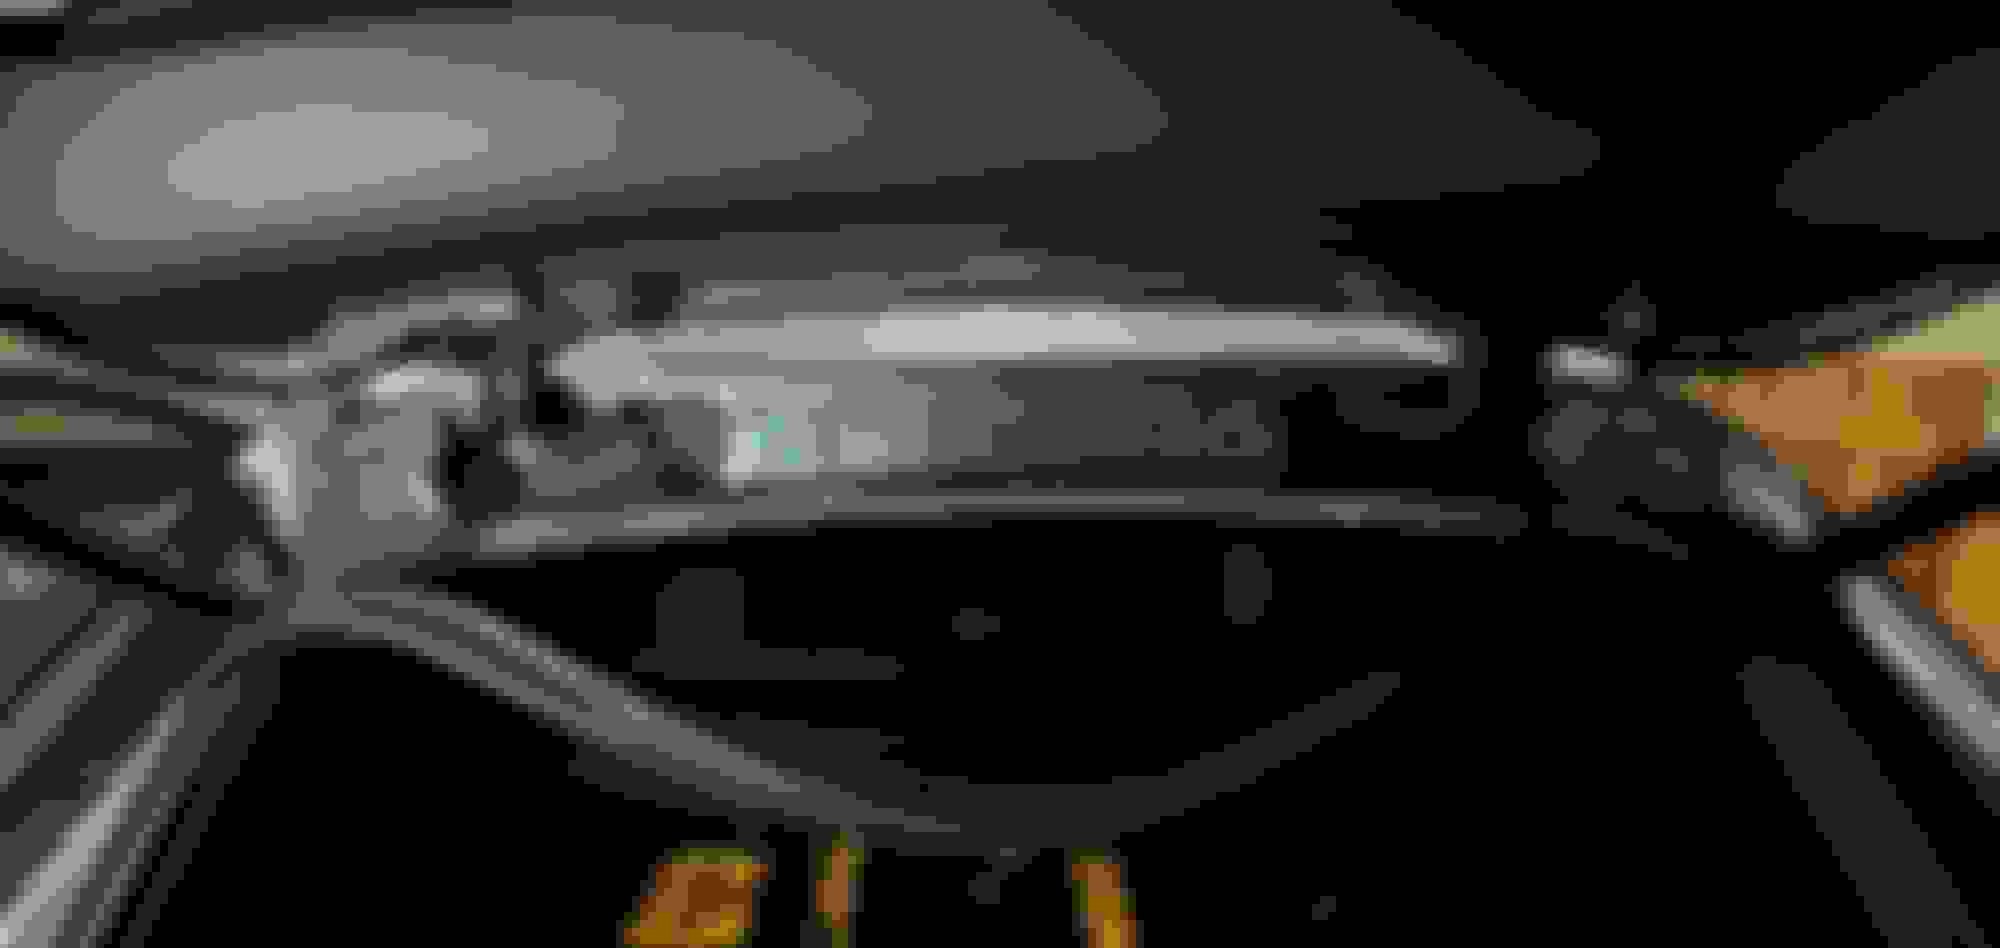
What I notice is that on the new camera, I notice some "weird" effect. I have attached the full size snap of the video, notice the weird pattern on the road and some "grip" like effect. I think that might be due to the grip that allows signal to pass through.
I haven't move the camera yet so I wasn't sure if it is the location issue or if it is the camera issue.
What I notice is that on the new camera, I notice some "weird" effect. I have attached the full size snap of the video, notice the weird pattern on the road and some "grip" like effect. I think that might be due to the grip that allows signal to pass through.
I don�t notice much, but that arm phone mount is sure obtrusive.
I haven't move the camera yet so I wasn't sure if it is the location issue or if it is the camera issue.
What I notice is that on the new camera, I notice some "weird" effect. I have attached the full size snap of the video, notice the weird pattern on the road and some "grip" like effect. I think that might be due to the grip that allows signal to pass through.
That's interesting. It must be that mesh in the acoustic package cutout behind the rearview mirror causing that. Zoomed in and it's very noticeable so I wonder how that might affect the capture of a license plate in a high speed scenario, possibly making it grainy enough to make it unreadable? This makes me feel like it would be better to preserve unadulterated image quality vs getting a GPS signal in the cutout.
Does your camera have any lens filters? Just curious because I also notice the vent reflection and I wonder if a polarized filter would reduce that. Not sure if blackvue sells that but here's a 3rd party one, kind of pricey though. Viofo sells this for around $10 for their cameras.
CPL Filter Compatible with BlackVue DR970X-1CH Plus Series Dashcam https://a.co/d/bqSy4nv Zoomed in: notice the tight parallel, diagonal lines described as "grip"
My previous DR900S-2CH has a CPL filter and it does reduce reflection, but at the cost of making everything slightly darker. I haven't seen one for the 970x plus yet.
I am thinking to move the camera slightly lower so that the lens is just below the "cut out" but still allow the top of the camera to be directly below it so it.
Last edited by zengshengliu; Dec 8, 2024 at 08:32 AM.
This might be due to the change in shape of the "plus" model which have the lens slightly closer to the windshield.
Yes I thought it was the defroster vent. I'm sure it's not like that all the time anyway.
I think I might move mine to my previous post above outlined with the blue box. I also have part of my image cut off from the mirror's housing so I need to move it anyway.
The main reason I would like to move it is so that I don't see the camera from the driver's perspective, even though it's harder to verify the camera is functioning with each drive; I'll just spot check it from time to time. I have a strong OCD with having a clean windshield (same with my sunglasses) so anything blocking my view is bothersome to me, especially a dirty windshield but also a small dashcam in the periphery. 🤣
I haven't move the camera yet so I wasn't sure if it is the location issue or if it is the camera issue.
What I notice is that on the new camera, I notice some "weird" effect. I have attached the full size snap of the video, notice the weird pattern on the road and some "grip" like effect. I think that might be due to the grip that allows signal to pass through.
I just positioned my Cam with the GPS base in the IR open grid, with the lens below. Hoping for more accurate GPS and sharp videos. Pics later.
But here's a better pic of the 2021 Acoustic Windshield grid.
I wonder what the science behind this is.
Resurrecting on old-ish thread here because I am stuck with a dashcam install on my 2020 GLE450! I am attempting to hardwire a BlackVue DR970X-1CH Plus (single ch.), somewhat similar to @zengshengliu and @shotgun_banjo .
Before I was running a no-name chinese dashcam which fed off the mirror light supply. That has 3 wires: brown, yellow, and green. The noname worked off green and brown only and shut off with engine shutoff.
The BlackVue has black, red, and yellow wires. I tried with the mirror wiring and that won't power on. Tried with the rain sensor wiring too, but that simply turns on the wipers and gets an error message displayed.
Not sure how to connect it all here. I am certain that either the mirror supply or the rain sensor supply should work but not sure how to connect the wires exactly as colors don't match.
Mirror lights: brown, yellow, green. Rain sensor: brown, yellow (with a gray stripe), red (with a black stripe). BlackVue: black, yellow, red. The mirror makes the most sense to me as it is dead upon shutoff.
Anyone here know which colors should connect to what? Thanks!
Last edited by RedHotPepper; Jan 31, 2025 at 09:25 AM.
Resurrecting on old-ish thread here because I am stuck with a dashcam install on my 2020 GLE450! I am attempting to hardwire a BlackVue DR970X-1CH Plus (single ch.), somewhat similar to @zengshengliu and @shotgun_banjo .
Before I was running a no-name chinese dashcam which fed off the mirror light supply. That has 3 wires: brown, yellow, and green. The noname worked off green and brown only and shut off with engine shutoff.
The BlackVue has black, red, and yellow wires. I tried with the mirror wiring and that won't power on. Tried with the rain sensor wiring too, but that simply turns on the wipers and gets an error message displayed.
Not sure how to connect it all here. I am certain that either the mirror supply or the rain sensor supply should work but not sure how to connect the wires exactly as colors don't match.
Mirror lights: brown, yellow, green. Rain sensor: brown, yellow (with a gray stripe), red (with a black stripe). BlackVue: black, yellow, red. The mirror makes the most sense to me as it is dead upon shutoff.
Anyone here know which colors should connect to what? Thanks!
Black= ground which we all know
Yellow = Battery
Red = Acc
i would assume that yellow goes to your power (always on) and the red (acc) connects to a switched power supply so the camera knows when the vehicle is on or off and to enable park mode.
You can tie together the yellow and red wires and connect them to a switched power source (fuse tap) and the black to a good ground.
Thanks my understanding of the BlackVue wiries is the same as you posted. What I am not understanding is how to connect those to the mirror light feed, for example.
If I recall correctly, MB used brown for ground? Maybe black Vue would go to brown MB, yellow Vue to yellow MB, and red Vue to green MB? (again, this is the mirror feed)?
I'd make sure your current requirements don't exceed the wiring capacity. The new sensors available today are power hungry. I had to use a larger USB-C cable (not hardwired) because my Viofo won't even fire up with standard C's.
I wouldn't hardwire to anything other than a fuse box tap. And then I'd have to trust the low voltage cutoff setting, and hope that when I chose 12.2V it actually shut off at 12.2.
Maybe I'm too cautious, maybe not.
Thanks my understanding of the BlackVue wiries is the same as you posted. What I am not understanding is how to connect those to the mirror light feed, for example.
If I recall correctly, MB used brown for ground? Maybe black Vue would go to brown MB, yellow Vue to yellow MB, and red Vue to green MB? (again, this is the mirror feed)?
Thanks. I tried connecting to the mirror feed as follows (black, red, yellow is the Vue wiring and Brown, Green is MB wiring):
Black to Brown
Red+Yellow to Green
= starts recording but reboots every 10 secondsBlack to Brown
Red to Green
= nothing
Black to Brown
Yellow to Green
= nothing
So Black on Vue is Ground and that is correctly connected to Brown on MB.
Tying Red+Yellow on Vue together and connecting to Green on MB whould give constant current.
Not sure why it's misbehaving, whether it's some sort of voltage sensitivity or sdcard issue.
I will try another card...
Last edited by RedHotPepper; Jan 31, 2025 at 12:08 PM.
Thanks. I tried connecting to the mirror feed as follows (black, red, yellow is the Vue wiring and Brown, Green is MB wiring):
Black to Brown
Red+Yellow to Green
= starts recording but reboots every 10 secondsBlack to Brown
Red to Green
= nothing
Black to Brown
Yellow to Green
= nothing
So Black on Vue is Ground and that is correctly connected to Brown on MB.
Tying Red+Yellow on Vue together and connecting to Green on MB whould give constant current.
Not sure why it's misbehaving, whether it's some sort of voltage sensitivity or sdcard issue.
I will try another card...
That seems correct to me so I guess you're left with wiring it elsewhere unfortunately.
Definitely try a different SD card (or try reformatting it).
I see similar issues before with mine when there is issue with SD card which cause the camera to constantly reboot.
Well is was, in fact, the SD card. I was trying a SAMSUNG PRO Endurance 256GB MicroSDXC Memory Card which was causing the problem.
Swapped to the BlackVue card that came with the dashcam and it works! So, to reiterate for anyone who discovers this thread later:
I tapped into the wiring that goes into the mirror. Camera is BlackVue DR970X-1CH Plus with black / yellow / red cabling.
I tied yellow & red together and spliced into the Mercedes green wire. BlackVue's black wire went to the Mercedes brown wire.
Had a big difficulty to fish the cable following the directions below.
Any trick to push the metal strip through?
How big is the small gap between the glass and trim?
Was the metal strip more close to the glass or the trim to push through?
At what angle was the metal piece to push, from middle point of the trim upper edge to the rubber opening below the trim (about 30 degree), or from the trim upper edge right above the rubber opening to the ribber opening (90 degree)?
Behind the trim is there open space to push the metal strip, or a specific hole or path to push through?
Thanks!
"For the final set of cable, I did not remove the trim piece (since it will take a long time to try to do it safely). Instead, I use a plastic pry tool to open up a small gap, then use a piece of metal I have laying around (on most wiper with open "frame" model, it has two metal strip on each side of the wiper rubber, I use that) and push the metal through (from window to the rubber tube opening), tape the cable to it, and pull it back."
Originally Posted by zengshengliu
Aww I see.
It took me close to 2 hours to fix that, but that is probably because i was taking time removing the trim piece (yellow circle), and trying to fish the cable through the other side (blue line). It also takes some time to fish the cable through the rubber tube (red circle).
For rubber tube (sorry don't know the name), it would be easier if you pull the tube out from both end, and collapse it as much as you can in the middle before trying to get the wire through.
For the trim piece, that took me the longest, partially because I didn't want to damage it, and didn't know where the clip location is. I have a picture below with green circle showing where it is so you know where to "pull" from. (make sure you don't lose the "rubber" washer on the clip on the back side of the trim piece.
For the final set of cable, I did not remove the trim piece (since it will take a long time to try to do it safely). Instead, I use a plastic pry tool to open up a small gap, then use a piece of metal I have laying around (on most wiper with open "frame" model, it has two metal strip on each side of the wiper rubber, I use that) and push the metal through (from window to the rubber tube opening), tape the cable to it, and pull it back.
Make sure you have enough length of cable before doing all that. I have extra and tug it inside the fuse box panel
It will take you some time to get it done properly, but you will definitely like the end result.
I just gave up on my Viofo rear camera, asking myself "why do I need a rear camera anyway?"
Then I decided to return the entire kit. Although it's nice to have recordings Just In Case I need to defend my actions or liability, I thought that the camera was ugly and demanded too much windshield real estate, especially because I have Acoustic Glass which dictates positioning. And the wiring / battery supply to enable parking vigilance was yet another point of failure. Maybe if I parked on the street in Big City I'd have a different take on the situation.
My Escort is useful a couple times a week, so it stays. I don't bother stashing / hiding it when parked.
Mercedes SLR McLaren 722 S Is Extremely Rare Example Modified by McLaren
Slideshow: A one-of-one U.S.-spec Mercedes-Benz SLR McLaren Roadster became even rarer after a factory-backed transformation at McLaren's headquarters.