When you click on links to various merchants on this site and make a purchase, this can result in this site earning a commission. Affiliate programs and affiliations include, but are not limited to, the eBay Partner Network.
There has been quite a few posts I've read concerning ML350 electronic ignition switches (EIS) P/N 203.545.06.08 and no communication with other modules on MB CAN when th smart key is inserted. I have found an issue with my recently purchased 2010 ML350 BlueTEC. The problem started when I drove to Florida last week and the car sat in the sun for about a week. When I first tried to start her, the smart key turned but no dash lights, seat & steering column memory function. I opened the doors and aired out the car for a few hours in the evening and to my surprise, it restarted fine. This problem reoccurred a few times throughout my trip and occurred again today back here in Quebec (temperature 66 F). I understand a few folks here on MBWorld had or have the same experience and had to have the dealer replace the EIS (sometimes after a dealer second key program) requiring new EIS, smart key(s) and coding/programming. I also know that "Hacks" to bypass the system are frowned upon by MB purists. I wasn't about to part with $1600 CDN for the dealer to replace said switch after the cost of towing the vehicle 50 Kilometers on a dolly(stuck in park).
So, here's what I've found and repairs some switches for those who are handy and have basic tools(sorry no photos). First, to get the ignition switch out does not require dashboard disassembly on an ML. You only need telescope the column all the way out & raise it. Second, pull the steering accordion (column dash filler) toward the steering wheel. Its held on by snap locks which release easily. Once the cover releases, pull it all the way up the column. Third, using a wide blade standard screw driver (plastic trim tool) rotate the ignition switch escutcheon (trim ring) counter clockwise until the EIS releases into the dash pad. Fourth, reach in through the opening at the base of the steering column where you previously removed the cover. Grab the EIS module and rotate it so you can observe the 2 harness connectors. Using needle nosed pliers, through the ignition mounting hole, disconnect the 2 plugs. Now you can pull the EIS module out though the steering column gap (after rotating the switch a little to clear). A quick diagnose is to place the EIS module in the freezer for 20 minutes then pull the 2 connectors through the dash panel mounting hole, reconnect them to the chilled switch outside the dash and retry start up sequence (this also can be performed by spraying the back of the module using electronic component freeze or canned air (CO2) held upside down. Another test would be warming the EIS with a hair drier. This will prove what I've found with said defective switches, cold solder joints. Fifth, With the EIS module on a bench (kitchen table) carefully pry the rear cover off the EIS module using feeler gauge blades placed under the lock tabs. Next, carefully pry the printed circuit board out of the EIS module by un-clipping the locking tabs. Make sure you pull the PC board straight out to avoid breaking the inside 3 terminal plug (white in color). What you may find is the white connector plug that connects the outer PC board has stayed connected to the inside terminals of the module (this has come un-soldered (fractured) from the main PC board causing your failure). The fact is, that this is technically a "cold solder" connection thus affected by heat/cold. Sixth, pull the white connector(3 pin) out of the module housing and re-solder it the the PC main board. While you're inside the module, using a Q-tip, clean the infra red receptor chip in the middle of the main PC Board located on the inside facing part of the PC board (its aligned with the clear plastic lens in the middle gear mechanism of the module (this repairs intermittent communication issues). I suspect this is the problem most EIS rebuilders face when reconditioning bad switches. You can retest the repaired switch with the 2 plugs still passed through the mounting hole in dash pad. Once repaired, reverse the disassembly process. The repair doesn't require new EIS coding or key programming. I also suspect this issue occurs more frequently in the warmer, dustier climates. Saves wallet bleeding and visit to your favorite MB dealer. Enjoy!
This worked for me. A lot easier than I thought. Took it to a iPhone repair shop and they fixed it for $70 Thank you!
I removed the EIS on our 2010 ML350 bluetec yesterday and took it to a first-class electronic repairman (who is truly a genius) in Bartlesville for re-soldering. He charged $45.00. He mentioned a failure point that I don't remember from prior posts. He said that as well as the white block (shown in previous picture) being completely de-soldered from the PC board, the microswitch on the board was also de-soldered. This is something to check if the re-soldering is DIY, or to pass on to your technician if you farm the re-soldering out. I did get a few scrapes on my left arm when the EIS fell into the open space next to the GPS and I had to retrieve it. THANKS, THUMBDOCTOR FOR THE EXCELLENT TUTORIAL
This worked for me too!
Thanks guys
Saved me over $1500!!!!
I have a MY11 R300 and had the same problems. The car would start first thing in the morning when I turned the key but later in the day it would take numerous tries to have the car recognise the key and start the car
Took out the EIS as described though I had to fiddle a bit to remove it from under the steering wheel
The 3 pin white connector on the circuit board completely broke away when I opened the EIS (noobie me )
I then brought the board and white connector to have it soldered by a local expert electrician and then reinstalled the EIS
Havent had any problems since
This worked for me. A lot easier than I thought. Took it to a iPhone repair shop and they fixed it for $70 Thank you!
my white connector seems pretty fixed in there so do I ask the guy to solder the back side of the board or do I gently pull out the white connector - thank you
Now: '04 C320 Evolution Coupe Previous: VW GTI 1.8T
Can someone please provide some tips on how to turn the ignition chrome ring to unlock the EIS listed in step 2? I am still struggling with it after two hours. I have a x164 Gl450. Thank you so much.
Can someone please provide some tips on how to turn the ignition chrome ring to unlock the EIS listed in step 2? I am still struggling with it after two hours. I have a x164 Gl450. Thank you so much.
In lieu of the proper tool at the bottom of PDF #1, use needle nose pliers at the two points indicated in PDF #3 and simultaneously turn to the left.
Last edited by Maj. Dundee; Feb 8, 2021 at 11:01 AM.
Now: '04 C320 Evolution Coupe Previous: VW GTI 1.8T
Originally Posted by Maj. Dundee
In lieu of the proper tool at the bottom of PDF #1, use two pocket screwdrivers at the two points indicated in PDF #3 and simultaneously turn to the left.
This was super helpful thank you. My dumbass still couldn't do it with the screwdrivers and ended up getting the tool from Amazon for $12.
Thanks to everyone else that provided detailed instructions and pictures as well. I also had the broken connector and did the soldering myself.
There has been quite a few posts I've read concerning ML350 electronic ignition switches (EIS) P/N 203.545.06.08 and no communication with other modules on MB CAN when th smart key is inserted. I have found an issue with my recently purchased 2010 ML350 BlueTEC. The problem started when I drove to Florida last week and the car sat in the sun for about a week. When I first tried to start her, the smart key turned but no dash lights, seat & steering column memory function. I opened the doors and aired out the car for a few hours in the evening and to my surprise, it restarted fine. This problem reoccurred a few times throughout my trip and occurred again today back here in Quebec (temperature 66 F). I understand a few folks here on MBWorld had or have the same experience and had to have the dealer replace the EIS (sometimes after a dealer second key program) requiring new EIS, smart key(s) and coding/programming. I also know that "Hacks" to bypass the system are frowned upon by MB purists. I wasn't about to part with $1600 CDN for the dealer to replace said switch after the cost of towing the vehicle 50 Kilometers on a dolly(stuck in park).
So, here's what I've found and repairs some switches for those who are handy and have basic tools(sorry no photos). First, to get the ignition switch out does not require dashboard disassembly on an ML. You only need telescope the column all the way out & raise it. Second, pull the steering accordion (column dash filler) toward the steering wheel. Its held on by snap locks which release easily. Once the cover releases, pull it all the way up the column. Third, using a wide blade standard screw driver (plastic trim tool) rotate the ignition switch escutcheon (trim ring) counter clockwise until the EIS releases into the dash pad. Fourth, reach in through the opening at the base of the steering column where you previously removed the cover. Grab the EIS module and rotate it so you can observe the 2 harness connectors. Using needle nosed pliers, through the ignition mounting hole, disconnect the 2 plugs. Now you can pull the EIS module out though the steering column gap (after rotating the switch a little to clear). A quick diagnose is to place the EIS module in the freezer for 20 minutes then pull the 2 connectors through the dash panel mounting hole, reconnect them to the chilled switch outside the dash and retry start up sequence (this also can be performed by spraying the back of the module using electronic component freeze or canned air (CO2) held upside down. Another test would be warming the EIS with a hair drier. This will prove what I've found with said defective switches, cold solder joints. Fifth, With the EIS module on a bench (kitchen table) carefully pry the rear cover off the EIS module using feeler gauge blades placed under the lock tabs. Next, carefully pry the printed circuit board out of the EIS module by un-clipping the locking tabs. Make sure you pull the PC board straight out to avoid breaking the inside 3 terminal plug (white in color). What you may find is the white connector plug that connects the outer PC board has stayed connected to the inside terminals of the module (this has come un-soldered (fractured) from the main PC board causing your failure). The fact is, that this is technically a "cold solder" connection thus affected by heat/cold. Sixth, pull the white connector(3 pin) out of the module housing and re-solder it the the PC main board. While you're inside the module, using a Q-tip, clean the infra red receptor chip in the middle of the main PC Board located on the inside facing part of the PC board (its aligned with the clear plastic lens in the middle gear mechanism of the module (this repairs intermittent communication issues). I suspect this is the problem most EIS rebuilders face when reconditioning bad switches. You can retest the repaired switch with the 2 plugs still passed through the mounting hole in dash pad. Once repaired, reverse the disassembly process. The repair doesn't require new EIS coding or key programming. I also suspect this issue occurs more frequently in the warmer, dustier climates. Saves wallet bleeding and visit to your favorite MB dealer. Enjoy!
Really want to thank thumbdoctor for posting this. my 2011 R350 would often take many tries to start, but only on very hot days when it got to around 90 degrees inside the car. Problem was slowly getting worse, sometimes taking minutes of trying before getting any response from turning the key. Was able to remove the ignition switch through the steering column. Everything was exactly as thumbdoctor describes. I soldered the connector back on (soldered both sides of the connector to make it rock solid). Everything is working perfectly now. I'm so grateful for forums like this that save us from getting soaked by MB dealers for what really amounts to a manufacturing defect.
Last edited by Jeff Wong; Jun 15, 2019 at 07:29 PM.
Excellent instructions! I was experiencing the same issues of no dash lights and no start when turning the key. After the fifth or sixth try, it would finally recognize the key and start. I removed the EIS a couple of weeks ago, pulled the circuit board, and found the three connections on one side of the white connector had broken loose. A local computer/cell phone repair place was able to solder the three broken connections and also strengthened the three on the other side. It's been working flawlessly since. Hopefully the pics are attached.
Broken 3 pin connector
Sorry it's not clear, but this is after the connection was soldered.
I removed my EIS and the exact same problem with the broken 3 pin connector. Took it to an electronics shop and reattached in about 5 minutes. .
But I also recommend you check the other cold solder connections on the back side of the board for the pins ( extending on the opposite side of the board) on the board for the other two wire harnesses that plug into the EIS.
I found that these solder joints were also weak and about to fail. .
I made the repair and so far in one week, no recurrence of the issue.
nice easy repair. Combined time from disassembly, driving to the electronic shop and back for reinstall.about 2 hours.
There has been quite a few posts I've read concerning ML350 electronic ignition switches (EIS) P/N 203.545.06.08 and no communication with other modules on MB CAN when th smart key is inserted. I have found an issue with my recently purchased 2010 ML350 BlueTEC. The problem started when I drove to Florida last week and the car sat in the sun for about a week. When I first tried to start her, the smart key turned but no dash lights, seat & steering column memory function. I opened the doors and aired out the car for a few hours in the evening and to my surprise, it restarted fine. This problem reoccurred a few times throughout my trip and occurred again today back here in Quebec (temperature 66 F). I understand a few folks here on MBWorld had or have the same experience and had to have the dealer replace the EIS (sometimes after a dealer second key program) requiring new EIS, smart key(s) and coding/programming. I also know that "Hacks" to bypass the system are frowned upon by MB purists. I wasn't about to part with $1600 CDN for the dealer to replace said switch after the cost of towing the vehicle 50 Kilometers on a dolly(stuck in park).
So, here's what I've found and repairs some switches for those who are handy and have basic tools(sorry no photos). First, to get the ignition switch out does not require dashboard disassembly on an ML. You only need telescope the column all the way out & raise it. Second, pull the steering accordion (column dash filler) toward the steering wheel. Its held on by snap locks which release easily. Once the cover releases, pull it all the way up the column. Third, using a wide blade standard screw driver (plastic trim tool) rotate the ignition switch escutcheon (trim ring) counter clockwise until the EIS releases into the dash pad. Fourth, reach in through the opening at the base of the steering column where you previously removed the cover. Grab the EIS module and rotate it so you can observe the 2 harness connectors. Using needle nosed pliers, through the ignition mounting hole, disconnect the 2 plugs. Now you can pull the EIS module out though the steering column gap (after rotating the switch a little to clear). A quick diagnose is to place the EIS module in the freezer for 20 minutes then pull the 2 connectors through the dash panel mounting hole, reconnect them to the chilled switch outside the dash and retry start up sequence (this also can be performed by spraying the back of the module using electronic component freeze or canned air (CO2) held upside down. Another test would be warming the EIS with a hair drier. This will prove what I've found with said defective switches, cold solder joints. Fifth, With the EIS module on a bench (kitchen table) carefully pry the rear cover off the EIS module using feeler gauge blades placed under the lock tabs. Next, carefully pry the printed circuit board out of the EIS module by un-clipping the locking tabs. Make sure you pull the PC board straight out to avoid breaking the inside 3 terminal plug (white in color). What you may find is the white connector plug that connects the outer PC board has stayed connected to the inside terminals of the module (this has come un-soldered (fractured) from the main PC board causing your failure). The fact is, that this is technically a "cold solder" connection thus affected by heat/cold. Sixth, pull the white connector(3 pin) out of the module housing and re-solder it the the PC main board. While you're inside the module, using a Q-tip, clean the infra red receptor chip in the middle of the main PC Board located on the inside facing part of the PC board (its aligned with the clear plastic lens in the middle gear mechanism of the module (this repairs intermittent communication issues). I suspect this is the problem most EIS rebuilders face when reconditioning bad switches. You can retest the repaired switch with the 2 plugs still passed through the mounting hole in dash pad. Once repaired, reverse the disassembly process. The repair doesn't require new EIS coding or key programming. I also suspect this issue occurs more frequently in the warmer, dustier climates. Saves wallet bleeding and visit to your favorite MB dealer. Enjoy!
Just did this fix myself after putting it off for 6 months. Total time was 15 minutes to get to eis module (radio method) and uninstall /reinstall, 2 minutes to get ignition trim on and off and roughly 30 minutes of solder (set up and breakdown) very very straightforward process and starting my truck was instant.
There has been quite a few posts I've read concerning ML350 electronic ignition switches (EIS) P/N 203.545.06.08 and no communication with other modules on MB CAN when th smart key is inserted. I have found an issue with my recently purchased 2010 ML350 BlueTEC. The problem started when I drove to Florida last week and the car sat in the sun for about a week. When I first tried to start her, the smart key turned but no dash lights, seat & steering column memory function. I opened the doors and aired out the car for a few hours in the evening and to my surprise, it restarted fine. This problem reoccurred a few times throughout my trip and occurred again today back here in Quebec (temperature 66 F). I understand a few folks here on MBWorld had or have the same experience and had to have the dealer replace the EIS (sometimes after a dealer second key program) requiring new EIS, smart key(s) and coding/programming. I also know that "Hacks" to bypass the system are frowned upon by MB purists. I wasn't about to part with $1600 CDN for the dealer to replace said switch after the cost of towing the vehicle 50 Kilometers on a dolly(stuck in park).
So, here's what I've found and repairs some switches for those who are handy and have basic tools(sorry no photos). First, to get the ignition switch out does not require dashboard disassembly on an ML. You only need telescope the column all the way out & raise it. Second, pull the steering accordion (column dash filler) toward the steering wheel. Its held on by snap locks which release easily. Once the cover releases, pull it all the way up the column. Third, using a wide blade standard screw driver (plastic trim tool) rotate the ignition switch escutcheon (trim ring) counter clockwise until the EIS releases into the dash pad. Fourth, reach in through the opening at the base of the steering column where you previously removed the cover. Grab the EIS module and rotate it so you can observe the 2 harness connectors. Using needle nosed pliers, through the ignition mounting hole, disconnect the 2 plugs. Now you can pull the EIS module out though the steering column gap (after rotating the switch a little to clear). A quick diagnose is to place the EIS module in the freezer for 20 minutes then pull the 2 connectors through the dash panel mounting hole, reconnect them to the chilled switch outside the dash and retry start up sequence (this also can be performed by spraying the back of the module using electronic component freeze or canned air (CO2) held upside down. Another test would be warming the EIS with a hair drier. This will prove what I've found with said defective switches, cold solder joints. Fifth, With the EIS module on a bench (kitchen table) carefully pry the rear cover off the EIS module using feeler gauge blades placed under the lock tabs. Next, carefully pry the printed circuit board out of the EIS module by un-clipping the locking tabs. Make sure you pull the PC board straight out to avoid breaking the inside 3 terminal plug (white in color). What you may find is the white connector plug that connects the outer PC board has stayed connected to the inside terminals of the module (this has come un-soldered (fractured) from the main PC board causing your failure). The fact is, that this is technically a "cold solder" connection thus affected by heat/cold. Sixth, pull the white connector(3 pin) out of the module housing and re-solder it the the PC main board. While you're inside the module, using a Q-tip, clean the infra red receptor chip in the middle of the main PC Board located on the inside facing part of the PC board (its aligned with the clear plastic lens in the middle gear mechanism of the module (this repairs intermittent communication issues). I suspect this is the problem most EIS rebuilders face when reconditioning bad switches. You can retest the repaired switch with the 2 plugs still passed through the mounting hole in dash pad. Once repaired, reverse the disassembly process. The repair doesn't require new EIS coding or key programming. I also suspect this issue occurs more frequently in the warmer, dustier climates. Saves wallet bleeding and visit to your favorite MB dealer. Enjoy!
this worked for me. I used it on my 2011 ML350 4Matic. Saved me so much money.
Thank You thumbdoctor for your post, I read through everyone's comments and tips, followed your directions, and was able to repair my ML320CDI 2009 within 30 mins. The white connector was EXACTLY as described in the instructional post and with the help of some of the other tips such as using a fine blade knife and also using the toothpicks, I was able to disassemble the EIS without damage, find and correct the issue, reassemble and test. So far so good. It is a hot day here in Melbourne and when I started, the ignition would not even come on, I tried like 5 times and got absolutely nothing from the dash. Once I performed the repair, every time even in this heat the ignition comes on after the first click of the key, and it also started every go.
I cannot tell you how thankful I am for the posted instructions. Whilst I had the unit apart I also re-flowed the solder to the microswitch suggested by another member, just to be sure.
Hopefully no more issues!!!
Thanks again ALL for this very informative post.
HI, had exactly the same problem in my 2009 ML320 CDI. Key in ignition and nothing in position 1 or 2, remove key repeat over and over, sometimes getting the wrong key message and when key removed the mileage would light up bit no ignition lights, eventually it would engage and ignition light come on and car would start. Could take from 5 to 30 minutes to start. I noticed the unit seemed a bit loose when inserting or removing key and I tightened it with the new tool I purchased to remove the EIS. That did the trick and the car ignition is back to normal. Lets hope it stays that way but I have started it first time every time this evening after tightening it.
Hi, Its a small cylinder / pipe like tool with slots cut into it which engage in the lock nut holding the EIS in position, its drilled to insert a screwdriver or the like for leverage to twist off the EIS retaining nut. Mine was quite loose, took 3 or so turns to tighten it and the ignition is back up again every time. I do notice a very intermittent message advising key does not belong to vehicle so that solder job on the white block as per earlier posts may have to be done. Tool bought on ebay for 5 euro
Hi, Its a small cylinder / pipe like tool with slots cut into it which engage in the lock nut holding the EIS in position, its drilled to insert a screwdriver or the like for leverage to twist off the EIS retaining nut. Mine was quite loose, took 3 or so turns to tighten it and the ignition is back up again every time. I do notice a very intermittent message advising key does not belong to vehicle so that solder job on the white block as per earlier posts may have to be done. Tool bought on ebay for 5 euro
Hi, It reverted back to its more regular no ignition mode so had to resort to a repair. Mine being a right hand drive meant that access was not possible through the radio slop as my ignition in on thew other side of the steering wheel. I removed the tray under containing the OBD port and the side panel which I prized off. The is a foam block wrapped around the steeling column which makes access difficult but with a bit of maneuvering i managed to release it and remove the wiring connections. I sent it to a repair shop who repaired it ( 150€ ). Refitting was more difficult than removing. I had to get a hack saw blade and trim back some of the foam ( access through hole in dash where ignition removed and had a few attempts until sufficient foam removed to allow entry of ignition unit. Anyway got it refitted and cover screw to clamp it in. It slots in only one way as there are grooves to locate it correctly in the housing. It back in full operation now, the center panel wakes up when door open showing mileage etc and starts up first time. I bottled fixing it myself as my soldering skills proved questionable when I attempted the turbo actuator re-solder a few months ago.
I just wanted to revisit this old thread,and say "thank you" as my 2008 ML350 with 168k miles started to exhibit the same problem. About 1 out of 10 turns and the car would not turn on, no lights on the cluster, etc. All diagnosis pointed to an internal fault of the EIS. I decided to attempt the repair as shown. I removed the radio and had the EIS out in about 5 minutes. After disassembly, I found my 2008 does NOT have that white connector inside, as a previous poster said about his 2008. While I had it apart, I inspected all solder joints and they looked good. I proceeded to clean both brown microswitches and 3 u-shaped optical sensors (i think) using a q-tip and rubbing alcohol. Compressed air was gently used to blow dry the circuit boards and switches. I also cleaned the clear optical eye on the board. Most importantly, and I think this may have been the real problem- I cleaned the spring loaded trap door that the end of the key pushes against. While this may look like black plastic, it's actually a very dark red translucent plastic just like the end of the key (which I also cleaned). After so many years of the key getting dirty and dusty, a film builds, along with scratches and the infrared signal cannot fully pass through. After re-installing, I am happy to say the problem has been cured, saving me several hundred dollars. You may want to try cleaning the key end and "trap door" before removing the EIS.
Last edited by E55Greasemonkey; May 7, 2020 at 11:11 PM.
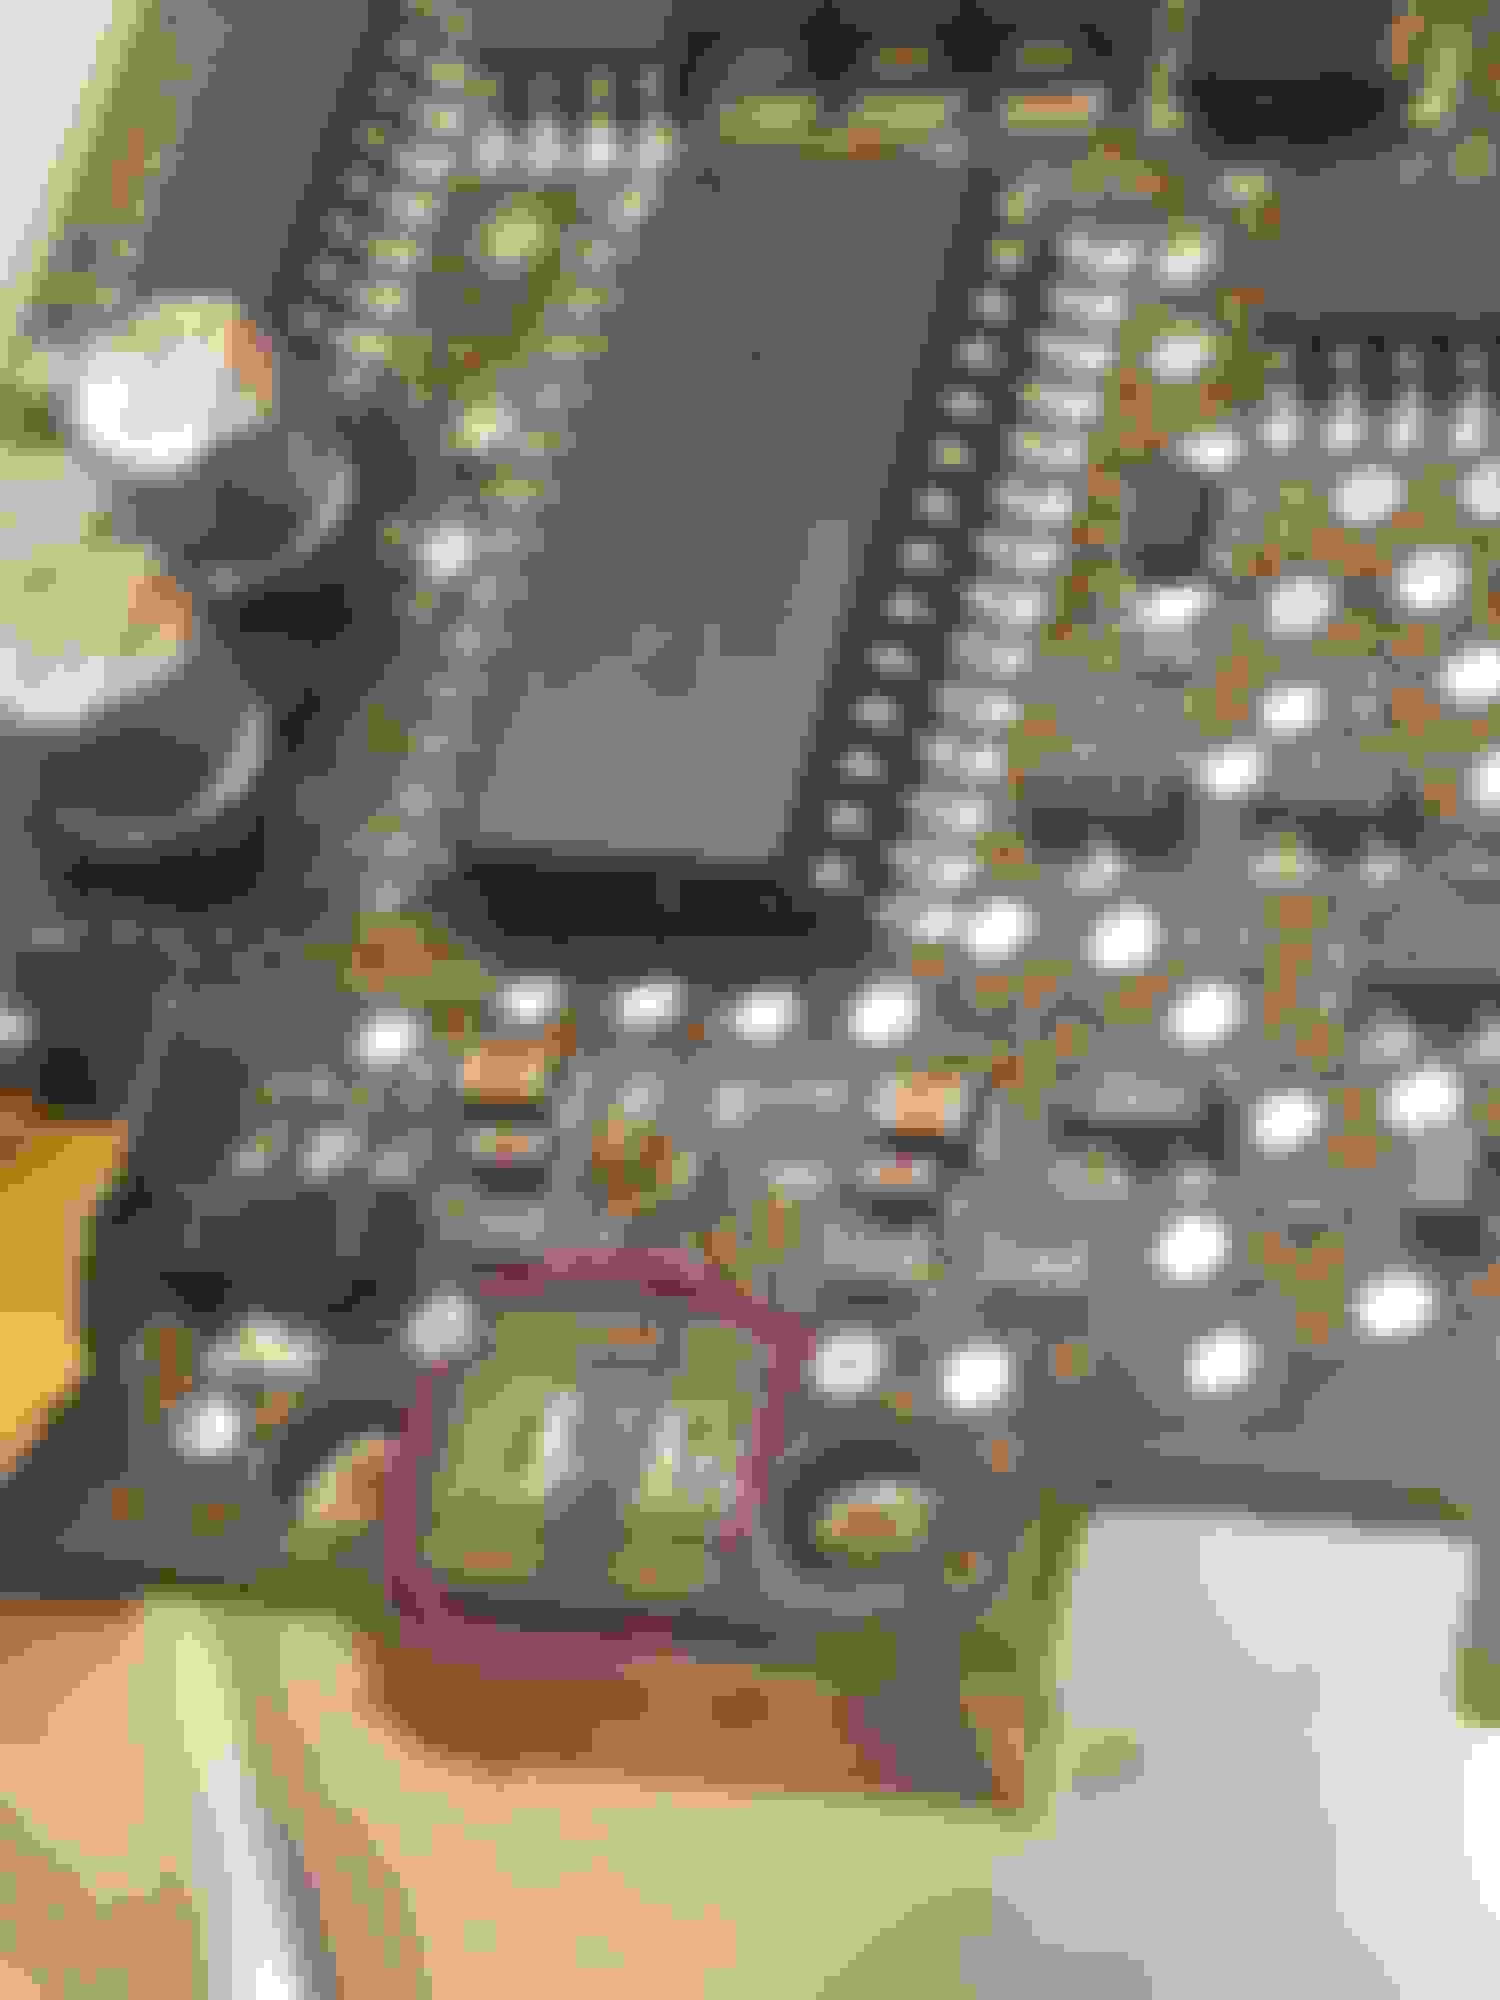
Thank you so much all! This thread explains the exact problem with my 2011 ML 350. Though I got another issue, and hope that someone here could point me in the right direction.
So I removed the EIS and found this piece is broken. What could this be? It's directly on the other side of the 3 pin connector.
I circled its location where I took it out from here. This was where the teal device came from.
Do you what that teal device is and if I can buy it?
I've been looking over the internet for SMD resistor/ capacitor but I cant find one with teal color. It's dimension is 2 mm x 1 mm. I appreciate any suggestions.
i fix my eis years ago, I am not an electronic guy. So I removed the eis and sent it to luxauto. I listed his contact info, it�s buried in this tread. We still have this ml and it work perfect. Highly recommend you send it to him. I believe he charged a$100 to repair it.
i fix my eis years ago, I am not an electronic guy. So I removed the eis and sent it to luxauto. I listed his contact info, it�s buried in this tread. We still have this ml and it work perfect. Highly recommend you send it to him. I believe he charged a$100 to repair it.
Please PM me luxauto contact. I hope he is still fixing EIS. Thank you!
You can find him on ebay at the name below. He is located in the suburbs of chicago. I have always communicated with him on ebay, i had him repair the eis on our ML at 95K and now we have 150k on it and now problems.
Thank you so much all! This thread explains the exact problem with my 2011 ML 350. Though I got another issue, and hope that someone here could point me in the right direction.
So I removed the EIS and found this piece is broken. What could this be? It's directly on the other side of the 3 pin connector.
I circled its location where I took it out from here. This was where the teal device came from.
Do you what that teal device is and if I can buy it?
I've been looking over the internet for SMD resistor/ capacitor but I cant find one with teal color. It's dimension is 2 mm x 1 mm. I appreciate any suggestions.
I found out that the broken piece is an smd resistor. The size of the resistor is 1206 and resistor value is 3.3 Ohm. I bought the resistor from Amazon and fixed the problem. I just want to share the information here. I'm so happy with the fix.
Mercedes SLR McLaren 722 S Is Extremely Rare Example Modified by McLaren
Slideshow: A one-of-one U.S.-spec Mercedes-Benz SLR McLaren Roadster became even rarer after a factory-backed transformation at McLaren's headquarters.


 )
)


