


2011 adblue heater and processor failure

Thread Starter
Junior Member
Joined: Jan 2011
Posts: 50
Likes: 5
2011 ML350 Blueteck (Sold); 2014 E350 Wagon, Sport, Indigo Blue (Sold); 2021 GLC300, 2022 BMW X5
2011 adblue heater and processor failure
So just out or warranty on my 2011 ML350 Bluetec and just after a couple of failures that got covered (cam shaft sensor and a timing chain issue) when a check engine light just came on. Diagnoses was adblue heater failure and that a processor also need to be replaced to the tune of $3,100.
In reading I have seen some people get this all covered because it is part of the emissions system, others it was covered under CPO, and others not.
I felt I had read about these failures and mentioned it and that at this point I would call the string of failures as epic failures of a car that will be 3 years old next week.
Curious if anyone knows if this is a known problem and have more specifics on if this should be covered.
What is the kick in this is I was trying to order a E wagon and this has soured me completely.
Any info would be appreciated.
Thanks
Last edited by dminahan; Jun 2, 2014 at 08:12 PM.

Junior Member
Joined: Jun 2012
Posts: 23
Likes: 0
From: Round Lake, IL
2010 ML350 Bluetec
AdBlue heater replacement
I have a 2010 ML350 with around 50,000 miles, and the check engine light came on. Just took it in three weeks ago, and they replaced the AdBlue heater. The dealer said that it was not covered under warranty. I did not need the processor replaced. The repair was $494.20 for the labor and $1,170 for the "RS Preheater" #164-471-11-75.
Fortunately, I had purchased an extended warranty for this vehicle in December, so it only cost me additional my $250 deductible.
I take it with a grain of salt when a service advisor says " this really doesn't happen that often". Yes - they said that to me as well in May. I think it's one of the mechanisms they use to "soften the blow."
Thread Starter
Junior Member
Joined: Jan 2011
Posts: 50
Likes: 5
2011 ML350 Blueteck (Sold); 2014 E350 Wagon, Sport, Indigo Blue (Sold); 2021 GLC300, 2022 BMW X5
So the only problem with this is the DEF Tank is on the emissions warranty list and federally there is an emissions warranty. The tank was not listed for the plastic only I believe but the fact the tank as a whole (with its integral parts) is necessary for emissions. The heater as well as some other parts that can be repaired are a part of the tank and you get them if you buy it. I have no problem with mercedes offering a way to more cheaply make the tank whole (i.e. make some of the components separate for replacement) provided they don't use that to deny the emissions warranty.
The failure of the heater even in warm temperatures triggered the check engine light because the emssions system and the tank is no longer functioning properly. I.E. the emissions warranty now takes over. To me there is no gray area on this.
So to read about this issue hitting people and they are being told to pay for something that the federally mandated emissions warranty should cover isn't right and I'm not saying it is just mercedes doing this either. By the way, my state is one of the ones called out on the emissions warranty for the bluetecs as they don't require me to emissions test my diesel due to the system installed and probably because if a necessary component fails it triggers the check engine light. So I personally believe anyone that has this happen to them needs to fight it completely if they are within the 7 yr/70k miles.
It sounds like some people's extended warranties have rejected covering this with the response this is an emissions warranty issue. I am glad it worked out for you that your repair was covered on the plan you got.
Junior Member
Joined: Jun 2012
Posts: 23
Likes: 0
From: Round Lake, IL
2010 ML350 Bluetec
AdBlue heater replacement
I totally get where you are at with this. I did put a call into the dealership to ask again about clarification on your point. I wouldn't mind having my $250 back. They are going to look into it further and return my call. Stand by ....
Thread Starter
Junior Member
Joined: Jan 2011
Posts: 50
Likes: 5
2011 ML350 Blueteck (Sold); 2014 E350 Wagon, Sport, Indigo Blue (Sold); 2021 GLC300, 2022 BMW X5
Have you had other things go wrong with your 2010 under warranty or extended warranty? Where I'm at is if I should even consider keeping this vehicle or get out into a wagon and figure out any additional cars over time.
Junior Member
Joined: Jun 2012
Posts: 23
Likes: 0
From: Round Lake, IL
2010 ML350 Bluetec
I have to say that I have really had nothing else major go wrong with my 2010 ML350 since I bought it - used - in 2012. I am generally pretty happy with it, and purchased an extended warranty for peace of mind knowing that if anything did go wrong after the factory warranty expired, I would only have a $250 exposure for the next several years. The thing in the back of my mind that has me most concerned is the bio-diesel issue we have here in Illinois, but that's a topic for another thread.
BTW ... no joy on the emissions warranty question. The dealer got back to me with verification that this repair was under no way, shape, or form covered under the emissions warranty. They said they have a code that automatically comes up for parts that are covered under the emissions warranty, and their warranty administrator confirmed that this part number (listed above) is not in that classification. Since I'm only out the $250, I will not escalate it any further. Perhaps others have gone that route and gotten consideration offered from higher ups ?
BTW ... no joy on the emissions warranty question. The dealer got back to me with verification that this repair was under no way, shape, or form covered under the emissions warranty. They said they have a code that automatically comes up for parts that are covered under the emissions warranty, and their warranty administrator confirmed that this part number (listed above) is not in that classification. Since I'm only out the $250, I will not escalate it any further. Perhaps others have gone that route and gotten consideration offered from higher ups ?
Trending Topics
Senior Member
Joined: Feb 2010
Posts: 431
Likes: 4
From: Cross Roads, PA
2008 ML320CDI
Just found this. Might not be a heater failure at all, dealers might not be reading up on the TSBs. It does state to replace parts, but I am wondering if the resistance change thats causing the error
Heating element of AdBlue tank has malfunction, fault code
20BE1B and/or 20BD1B logged in BlueTec control unit Topic number LI49.20-P-056353 Version 1 Design group 49.20 Exhaust aftertreatment unit Date 05-23-2013 Validity Model 164 with engine 642 and SA code U42 (BlueTec SCR diesel exhaust treatment) Model 166 with engine 642 and SA code U42 (BlueTec SCR diesel exhaust treatment) Model X204 with engine 642 and SA code U42 (BlueTec SCR diesel exhaust treatment) Model 212 with engine 642 and SA code U42 (BlueTec SCR diesel exhaust treatment) Model 218 with engine 642 and SA code U42 (BlueTec SCR diesel exhaust treatment) Model 221 with engine 642 and SA code U42 (BlueTec SCR diesel exhaust treatment) Model 251 with engine 642 and SA code U42 (BlueTec SCR diesel exhaust treatment) Model 463 with engine 642 and SA code U42 (BlueTec SCR diesel exhaust treatment) Reason for change Complaint:
Engine diagnosis warning lamp active. Fault code 20BE1B and/or 20BD1B (The heating element of the AdBlue tank has a malfunction) is logged in the Blue-Tec control unit. Cause:
Due to resistance changes in the heating element, a malfunction may be diagnosed. Remedy: 1. Complete the guided tests in XENTRY by following the instructions. 2. After completing the guided tests and replacing the indicated components, the SCR control unit must additionally be programmed with new software (XENTRY version 03/2013 or later).
MB World Stories
The Best of Mercedes & AMG

7 Craziest Things AMG Gas Ever Built
Verdad Gallardo
New Electric Mercedes-AMG GT 4-Door Coupe Unveiled: 10 Things You Need to Know
Verdad Gallardo
6 Mercedes Models That Did NOT Age Well (But Are Somehow Still Cool)
Verdad Gallardo
Manual Mercedes? 6 Times Sindelfingen Let Drivers Have All The Fun
Verdad Gallardo
Mercedes SLR McLaren 722 S Is Extremely Rare Example Modified by McLaren
Verdad Gallardo
8 Classic Boxy Mercedes Designs That Have Aged Like Fine Wine
Verdad Gallardo
Flawlessly Restored Mercedes 190E Evo II Heads to Auction
Verdad Gallardo
Electric Mercedes C-Class Unveiled: 11 Things You Need to Know
Verdad Gallardo
Mercedes EQS Gets A Major Update: Everything You Need to Know
Verdad Gallardo
Newbie
Joined: Mar 2014
Posts: 3
Likes: 1
GL350
There are MULTIPLE chains on this forum and other about the Mercedes Adblue heater going out, quite often right after the warranty runs out. This is not just one one model but on all of them using the Bluetec diesel with the Adblue system. One Mercedes mechanic comment that the part is on back order. That tends to indicate there is a big demand for the device and the number of people needing replacements must be pretty high. I am wondering if anyone knows if there is a class action suit on this going on.

Senior Member

Joined: Mar 2009
Posts: 401
Likes: 31
From: CT
GL 450, 993TT, Cayenne Diesel, 964C4
Do any of the owners who had issues service/fill the adblue tank by themselves?
I service my GL and will not let service touch it. The active ingredient in the solution is ammonia and it crystallizes quickly when the water solution it's dissolved in evaporates.
The filler tank is easy to clean up with a wet rag. I bought the 1/2 gallon bottle and cut the locking ring so replenishment from the 2.5 gallon tank from the auto store is easy.
Not a problem with my adblue system so far.
I have a write up on it in the X164 sub forum. Just search with my user name. I realize that this is a new technology and there are teething problems but this is a system adopted by all German automakers so it's not just a Mercedes part.
Member

Joined: Sep 2013
Posts: 89
Likes: 26
E43AMG


Newbie
Joined: Aug 2012
Posts: 13
Likes: 7
From: Alexandria, Virginia
2007 Audi S4 Cabriolet, 2009 Audi A3 2.0T, 2011 Audi A4 2.0T Quattro
Well I just replaced the Reductant Pre-Heater and it cleared the codes associated with it, however I now have a new P20E8 reductant pressure too low code appearing, so it seems I am shopping for a replacement pump.
The pre-heater repair kit was pretty easy to swap out, and the part cost about $960 wholesale from Mercedes Benz of Monterrey. I expect I will be returning to them for the pump part as well. Nice wholesale parts guy there, Martin.
I took a ton of pictures during my replacement/repair. I can make a DIY, but I think there is already a really good one, though I cannot find it at the moment.

Junior Member
Joined: Dec 2011
Posts: 69
Likes: 0
From: HK
G350
Well I just replaced the Reductant Pre-Heater and it cleared the codes associated with it, however I now have a new P20E8 reductant pressure too low code appearing, so it seems I am shopping for a replacement pump.
The pre-heater repair kit was pretty easy to swap out, and the part cost about $960 wholesale from Mercedes Benz of Monterrey. I expect I will be returning to them for the pump part as well. Nice wholesale parts guy there, Martin.
I took a ton of pictures during my replacement/repair. I can make a DIY, but I think there is already a really good one, though I cannot find it at the moment.
you had this code before 20BD1B?
only change the heater kit? do you have the part number?
is it possible to show me how to repair it?
Newbie
Joined: Aug 2012
Posts: 13
Likes: 7
From: Alexandria, Virginia
2007 Audi S4 Cabriolet, 2009 Audi A3 2.0T, 2011 Audi A4 2.0T Quattro
Photo DIY for Additive Tank Pre-Heater Replacement
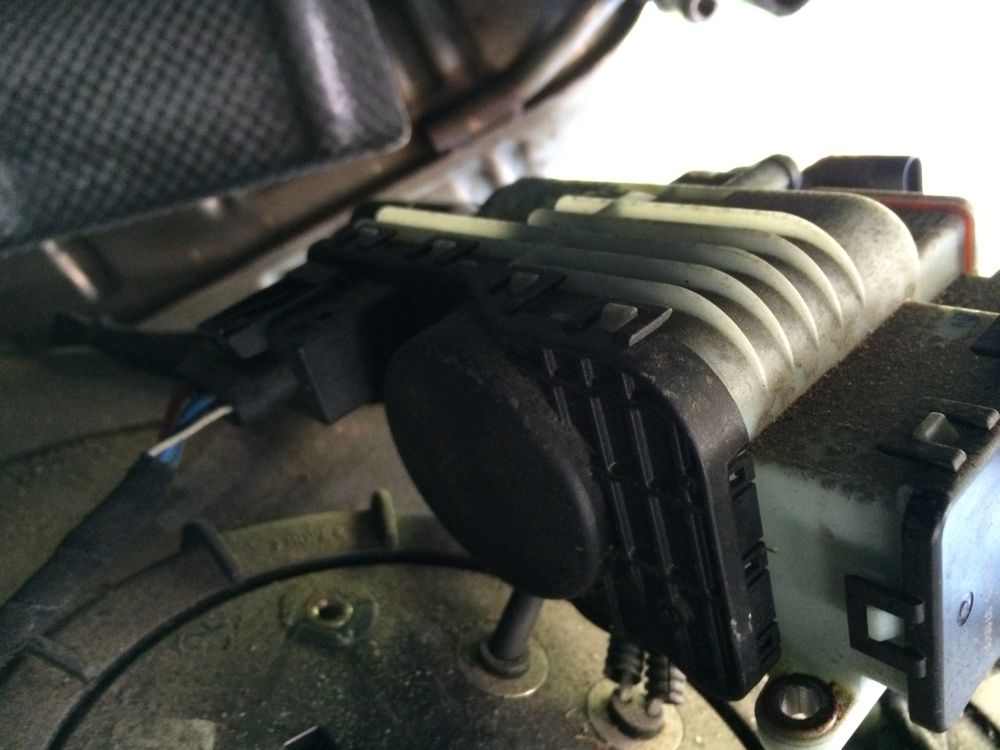
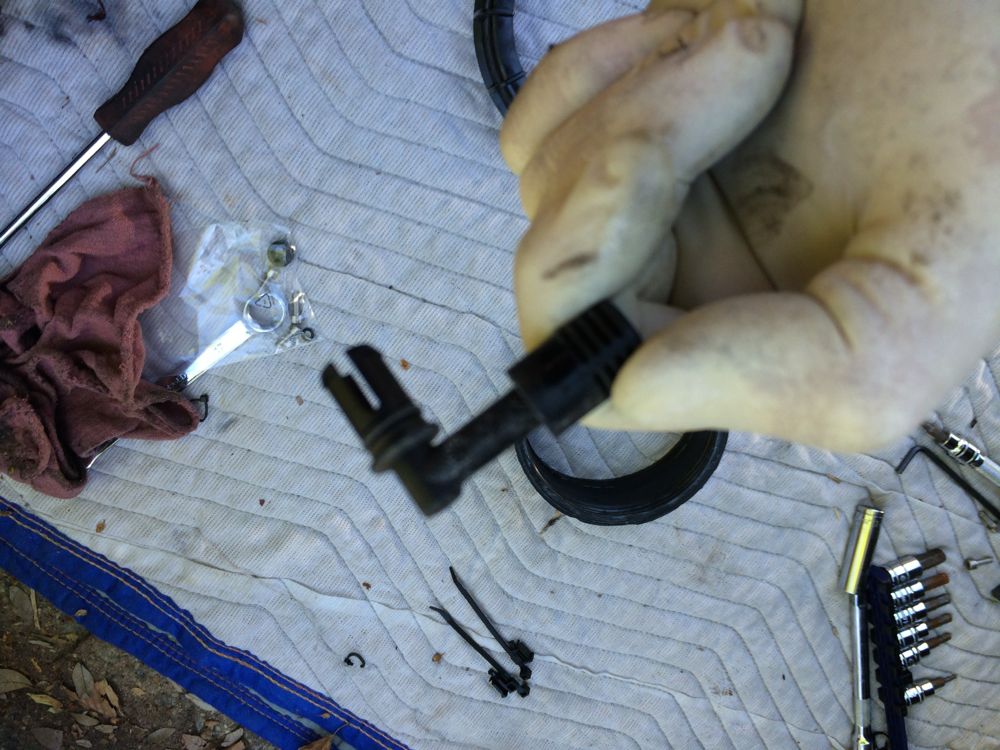
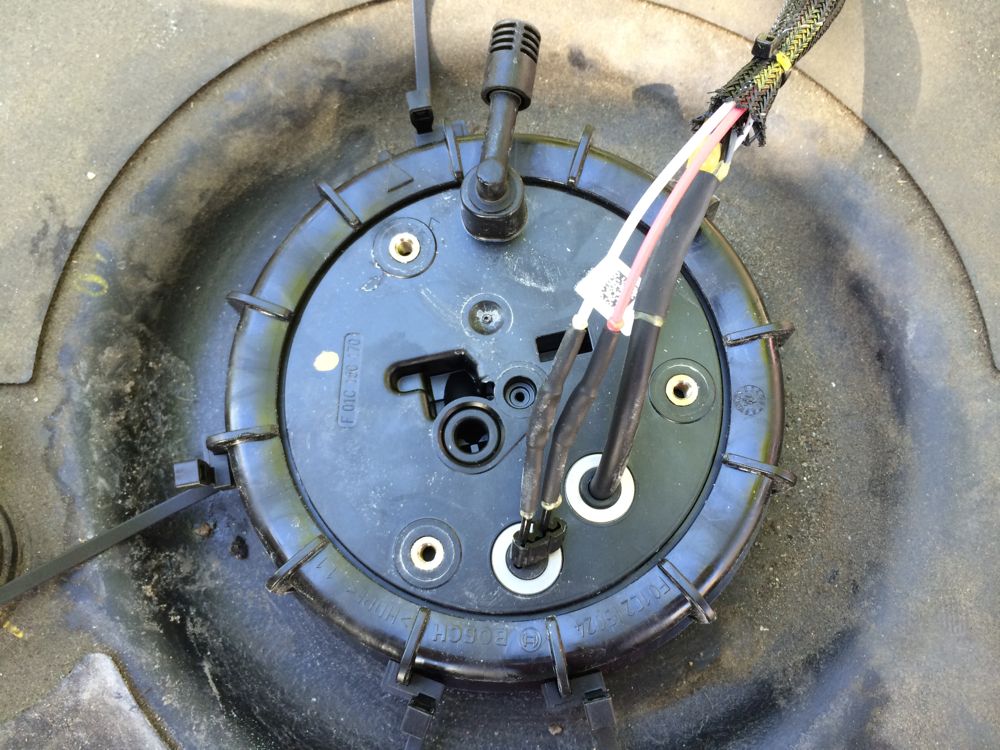
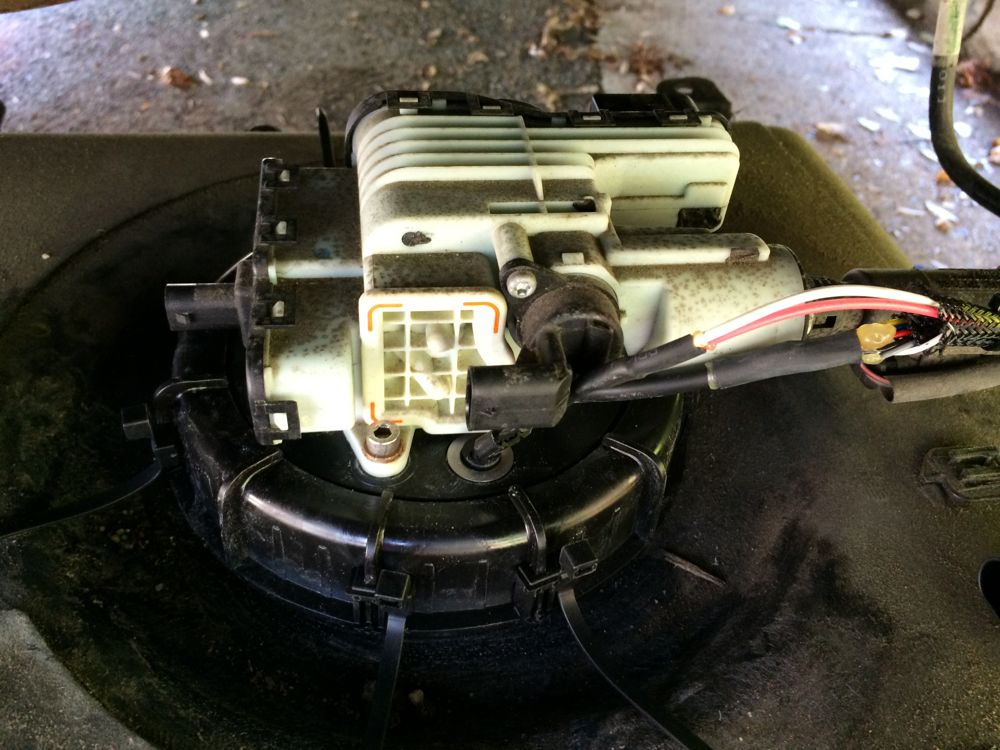
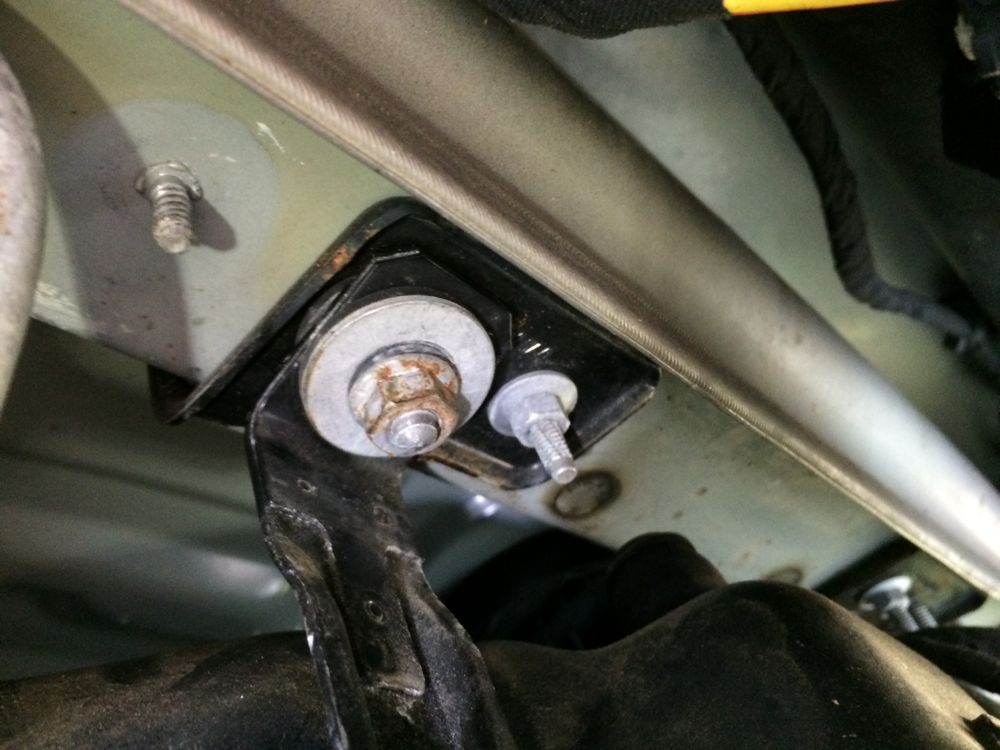
Photos start here because I wanted to take lots of pictures to make sure I remembered where to reconnect everything and where the zip ties were to be restored when finished. This is the pump unit on the lid of the additive tank. It has to be disconnected and removed to access failed pre-heater parts which are located inside the additive tank.
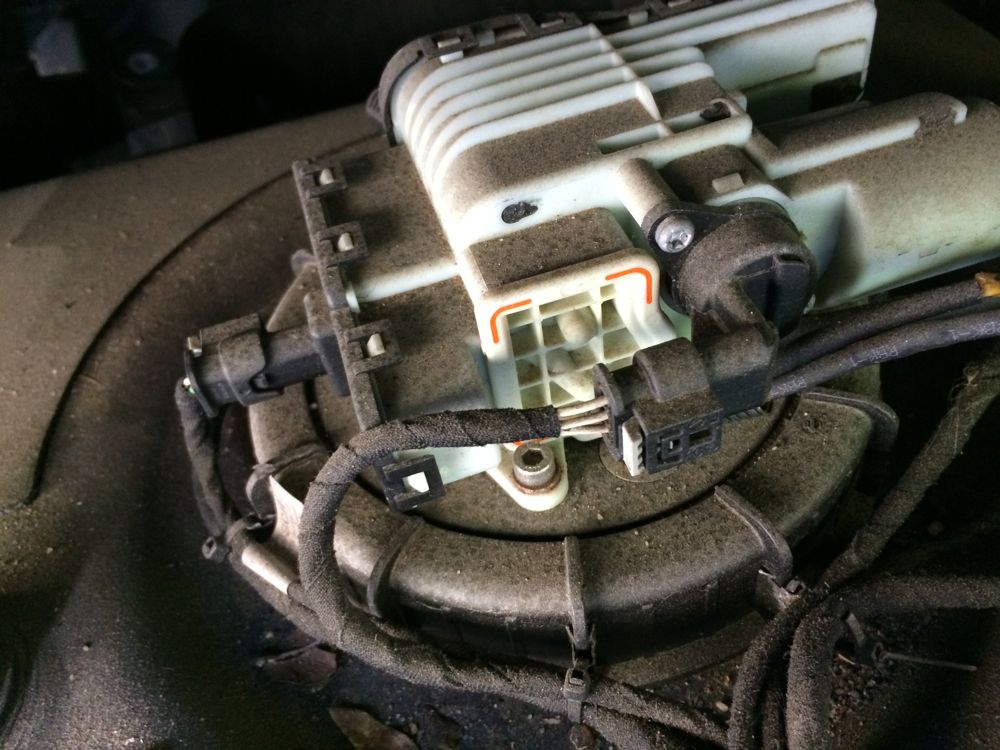
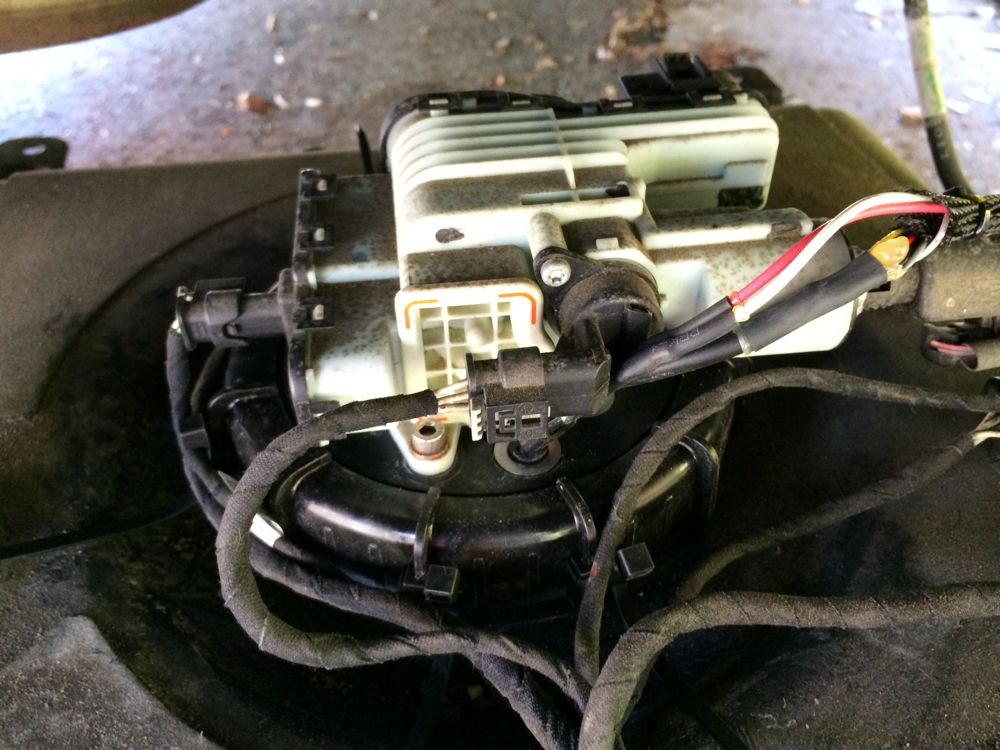
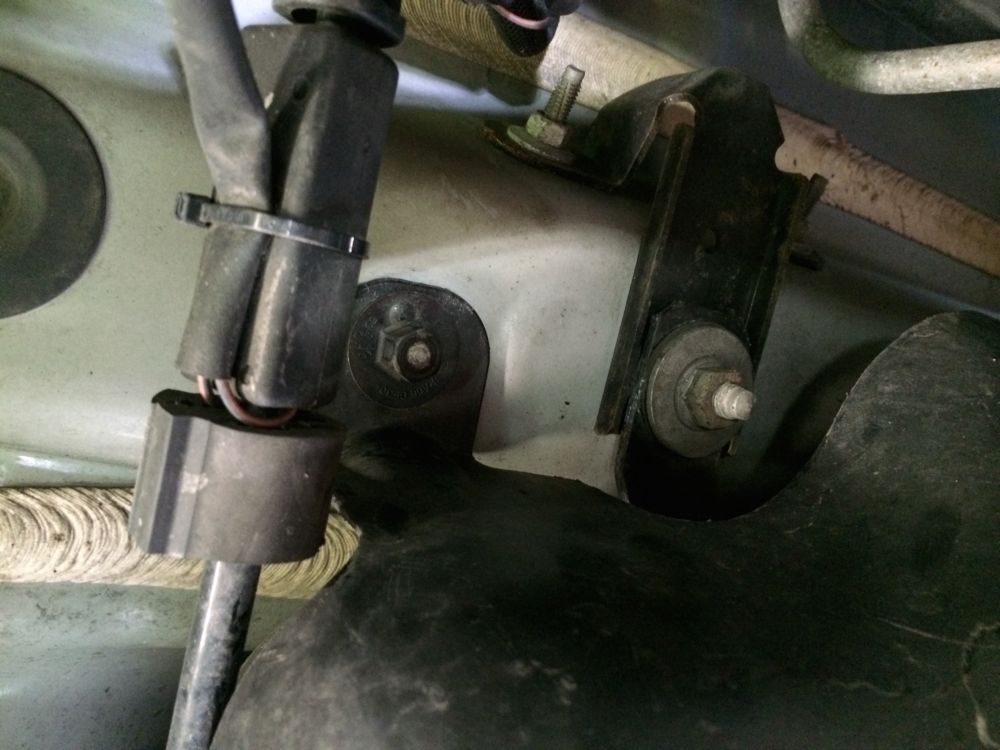
There are four connectors to the pump unit visible from the front. One is the actual additive line to the injector nozzle. There is also a large connector that is located behind the pump unit. I disconnected the four electrical connectors and left the fluid line connected while servicing the tank. Once the connectors were loose, I used a 4mm hex key to remove the three stainless fasteners that anchor the pump to the tank lid.

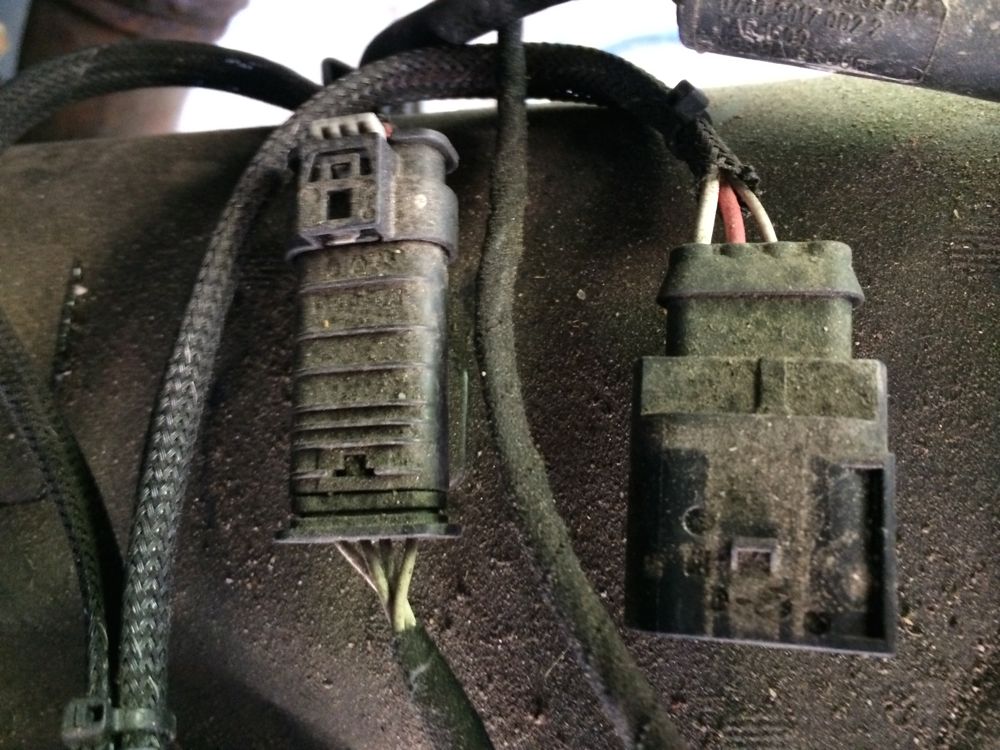
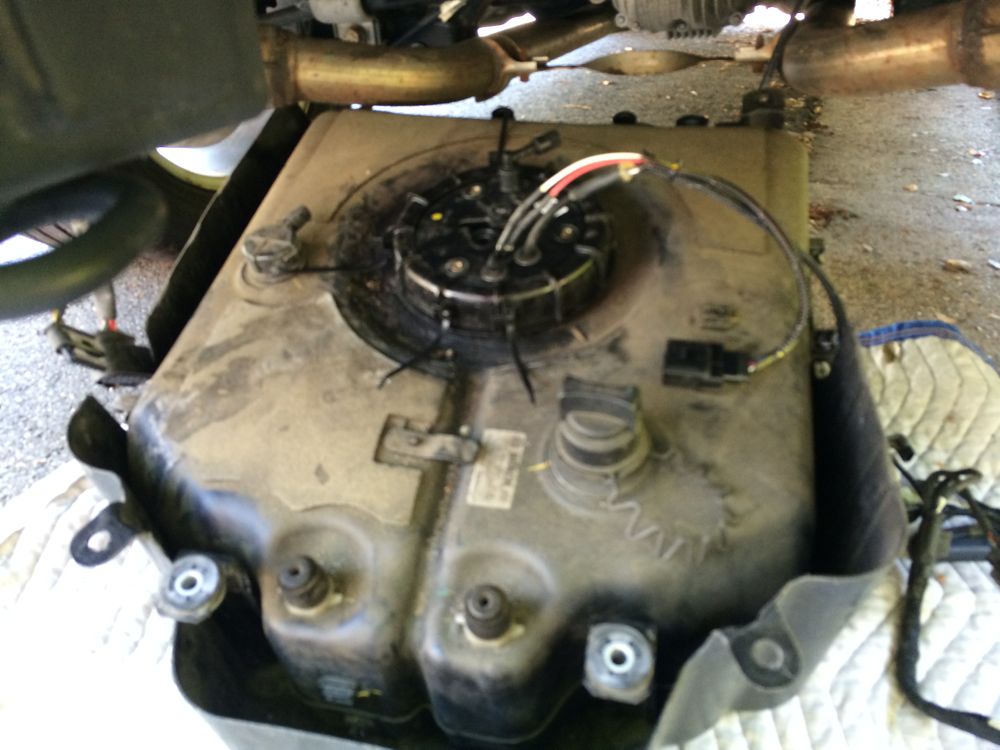
Once the pump was detached, and the other electrical connectors on the rearmost side of the tank were also detached, I was able pull the tank from the support straps and place it on the ground for the next steps.


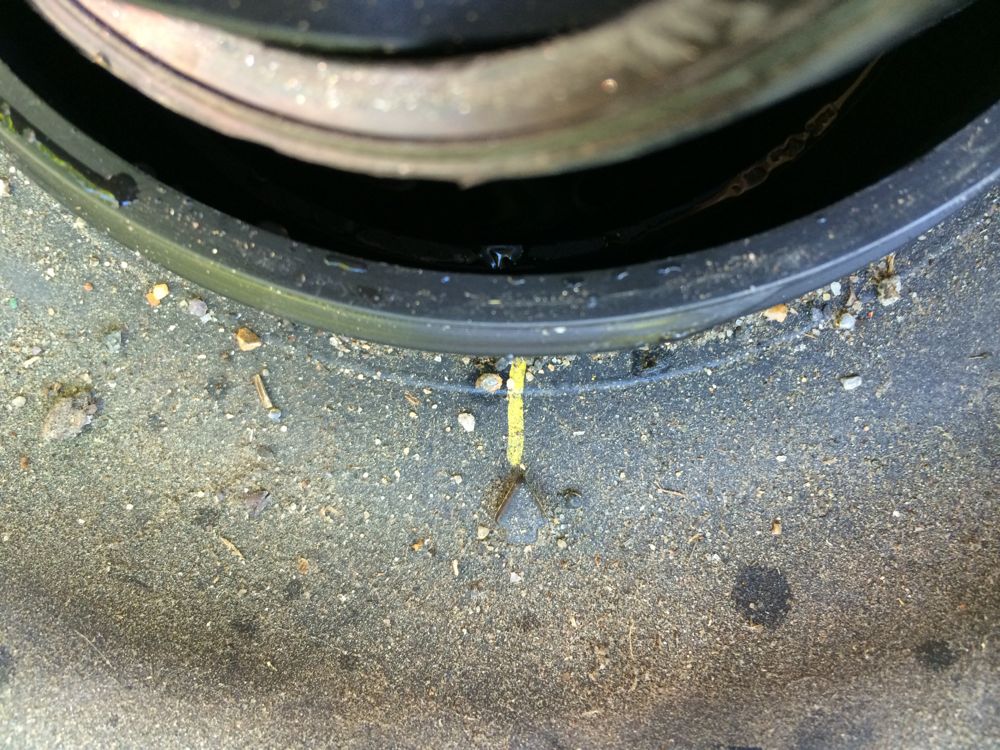
After documenting the position of the zip ties and removing them to free the harness connectors, I used a large flat blade screwdriver and a rubber mallet to knock the locking ring loose on the additive tank lid. It secures a soft silicone rubber gasket within, so it is quite difficult to twist off manually, but it turned easily with a few firm taps of the mallet. It will rotate one full revolution and lift off.
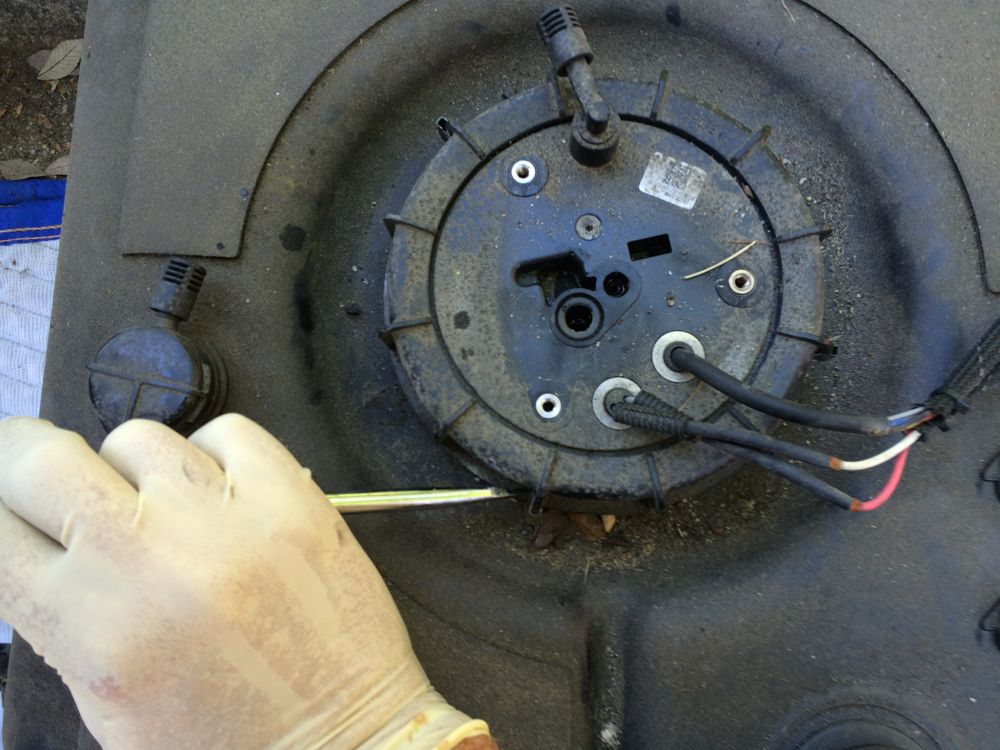
At this time, I noteed there is a reference arrow on the tank in the 11 o'clock position as looking from the perspective of the one the ground photo above. This reference is used to index the lid locking ring and the RS pre-heater assembly when installing within the additive tank.
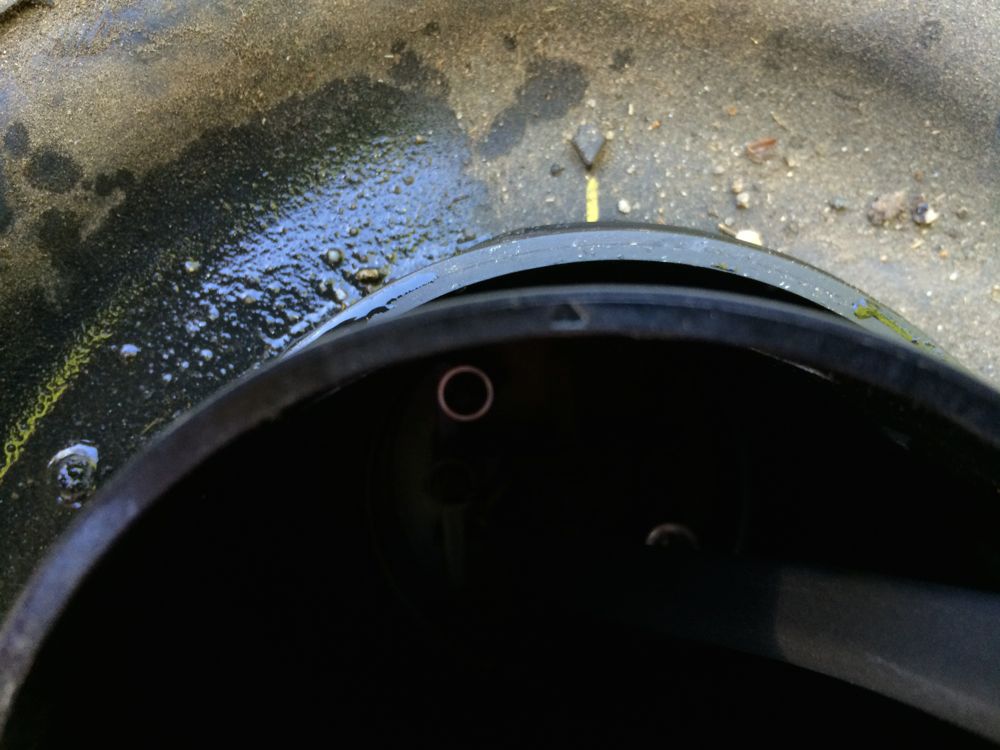
Pulling the rubber gasket from the lid opening, you see the RS pre-heater assembly installed within directly under the lid and pump assembly. There is just enough extra tubing length to be able to fit your fingers within to grab the assembly and twist about 5� counter- or anti-clockwise to loosen it from its anchor tabs.

The new RS pre-heater assembly has an index arrow on the top rim, align it about 5� CCW/ACW to insert and twist clock-wise to lock in place.
My kit came with a replacement vent, so I swapped that in.
Once the new pre-heater assembly is in place, install the new gasket and make sure the skirt of the gasket smoothly surrounds the top edge of the pre-heater assembly. Install new lid locking ring and tap into alignment with index arrow if needed with rubber mallet and large flat blade screw driver.
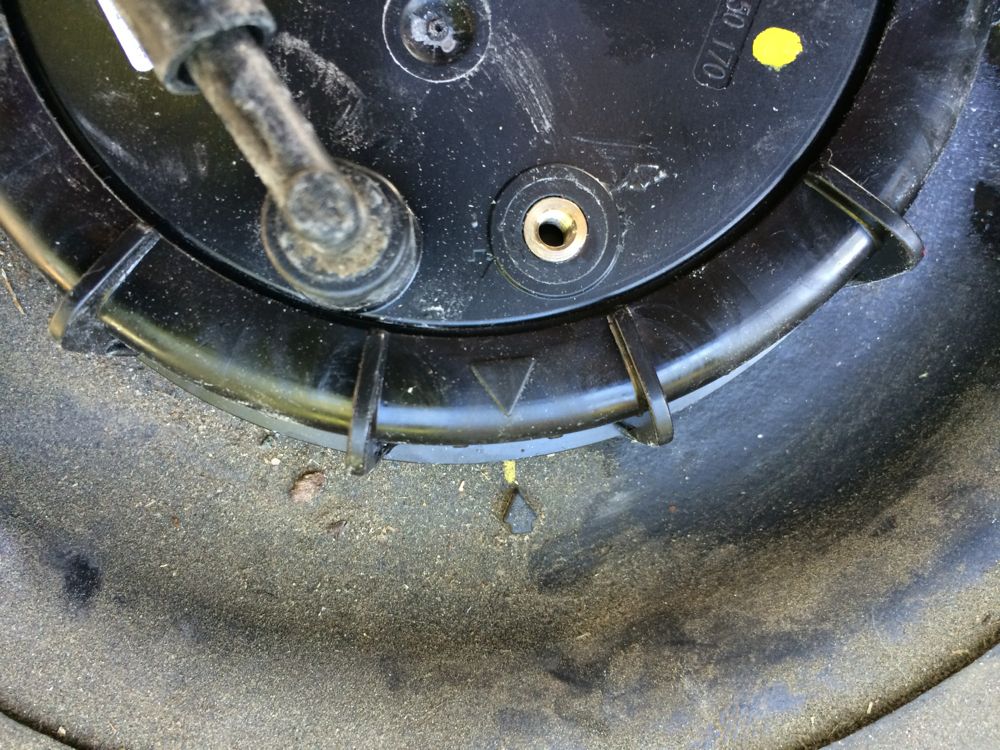
The new lid comes with a different kind of harness zip ties, so attach them to the lid at the locations indicated, roughly 12, 6, 7, and 9 o'clock starting from the index arrow.
Position tank with new pre-heater back in anchor straps.
Restore pump assembly to top of additive tank lid. There are two rubber rings used to promote a seal on the pump inlet and outlet, one is a small (6mm) o-ring, the other is thick (5mm x 14mm) rubber washer. The new tank lid already had the thicker washer seal installed, I put the smaller o-ring on the smaller pressure outlet of the pump housing. I used a little petroleum jelly to lube the larger fluid inlet so it would more easily slide into the thicker washer seal on the lid. Secure the pump with the three 4mm hex head screws.
Reattach the electrical connections to the pump and the tank harness. Zip tie the cables routed around the perimeter of the lid to tidy everything up (not pictured.)
Restore the tank to the mounted position and attach the support straps and then the four plastic cover nuts.

Turn the engine on and clear heater codes or drive it for a few cycles and they will clear automagically.
Pretty simple. I did it on the curb in front of my home (I do not have a garage or driveway) and it took me about 90 minutes, start to finish, feeling my way through the process. My heater codes have not since returned, but now I have a P20E8 control module related code that will not clear. So unfortunately, it is at the MB dealer getting that sorted because I just cannot put off re-registration any longer and I have to get emission inspection to do so. I am already 10 days overdue. :-(

Last edited by keithwbloom; Oct 14, 2014 at 12:22 PM.
Junior Member
Joined: Apr 2014
Posts: 72
Likes: 0
From: Columbus, OH
2011 E350 Bluetec
i am having the same issues, but still under factory warranty. Do you think this would be covered? I had a light to fill adblue. So, I bought from dealer and put in one container myself. Then one week later, I got the light again accompanied by the CEL. Does this sound like the heater failure? It just happened tonight, so I have yet to run the codes.
Newbie
Joined: Aug 2012
Posts: 13
Likes: 7
From: Alexandria, Virginia
2007 Audi S4 Cabriolet, 2009 Audi A3 2.0T, 2011 Audi A4 2.0T Quattro
Hard to know without a diagnostic CEL code. Low DEF level does not cause CEL. And CEL in W164 is not limited to DEF system. I cannot speak to whether your system is covered under factory warranty, our GL is under extended third party warranty (and was not covered) but dealer said it would not have been covered under factory warranty anyway. Good luck with yours!
i am having the same issues, but still under factory warranty. Do you think this would be covered? I had a light to fill adblue. So, I bought from dealer and put in one container myself. Then one week later, I got the light again accompanied by the CEL. Does this sound like the heater failure? It just happened tonight, so I have yet to run the codes.

Newbie
Joined: Apr 2015
Posts: 1
Likes: 0
2011 GL350 Bluetec
P20E8 Code Fix?
Thanks!
Newbie
Joined: Aug 2012
Posts: 13
Likes: 7
From: Alexandria, Virginia
2007 Audi S4 Cabriolet, 2009 Audi A3 2.0T, 2011 Audi A4 2.0T Quattro
As far as I could tell, the pump works by injecting air pressure into inner core within tank, it does not actually pump the fluid itself. I think the DEF fluid is then fed to a higher pressure pump upstream near the injectors.
Whatever the case, I suspect you're in need of a new pump if you have low pressure code. At the point I realized this, I just threw my hands up and handed to the dealer to fix. Lesson learned for next time I need a DEF pre-heater replacement.

Member
Joined: Apr 2015
Posts: 122
Likes: 15
From: Montana, USA
formerly drove a 2010 ML350 BLUETEC, currently drive Mazda, Chevrolet, and Toyota
Status on any class action or remedies, please? I'm experiencing a Mercedes nightmare currently. My 2010 ML350 BLUETEC's engine just seized at 82K miles, all after regular dealer maintenance in Montana and after several major dealer repairs since 2010 (including AdBlue heater and oil cooler seal leak @ approx. 65K miles, leading to catastrophic engine failure last week). Mercedes says they'll do nothing to assist, so my attorney is sending them a Demand Letter tomorrow. I'm happy to join forces with others of you who are experiencing, or have experienced, similar issues with Mercedes!
Newbie
Joined: Aug 2012
Posts: 13
Likes: 7
From: Alexandria, Virginia
2007 Audi S4 Cabriolet, 2009 Audi A3 2.0T, 2011 Audi A4 2.0T Quattro
Status on any class action or remedies, please? I'm experiencing a Mercedes nightmare currently. My 2010 ML350 BLUETEC's engine just seized at 82K miles, all after regular dealer maintenance in Montana and after several major dealer repairs since 2010 (including AdBlue heater and oil cooler seal leak @ approx. 65K miles, leading to catastrophic engine failure last week). Mercedes says they'll do nothing to assist, so my attorney is sending them a Demand Letter tomorrow. I'm happy to join forces with others of you who are experiencing, or have experienced, similar issues with Mercedes!
An oil cooler seal would eventually lead to seizure, but you would probably have a christmas tree of warning indicators before that happened, not the least of which would be low oil level or pressure indicated.
The AdBlue system is an emissions component and is not covered by Mercedes' factory or the various extended warranties available. Curiously in most cases is specifically omitted. Learned that the hard way of course. But outside that system's repair cost, the balance of ownership with our GL320 has been relatively trouble free.
Member
Joined: Apr 2015
Posts: 122
Likes: 15
From: Montana, USA
formerly drove a 2010 ML350 BLUETEC, currently drive Mazda, Chevrolet, and Toyota
Failure in the AdBlue system would not lead to seizure, it would lead to electronically initiated shutdown and starter lockout since emissions would no longer be treated until new AdBlue was added to system.
An oil cooler seal would eventually lead to seizure, but you would probably have a christmas tree of warning indicators before that happened, not the least of which would be low oil level or pressure indicated.
The AdBlue system is an emissions component and is not covered by Mercedes' factory or the various extended warranties available. Curiously in most cases is specifically omitted. Learned that the hard way of course. But outside that system's repair cost, the balance of ownership with our GL320 has been relatively trouble free.
Member
Joined: Apr 2015
Posts: 122
Likes: 15
From: Montana, USA
formerly drove a 2010 ML350 BLUETEC, currently drive Mazda, Chevrolet, and Toyota
Thanks for your insight. I mentioned the AdBlue and emission control as these were part of the myriad of issues I've had with this car. I'm honing in on the lack of any indicator lights prior to my engine failure, along with the oil seal leak from last year at 65K miles. MB techs I know are puzzled by no indicator lights and the common oil leaks in this type of engine. MBUSA is attributing the engine failure to oil sludge and is not offering any assistance nor accountability.


