


How To: Replace IC Pump on V12TT - Pics Included
Thread Starter
Super Member
Joined: Apr 2009
Posts: 537
Likes: 3
From: West Texas
Yes
How To: Replace IC Pump on V12TT - Pics Included
Well, I replaced my IC pump a while back and thought I would share the procedure. I don�t know if this will benefit anyone, but I hope it does. I do want to note that this is just how I did it, and there may be a better or easier way out there�however, this swap only took me about 45 minutes.
As a note, this is for a V12 only, I do not know what all the differences will be for a V8 car; I do believe the final bleed procedure will be different at the very least because the engine cooling and intercooler circuit share the same coolant, rather than two separate circuits for the V12 cars.
Tools:
�� drive ratchet (required)
8mm socket (required)
10mm socket (required)
13mm socket (required)
Flat screwdriver (required)
Hose pinch tool (optional)
Soldering iron (optional)
Valve stem removal tool (required)
Wire cutters (optional)
Parts:
IC Pump � Johnson CM30P7-1 12 volt (required)
Distilled water or coolant (required)
2ea � 2ft by 3/8� fuel line (optional)
Procedure:
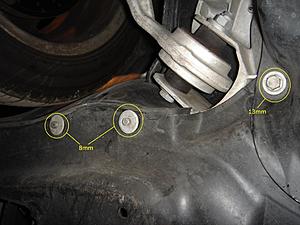
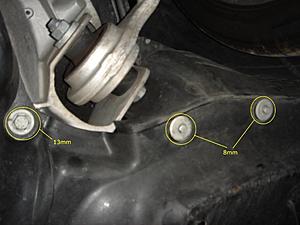
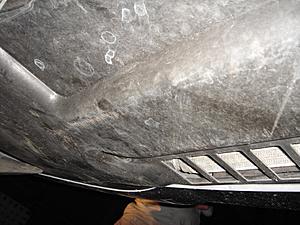
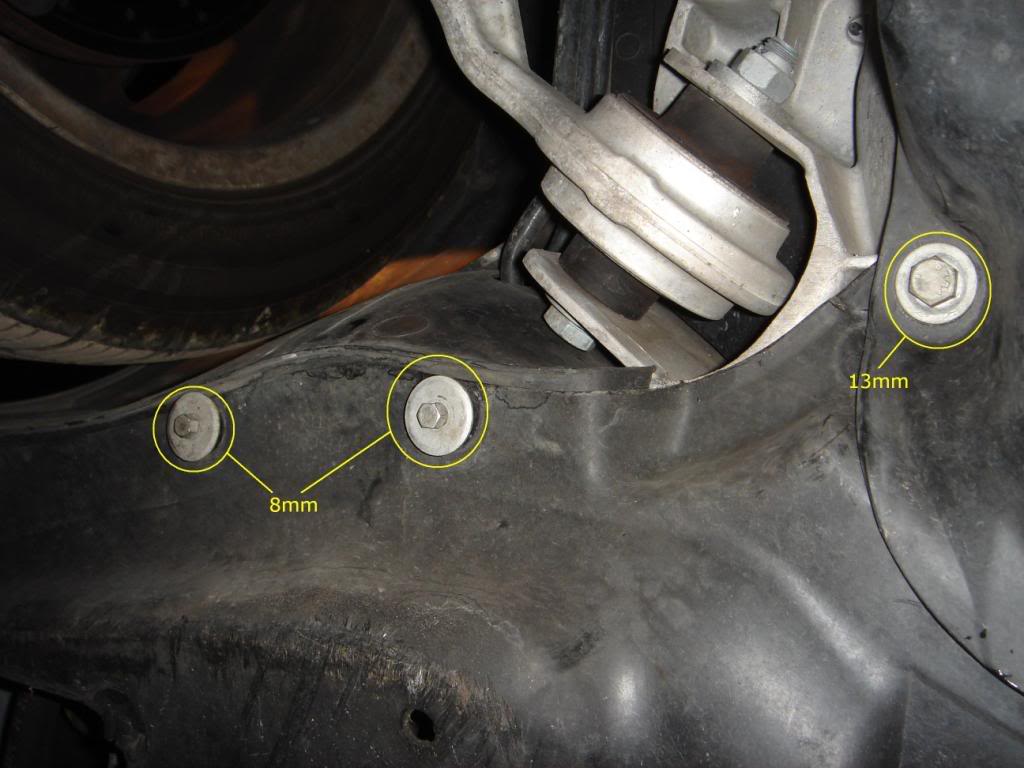
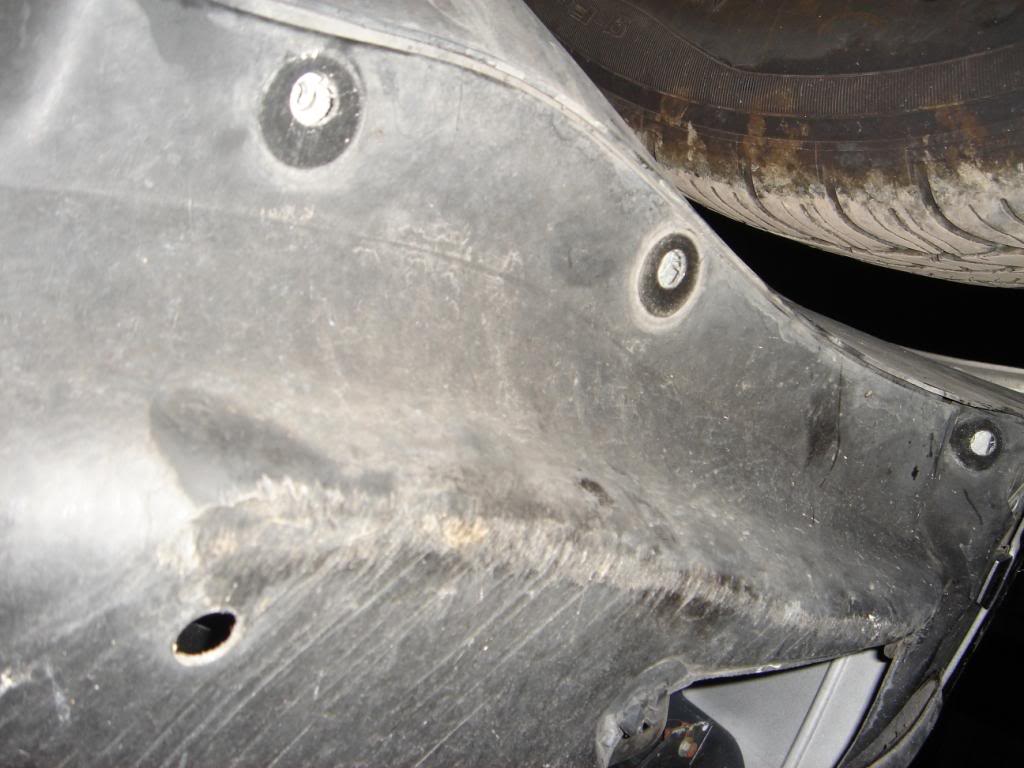
Step 1 � Remove Belly Pan:
First, put the car on ramps or something to elevate the front and set the parking brake and block the back tires for safety! Then, get under the car and remove the eight 8mm bolts on the front most belly pan. Next remove the two 13mm bolts that go through both belly pans. After than, open both �trap doors� that allow access to the fog lights (so you can grip the pan) and slide it forward. Once you do that, the rear of the pan will be free and you can slide the pan back and the place it out of your way.

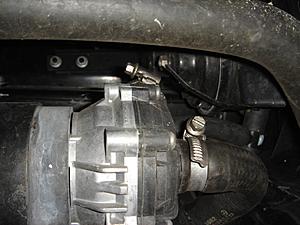
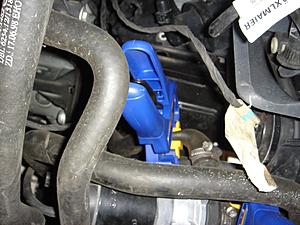
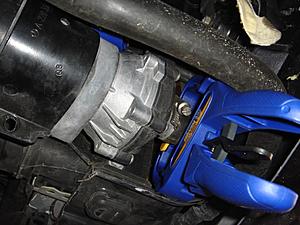
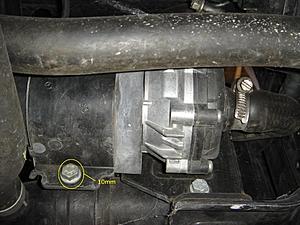
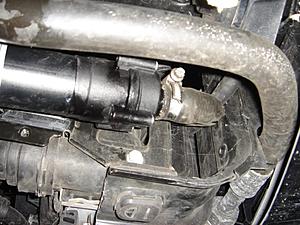
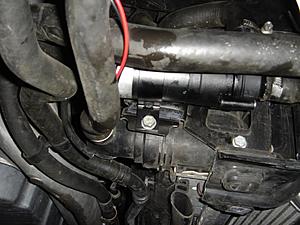
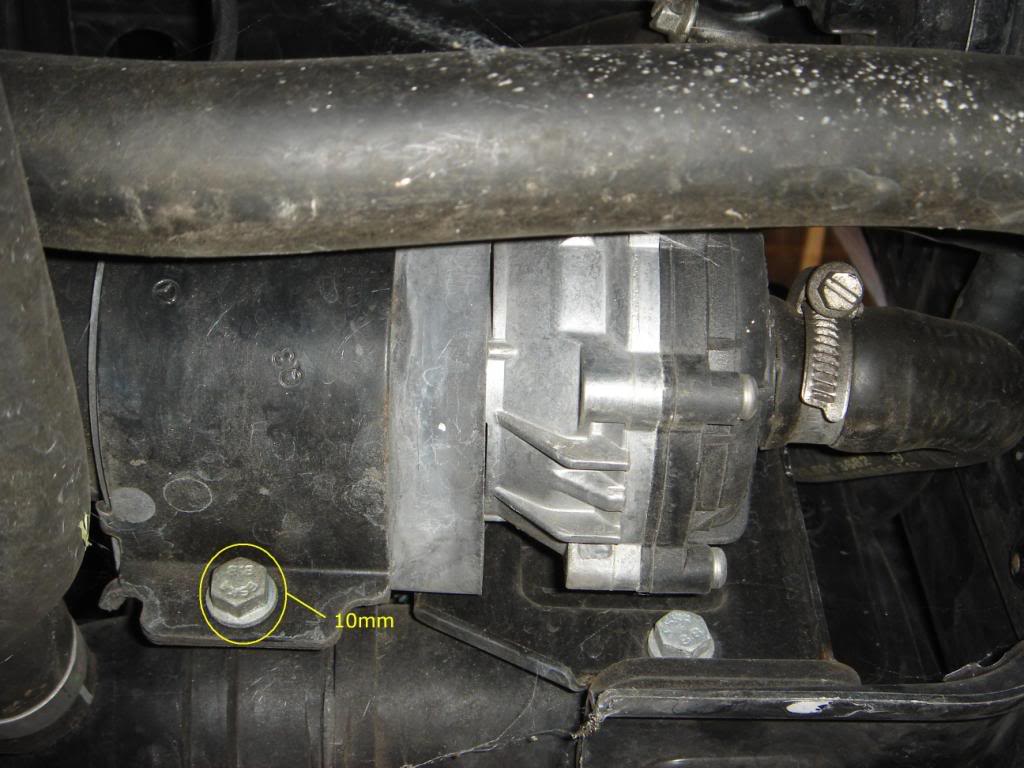
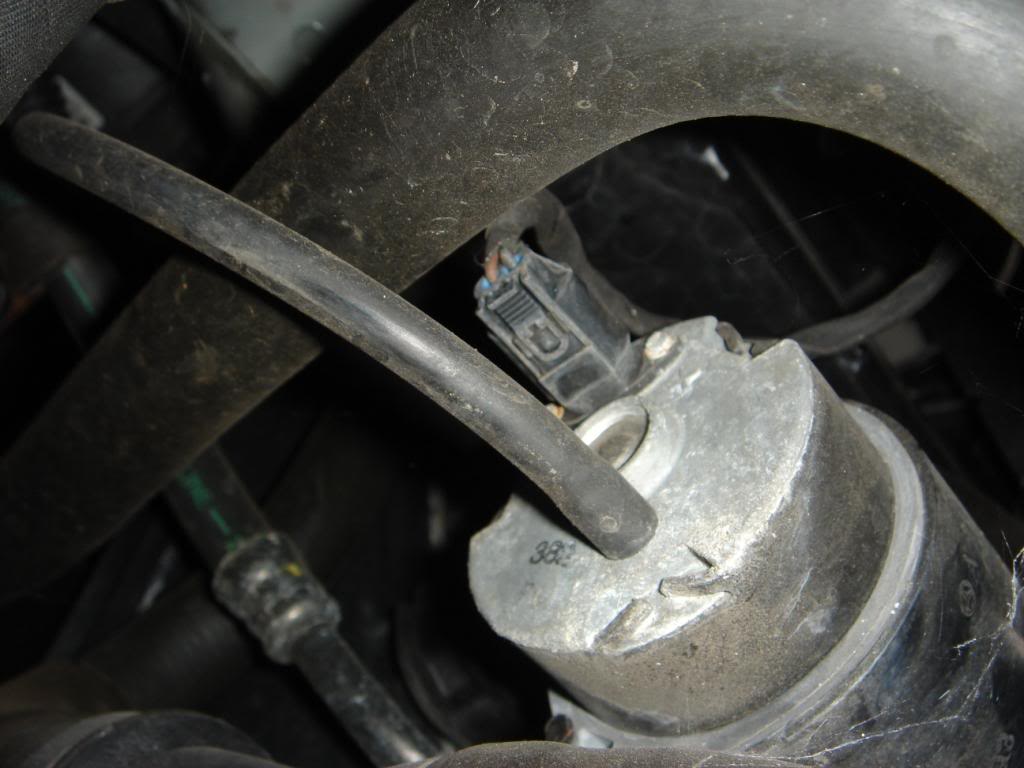
Step 2 � Pump Removal:
Now you can use two hose pinch tools (I just used two clamps) and pinch off both lines going to the IC pump. You don�t have to do this�but it�s pretty messy without them. Then loosen both hose clamps with the screwdriver. Then unplug the pump from the car. You will probably have to cut the vent tube going to the IC pump, unless it just slides off for you. Then remove the single 10mm bolt holding the pump on. You can now remove the pump completely from the car.
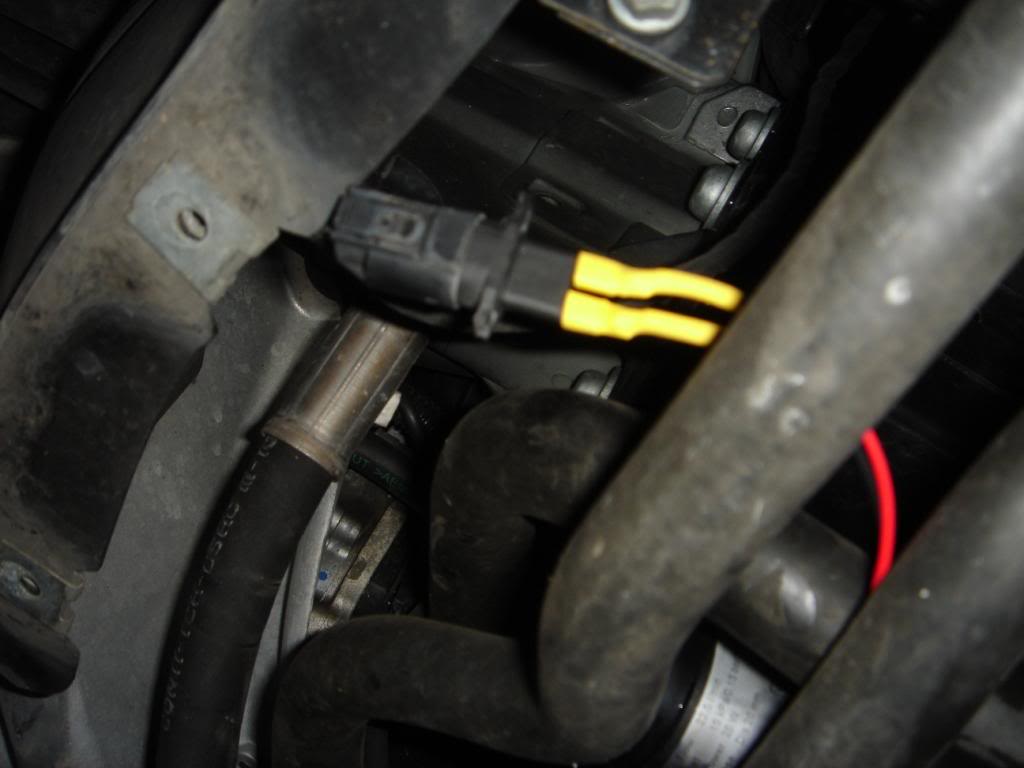
Step 3 � Remove/Replace Electrical Plug (optional):
Ok, this step is kind of up to you, but I recommend doing it. First, you will need to take the old pump apart, start by removing the 6 torx screws on the pump and then take it apart. Then you will need to use the wire cutters to snip the electrical connector�s internal wires and the two pins on the outside holding it on. Once you have it removed, you can solder the wires of your new pump to the old connector. I recommend using heat shrink on the connections after they are soldered. If you do not want to do this, you will need to connect the wiring your own way. I suppose you could use wire splices, etc�but I did not want to trust those for this application.
Step 4 � Replace Pump:
Basically this is the Step 2 repeated in reverse. The only difference will be the clamp on the new pump. If you will put the supplied clamp on the pump you can use one of the holes secure it to the car with your factory 10mm bolt.

Step 5 � Replace Belly Pan:
Again, this will be Step 1 repeated in reverse.
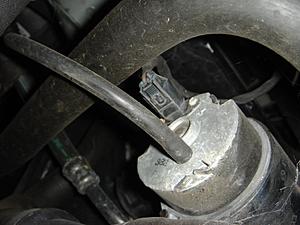
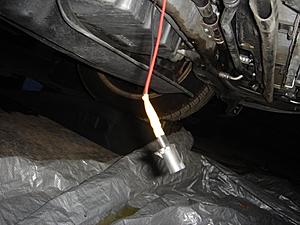
Step 6 � Bleed the System:
Ok, I have been informed that this is supposed to be done at a dealership with a special tool (I think this only applies to the factory pump with the vacuum fitting). I didn�t take it to the dealer, and I believe it is properly bled. First, back the car off the ramps and then put the ramps in the rear of the car, so it has a very significant nose down attitude. Then remove the radiator cap at the rear of the engine, and then remove the two �valve stems� from the two Schraeder valves near the cap. I used a cut coke bottle and pressed it into the filler, it had a nice snug fit. Then put the two 3/8� fuel lines over the valves and run them into the coke bottle. At this time, fill the coke bottle most of the way full with either distilled water (do not use bottled/tap water) or coolant and then start the car. Let the car idle for a while, and when the pump turns on, you should see fluid flow from the fuel lines into the coke bottle. Let the car run until there are no more bubbles in the water. Keep adding water as necessary to fill the system. Once that is done, you�ll need to have someone help you. They will need to keep the coke bottle full as you remove the fuel lines and replace the valve stems. Then, remove the coke bottle and cap the system. You should be done at this point and ready to drive!

Questions, comments, suggestions??
As a note, this is for a V12 only, I do not know what all the differences will be for a V8 car; I do believe the final bleed procedure will be different at the very least because the engine cooling and intercooler circuit share the same coolant, rather than two separate circuits for the V12 cars.
Tools:
�� drive ratchet (required)
8mm socket (required)
10mm socket (required)
13mm socket (required)
Flat screwdriver (required)
Hose pinch tool (optional)
Soldering iron (optional)
Valve stem removal tool (required)
Wire cutters (optional)
Parts:
IC Pump � Johnson CM30P7-1 12 volt (required)
Distilled water or coolant (required)
2ea � 2ft by 3/8� fuel line (optional)
Procedure:
Step 1 � Remove Belly Pan:
First, put the car on ramps or something to elevate the front and set the parking brake and block the back tires for safety! Then, get under the car and remove the eight 8mm bolts on the front most belly pan. Next remove the two 13mm bolts that go through both belly pans. After than, open both �trap doors� that allow access to the fog lights (so you can grip the pan) and slide it forward. Once you do that, the rear of the pan will be free and you can slide the pan back and the place it out of your way.


Step 2 � Pump Removal:
Now you can use two hose pinch tools (I just used two clamps) and pinch off both lines going to the IC pump. You don�t have to do this�but it�s pretty messy without them. Then loosen both hose clamps with the screwdriver. Then unplug the pump from the car. You will probably have to cut the vent tube going to the IC pump, unless it just slides off for you. Then remove the single 10mm bolt holding the pump on. You can now remove the pump completely from the car.


Step 3 � Remove/Replace Electrical Plug (optional):
Ok, this step is kind of up to you, but I recommend doing it. First, you will need to take the old pump apart, start by removing the 6 torx screws on the pump and then take it apart. Then you will need to use the wire cutters to snip the electrical connector�s internal wires and the two pins on the outside holding it on. Once you have it removed, you can solder the wires of your new pump to the old connector. I recommend using heat shrink on the connections after they are soldered. If you do not want to do this, you will need to connect the wiring your own way. I suppose you could use wire splices, etc�but I did not want to trust those for this application.

Step 4 � Replace Pump:
Basically this is the Step 2 repeated in reverse. The only difference will be the clamp on the new pump. If you will put the supplied clamp on the pump you can use one of the holes secure it to the car with your factory 10mm bolt.


Step 5 � Replace Belly Pan:
Again, this will be Step 1 repeated in reverse.
Step 6 � Bleed the System:
Ok, I have been informed that this is supposed to be done at a dealership with a special tool (I think this only applies to the factory pump with the vacuum fitting). I didn�t take it to the dealer, and I believe it is properly bled. First, back the car off the ramps and then put the ramps in the rear of the car, so it has a very significant nose down attitude. Then remove the radiator cap at the rear of the engine, and then remove the two �valve stems� from the two Schraeder valves near the cap. I used a cut coke bottle and pressed it into the filler, it had a nice snug fit. Then put the two 3/8� fuel lines over the valves and run them into the coke bottle. At this time, fill the coke bottle most of the way full with either distilled water (do not use bottled/tap water) or coolant and then start the car. Let the car idle for a while, and when the pump turns on, you should see fluid flow from the fuel lines into the coke bottle. Let the car run until there are no more bubbles in the water. Keep adding water as necessary to fill the system. Once that is done, you�ll need to have someone help you. They will need to keep the coke bottle full as you remove the fuel lines and replace the valve stems. Then, remove the coke bottle and cap the system. You should be done at this point and ready to drive!
Questions, comments, suggestions??
MBWorld Fanatic!
Joined: Apr 2006
Posts: 8,137
Likes: 26
From: Maryland
Eurocharged 2004 E500, Eurocharged ECU/TCU 2005 SL600, 2010 Caddy SwaggerWagon
Good job! Was your OEM pump bad, or did you just want to upgrade? Did you happen to do any before/after data logging for IAT?
Thread Starter
Super Member
Joined: Apr 2009
Posts: 537
Likes: 3
From: West Texas
Yes
Yeah, the OEM pump was dead. I did not do any data logging before or after...the power difference after the engine was warm was very noticeable, along with the change in 1/4 mile time.
Trending Topics
Thread Starter
Super Member
Joined: Apr 2009
Posts: 537
Likes: 3
From: West Texas
Yes
It's the same tool used to remove valve stem cores from wheels. It should be readily available at any auto parts store. It can also be found as the valve stem cap on some bicycle tubes.
MB World Stories
The Best of Mercedes & AMG

Manual Mercedes? 6 Times Sindelfingen Let Drivers Have All The Fun
Verdad Gallardo
Mercedes SLR McLaren 722 S Is Extremely Rare Example Modified by McLaren
Verdad Gallardo
8 Classic Boxy Mercedes Designs That Have Aged Like Fine Wine
Verdad Gallardo
Flawlessly Restored Mercedes 190E Evo II Heads to Auction
Verdad Gallardo
Electric Mercedes C-Class Unveiled: 11 Things You Need to Know
Verdad Gallardo
Mercedes EQS Gets A Major Update: Everything You Need to Know
Verdad Gallardo
5 Underrated Mercedes-Benz Models That Don't Get the Love They Deserve
Verdad Gallardo
Mercedes 300D Has Pushed Well Past 1 Million Miles and It Ain't Stopping
Verdad Gallardo
10 Most Reliable Mercedes-Benz Models You Can Buy Used
Verdad Gallardo
MBWorld Fanatic!


Joined: Nov 2010
Posts: 2,605
Likes: 343
From: Welwyn, Herts, UK
2006 S600
The V12TT has a separate low-temp cooling circuit for the charge coolers. Unlike the engine coolant system, there's no header tank, because there's not enough room for one. So its a sealed system, which is why you have to bleed it carefully.
Water expands when it heats up, which is why we have header tanks. So without an expansion tank, the rubber tubes presumably have to accomodate the increase in volume by expanding. They only do this if the water pressure increases, so at normal operating temperatures, the system will be significantly presurised.
Now, the IC pump is thermostatically controlled, in that it only runs when the IAT is above 95F, and its often much more than that when the eingine is idling (ie: when you're actually doing the test!). I think its fair to assume that the system will have a significant static pressurisation at that temperature, so that water will stream out of the bleed valves even when the pump isn't working. Indeed, if the pump isn't working, the water temperature is likely to be higher than if it is working - with a corresponding increase in pressure.
Lots of us M275 types obssess about the operation and performance of the IC pump, but I'm not convinced that we can use the valve test to establish the health of the pump. Having said that, I'm not sure what test we should do instead. All I can think of is to monitor intrake air temperatures with an OBD II reader, and see if the system is able to keep temps between 95 & 115F over a range of normal driving conditions.
Nick
Last edited by Welwynnick; Sep 8, 2012 at 07:52 AM.
MBWorld Fanatic!


Joined: Jan 2007
Posts: 1,986
Likes: 9
From: Toronto
V12TT
Is it normal for the IC system coolant to look white/milky? Lots of bubbles too in mine.
Did anyone add an expansion tank, like how the 55k guys add the BMW reservoir when doing the split system?
Did anyone add an expansion tank, like how the 55k guys add the BMW reservoir when doing the split system?

Member
Joined: May 2010
Posts: 112
Likes: 1
From: medina ,ohio
05,cl65;33ford3wc.
I have checked the IC fluid in my car when cold, with everything off. It is just below the cap about an inch if I recall, and looks like mb antifreeze. I'm unclear why the cap has a don't remove caution on it; I'm guessing removing it when its running may enhance aerating the fluid. Your fluid check sounds like it has air.
MBWorld Fanatic!
Joined: Jan 2007
Posts: 1,986
Likes: 9
From: Toronto
V12TT
I have checked the IC fluid in my car when cold, with everything off. It is just below the cap about an inch if I recall, and looks like mb antifreeze. I'm unclear why the cap has a don't remove caution on it; I'm guessing removing it when its running may enhance aerating the fluid. Your fluid check sounds like it has air.

Junior Member
Joined: Mar 2016
Posts: 40
Likes: 1
2004 Mercedes s600
[FONT=Arial][SIZE=3]
Step 6 � Bleed the System:
Ok, I have been informed that this is supposed to be done at a dealership with a special tool (I think this only applies to the factory pump with the vacuum fitting). I didn�t take it to the dealer, and I believe it is properly bled. First, back the car off the ramps and then put the ramps in the rear of the car, so it has a very significant nose down attitude. Then remove the radiator cap at the rear of the engine, and then remove the two �valve stems� from the two Schraeder valves near the cap. I used a cut coke bottle and pressed it into the filler, it had a nice snug fit. Then put the two 3/8� fuel lines over the valves and run them into the coke bottle. At this time, fill the coke bottle most of the way full with either distilled water (do not use bottled/tap water) or coolant and then start the car. Let the car idle for a while, and when the pump turns on, you should see fluid flow from the fuel lines into the coke bottle. Let the car run until there are no more bubbles in the water. Keep adding water as necessary to fill the system. Once that is done, you�ll need to have someone help you. They will need to keep the coke bottle full as you remove the fuel lines and replace the valve stems. Then, remove the coke bottle and cap the system. You should be done at this point and ready to drive!
Questions, comments, suggestions??
I have MB OEM coolant leftover, do you know what the best ratio is of Distilled water to coolant? i read some prefer little bit more water to coolant in the intercooler line, anybody want to shed some light on this be great.
I know this old post, but if your still around I really appreciate the help and again amazing write up!.


MBWorld Fanatic!
Joined: Nov 2010
Posts: 2,605
Likes: 343
From: Welwyn, Herts, UK
2006 S600
Guys,
When you bleed the charge cooler, don't forget to bleed the return line from the intercoolers to the heat exchanger.
There's a conventional bleed nipple at the forward end of the metal pipe, located at the front, left corner of the engine.
The pipe then downwards towards the HE inlet, and air bubbles don't go downhill.
Nick

Senior Member
Joined: Sep 2012
Posts: 411
Likes: 23
2011 E550 Coupe, 1992 Corvette ZR-1, 1991 368ci ZR-1, 1990 ZR-1, 1987 Callaway TT, 05 SL600, CLA45
I tried the setup with the coke bottle on my SL600, once with the car running, and then I put a connector on the pump and did it with the engine cold. The pump ran but no bubbles and IATs are still running high.
Any thoughts, I lost very little coolant when replacing the pump
Any thoughts, I lost very little coolant when replacing the pump

Super Member
Joined: Mar 2010
Posts: 643
Likes: 72
From: London UK
2013 W204 C63 AMG, 2008 W221 S65 AMG
I tried the setup with the coke bottle on my SL600, once with the car running, and then I put a connector on the pump and did it with the engine cold. The pump ran but no bubbles and IATs are still running high.
Any thoughts, I lost very little coolant when replacing the pump
Any thoughts, I lost very little coolant when replacing the pump
Super Member
Joined: Mar 2010
Posts: 643
Likes: 72
From: London UK
2013 W204 C63 AMG, 2008 W221 S65 AMG
A standard vac fill with work to get some flow through your system. You can then bleed via the bleeder ports on the top of the IC.
Ideally you need to then vac 20L of coolant from these via a Y pipe and a vac box, whilst also drawing in coolant to the filler.
Ideally you need to then vac 20L of coolant from these via a Y pipe and a vac box, whilst also drawing in coolant to the filler.
Last edited by alexanderfoti; May 26, 2017 at 12:03 PM.


