


V12TT Coil Pack DIY Replacement - With Pictures
Thread Starter
Super Member
Joined: Apr 2009
Posts: 537
Likes: 3
From: West Texas
Yes
V12TT Coil Pack DIY Replacement - With Pictures
Disclaimer: Use this �How To� at your own risk. I am not responsible for anything you break (including yourself).
This �How To� covers the driver�s side (cylinders 7-12) coil pack. The procedure for the passenger side (cylinders 1-6) is almost the same. The time to complete a single coil pack change will be between 20-60 minutes depending on your skill level.
This �How To� can also help with spark plug and/or plug insulator replacement.
Tools:
�� or 3/8� drive ratchet (required)
�� or 3/8� drive extension (required)
7mm socket (optional)
Flat screwdriver (required)
5/16� 12 point socket (required � probably actually a metric socket, but 5/16� works just fine)
Torx T20 (required)
Paper towels/rags (optional)
Needle nose pliers (may be required � see Step 5)
Parts:
Coil pack (required)
Insulators (required if not using a BNIB coil pack)
Spark Plugs (optional � 12 per side)
Procedure:
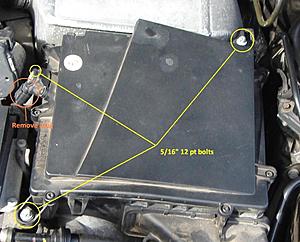
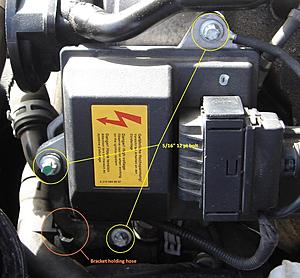
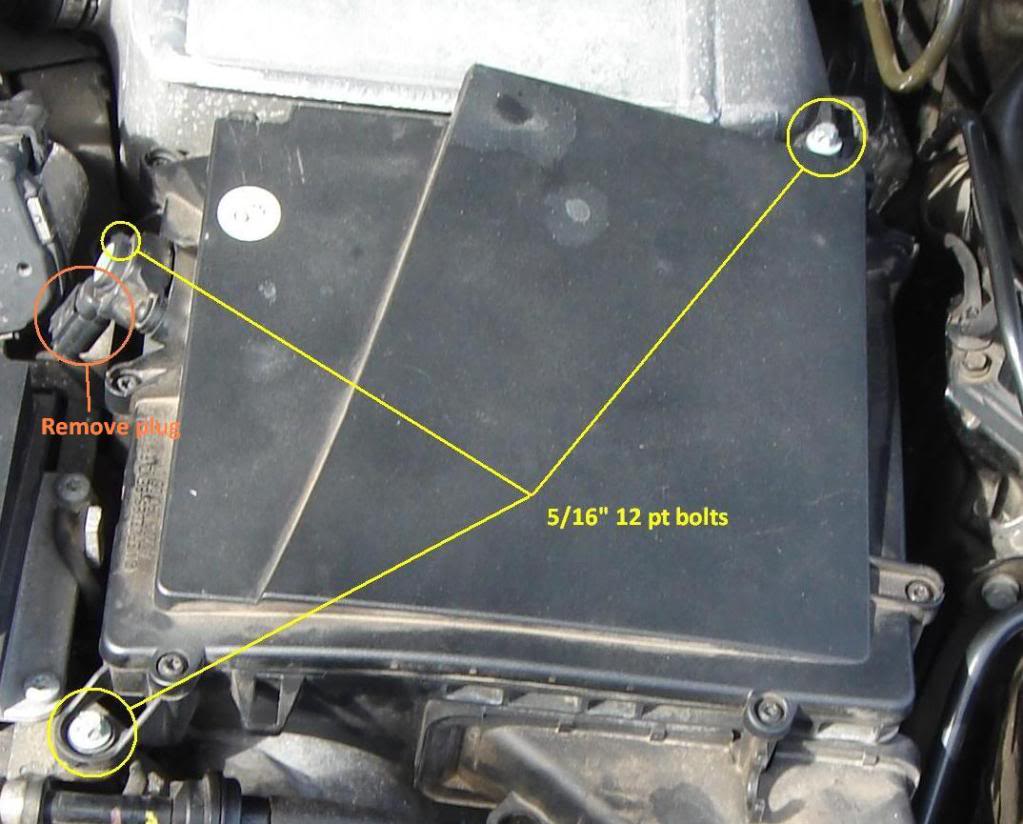
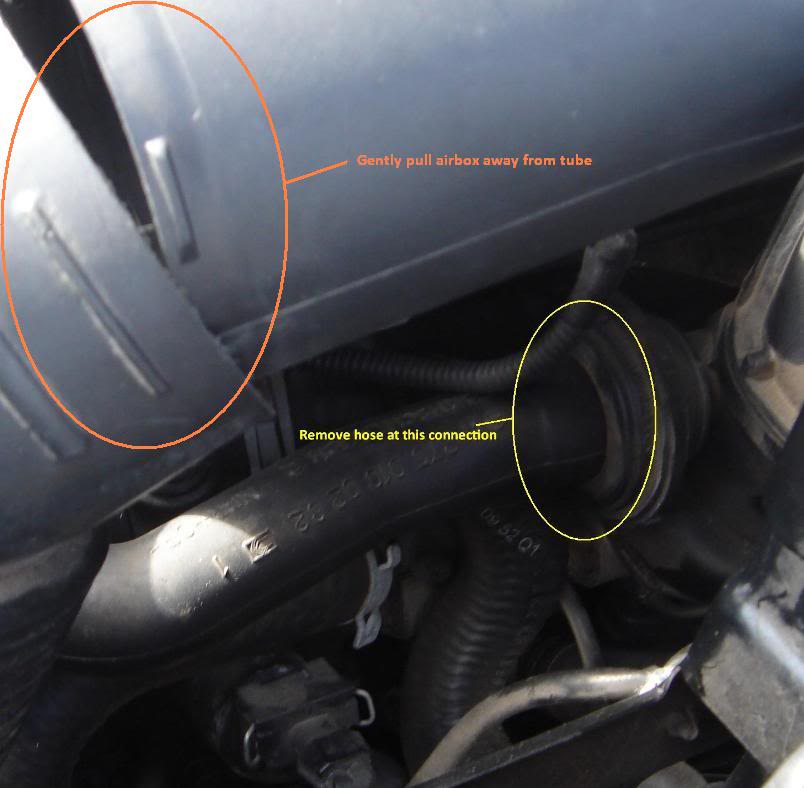
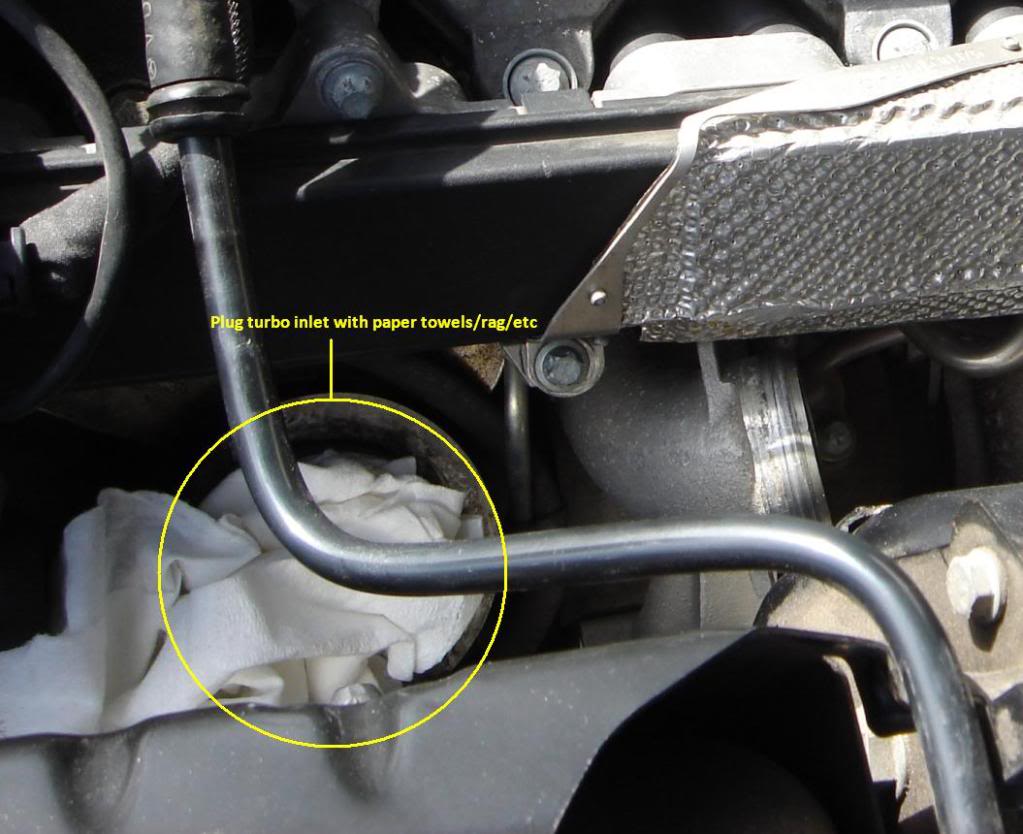
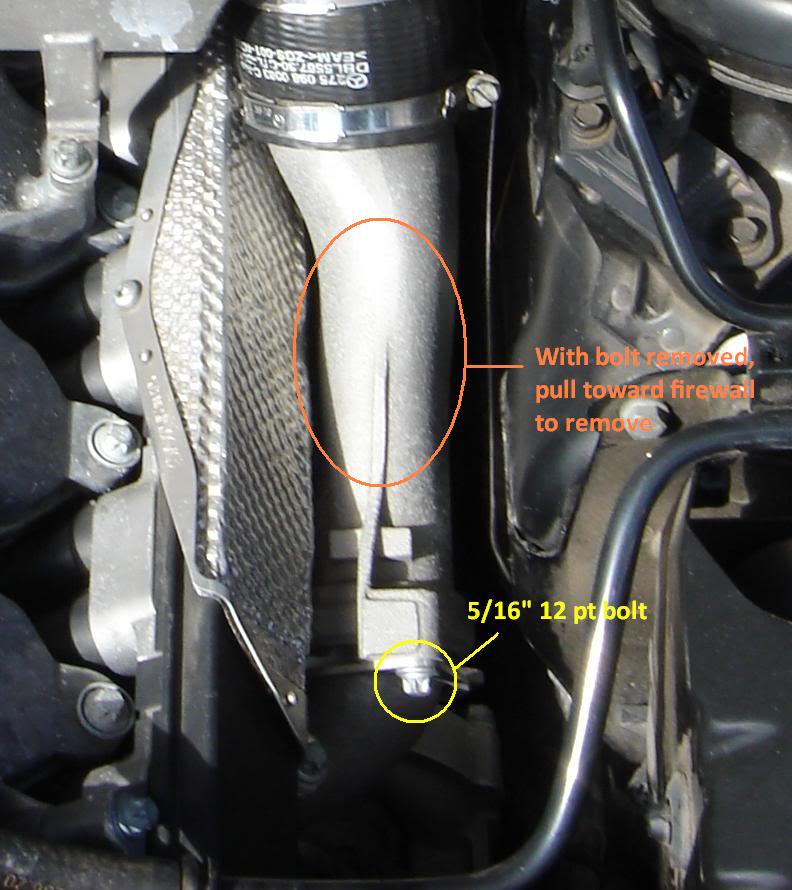
Step 1 � Remove air box:
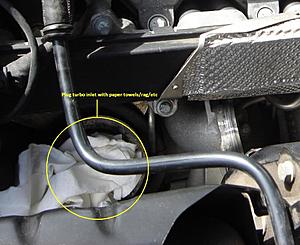
First, remove the key from the ignition. You will be working under the hood and don�t want to risk someone else accidentally starting your car with your fingers in there. Then, remove both engine covers by simply pulling upwards on them. With the covers off, remove the three 5/16� 12 pt bolts holding the air box down (yellow circles), unclip the plug (orange circle), remove the hose (yellow circle), then pull the airbox upward gently and toward the firewall to separate it from the intake tube (orange circle). I recommend you plug the turbo inlet with either paper towels, a rag, or something of the like so you don�t drop anything into the turbo (yellow circle).

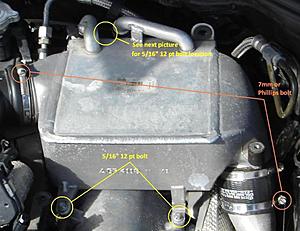
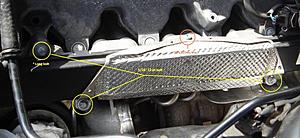
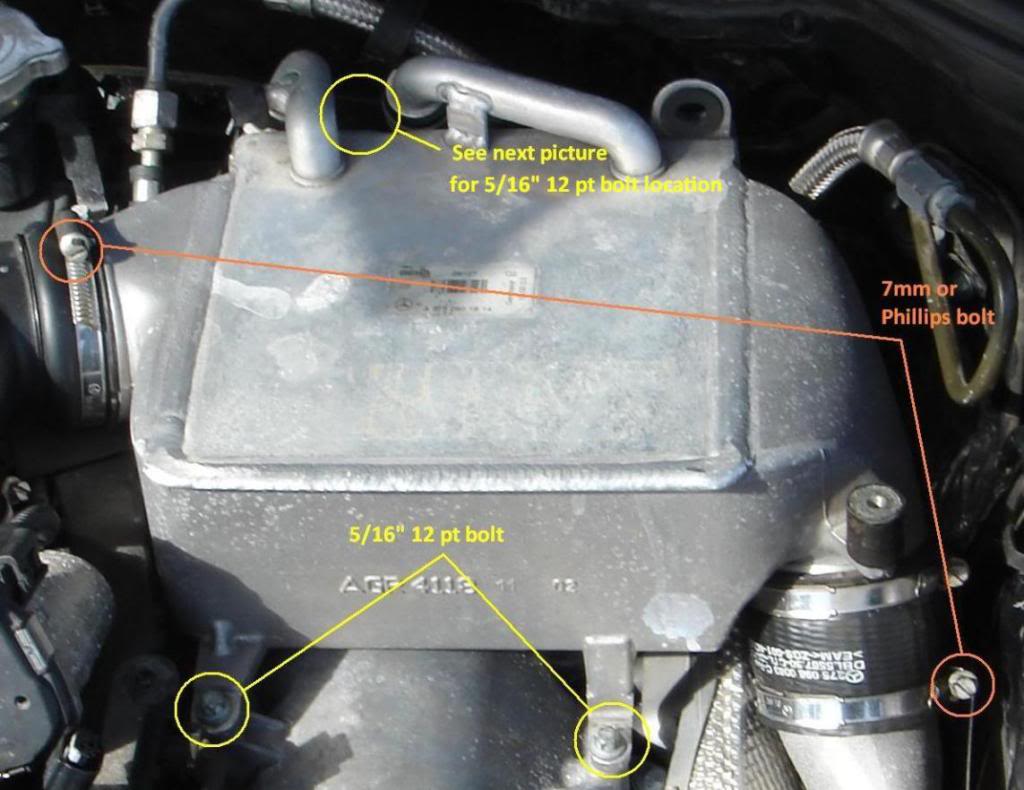
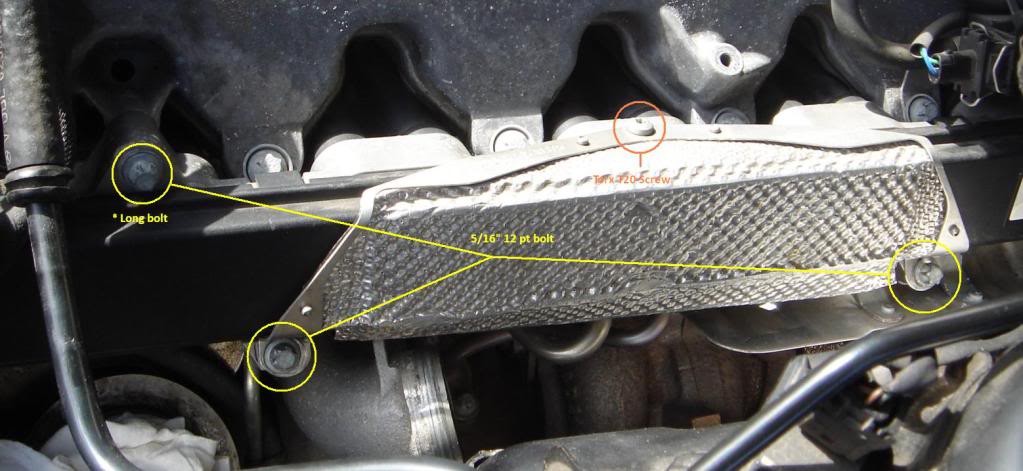
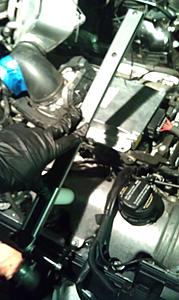
Step 2 � Remove Intercooler:
To remove the intercooler begin by remove the three 5/16� 12 pt bolts (yellow circles) and loosening the two hose clamps with either a 7mm socket (preferred) or flat screwdriver (orange circles). Then gently wiggle the intercooler up and out of the way, pushing it toward the firewall. Don�t move it too far, as it still has two hoses attached to it. These hoses do not need to be removed to replace the coil pack or spark plugs.

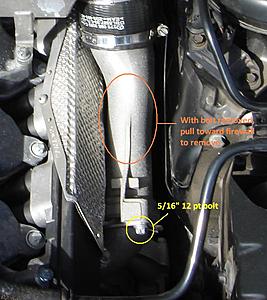
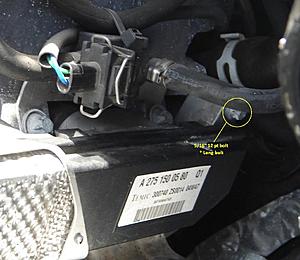
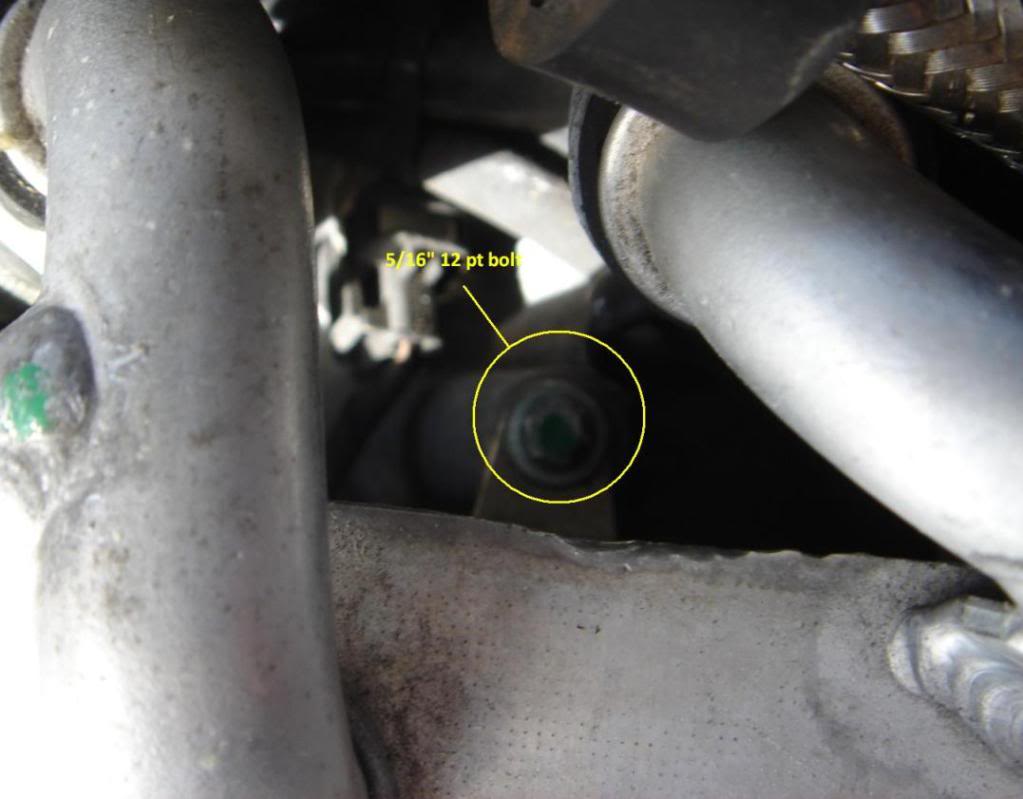
Step 3 � Remove Turbo-to-Intercooler Pipe:
Remove the 5/16� 12 pt bolt and hold down bracket (yellow circle) and pull/wiggle toward the firewall to remove (orange circle). The passenger side of the car is harder than the drivers side on my car, so you may have to use some force.
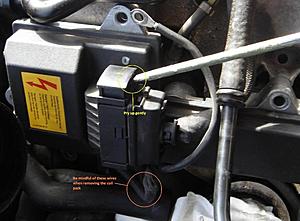
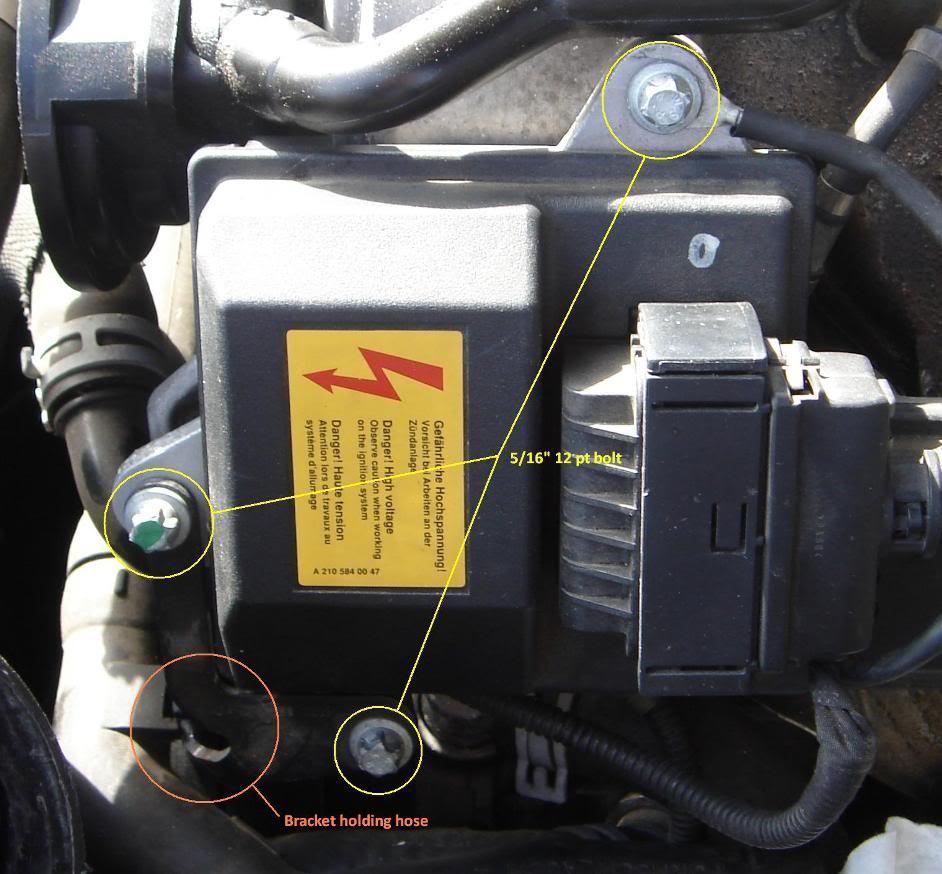
Step 4 � Remove Coil Pack:
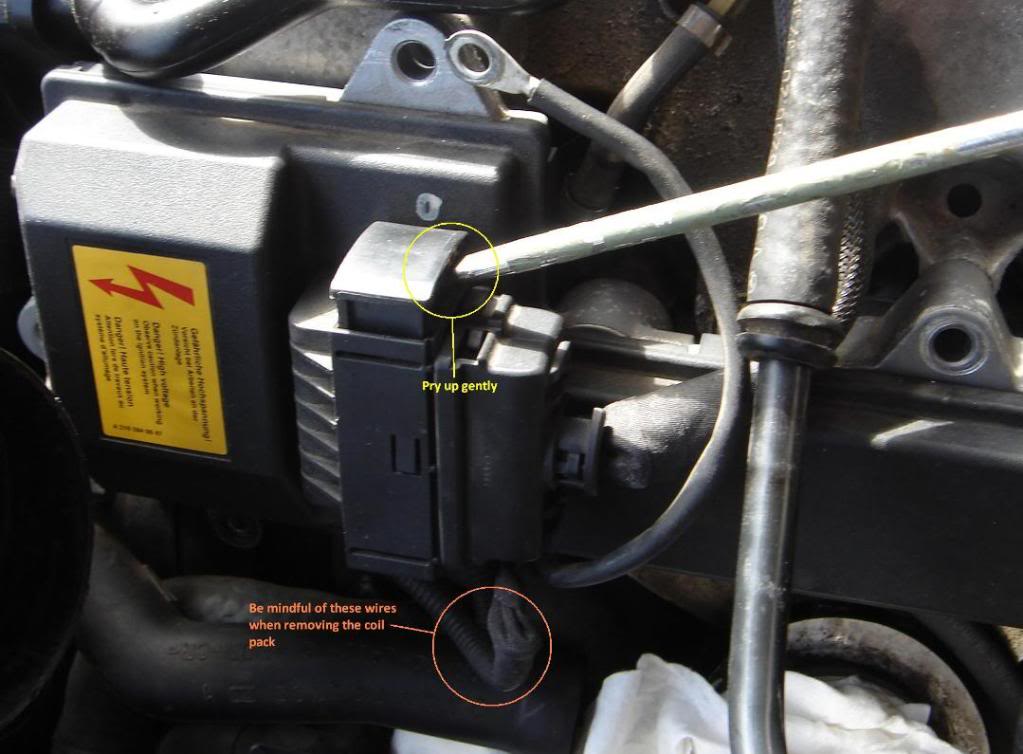
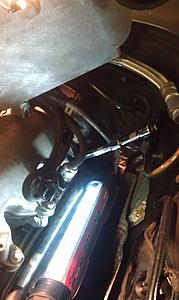
First remove seven 5/16� 12 pt bolts � pay special attention to the location of the two long bolts (yellow circles) and remove the Torx T20 screw on the heat shield (orange circle). Next, remove the plug by prying upwards with a screwdriver. It will come up approximately �� inch, then pull towards firewall as you keep lifting (yellow circle). Remove the hose from the bracket under the front of the coil pack (orange circle). Now pull the coil pack straight out. It will require quite a bit of force, pull forcefully but not abruptly (especially if you are just doing an insulator or spark plug change). Pay special attention to the wires are you try to remove the coil pack (orange circle). The coil pack will come out without removing anything else, but you will have to take care as you try to remove it.
Step 5 � Remove Insulators/Spark Plugs (if required):
Once you have the coil pack removed, there may still be some red insulators left on the spark plugs. To remove them, use needle nose pliers. If you are replacing with a new coil pack (that comes with new insulators) you will not need to be as careful. If you are not replacing your insulators � use care with these. Note: I am told that old/cracked insulators can give the same codes as a bad coil pack. These insulators are available separately. If they are bad, when you squeeze them they will look cracked/dry rotted. If they are still soft and pliable with no cracks, they are probably not the problem. If you are going to replace your spark plugs, now is the time!
Sorry, I forgot to take pictures of this part � but it�s very straightforward.
Step 6 � Reassemble:
Basically repeat Steps 1-5 in reverse order. A few notes:
1) When you install the coil pack, give firm pressure to seat it; but do not push too hard or you may break it. You can also get it started and use the bolts to help finish seating it. Pushing down directly over a tube is better than pushing between them. And remember where your two long bolts go.
2) Don�t forget to put the heat shield on the new coil pack.
3) Take care with the wires attached to the plug.
4) When you put the turbo-to-intercooler pipe back on, do not tighten the bracket all the way until you have the intercooler reattached and bolted down; otherwise you may put it in a bind.
5) Do not over tighten the bolts when you reassemble � you are putting bolts in fine threaded aluminum and you can strip it.
This �How To� covers the driver�s side (cylinders 7-12) coil pack. The procedure for the passenger side (cylinders 1-6) is almost the same. The time to complete a single coil pack change will be between 20-60 minutes depending on your skill level.
This �How To� can also help with spark plug and/or plug insulator replacement.
Tools:
�� or 3/8� drive ratchet (required)
�� or 3/8� drive extension (required)
7mm socket (optional)
Flat screwdriver (required)
5/16� 12 point socket (required � probably actually a metric socket, but 5/16� works just fine)
Torx T20 (required)
Paper towels/rags (optional)
Needle nose pliers (may be required � see Step 5)
Parts:
Coil pack (required)
Insulators (required if not using a BNIB coil pack)
Spark Plugs (optional � 12 per side)
Procedure:
Step 1 � Remove air box:
First, remove the key from the ignition. You will be working under the hood and don�t want to risk someone else accidentally starting your car with your fingers in there. Then, remove both engine covers by simply pulling upwards on them. With the covers off, remove the three 5/16� 12 pt bolts holding the air box down (yellow circles), unclip the plug (orange circle), remove the hose (yellow circle), then pull the airbox upward gently and toward the firewall to separate it from the intake tube (orange circle). I recommend you plug the turbo inlet with either paper towels, a rag, or something of the like so you don�t drop anything into the turbo (yellow circle).
Step 2 � Remove Intercooler:
To remove the intercooler begin by remove the three 5/16� 12 pt bolts (yellow circles) and loosening the two hose clamps with either a 7mm socket (preferred) or flat screwdriver (orange circles). Then gently wiggle the intercooler up and out of the way, pushing it toward the firewall. Don�t move it too far, as it still has two hoses attached to it. These hoses do not need to be removed to replace the coil pack or spark plugs.
Step 3 � Remove Turbo-to-Intercooler Pipe:
Remove the 5/16� 12 pt bolt and hold down bracket (yellow circle) and pull/wiggle toward the firewall to remove (orange circle). The passenger side of the car is harder than the drivers side on my car, so you may have to use some force.
Step 4 � Remove Coil Pack:
First remove seven 5/16� 12 pt bolts � pay special attention to the location of the two long bolts (yellow circles) and remove the Torx T20 screw on the heat shield (orange circle). Next, remove the plug by prying upwards with a screwdriver. It will come up approximately �� inch, then pull towards firewall as you keep lifting (yellow circle). Remove the hose from the bracket under the front of the coil pack (orange circle). Now pull the coil pack straight out. It will require quite a bit of force, pull forcefully but not abruptly (especially if you are just doing an insulator or spark plug change). Pay special attention to the wires are you try to remove the coil pack (orange circle). The coil pack will come out without removing anything else, but you will have to take care as you try to remove it.

Step 5 � Remove Insulators/Spark Plugs (if required):
Once you have the coil pack removed, there may still be some red insulators left on the spark plugs. To remove them, use needle nose pliers. If you are replacing with a new coil pack (that comes with new insulators) you will not need to be as careful. If you are not replacing your insulators � use care with these. Note: I am told that old/cracked insulators can give the same codes as a bad coil pack. These insulators are available separately. If they are bad, when you squeeze them they will look cracked/dry rotted. If they are still soft and pliable with no cracks, they are probably not the problem. If you are going to replace your spark plugs, now is the time!
Sorry, I forgot to take pictures of this part � but it�s very straightforward.
Step 6 � Reassemble:
Basically repeat Steps 1-5 in reverse order. A few notes:
1) When you install the coil pack, give firm pressure to seat it; but do not push too hard or you may break it. You can also get it started and use the bolts to help finish seating it. Pushing down directly over a tube is better than pushing between them. And remember where your two long bolts go.
2) Don�t forget to put the heat shield on the new coil pack.
3) Take care with the wires attached to the plug.
4) When you put the turbo-to-intercooler pipe back on, do not tighten the bracket all the way until you have the intercooler reattached and bolted down; otherwise you may put it in a bind.
5) Do not over tighten the bolts when you reassemble � you are putting bolts in fine threaded aluminum and you can strip it.
MBWorld Fanatic!


Joined: Jan 2011
Posts: 1,181
Likes: 59
CL65
Very nice job!!! The step by step with pics make it dummy proof. This should give anyone with a little common sense the confidence in doing there own plugs. You made it look easier than putting a kids toy together. Great contribution.
Thread Starter
Super Member
Joined: Apr 2009
Posts: 537
Likes: 3
From: West Texas
Yes
No problem, just hope it helps.
You know the joke, if you make it dummy proof, they'll just make a better dummy.
Seriously, though - I know some of the guys that own these cars really want to do some of the work themselves, but just aren't sure. I just wanted to show that this is a very very easy change and can save you money if that sort of thing matters to you!
Most people here have seen it, but there is also a write up on the intercooler pump I did that is in similar format.
Super Member
Joined: Apr 2006
Posts: 796
Likes: 0
From: Raleigh NC
2007 E63, 2006 C55
RE: Coil Pack R&R
I've ordered 24 OEM NGK plugs, and will do my plugs next week. Just did them in my E63, which were not hard at all.
I was on the fence with doing the V12 myself or paying someone, but seeing your write up and pics persuaded me to go for it. Much appreciated, and thanks for sharing.
I was on the fence with doing the V12 myself or paying someone, but seeing your write up and pics persuaded me to go for it. Much appreciated, and thanks for sharing.
Trending Topics
Senior Member
Joined: Feb 2010
Posts: 390
Likes: 2
From: SoCal
CL65, FJ80, Sportsmobile 4x4, Model X Plaid
Just took the right coil out. Old original Parton...
The air box just wouldn't let go but it finally let go...
The rest was straight forward.
Want to add you might want to snip the ziptie that holds a wire that is below the square part of the coil that wraps around, on the right coil. Also there are what looks like vacuum lines that also hinders from pulling out the right coil pack, had to disconnect it at the T.
Other than that, can you believe getting the air box to let go by pushing up was the hardest, b#%*h.
First time is always the hardest.
Thanks for the instructions!
Last edited by NRL; Apr 13, 2012 at 04:48 AM.
MB World Stories
The Best of Mercedes & AMG

Manual Mercedes? 6 Times Sindelfingen Let Drivers Have All The Fun
Verdad Gallardo
Mercedes SLR McLaren 722 S Is Extremely Rare Example Modified by McLaren
Verdad Gallardo
8 Classic Boxy Mercedes Designs That Have Aged Like Fine Wine
Verdad Gallardo
Flawlessly Restored Mercedes 190E Evo II Heads to Auction
Verdad Gallardo
Electric Mercedes C-Class Unveiled: 11 Things You Need to Know
Verdad Gallardo
Mercedes EQS Gets A Major Update: Everything You Need to Know
Verdad Gallardo
5 Underrated Mercedes-Benz Models That Don't Get the Love They Deserve
Verdad Gallardo
Mercedes 300D Has Pushed Well Past 1 Million Miles and It Ain't Stopping
Verdad Gallardo
10 Most Reliable Mercedes-Benz Models You Can Buy Used
Verdad GallardoSenior Member
Joined: Feb 2010
Posts: 390
Likes: 2
From: SoCal
CL65, FJ80, Sportsmobile 4x4, Model X Plaid
Originally Posted by NRL
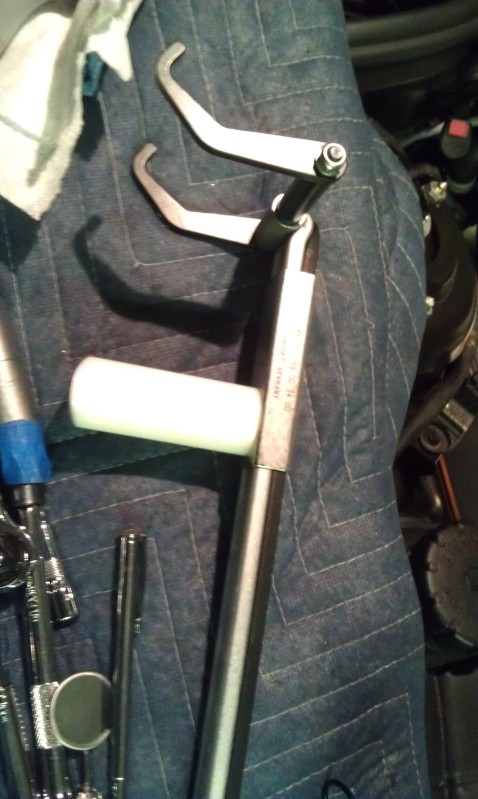
I did it once without that special tool.. And the rest with that ingenious tool.
Its easier with the tool. Made by Hazet, Mercedes Part# 137589003300.
You need the base too 285589009400 which is used to leverage on the valve cylinder cover, and pivots the coil out a bit at a time..
Again not necessary, just makes it easier.
Good luck, I just got mine all back together, a new beast..
here are some pics of that tool I mentioned and some other pics


Member
Joined: Dec 2009
Posts: 141
Likes: 0
2005 CL65 (current), 2001 CL600 (chopped)
Step 5 – Remove Insulators/Spark Plugs (if required):
Once you have the coil pack removed, there may still be some red insulators left on the spark plugs. To remove them, use needle nose pliers. If you are replacing with a new coil pack (that comes with new insulators) you will not need to be as careful. If you are not replacing your insulators – use care with these. Note: I am told that old/cracked insulators can give the same codes as a bad coil pack. These insulators are available separately. If they are bad, when you squeeze them they will look cracked/dry rotted. If they are still soft and pliable with no cracks, they are probably not the problem. If you are going to replace your spark plugs, now is the time!
Once you have the coil pack removed, there may still be some red insulators left on the spark plugs. To remove them, use needle nose pliers. If you are replacing with a new coil pack (that comes with new insulators) you will not need to be as careful. If you are not replacing your insulators – use care with these. Note: I am told that old/cracked insulators can give the same codes as a bad coil pack. These insulators are available separately. If they are bad, when you squeeze them they will look cracked/dry rotted. If they are still soft and pliable with no cracks, they are probably not the problem. If you are going to replace your spark plugs, now is the time!
EDIT: Are we talking about this? 0001590080 gasket? qty 24?
I also need to know which side is which, I have misfires in cylinders 7, 8, 9, 11, just curious if this is left or right side (left being driver, right being passenger).
Last edited by ch33sehead; May 24, 2012 at 02:29 PM.

Member
Joined: Feb 2012
Posts: 144
Likes: 1
2005 CL65
Do you have the part number for the insulators themselves or any idea where to buy them? I don't see it in EPC.
EDIT: Are we talking about this? 0001590080 gasket? qty 24?
I also need to know which side is which, I have misfires in cylinders 7, 8, 9, 11, just curious if this is left or right side (left being driver, right being passenger).
EDIT: Are we talking about this? 0001590080 gasket? qty 24?
I also need to know which side is which, I have misfires in cylinders 7, 8, 9, 11, just curious if this is left or right side (left being driver, right being passenger).
Member
Joined: Feb 2012
Posts: 144
Likes: 1
2005 CL65
I ordered my plugs and coil packs they should be here towards the end of this week so in the meantime I just removed both coil packs and spark plugs today. I have to say, this was REALLY REALLY easy I didn't look at any manuals or websites I just jumped in head first. This was the first one I've done on any v12 mercedes.
I timed myself just for kicks. I did the passenger side first and it took me 52 minutes. The driver side only took me 35 minutes since I had the experience of just doing the passenger side and it only took me 15 minutes to remove the coil pack. I didn't use any electric or air tools this was all by hand. And I wasn't rushing I was just cruising along listening to music and texting my old lady at the same time. Now she (the car not my old lady) sits and waits for Fedex to get here.....
How much do shops or dealers charge for this? I may have to open up my garage for others that need spark plugs or coil packs changed.

Junior Member
Joined: May 2012
Posts: 49
Likes: 4
From: Shanghai, China
2004 S600 Twin Turbo V12

Junior Member
Joined: Feb 2014
Posts: 39
Likes: 9
CL600 Bi Turbo 2003 Renntech, BMW E39 530D SE
Ignition control unit
Once again excellent write up! Quick question though, is it worth changing the ignition control unit which sits on top of the engine at the same time? I have heard that changing coil packs and not the icu at same time causes the icu to quickly break the new coil packs? Thanks alex
Senior Member
Joined: Apr 2014
Posts: 290
Likes: 3
SL65


Super Member
Joined: Jan 2006
Posts: 607
Likes: 8
From: South Florida
W220 V12TT Land Yacht / W211 E55 Estate
Looking at a 02 V12TT S600 today that does not have maintenance records. I know the coil pack and igniter are big money repairs. Is there any way to visually confirm that the coil packs have been replaced with the "new and improved" unit? Thank you!!!
Senior Member
Joined: Apr 2014
Posts: 290
Likes: 3
SL65
If you look at the part numbers on the black and white sticker they should end with 680 or 780 depending which side of the engine your looking at, these would be the newer coil packs! Also if you can't see the stickers for the part number the newer ones have a voltage sticker warning label on them. Hope this helps
Super Member
Joined: Jan 2006
Posts: 607
Likes: 8
From: South Florida
W220 V12TT Land Yacht / W211 E55 Estate
If you look at the part numbers on the black and white sticker they should end with 680 or 780 depending which side of the engine your looking at, these would be the newer coil packs! Also if you can't see the stickers for the part number the newer ones have a voltage sticker warning label on them. Hope this helps
Senior Member
Joined: Apr 2014
Posts: 290
Likes: 3
SL65
So the yellow sticker is the warning one, the white is the part number, although dont quote me 100% that all the newer ones have the warning sticker, I think I've seen newer ones without it, but the part number will definitely 100% tell you


