There's a lot of discussion of DaviesCraig pumps early in this thread. They have similar characteristics to the Meziere WP136, Johnson CM90 and Jabsco 50840, which are engine cooling pumps, and tuned for a different system resistance. They have too high flow and too low pressure for IC systems.
Nick
Yeah, the pump on my Buick is a Meziere WP336S. Same scenario...it works great with low restriction. It's great for my big intercooler core for the turbo with the 1.5" hoses (the inlet/outlet fittings are actually like 1" though)...but I have a bosch mercedes pump as an inline booster for the more restrictive cooler under the supercharger. It works well enough, but I wish I'd known then what I know now...the Meziere was $500, I could have had the higher current limit EMP pump for that, and not needed the second pump.
OT: How do you measure flow? I never found a good solution for that.
Nick
You could probably get complicated with the math and temperature sensors to figure it out, or get an expensive flow meter (my dad lives on a small air strip and has a 500 gallon tank of av gas, which has a very accurate flow-meter inline but I'm sure they are expensive). I just put my return lines out on the ground and timed how long it took to pump my 12 gallon cooler dry through the entire system, lol (not long at all with both pumps going). I don't recall the exact comparison figures, only that it was significantly better (like 4x the flow) from the Meziere once I upgraded the line size.
Through 5/8" hose, I don't think the Meziere even performed as well as the original Bosch "cobra" pump I had.
On a side note, do you think there's any advantage to be had by pumping the coolant through the system faster than 1 turn per 1/4 mile run? I mean say the system holds 2 gallons and you can pump 8 gpm @ whatever system backpressure is at that flow rate so the intercoolers always have "fresh" water during a 15 second period do you gain anything by flowing any more water than you have capacity?
I really don't know the answer. Slower pumping means the water arrives at the intercoolers cooler and leaves hotter, and that there is a larger temperature differential between water at various points in your system. Which should make the front mount heat exchanger more efficient, but the intercoolers might have a higher temp due to the water staying there longer (but it was possibly cooler water to start with). On the other hand, pumping it faster would keep your water temps more consistent throughout the system and no one point would be likely to heatsoak, which would ensure the intercoolers were receiving a more consistent water temp across the entire core. Would it depend more on what your total capacity as to which strategy makes more sense? I kind of think the flow is only important to the extent that the mass flow rate of water is enough to maintain a reasonable temperature rise from one end of the intercooler to the other, beyond that, more flow may just be crippling your heat exchanger capacity (which will always happen anyway the closer the water temps get to ambient).
I had started a response to that, but decided the topics I wanted to address were perhaps better served by their own thread, so I will make one. Suffice it to say that I agree with you and believe it's correct that higher flow always gives better cooling. Any indication that I thought otherwise from my previous post was just me playing devil's advocate.
What I really wonder about is to what degree the diminishing returns come into effect in say a 100% stock intercooler system with just a pump upgrade. Are you doubling the flow to net a 1% cooling improvement, or are you doubling the flow to net a 20% cooling improvement, etc? I simply don't know the answer to that, and thus don't know how far it is worth chasing. But make no mistake, I'm an enthusiast...I enjoy the chase, even if it's mostly to disproportionately expensive results. I still try to prioritize on somewhat of a cost-efficiency basis though.
The tricky thing with cooling systems is that the more effective they are, the less efficient they become, and vice versa (at least in terms of the front mount heat exchanger)...due to diminished temperature differential.
I called EMP pumps distributors in USA and UK turns out that it is not a multi voltage pump its either 12v or 24v , USA distributor told the $508.64 . and I am currently waiting for the price in the UK .
USA EMP pumps distributors locator : http://www.emp-corp.com/support/dist...or/default.asp
Buy I also wrote a comment on youtube guy installed EMP pump on his mustang and this is what he said :
Mercedes-Benz & Cars and street racing3 days ago:
does this emp wp29 24v version works with 12volts?
Reply
Jamieson Allen
+Mercedes-Benz & Cars and street racing
Yes this works with 12 volts. Also you can have it flow at two different rates. When you order just specify which rate you want. You can send it back also to have them program a new rate too.
So as far as I understand giy buy 24v pumps and run it on 12v?
or may be just a common 12v to 24v converter would work for us?
I will get more answers on this from emp pump distributors wanna install this pump on my car so bad
I'm still like 99% sure you can't run the 24V pump properly on 12V. It would probably just have terrible performance. Chances are that guy has a 12V pump and didn't understand what you were asking. There are at least two different calibrations available on the pump that change the current limit and such, I believe that's what he was talking about.
I'm 99% sure you can't do it either. These electronic centrifugal pumps are works of art, and finely tuned. If run one at the wrong voltage, into the wrong resistance, with the axis tilted, of with the outlet pointing down, you'll have a world of problems. There's a lot of engineering goes into cooling systems.
I also wasn't too impressed with his "garden hose" flow, really. It didn't appear to be coming out with much force/velocity. I wish I had a video of my meziere/bosch combo in action in the Buick. It really sprays out the return (on the bosch side. The big Meziere return is a less impressive velocity/pressure but that's also a 1.5" hose as well.
email from UK EMP pumps distributor : Further to your telephone enquiry can you please complete the attached form for us to enable your exact requirements, as there are different version of the WP29.
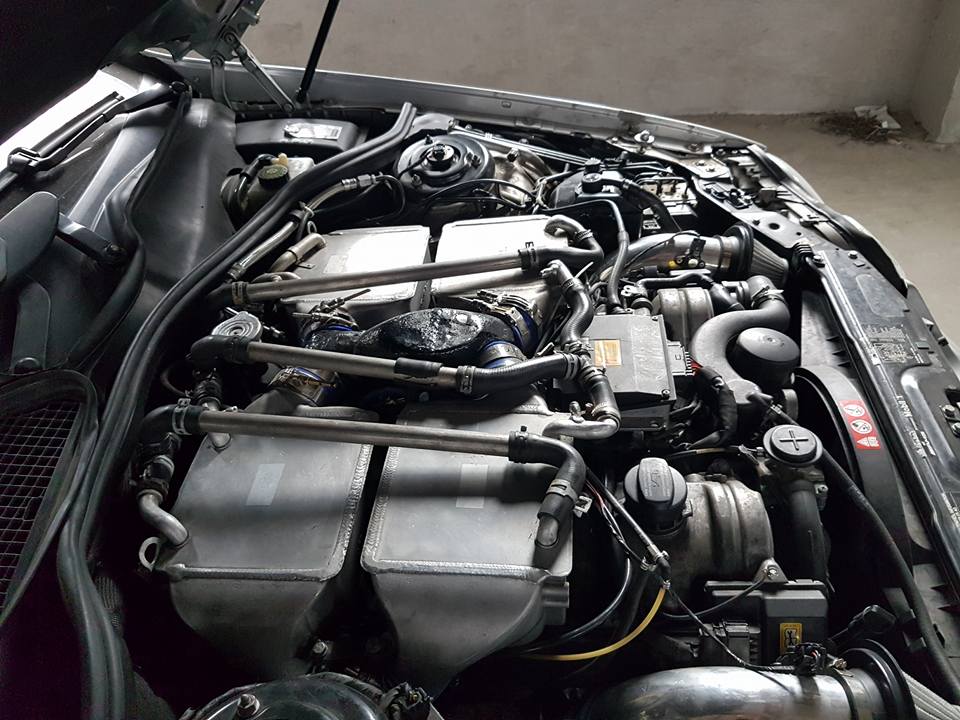
I successfully fit a BMW X3 radiator tonight. Tight is an understatement. I haven't gotten the tanks sealed up or the new barbs on yet but it fits. The top will end up flush with the radiator/condenser and the bottom sits on the belly tray mounts. I still probably need to relocate the two center screws. I drilled new holes for the hood latch and clearanced the stop so the release doesn't stick out...lines/ABC cooler appear to clear everything.
I still have quite a bit to do, but I think it will be done before the end of the weekend. Still need to install mount points for the ABC cooler and lines onto this radiator, and hopefully get the tanks modified for my intercooler lines. I'm super tempted to pull the tanks off and make custom aluminum ones. There's actually quite a bit of room I could make the tanks bigger to bump the system capacity a bit. But at this point, I kind of just want to get the car back on the road so I'll make due with the plastic tanks for now (unless they end up not holding water after the modifications).
I am also considering building a reservoir that would tuck right in that empty corner of the bumper there on the passenger side. I really think some extra capacity would do wonders for keeping temps down on longer WOT pulls (or especially at the track). I don't know if it's worth the trouble with the available space though. I need to throw the bumper cover back on and get some dimensions so I can see what kind of capacity it would add.
I definitely recommend fitting a proper header tank to the IC system. Bleeding is a nightmare, and even a tiny bit of air in the system makes a huge difference to pump performance.
I definitely recommend fitting a proper header tank to the IC system. Bleeding is a nightmare, and even a tiny bit of air in the system makes a huge difference to pump performance.
Nick
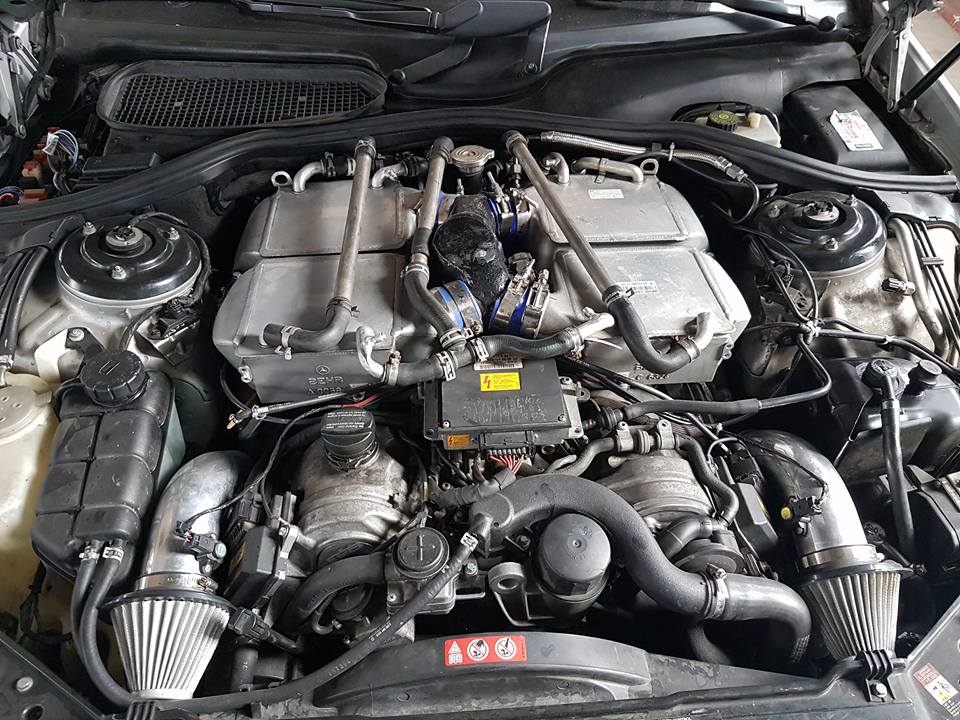
Agreed, it's a huge pain. I am going to try vacuum filling it this time...but also plan to add the expansion tank and radiator cap. The latest plan is to go ahead and add a trunk tank and refrigerated loop (although I won't have that up and going for a while yet), but I have pretty well done away with the idea of installing 4 intercoolers...I really want to keep the stock airboxes and underhood plastics in place.
So basically, I'll be installing it killer chiller style, with valving to bypass the front mount heat exchanger if I'm wanting to run ice in the tank or operate strictly on the A/C chiller system. Ideally, the stock pump would continue to circulate water through the heat exchanger and brazed plate A/C condenser I will be adding, while the pump in the rear tank will continue to pump from the trunk mount tank through the intercoolers and the brazed plate A/C evaporator core. This will take some extra plumbing and some 3-way valves (probably manual for now, I don't really want to come up with the $600 or so it would take to do it electronically). I think it would take 3 valves to have complete flexibility with the system.
Theoretically, that will allow me to operate the system any of three ways. 1.) As a stock configuration with just a lot more system water capacity.
2.) As an ice box system by bypassing just the heat exchanger, keeping both pumps working on one loop.
3.) In chill mode as two completely separate loops. One for chilling coolant and supplying it to the intercoolers, and one as an ambient heat exchanger loop used to water-cool an auxiliary brazed-plate A/C condenser to enhance the performance of the chilled loop.
That would give me the opportunity to experiment with various setups to see what works best without having to change anything other than flipping some valves. I may well find out that the A/C setup works well enough that I won't need/want changeover valves. Or that it's more or less pointless and I should just stay in a stock-style heat exchange loop all the time. But regardless of what ends up working, this way I wouldn't necessarily have to change anything later.
And if it does turn out I'm wanting to switch modes frequently or from the cabin, I can invest in upgrading to electronic valves after I'm satisfied that it's a good investment. Unless somebody has a significantly cheaper option than the one KC offers. http://killerchiller.com/products/12...pass-valve-kit
I am so done with cheap replacement radiators. So after all the work and mods on this x3 radiator, I went to smoke-test it for leaks and all my patches and fittings are just fine, but it's seeping ALL the way around where one of the plastic end tanks attaches. Should have just made aluminum tanks in the first place. I am going to try and re-seal both tanks tonight...that's really the only thing holding me up from putting the car back together. If that fails, I'll get to work on building some aluminum replacements (which means waiting on parts). Either way, I will try and get some fit pictures for you guys tonight.
So if you buy this one, pressure test it before you do anything else. http://www.ebay.com/itm/251991128911?_trksid=p2060353.m2749.l2649&ssPageName=STRK%3AMEBIDX%3AIT
Sorry to hear about that. You can probably get it to seal up by pinching the crimp flanges around the edge of the header tank, using some big pliers.
I dismantled by W124 radiator by levering the flanges open, and its only a rubber seal held in place by crimping. Nothing clever. Good luck.
Nick
Yes, that's the first thing I tried, lol. It actually seemed to make the problem slightly worse. I think they must not have the rubber aligned properly on that end. I was worried about breaking the tank or tabs if I attempted to remove the tank completely (considering how cheaply it appears to be made/assembled), so I just threw a layer of black RTV all the way around on both tanks. If that doesn't work, off they come to build proper aluminum ones. I'm not running this thing if it doesn't even pass a smoke test...it needs to at least hold vacuum so I can fill the system properly.
Oh well, if it doesn't seal up at least I don't have to worry about breaking the tanks getting them off if I'm going to be welding completely new tanks on.
Well, it sealed up. As long as I didn't disturb the silicone in any critical areas with the rest of the fit-up, I should be good to go. I finished the mounting for the ABC cooler and lines. All that should be left is to trim the top edge a wee bit so my hood latch will sit all the way down and then I can attempt to fill/leak-check the system and if it holds, start putting this car back together. I ended up doing several things a little differently from Nick's install. For one thing, I am doing this while replacing the radiator, so I did all my fitment/work from the top instead of the bottom. My radiator mount brackets remained in place the entire time and I just slid the core in and out from the top while I was fitting things.
One thing I did differently is I didn't trim the A/C brackets at the bottom, so there is a very slight tilt to the heat exchanger. This has one advantage, that I won't need to relocate the under-tray screws, they are completely behind the bottom of the heat exchanger. Also, after having to apply so much silicone/sealant to the tanks, the A/C brackets provide for a nice tight wedge fit between the condenser and the radiator mounting brackets (I did have to cut a small part of the driver's side mount out to allow the heat exchanger to sit down far enough). I am concerned that this might transmit additional vibration to the cabin, but the silicone should help a bit and I am going to add vibration damping (car audio) mats to every bit of metal I can get to while I'm in there. The other downside to not trimming the A/C brackets is that I did have to clearance the plastic shroud/duct around the oil cooler. The pieces where it snaps together stick back quite a ways and would have been very, very close to the core if not touching it (they certainly touched the cardboard).
For mounting the lines and ABC cooler, I used the ABC mounting point, and retained the two condenser mounts with homemade spacers. I couldn't find M6 bolts long enough, so I had to grind the head of smaller bolts down and press them into a piece of aluminum tubing and do the same with a nut on the other end. The other mount that was attached to the condenser core on the driver's side didn't look like it was going to fit/line up, so I just cut those mount points off the lines and slipped split rubber hose over them to prevent vibration damage to the core or the lines themselves or other nearby stuff. I'll have to take pics of that tomorrow so it will make more sense.
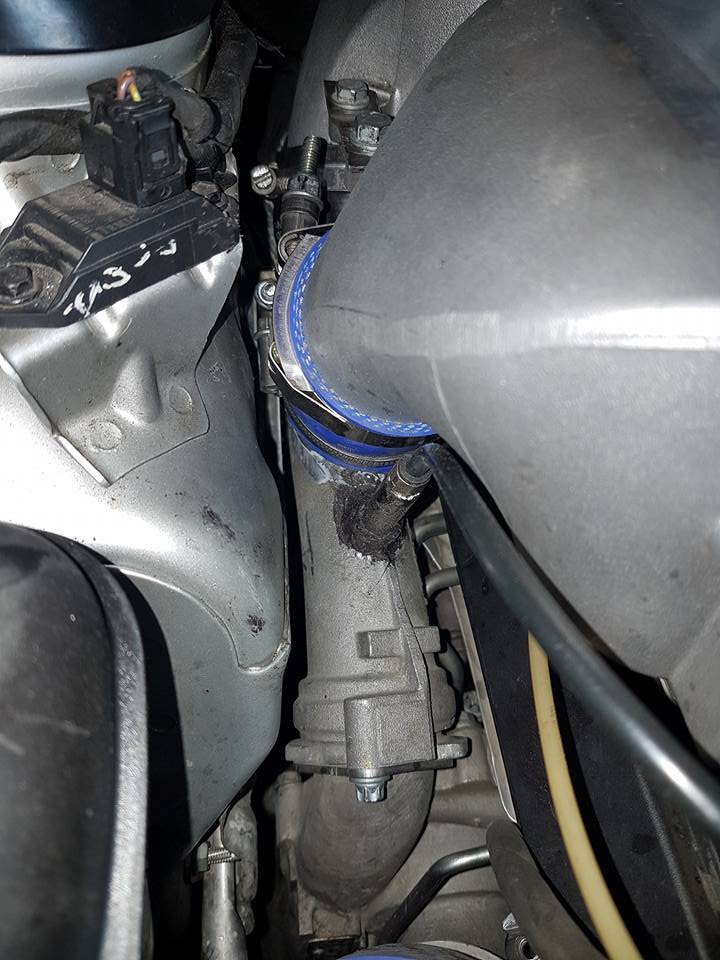
The 3/4" plastic barbs I epoxied into the end tanks made it more difficult to install/remove the core, but certainly not impossible. I have a 90-degree one facing down on the passenger side, and a straight barb on the driver's side. Basically, it puts the connections very close to where they were from the factory and I think I should have no trouble getting the factory hoses on there as opposed to running new ones. I did not have to cut the headlight brackets, but it would make installation/removal easier if I did.
I ran off and left the camera at home and my phone battery is dead so I'll have to remember to snap some pictures tomorrow before I (hopefully) start buttoning things up.
Well it didn't stay sealed. I removed the problem tank and didn't see any issues with the tank or gasket so I glued/crimped the sucker back on and am going to pressure test to 15psi tomorrow (as opposed to just a low-pressure smoke test). Hopefully I won't have to do the other tank as well.
Got it re-installed and it appears I have no leaks. I took some pictures but forgot to bring the camera home to upload them. Filling the system ended up being even more of a pain in the butt than I anticipated.
Despite vacuum-filling it (I didn't dig out the A/C vacuum pump, just used the shop air-powered venturi style so it was only probably a 60% vacuum), it still took over an hour of running the pump before I was getting nice clear bubble-free coolant out the intercooler ports. I built my bleed setup out of the stock cap (since I will be replacing it with a radiator cap and utilizing an expansion tank) and an empty gatorade bottle. Basically I drilled a hole in the middle of the cap and cut the bottom off of a gatorade bottle and then epoxied it to the radiator cap upside down. Removed the schrader valves in the intercoolers, clamped a pair of hoses on there routed to the gatorade bottle, hooked up a 13.8V power supply and just let the pump run. Watched it for about 20 minutes and it was still really cloudy so I decided to just go to dinner and keep letting it run. It was finally running clear (and a lot better flow) when I got back so I'm pretty sure I'm good to go. In retrospect, I wish I had put a bleed fittings in the top of the x3 radiator. I think it would have made the process go a lot faster. Next time I'll probably just rig up an adapter for the A/C vacuum pump...that thing will get ALL the air out.
Bleeding is a total pain, isn't it? The pump never runs right until all the air is out. Hang your head in shame, Mercedes.
Mercedes dealers use a compressed-air vacuum pump, and I think that's a compromise, too. You don't actually have to get a total vacuum to get all the air out, but you have to get it low enough to boil water. That's the vacuum equivalent to the saturated vapour pressure of water, at whatever your ambient temperature is.
Therefore you need about 99% vacuum (1 kPa), and then the coolant will boil, and after a while it will totally replace all the air in the cooling system with water vapour. Then, when you refill the system with coolant, the water vapour will condense back to water, and you have a totally, guaranteed, 100% air-free cooling system. Even in the parts of the HE and IC that you can't bleed.
Compressed air pumps only get down to around 80% vacuum, but single stage rotary vane pumps will go below 10 Pa without breaking a sweat. 1/4 hp Chinese pumps are less than $100, so it's almost a justifiable addition to a V12TT owner's tool box. Plus you can do your own AC.
It shouldn't have to be this hard, should it?
Nick
Yeah man, it's ridiculous. I do have a really good A/C vacuum pump at the shop, I just didn't have the right size hose to make it work with the coolant fill manifold and the parts store was already closed. I couldn't believe how long it took though to even just get the pump to stop surging after attempting a vacuum fill with the venturi-type.
After seeing that, I am definitely going to stop using shop air and the venturi deal to fill radiator/cooling systems as well. I definitely need to adapt the A/C vacuum pump to work with the fill manifold from that kit. The valving and all the fittings are really pretty slick, but even with 175psi shop air it's hard pressed to get above 70% or so vacuum. Which is a heck of a lot better than just pouring water in the filler for HOURS...but it would be nice to just suck it down, then switch the valves and know without a doubt it was going to fill properly the first try.
Ok, so I do have some pictures and hopefully will be remembering the camera tonight. But in the meantime, I have acquired an ice box/reservoir for the trunk and have been contemplating what the simplest way to plumb it into the system is.
I am thinking something like the attached crude MS paint drawing. Basically, I will intercept the return line after the intercooler merge and install a 3-way valve at that point to direct the coolant through the heat exchanger normally, but through a bypass line Y'd in right at the stock pump inlet for when I have ice in the trunk tank. This will allow me to utilize series pumps as well as the full system capacity of coolant all the time, regardless of which operating mode I want to be in. It's just a simple blockage of flow through the heat exchanger when I switch the valve. It does not give me the capability to create two completely separate loops however, like I would need if I go to an A/C based setup. In the meantime, I think it's a good/cheap compromise. What do you guys think?
Slideshow: A one-of-one U.S.-spec Mercedes-Benz SLR McLaren Roadster became even rarer after a factory-backed transformation at McLaren's headquarters.