


HTC Android S-Class custom install...

Thread Starter
Member
Joined: Jul 2011
Posts: 123
Likes: 11
From: Brooklyn, NY
2006 R500
HTC Android S-Class custom install...
hey guys just wanted to show my android in dash install in my 2000 S500 that I'm just about finishing up.I always loved this car and I've wanted one for the longest time, but now that I finally do have a decent one I really want to trade up to a newer, younger and nicer, low mileage really sweet one eventually, maybe an 05-06 S55 or S600, or who knows, maybe even a newer S550, so with these thoughts in mind I really didn't want to have to rip the whole original command system out of this 2000 I have for now, I didn't want to have to do a whole system replacement of the fiber optic buss, complicated mess if the car is just going to be replaced eventually anyway, but at the same time I surely could not live with the original antique command system from 2000. no way, and I really didn't want to have to resort to the tacky way of docking my android phone on the dash. I mean sure, at first I had no choice and winded up doing the phone on the dash deal that so many wind up being stuck with, I really wanted a better, easier to use and more integrated system than that.it sucks when the nav on your phone is way better than the nav in the dash. I needed a solution
I knew I wanted to keep everything 100% easily reversible to stock when the time comes to sell it, because most times a car with a stock unmolested dash is going to be worth more than even the nicest aftermarket setup & you'll never get the value back of a full custom system on top of the value of the car. I really didn't want to loose a few grand here by ripping everything out and installing an aftermarket head unit, so I had to come up with something custom.
my goal here was to install a custom computer system that gives me all the latest bells & whistles, the latest navigation with live traffic integration, all my MP3's & movies, both on board & over 4G via slingbox, full internet access and internet radio. Pandora, Shoutcast & Slacker are awesome, so much better than FM. but at the same time I still wanted to keep all of the factory stuff functional, stuff like the whole original fiber optic bose audio system, the steering wheel controls, even keep the factory FM & CD changer to stay fully functional too.
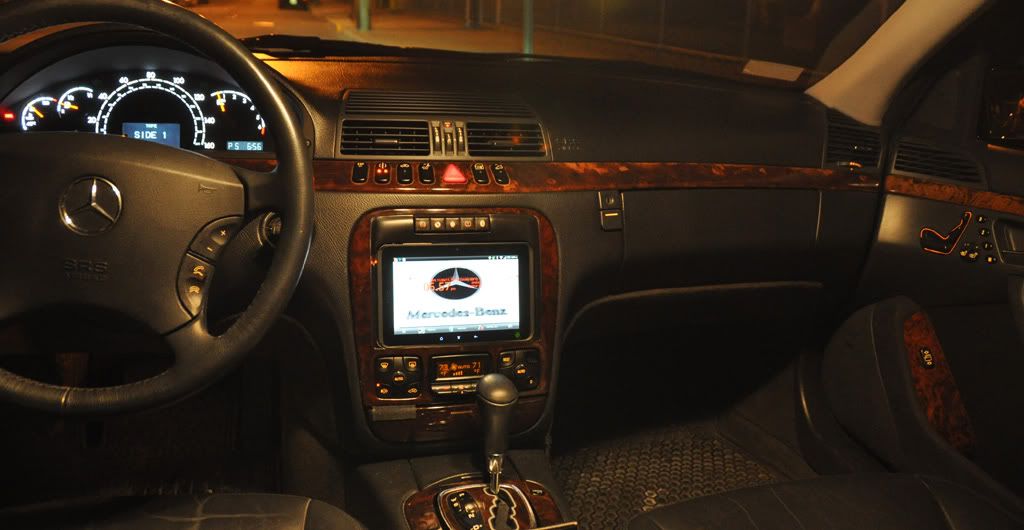
I also really wanted this to look perfect and to look factory. no tablet jutting out of the dash like a bigger version of the giant tacked on phone mount... I def wanted it to look like it could have came that way. I wanted the styling and even the illumination to match the rest of the dash well enough that it just looks like it belongs there. this car is just too nice to want any less, but again it had to be easily reversible too.
what I eventually came up with I think winded up being a truly perfect solution for all my goals.
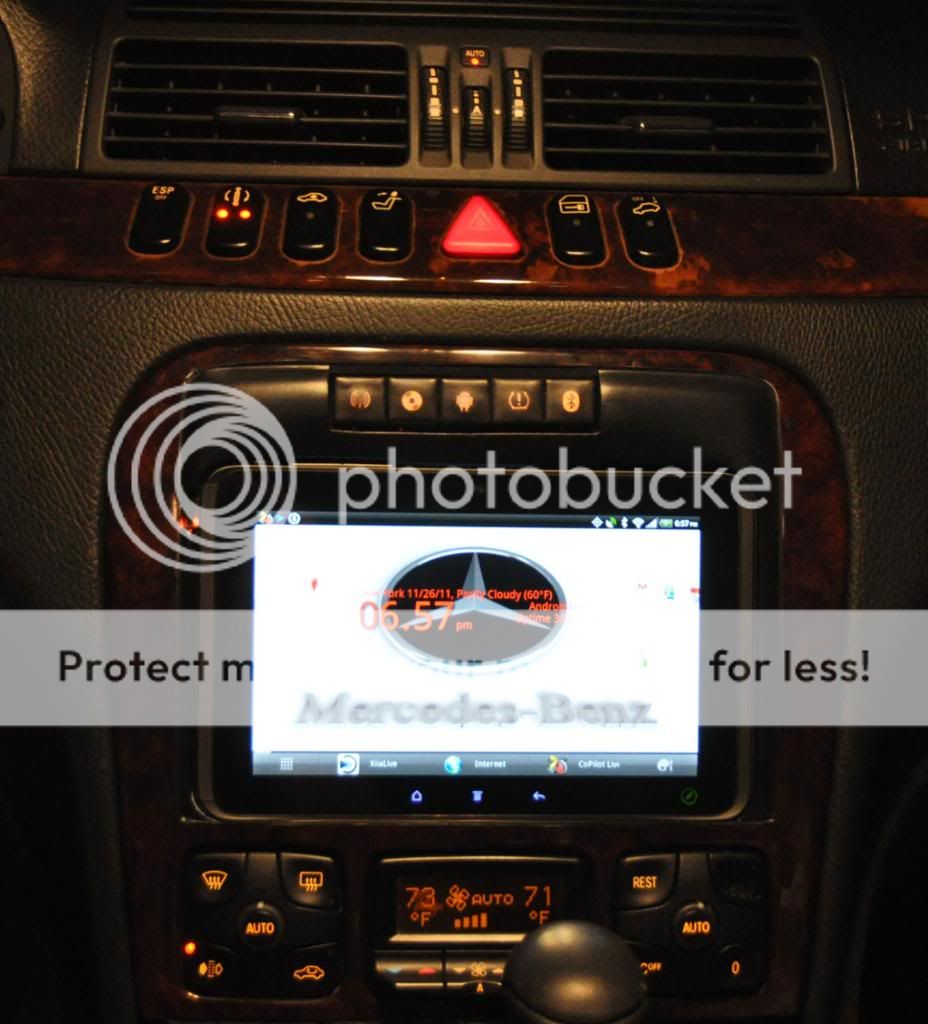
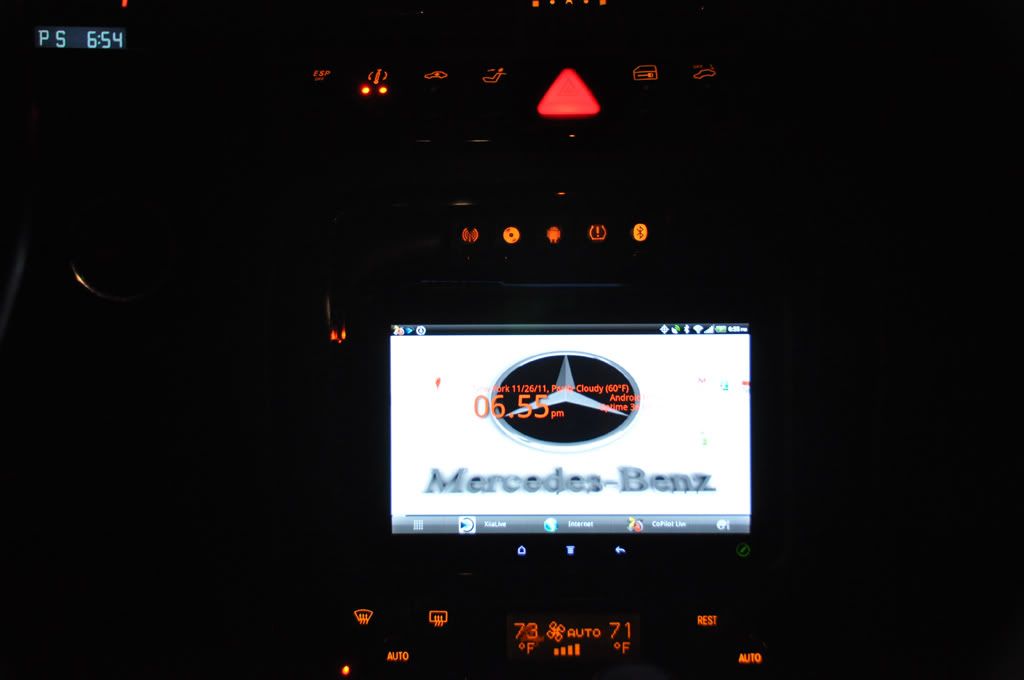
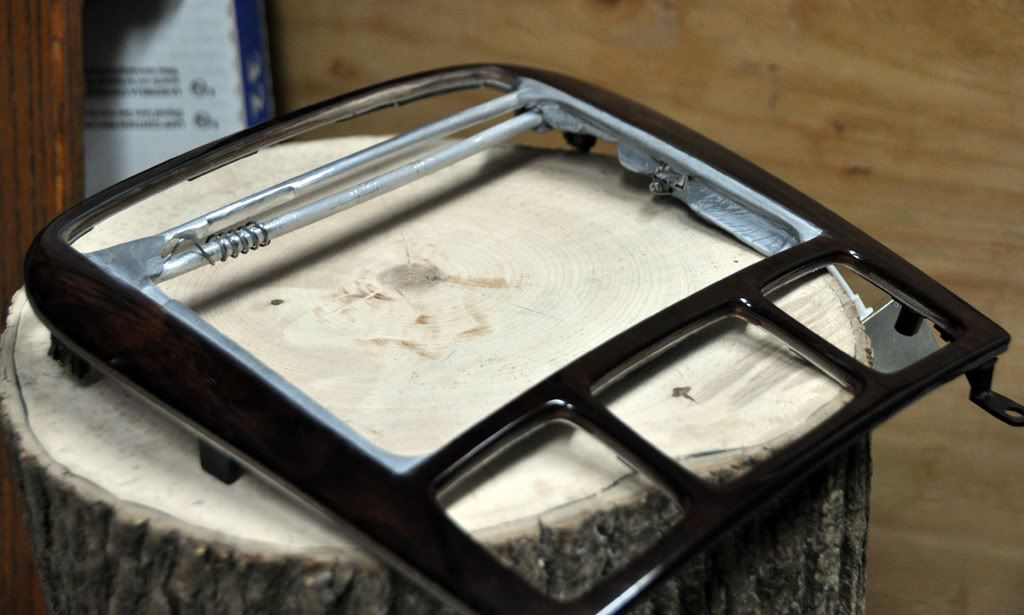
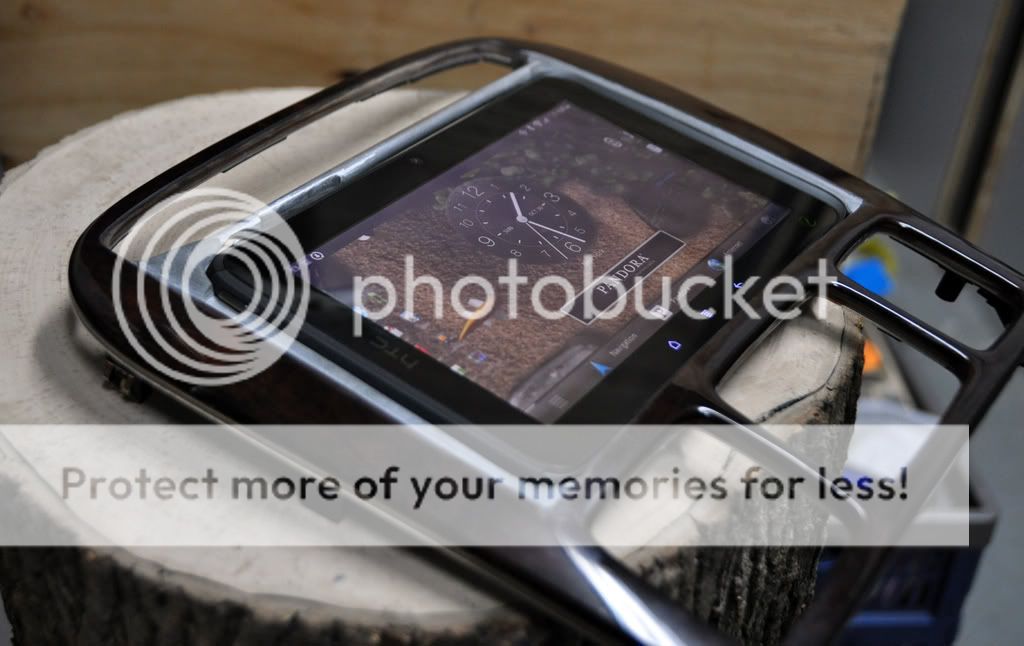
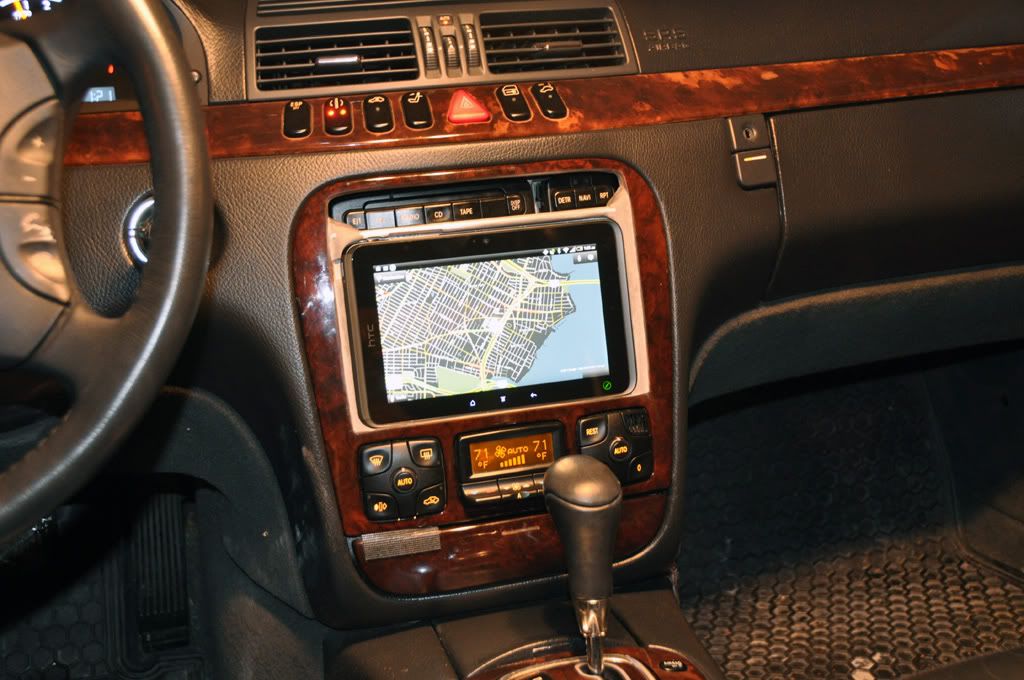
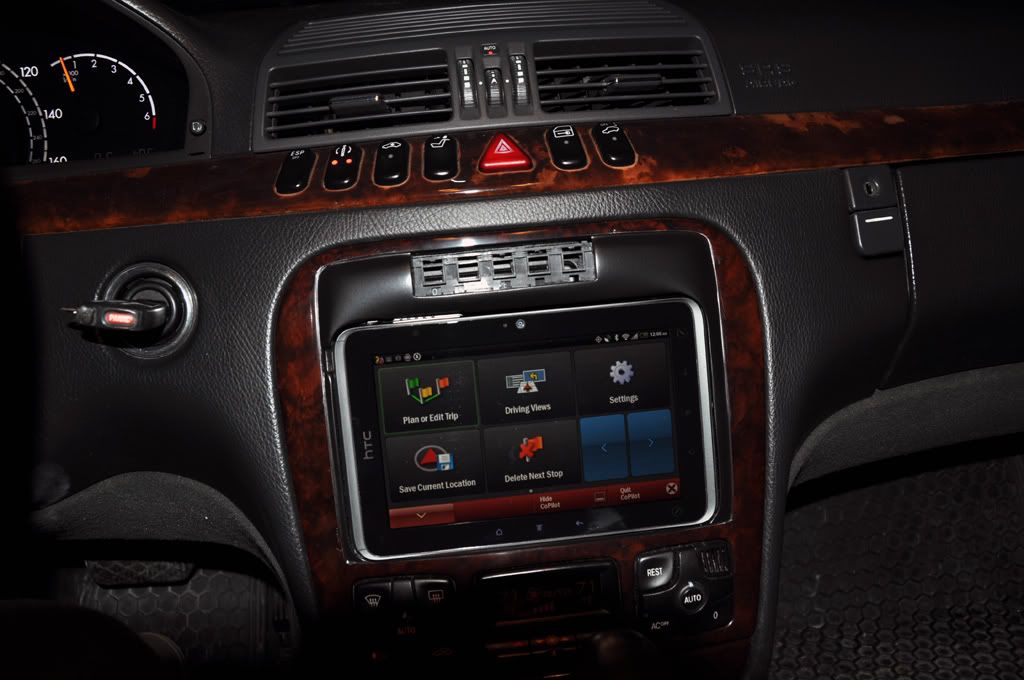
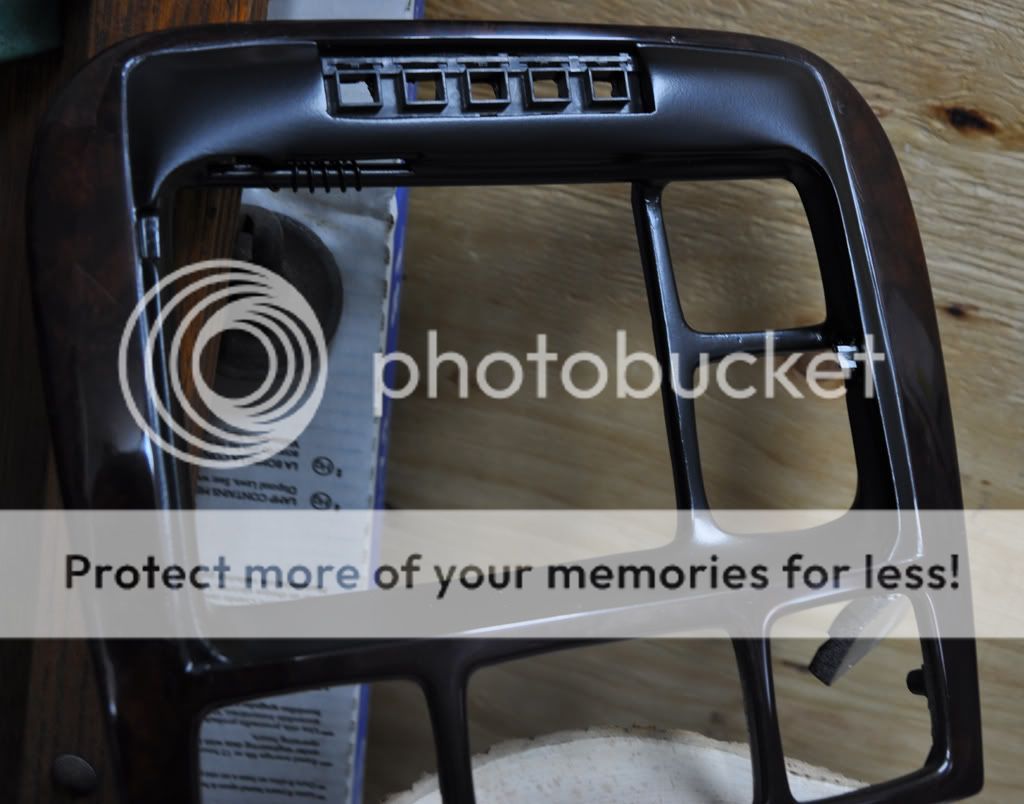
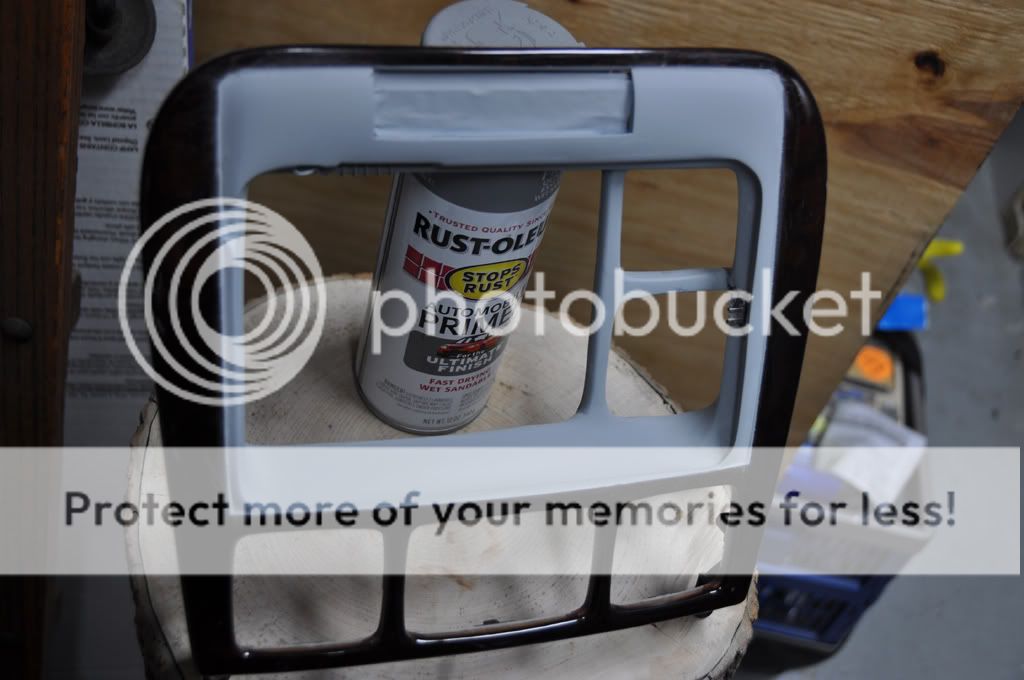
I removed the factory bezel & saved it, then recessed the radio into the dash a bit with custom brackets, and then built a new custom bezel to fit directly over the original radio with enough room to dock the HTC evo view tablet completely flush into the bezel. when it's docked it pretty much looks fully integrated & installed and you have no clue the original radio is right behind it. most that see it think it is a head unit at first... but then notice the mercedes logo on the display, then the android elements... then the custom buttons
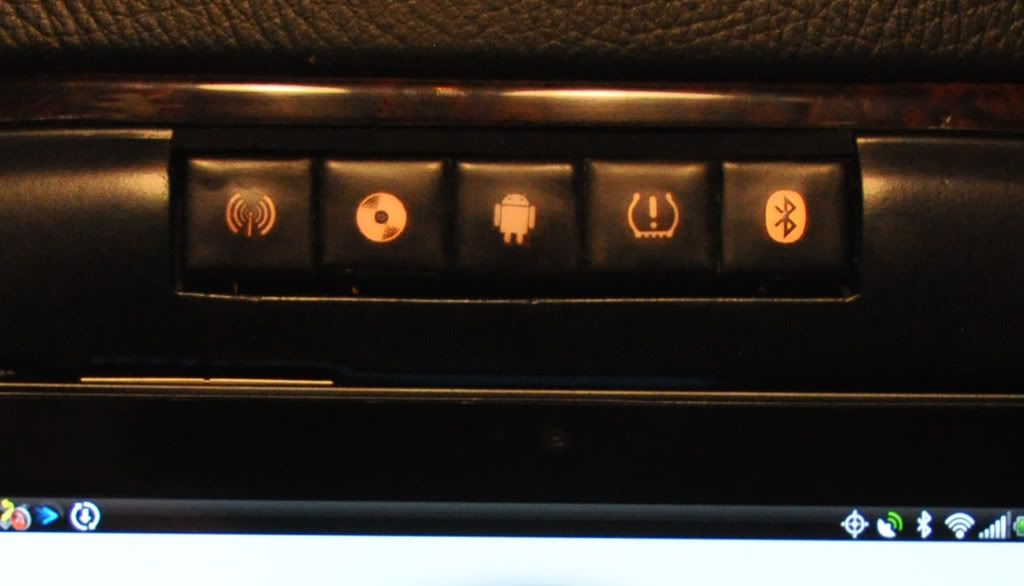
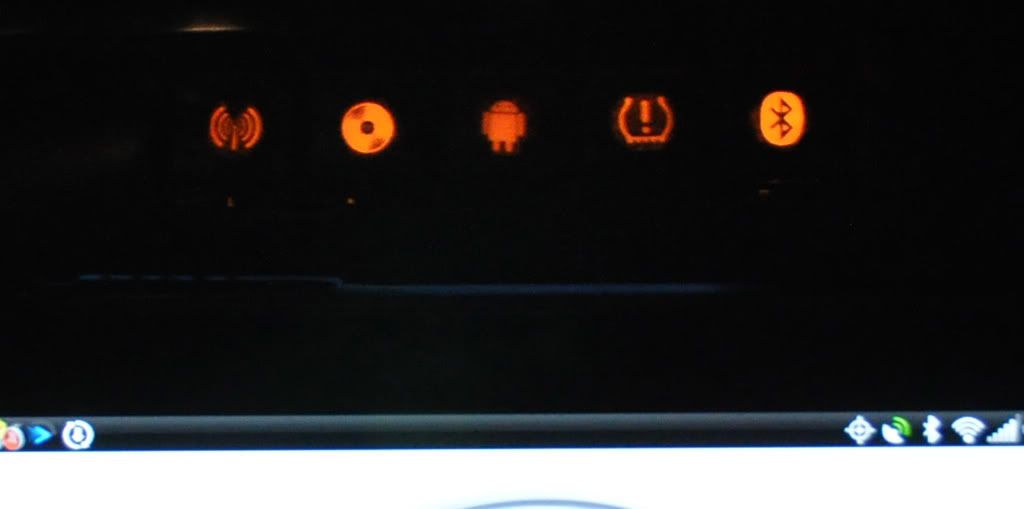
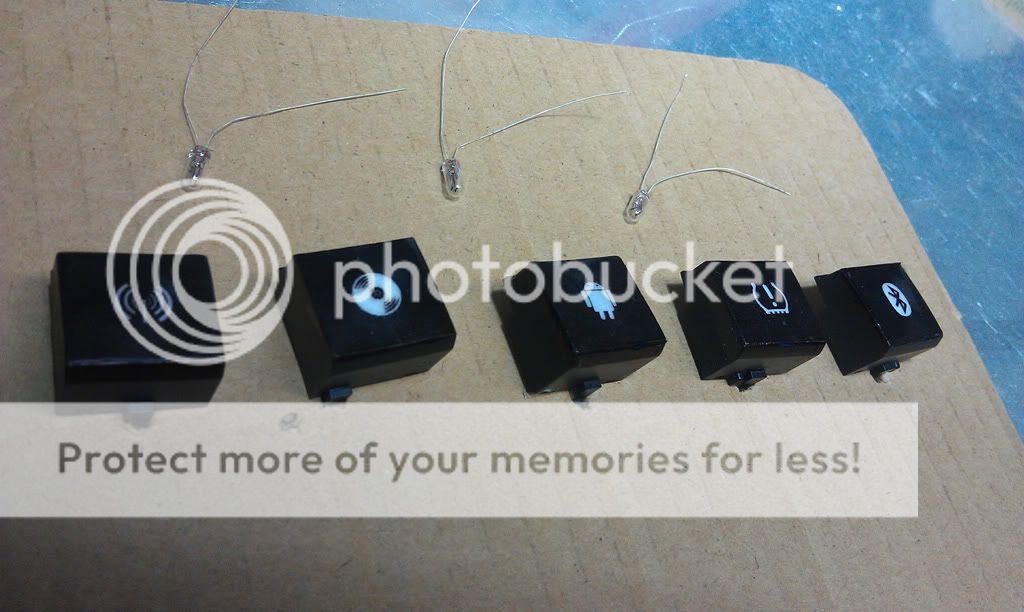
I was able to piece this together in a way that my new bezel has buttons that press the original head units buttons behind them. the first 3 of my custom buttons press the original buttons for: radio, cd changer and tape deck buttons. to match best and follow mercedes styling I decided to use symbols for button labels as mercedes does throughout the dash. the radio button is now an antenna icon, the cd changer is a cd icon, and the tape deck which is now hidden & used as just the auxiliary input in this configuration, so the tape deck button is labeled with an android icon, it select's the tablet as source.
the next 2 buttons are just add on buttons that I had to add to keep everything symmetrical & balanced looking, it looked off with just the 3 buttons off center, these 2 extra buttons are to turn my TPMS display on and off and to turn my bluetooth on and off.
even when the tablet is docked & being used for navigation blocking the original screen, I can select FM or the CD changer & control these right through the instrument panel display with the steering wheel buttons, so fm & the cd changer are both very usable even with the factory screen blocked.
the bezel is done in a way that leaves the factory radio accessible & somewhat presentable even when the tablet is removed, the tablet easily docks & ejects, so if I ever have to use the car without the tablet it is still usable.
to return this whole thing to 100% stock takes less than 15 minutes. the total cost, aside from the tablet itself, was less than $200. I used a $50 junk yard bezel & about $40 worth of jb weld to build the bezel/dock. the rest is for the HTC HDMI adapter & HTC car power supply, the cassette adapter & misc materials to finish this. the whole thing, even including the tablet itself,cost less than just some of the add on ipod kits I've this for this car, so I'd say it was pretty cost effective too
anyway, long winded, I know, so here's some pictures of the build


I knew I wanted to keep everything 100% easily reversible to stock when the time comes to sell it, because most times a car with a stock unmolested dash is going to be worth more than even the nicest aftermarket setup & you'll never get the value back of a full custom system on top of the value of the car. I really didn't want to loose a few grand here by ripping everything out and installing an aftermarket head unit, so I had to come up with something custom.
my goal here was to install a custom computer system that gives me all the latest bells & whistles, the latest navigation with live traffic integration, all my MP3's & movies, both on board & over 4G via slingbox, full internet access and internet radio. Pandora, Shoutcast & Slacker are awesome, so much better than FM. but at the same time I still wanted to keep all of the factory stuff functional, stuff like the whole original fiber optic bose audio system, the steering wheel controls, even keep the factory FM & CD changer to stay fully functional too.
I also really wanted this to look perfect and to look factory. no tablet jutting out of the dash like a bigger version of the giant tacked on phone mount... I def wanted it to look like it could have came that way. I wanted the styling and even the illumination to match the rest of the dash well enough that it just looks like it belongs there. this car is just too nice to want any less, but again it had to be easily reversible too.
what I eventually came up with I think winded up being a truly perfect solution for all my goals.
I removed the factory bezel & saved it, then recessed the radio into the dash a bit with custom brackets, and then built a new custom bezel to fit directly over the original radio with enough room to dock the HTC evo view tablet completely flush into the bezel. when it's docked it pretty much looks fully integrated & installed and you have no clue the original radio is right behind it. most that see it think it is a head unit at first... but then notice the mercedes logo on the display, then the android elements... then the custom buttons
I was able to piece this together in a way that my new bezel has buttons that press the original head units buttons behind them. the first 3 of my custom buttons press the original buttons for: radio, cd changer and tape deck buttons. to match best and follow mercedes styling I decided to use symbols for button labels as mercedes does throughout the dash. the radio button is now an antenna icon, the cd changer is a cd icon, and the tape deck which is now hidden & used as just the auxiliary input in this configuration, so the tape deck button is labeled with an android icon, it select's the tablet as source.
the next 2 buttons are just add on buttons that I had to add to keep everything symmetrical & balanced looking, it looked off with just the 3 buttons off center, these 2 extra buttons are to turn my TPMS display on and off and to turn my bluetooth on and off.
even when the tablet is docked & being used for navigation blocking the original screen, I can select FM or the CD changer & control these right through the instrument panel display with the steering wheel buttons, so fm & the cd changer are both very usable even with the factory screen blocked.
the bezel is done in a way that leaves the factory radio accessible & somewhat presentable even when the tablet is removed, the tablet easily docks & ejects, so if I ever have to use the car without the tablet it is still usable.
to return this whole thing to 100% stock takes less than 15 minutes. the total cost, aside from the tablet itself, was less than $200. I used a $50 junk yard bezel & about $40 worth of jb weld to build the bezel/dock. the rest is for the HTC HDMI adapter & HTC car power supply, the cassette adapter & misc materials to finish this. the whole thing, even including the tablet itself,cost less than just some of the add on ipod kits I've this for this car, so I'd say it was pretty cost effective too
anyway, long winded, I know, so here's some pictures of the build

MBWorld Fanatic!


Joined: Jan 2008
Posts: 6,151
Likes: 533
Mercedes
BRAVO
this is one of the best custom installs of a tablet pc i have ever seen
now the big question...are you willing to make this for the rest of us?? How much for the custom bezel and mounts to recess the COMAND unit?
this is one of the best custom installs of a tablet pc i have ever seen
now the big question...are you willing to make this for the rest of us?? How much for the custom bezel and mounts to recess the COMAND unit?
MBWorld Fanatic!
Joined: Jan 2008
Posts: 6,151
Likes: 533
Mercedes
No he says the stock radio is recessed deeper into the console so the tablet PC can fit flush in the new bezel..
"I recessed the radio into the dash a bit with custom brackets, and then built a new custom bezel to fit directly over the original radio with enough room to dock the HTC evo view tablet completely flush into the bezel."
"I recessed the radio into the dash a bit with custom brackets, and then built a new custom bezel to fit directly over the original radio with enough room to dock the HTC evo view tablet completely flush into the bezel."

Super Member
Joined: Oct 2011
Posts: 933
Likes: 25
2004 CLK 500
No he says the stock radio is recessed deeper into the console so the tablet PC can fit flush in the new bezel..
"I recessed the radio into the dash a bit with custom brackets, and then built a new custom bezel to fit directly over the original radio with enough room to dock the HTC evo view tablet completely flush into the bezel."
"I recessed the radio into the dash a bit with custom brackets, and then built a new custom bezel to fit directly over the original radio with enough room to dock the HTC evo view tablet completely flush into the bezel."
Thread Starter
Member
Joined: Jul 2011
Posts: 123
Likes: 11
From: Brooklyn, NY
2006 R500
thanks man, but there really is no practical way for me to build this for others. first of all the level of precision required is very high, the buttons I used only have about 2.5mm total throw, while the buttons on the original radio need a little more than 2mm movement to activate, so this leaves a margin of error in adjustment of less than half a mm as it's being built, which means the bezel has to be built precisely to the new radio location in the dash and it has to be built with the car on hand for fabrication. second of all the buttons I used here are from a spare radio face that I had laying around from my infiniti FX install, and I don't have access to any more of these units to salvage the buttons from, and last but not least is, although this does look pretty simple, it does actually take a lot of precision work and many hours of labor, so by the time you got my bill for the total, all said and done you probably wouldn't like this anywhere near as much as you like it now 
Last edited by turbocad6; Nov 27, 2011 at 05:27 PM.
Trending Topics
MB World Stories
The Best of Mercedes & AMG

7 Craziest Things AMG Gas Ever Built
Verdad Gallardo
New Electric Mercedes-AMG GT 4-Door Coupe Unveiled: 10 Things You Need to Know
Verdad Gallardo
6 Mercedes Models That Did NOT Age Well (But Are Somehow Still Cool)
Verdad Gallardo
Manual Mercedes? 6 Times Sindelfingen Let Drivers Have All The Fun
Verdad Gallardo
Mercedes SLR McLaren 722 S Is Extremely Rare Example Modified by McLaren
Verdad Gallardo
8 Classic Boxy Mercedes Designs That Have Aged Like Fine Wine
Verdad Gallardo
Flawlessly Restored Mercedes 190E Evo II Heads to Auction
Verdad Gallardo
Electric Mercedes C-Class Unveiled: 11 Things You Need to Know
Verdad Gallardo
Mercedes EQS Gets A Major Update: Everything You Need to Know
Verdad Gallardo

Thread Starter
Member
Joined: Jul 2011
Posts: 123
Likes: 11
From: Brooklyn, NY
2006 R500
thanks guys, the buttons came out far from perfect and there a big make it or break it kinda thing on this bezel. to me there just barely good enough to live with for now, I mean they don't annoy the crap out of me each time I see them, but they are def not good enough for me to really be proud of them, barely good enough to not be embarrassed 
how I made these button labels
I first sanded all the black from the face of the donor buttons. the donor buttons were originally from a set of radio presets, so they were labeled 1-5. once the black finish was sanded the face of the button where sanded is opaque & the whole thing lights up when a lamp is placed behind it. to make just a button logo light up you need to block off with black wherever you don't want light, just leaving the white logo for the light to shine through. the images are too small for an average vinyl plotter to cut, so I couldn't get them cut by a sign guy which how I would normally do a stencil that's larger than this.
what I did was print the images I wanted onto a CD label with a laserjet, then stick it on the button face & trim it with an xacto blade. then clearcoat the whole button, sealing this label to the button & making it all appear as one piece.
the 2 main problems I had was, first, even though the laser jet toner is black,it's not really dense enough or dark enough to completely block light from behind. between coats I colored the black area best I could with a black sharpie to block the light so it didn't light up grey along with the white icon. this doesn't give perfect results because I can't really trace close enough to the icons to get crisp edges.
second problem I had was, these buttons suck because they have a round raised bump in the center of each. this made it impossible for the stick on label to really sit completely flat, so I winded up having to then stick the labels on with clear epoxy, the clear epoxy kinda filled the tiny voids which would have otherwise been air bubbles without the epoxy. even after the epoxy set it was a little bit of a bumpy mess, but after enough clear & sanding & re-clearing it leveled off a bit eventually.
I left the buttons no gloss because this hides the imperfections of my sharpie work. if I polished these buttons for a bit more gloss then the resulting clearer finish would allow you to see the sharpie stuff more. leaving the dull finish hides all that. I may try to sand them a little more gloss though, just to a matte finish rather than flat finish & see if they really look bad
if I redo these button again eventually then I'd cut the face down to completely flat, removing that raised bump in the center of each. the bump in the middle will become a hole because the button is thin plastic & the bump is pressed to above the level of flat, which is why I didn't do that initially. the resulting hole would have been a big problem with a CD label as the decal, but this time I would print the icon on photo paper because it has enough body to span the hole, maybe even epoxy in a thin sheet of plastic first, laminating over the hole even, if necessary, but definitely removing that bump & then printing it dark enough to completely block the light & not having to do any sharpie touch ups, then clearing that would result in a much better button...
I'd have to find the time & patience to do them again, one day I may, but as I said there at least presentable, usable & decent right now at least & I have far more pressing projects waiting for my attention atm so these will stay like this for a bit I think. as they are now I'd give them a 7 or so on a scale of 1-10 funny though most that see it in person think i'm crazy & think there perfect, but there definitely not.
how I made these button labels
I first sanded all the black from the face of the donor buttons. the donor buttons were originally from a set of radio presets, so they were labeled 1-5. once the black finish was sanded the face of the button where sanded is opaque & the whole thing lights up when a lamp is placed behind it. to make just a button logo light up you need to block off with black wherever you don't want light, just leaving the white logo for the light to shine through. the images are too small for an average vinyl plotter to cut, so I couldn't get them cut by a sign guy which how I would normally do a stencil that's larger than this.
what I did was print the images I wanted onto a CD label with a laserjet, then stick it on the button face & trim it with an xacto blade. then clearcoat the whole button, sealing this label to the button & making it all appear as one piece.
the 2 main problems I had was, first, even though the laser jet toner is black,it's not really dense enough or dark enough to completely block light from behind. between coats I colored the black area best I could with a black sharpie to block the light so it didn't light up grey along with the white icon. this doesn't give perfect results because I can't really trace close enough to the icons to get crisp edges.
second problem I had was, these buttons suck because they have a round raised bump in the center of each. this made it impossible for the stick on label to really sit completely flat, so I winded up having to then stick the labels on with clear epoxy, the clear epoxy kinda filled the tiny voids which would have otherwise been air bubbles without the epoxy. even after the epoxy set it was a little bit of a bumpy mess, but after enough clear & sanding & re-clearing it leveled off a bit eventually.
I left the buttons no gloss because this hides the imperfections of my sharpie work. if I polished these buttons for a bit more gloss then the resulting clearer finish would allow you to see the sharpie stuff more. leaving the dull finish hides all that. I may try to sand them a little more gloss though, just to a matte finish rather than flat finish & see if they really look bad
if I redo these button again eventually then I'd cut the face down to completely flat, removing that raised bump in the center of each. the bump in the middle will become a hole because the button is thin plastic & the bump is pressed to above the level of flat, which is why I didn't do that initially. the resulting hole would have been a big problem with a CD label as the decal, but this time I would print the icon on photo paper because it has enough body to span the hole, maybe even epoxy in a thin sheet of plastic first, laminating over the hole even, if necessary, but definitely removing that bump & then printing it dark enough to completely block the light & not having to do any sharpie touch ups, then clearing that would result in a much better button...
I'd have to find the time & patience to do them again, one day I may, but as I said there at least presentable, usable & decent right now at least & I have far more pressing projects waiting for my attention atm so these will stay like this for a bit I think. as they are now I'd give them a 7 or so on a scale of 1-10
funny though most that see it in person think i'm crazy & think there perfect, but there definitely not.

Thread Starter
Member
Joined: Jul 2011
Posts: 123
Likes: 11
From: Brooklyn, NY
2006 R500
I'm using a decent cassette adapter and it sounds really good. was considering opening the head unit at some point and hard wiring it but really don't see a need to at this point...
Thread Starter
Member
Joined: Jul 2011
Posts: 123
Likes: 11
From: Brooklyn, NY
2006 R500
yeah, the android button on my new bezel presses the cassette button on the stock unit behind it, so when I press the android button everything that comes through the whole system is from the tablet. if I press the radio or cd changer button then everything comes through as the stock system.
as far as cassette adapter sound quality, it is very good. selecting the android from listening to regular FM & it's very apparent that the sound quality is much better from the tablet than from FM, it's closer to the sq of the cd changer, but the main reason the CD changer still sounds a bit better than the tablet is because cd's are recorded at much higher bit rate with no compression & no loss like mp3's & streaming internet radio. I haven't tried the same exact mp3 from the cd changer and the tablet in a side by side to really see the difference but from what I'm hearing I'm willing to bet that there at least very close.
the only drawback I have is, if I decide to listen to fm or cd while running navigation on the tablet, then the tablet can not interrupt the audio & give voice guidance. not too much of an issue because most times I use nav without voice anyway and also most times if not always, I'm listening to the tablet as source so this hasn't been a problem for me


